Connect to an OKE Cluster using the local access option
This tutorial will guide you through connecting to an Oracle Kubernetes Engine (OKE) cluster using the local access option. By the end of this guide, you'll be able to configure your local machine to interact with your OKE cluster securely and efficiently. This connection method is essential for managing your cluster resources, deploying applications, and troubleshooting issues from your local environment. Whether you're a beginner or experienced with Kubernetes, this step-by-step approach will ensure a smooth and straightforward setup.
When you look at the networking part of the Kubernetes cluster, you can see different Kubernetes OCI/OKE network architectures that can be used for deployment.
In some cases, you want to deploy the API Endpoint with a PRIVATE IP address. When you do this, the Kubernetes cluster can not be managed using OCI's CLoudShell CLI application or from another machine connected to the Internet. You need to select the "Local Access" option here. But before we can connect with the local access option, we first need to set up an Instance that can act as a Bastion.
The Steps
- [ ] STEP 01: Make sure a Kubernetes cluster is deployed on OKE
- [ ] STEP 02: Create a new Linux Instance (acting as Bastion)
- [ ] STEP 03: Create a new Bastion and Session
- [ ] STEP 04: Setup OCI CLI
- [ ] STEP 05: Configure OCI CLI
- [ ] STEP 06: Access the Kubernetes cluster using Local CLI
STEP 01 - Make sure a Kubernetes cluster is deployed on OKE
Make sure you have a deployed Kubernetes Cluster on OCI's OKE.
If you have not deployed Kubernetes on OKE yet, use the following tutorials to do so first.
- [Here] I explain how to deploy a Kubernetes cluster on OKE using the Quick Create mode.
- [Here] I explain deploying a Kubernetes cluster on OKE using the Custom Create mode.
- [Here] I explain how to deploy Multi Kubernetes cluster (on multiple regions) on OKE using Terraform.
- I will explain deploying a Single Kubernetes cluster on OKE using Terraform. (ADD LINK WHEN PUBLISHED)
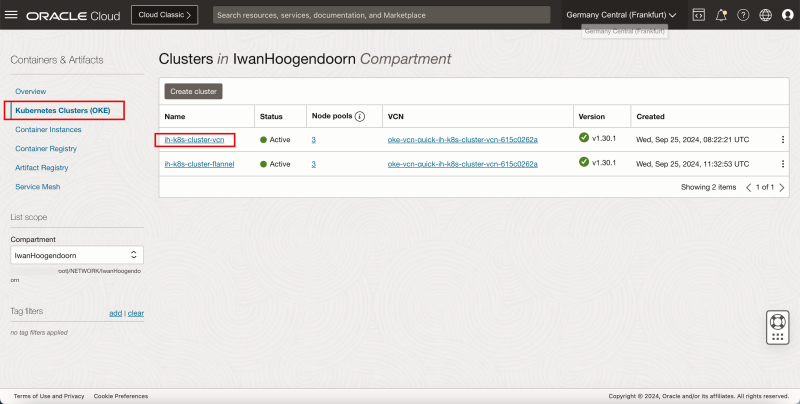
- Navigate to Developer Services > Kubernetes Clusters (OKE).
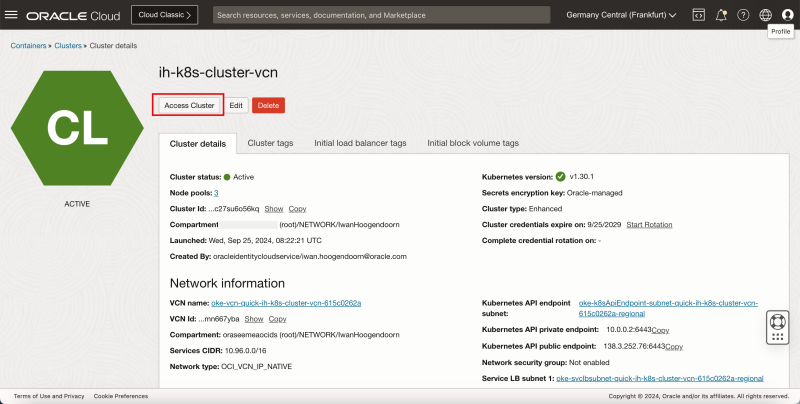
- Click on the cluster.
Click on the Access Cluster button.
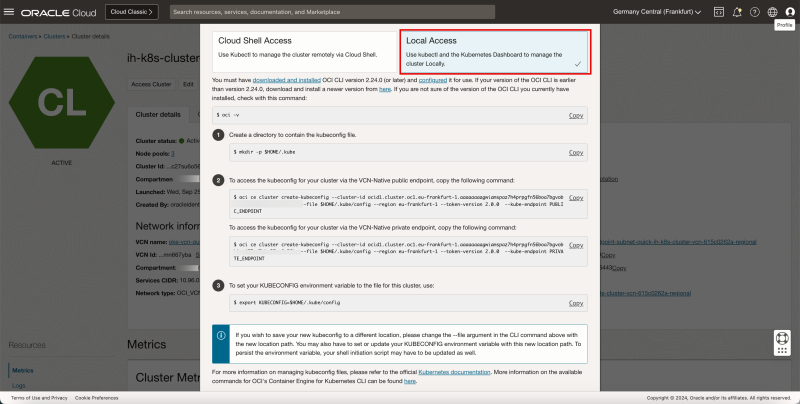
Select the Local Access option.
Notice that some commands are provided that you will need later once the Bastion has been created and configured correctly.
STEP 02 - Create a new Linux Instance acting as Bastion
Now that you have the Kubernetes Cluster on OKE ready, we need to create the Bastion, but before we do this, we first need to do a little bit of Infrastructure preparation.
- STEP 2-1: Create a
bastion-private-sec-listsecurity with below Ingress and Egress Rule - STEP 2-2: Create a
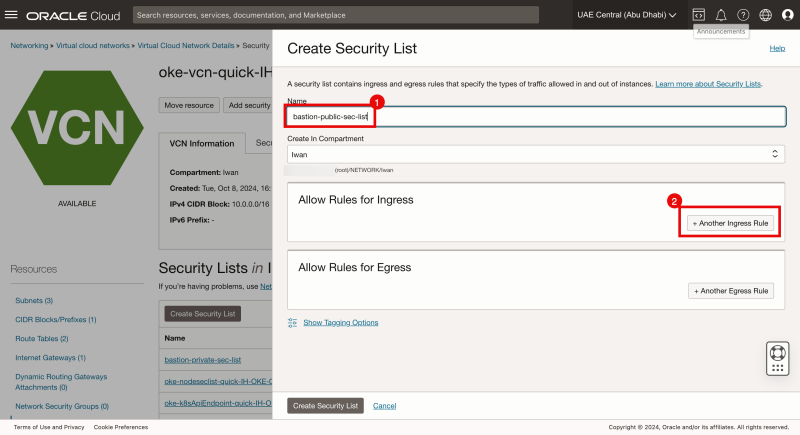
bastion-public-sec-listsecurity with below Ingress and Egress Rules - STEP 2-3: Create the
bastion-route-tablewithInternet Gatewayso that we can add to the bastion instance for internet access - STEP 2-4: Next create a Regional Public Subnet for the bastion instance with the name
bastion-subnet. - STEP 2-5: Add the
bastion-private-sec-listto the Worker Private Subnet so that the bastion instance can access the Worker nodes - STEP 2-6: Create Compute Instance
oke-bastion - STEP 2-7: Get the Public IP of the Bastion Instance
BastionHostto SSH into the Bastion instance - STEP 2-8: Login to bastion host as below
In this step, I am deploying a Bastion Instance in a PUBLIC SUBNET, but when using the Bastion Service and Session (later in this article), it is better to deploy the Bastion Instance on a PRIVATE SUBNET. I am not doing this in this tutorial because I want to showcase the flexibility and various options.
STEP 2-1 - Create a bastion-private-sec-list security with below Ingress and Egress Rule
Before we start, we will first determine that the new Subnet where the new Bastion Instance will be located will be 10.0.5.0/24. We need this to create the Security lists properly.
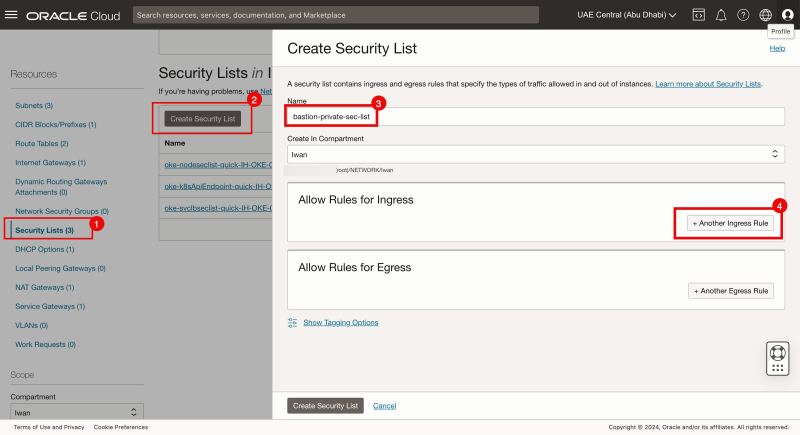
- Navigate to Networking > Virtual Cloud Networks.
- Select the VCN where your Kubernetes Cluster is deployed in.
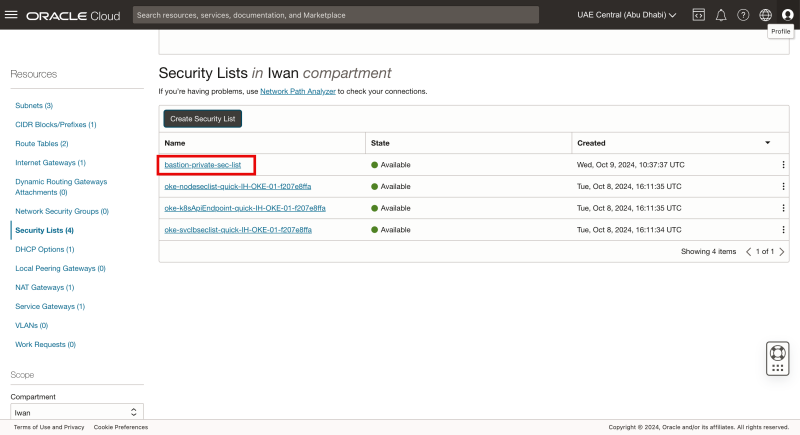
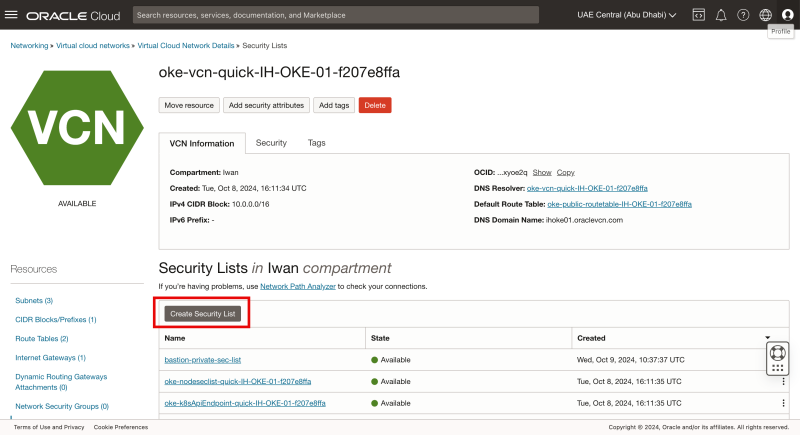
- Click on Security Lists.
- Click on the Create Security List button.
- Specify a Security List Name.
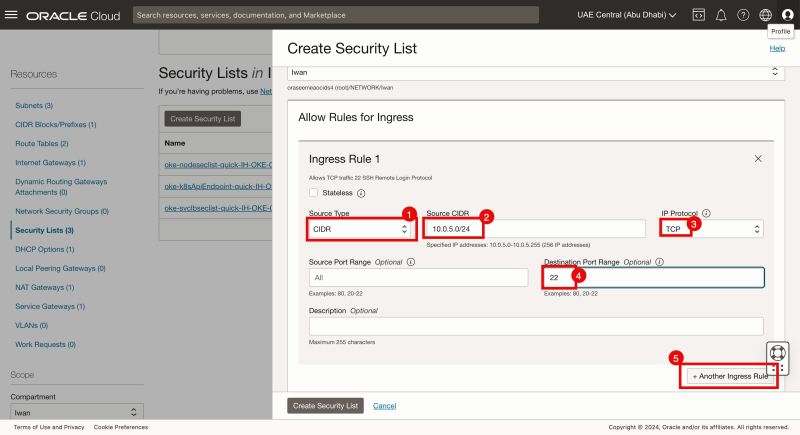
- Click on the + Another Ingress Rule button.
- Specify the source type to be: CIDR.
- Specify the source to be the Subnet of the Bastion Instance (10.0.5.0/24).
- Specify the IP Protocol to be: TCP
- Specify the Destination Port to be 22.
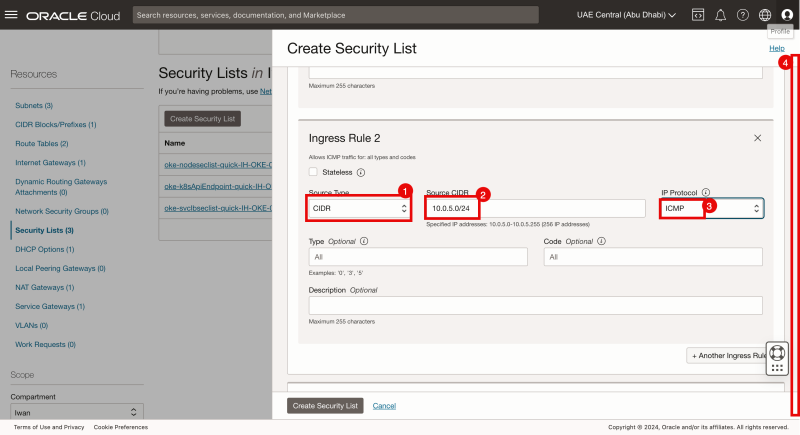
- Click on the + Another Ingress Rule button
- Specify the source type to be: CIDR.
- Specify the source to be the Subnet of the Bastion Instance (10.0.5.0/24).
- Specify the IP Protocol to be: ICMP
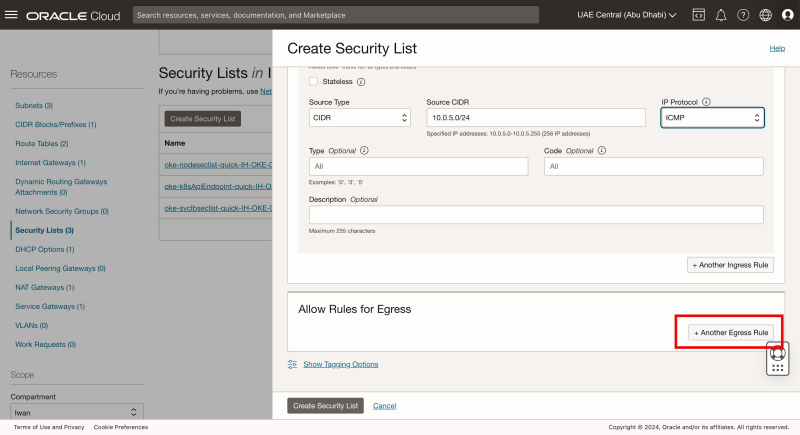
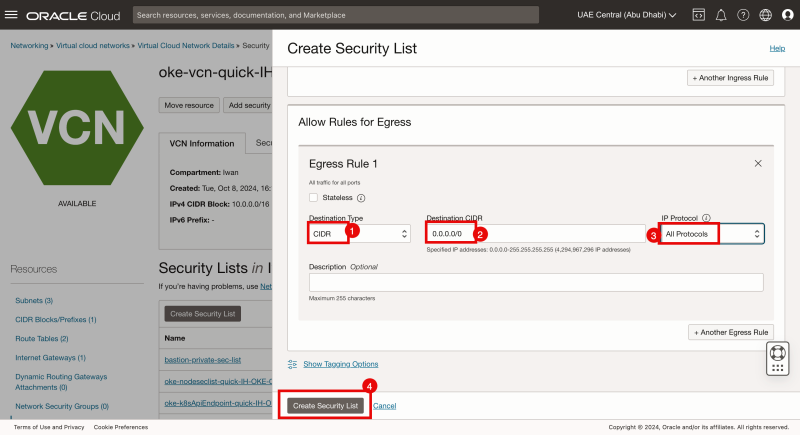
- Scroll down.
Click on the + Another Egress Rule button.
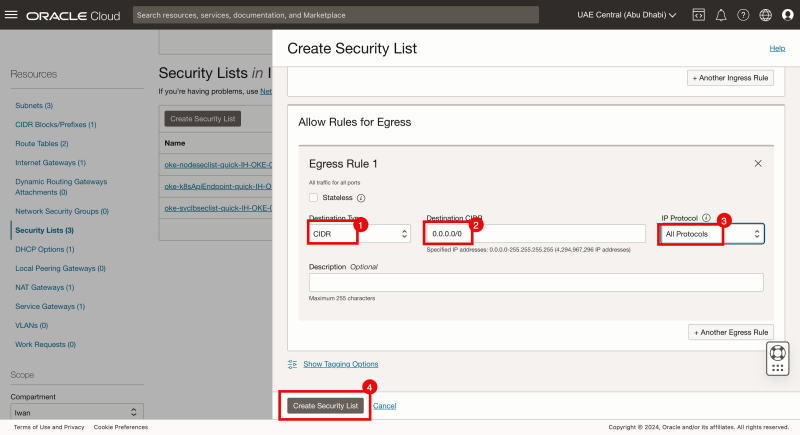
- Specify the destination type as: CIDR.
- Specify the source to be everything (0.0.0.0/0).
- Specify the IP Protocol to be: All Protocols
- Click on the Create Security List button.
Notice the new security list has been created. Click on it to verify the rules.
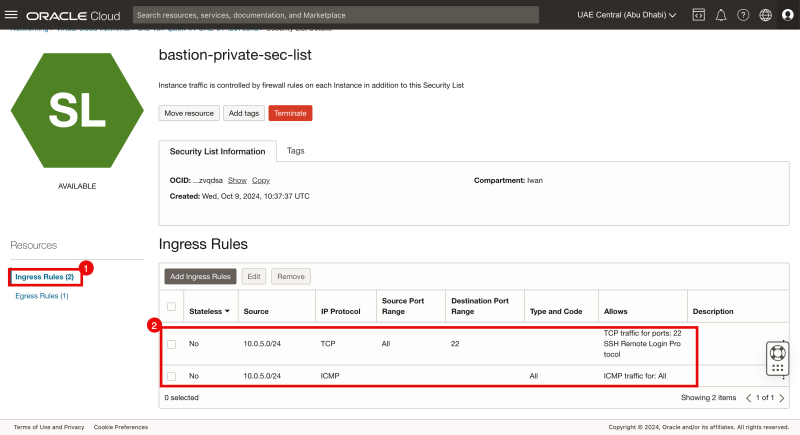
- Click on Ingress Rules.
- Notice that the rules that we have just created are present.
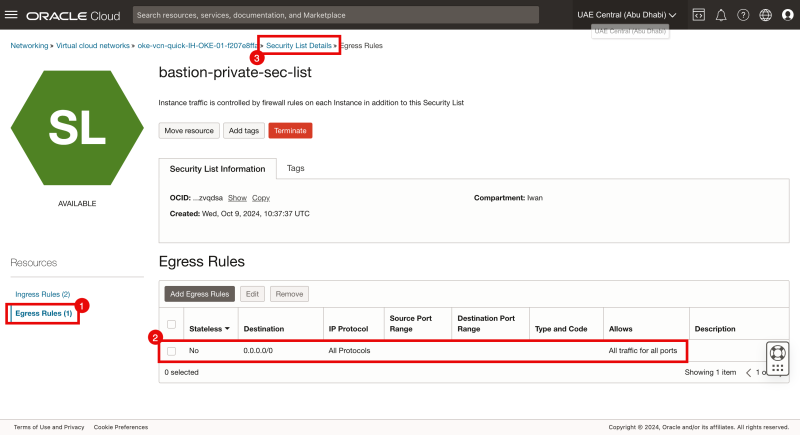
- Click on Egress Rules.
- Notice that the rule that we have just created is present.
STEP 2-2 - Create a bastion-public-sec-list security with below Ingress and Egress Rules
Click on the Create Security List button.
- Specify a Security List Name.
- Click on the + Another Ingress Rule button.
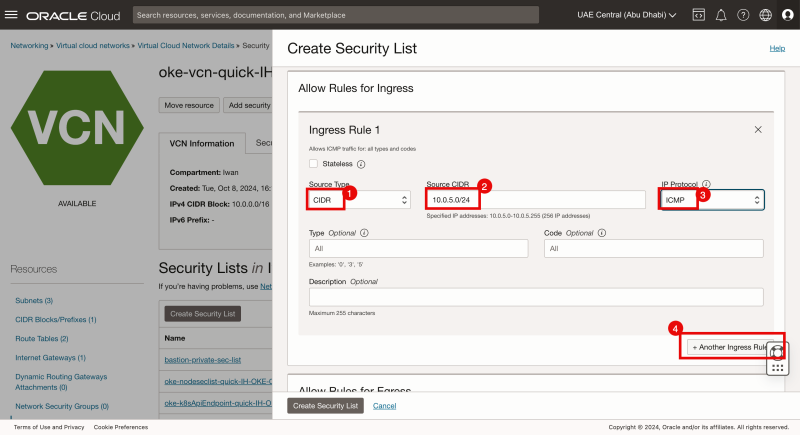
- Specify the source type to be: CIDR.
- Specify the source to be the Subnet of the Bastion Instance (10.0.5.0/24).
- Specify the IP Protocol to be: ICMP
- Click on the + Another Ingress Rule button.
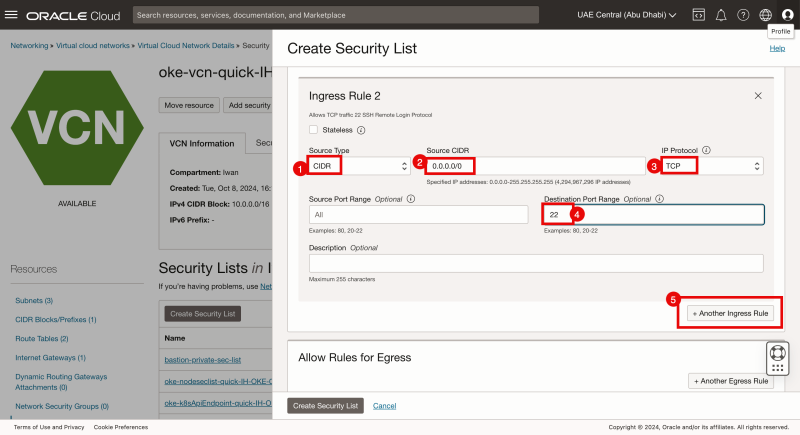
- Specify the source type to be: CIDR.
- Specify the source to be everything (0.0.0.0/0).
- Specify the IP Protocol to be: TCP
- Specify the Destination Port to be 22.
- Click on the + Another Ingress Rule button
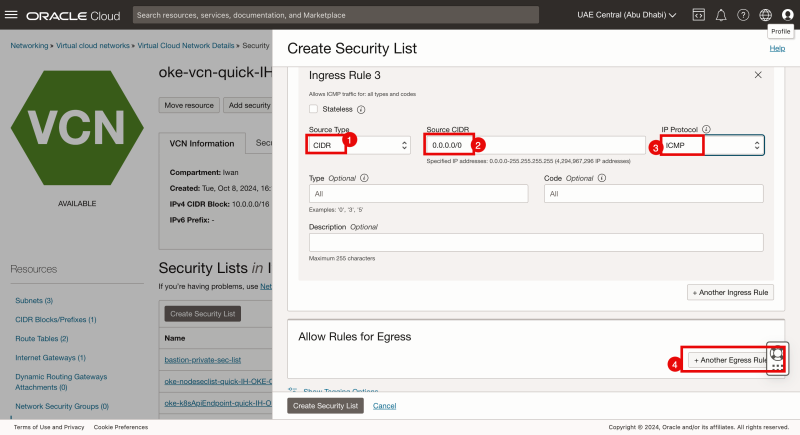
- Specify the source type to be: CIDR.
- Specify the source to be everything (0.0.0.0/0).
- Specify the IP Protocol to be: ICMP
- Click on the + Another Egress Rule button.
- Specify the destination type to be: CIDR.
- Specify the source to be everything (0.0.0.0/0).
- Specify the IP Protocol to be: All Protocols
- Click on the Create Security List button.
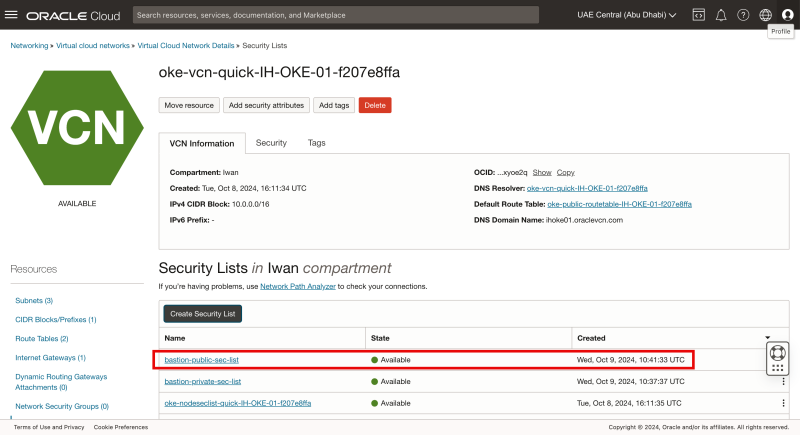
Notice the new security list has been created. Click on it to verify the rules.
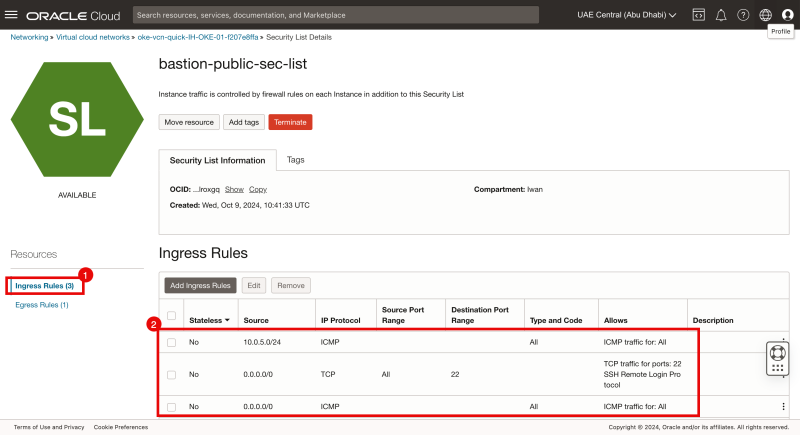
- Click on Ingress Rules.
- Notice that the rules that we have just created are present.
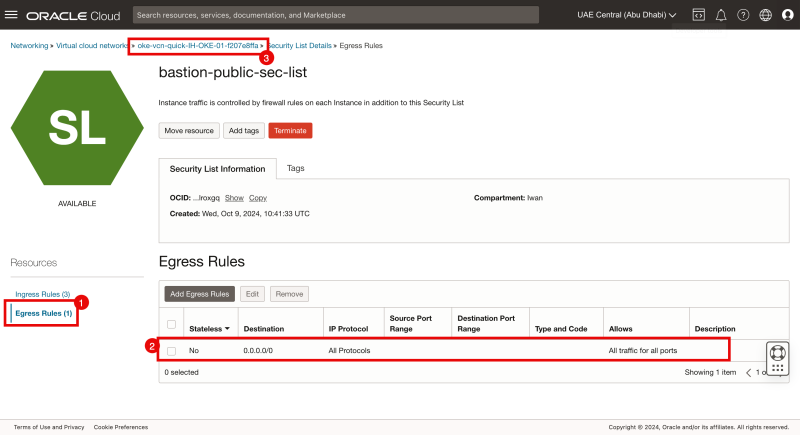
- Click on Egress Rules.
- Notice that the rule that we have just created is present.
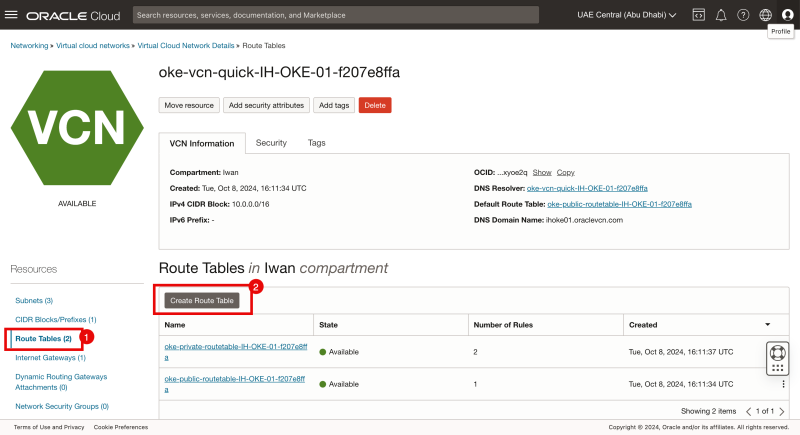
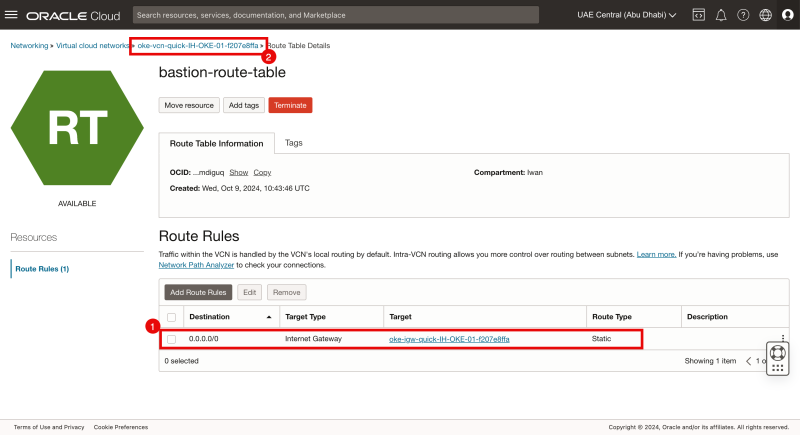
STEP 2-3 - Create the bastion-route-table with Internet Gateway so that we can add to the bastion instance for internet access
Make sure you have created an Internet Gateway in the VCN; if this is not there, please create one first.
>
- Click on Route Tables.
- Click on the Create Route Table button.
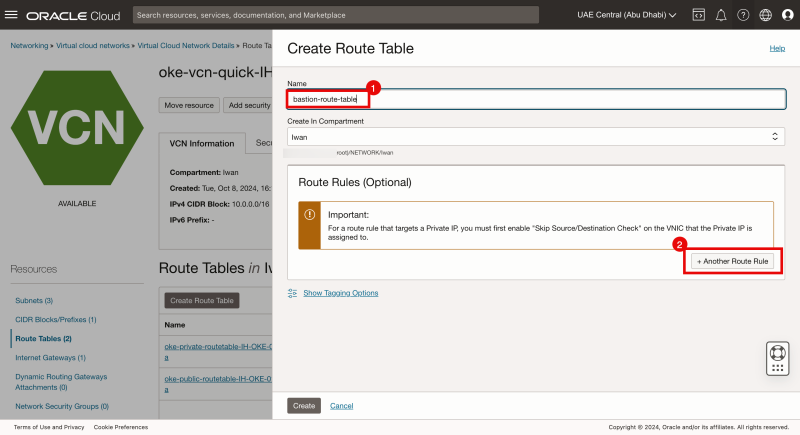
- Specify a Name.
- Click on the + Another Route Rule button.
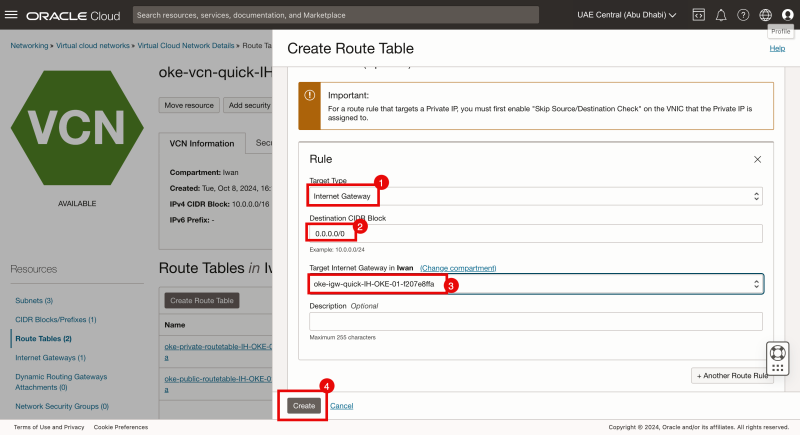
- Specify the target type as Internet Gateway.
- Specify the destination to be: 0.0.0.0/0.
- Select the existing Internet Gateway.
- Click on the Create button.
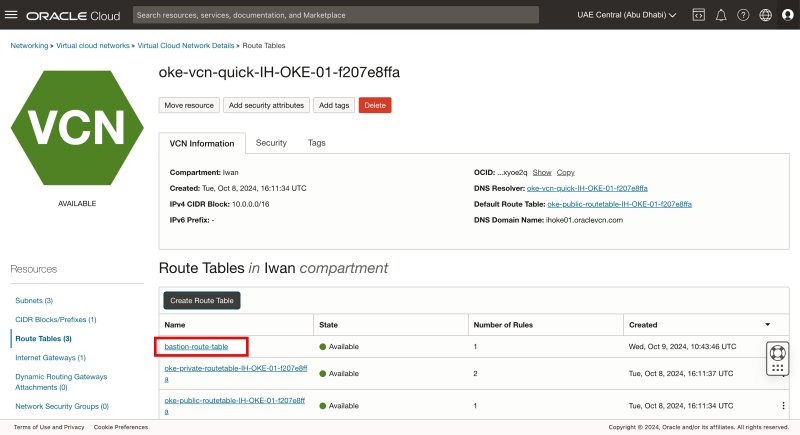
Notice that the new route table is created. Click on it to verify the rules.
- Notice that the rule that we have just created is present.
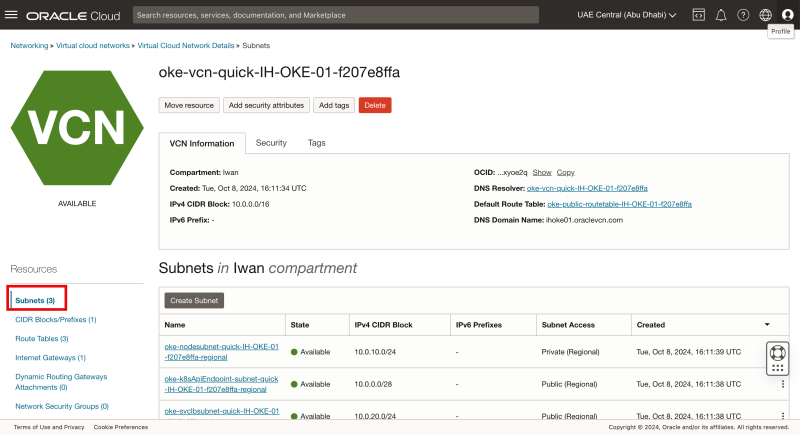
- Click on VCN to go back to the VCN page.
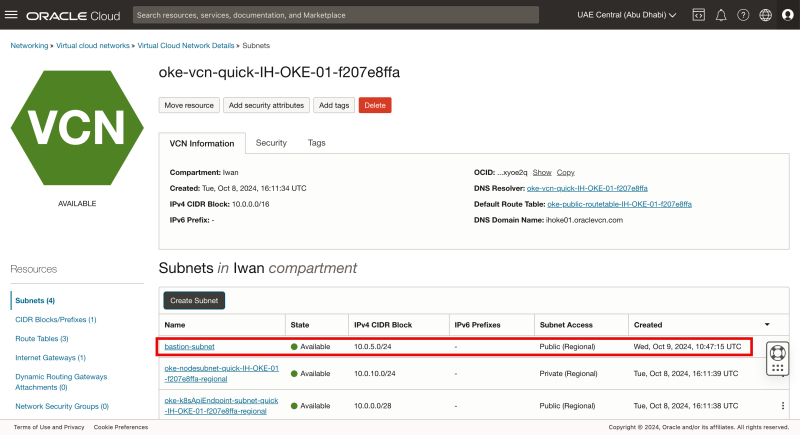
STEP 2-4 - Next, create a Regional Public Subnet for the bastion instance with the name bastion-subnet
Click on Subnets.
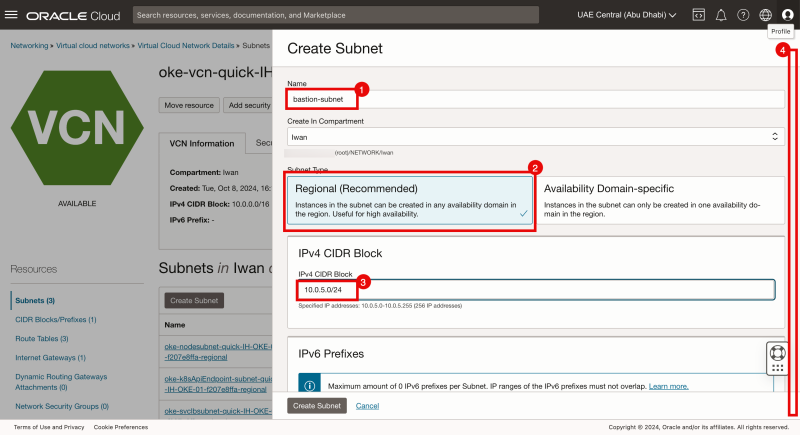
- Specify a Name.
- Select Regional.
- Specify an IPv4 CIDR Block: 10.0.5.0/24.
- Scroll down.
- Select the route table we have created in the previous step.
- Select Public Subnet.
- Scroll down.
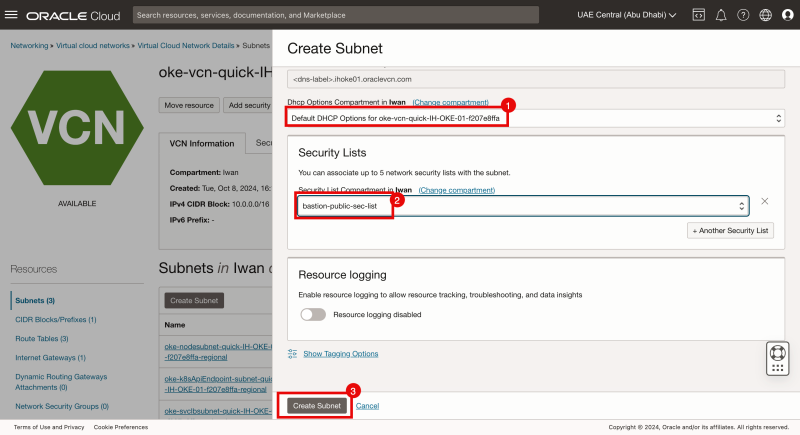
- Select the default DHCP Options.
- Select the Security List we created in one of the previous steps for the public subnet.
- Click on the Create Subnet button.
Notice that the new Subnet has been created.
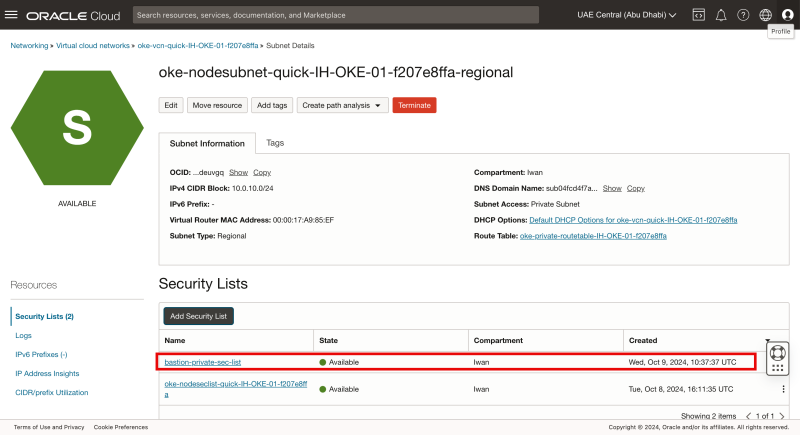
STEP 2-5: Add the bastion-private-sec-list to the Worker Private Subnet so that the bastion instance can access the Worker nodes
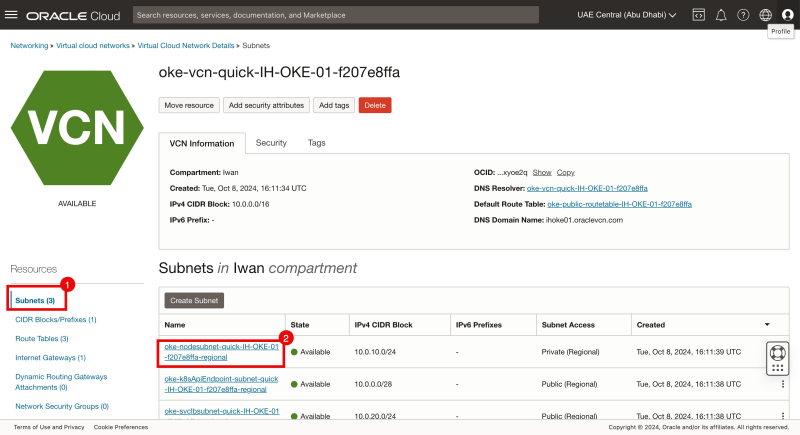
- Click on Subnets.
- Click on the Subnet to which your Kubernetes (Worker) Nodes are connected.
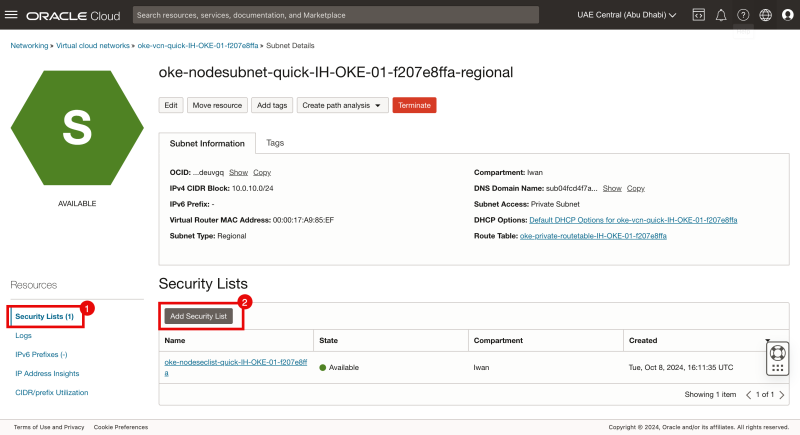
- Click on Security Lists.
- Click on the Add Security List button.
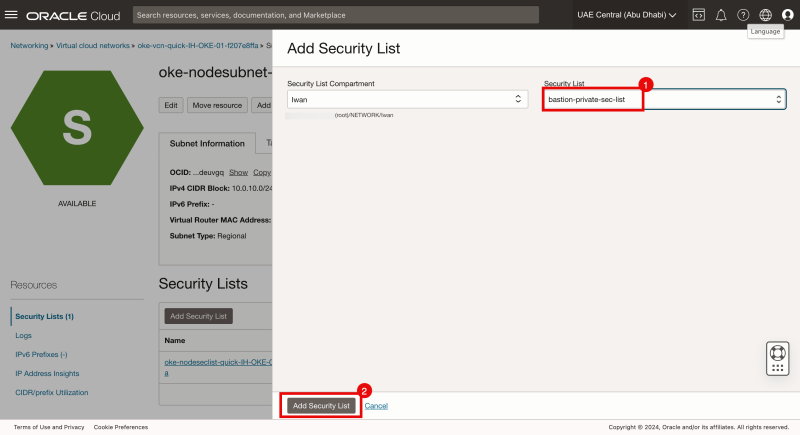
- Select the Security List for the Private Subnet we created in one of the previous steps.
- Click on the Add Security List button.
Notice that the security list has been added to the (Kubernetes worker node) Subnet.
STEP 2-6 - Create Compute Instance oke-bastion
Now that we have all the Security lists, subnets, and Routing Rules in place, we can create the Bastion Instance.
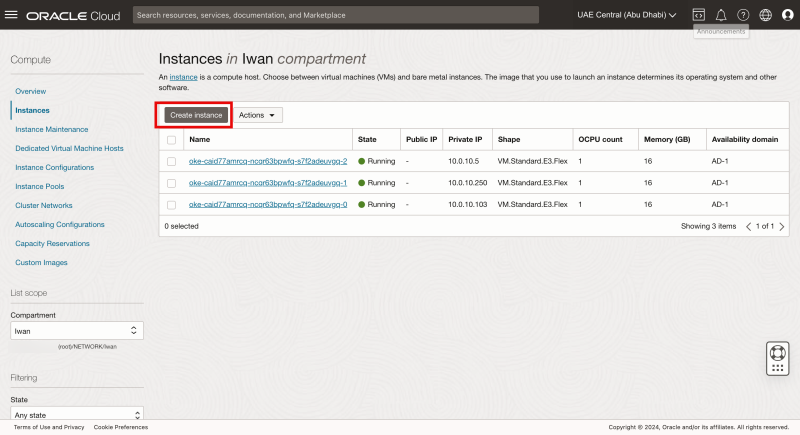
- Navigate to Compute > Instances.
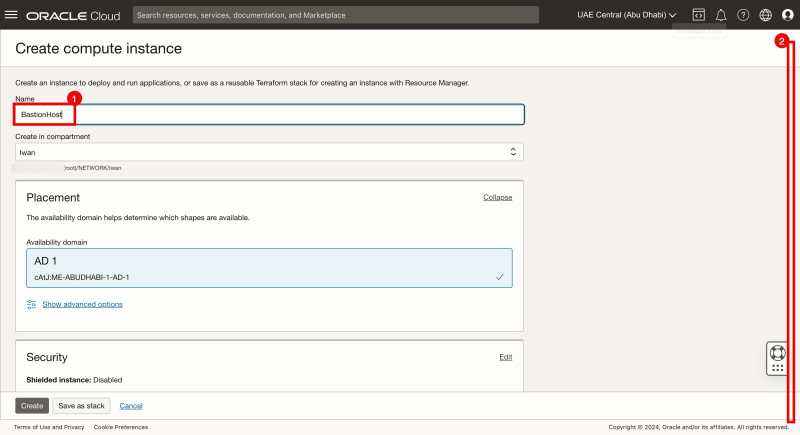
- Click on the Create Instance button.
- Specify a Name.
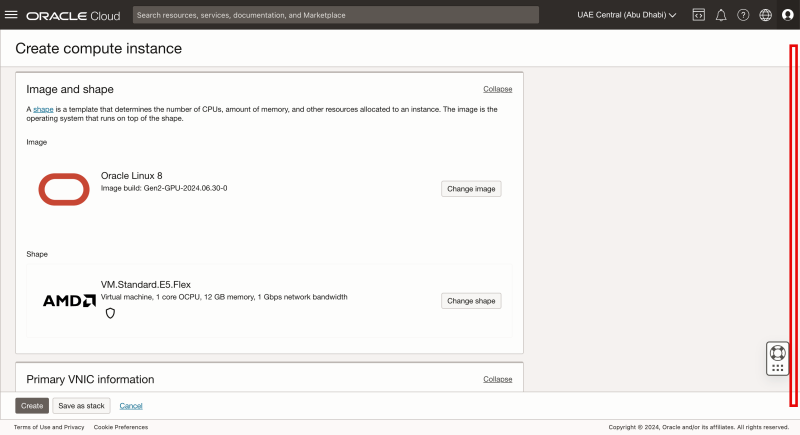
- Scroll down.
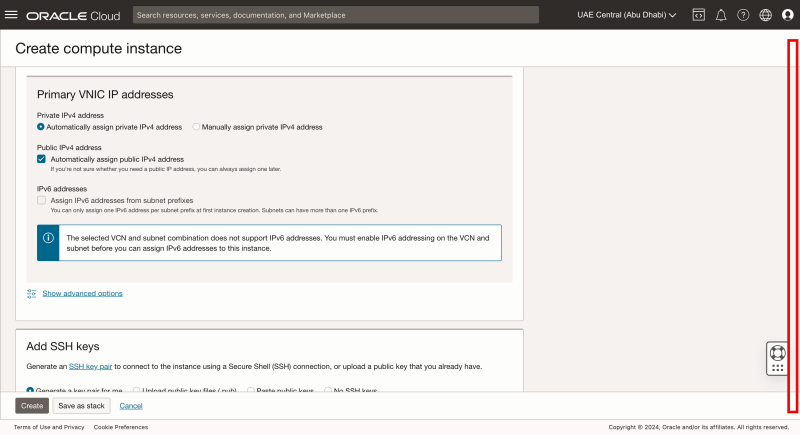
Scroll down.
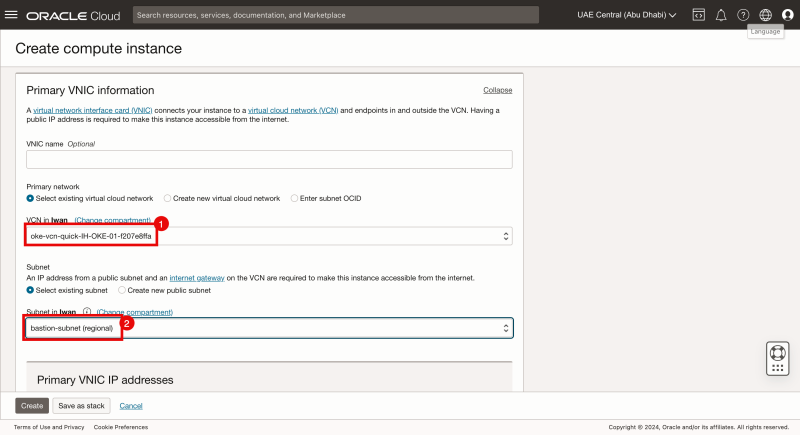
- Select the VCN you are using (the one you created the Subnet in the previous steps).
- Select the Subnet you just created.
Scroll down.
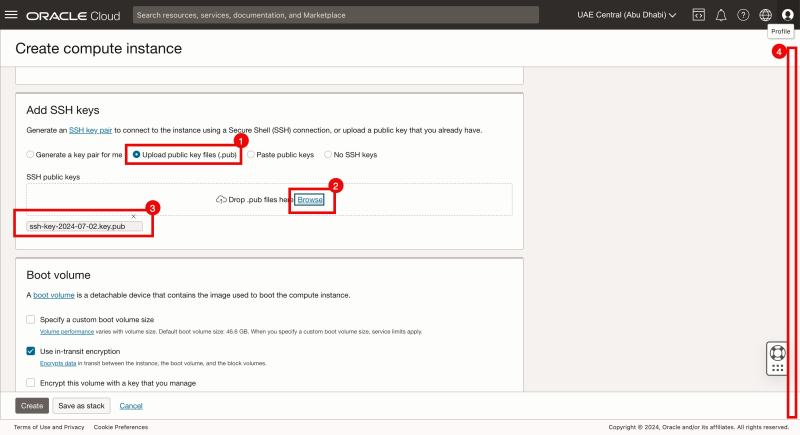
In the example below, I used an existing public key. You can also choose to Generate the Key pair, but if you do this, save it because you will need it later. In [this] article I explain how you create an instance with the "Generate a key pair option".
- Select upload public key files.
- Click on Browse.
- Make sure an existing public key is selected.
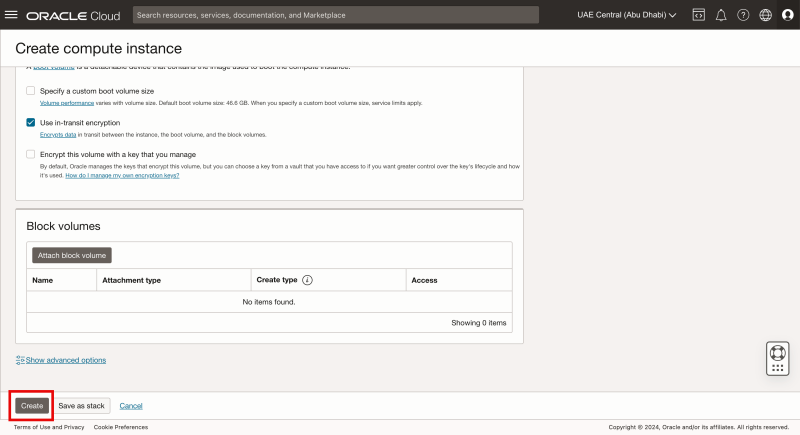
- Scroll down.
Click on the Create button.
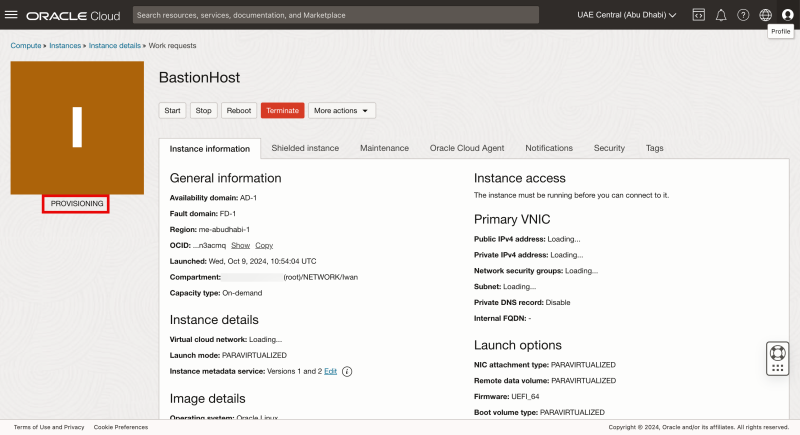
Notice the Instance has the PROVISIONING state.
STEP 2-7 - Get the Public IP of the Bastion Instance BastionHost to SSH into the Bastion instance
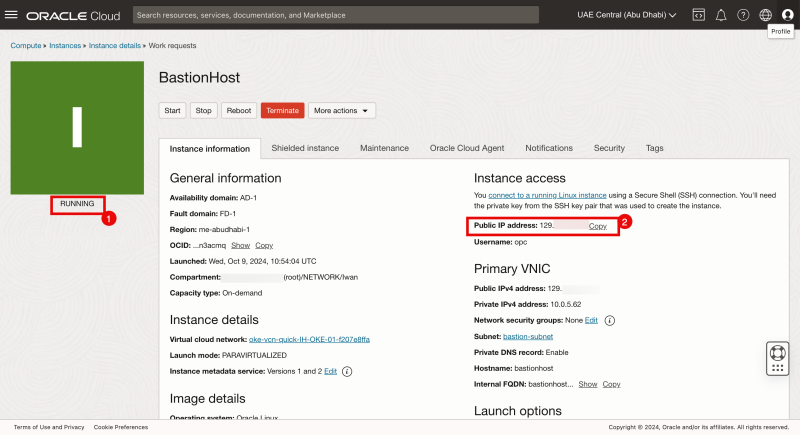
- When the Instance is fully deployed, It will be in the RUNNING state.
- Collect the Public IP address.
STEP 2-8 - Log in to Bastion host as below
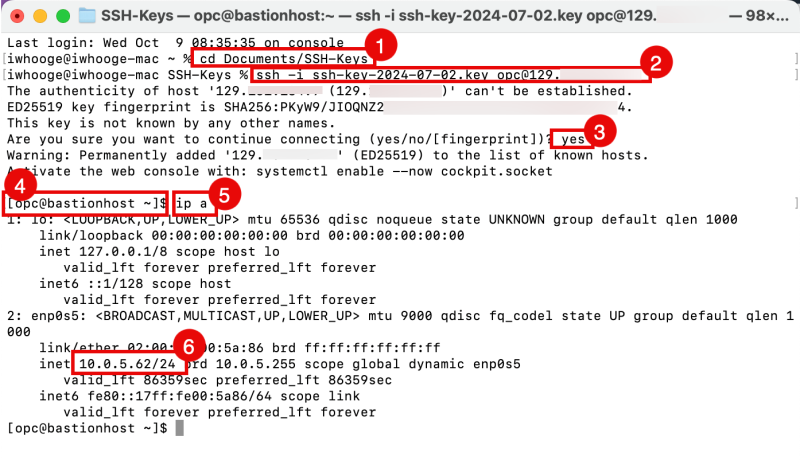
Open a terminal (or another application that you can use to set up SSH connections)
- Change the directory to where your private and public key is stored.
- Issue the command to connect with SSH to the Instance Public IP address using the private key.
- Type yes to continue.
- Notice that you are now logged in to the Instance.
- Issue this command to get the private IP address of the Instance.
- Notice that the Instance has an IP address of 10.0.5.62/24 in the Subnet of 10.0.5.0/24.
STEP 03 - Create a new Bastion and Session
We can use the Bastion Instance as a standalone host or the Bastion Service (or Bastion Session).
To do this, we need to install the Bastion plugin and create a Bastion session.
> [!What are the benefits of a Bastion + Session?] >When you deploy an instance within a Private Subnet, it is not directly accessible from the Internet. > >However, setting up a Bastion and initiating a Bastion session can make the private Instance accessible. This allows the Instance to act as a stepping stone for managing other resources within your OCI environment.
Install the Bastion plugin on the Instance created in the previous step
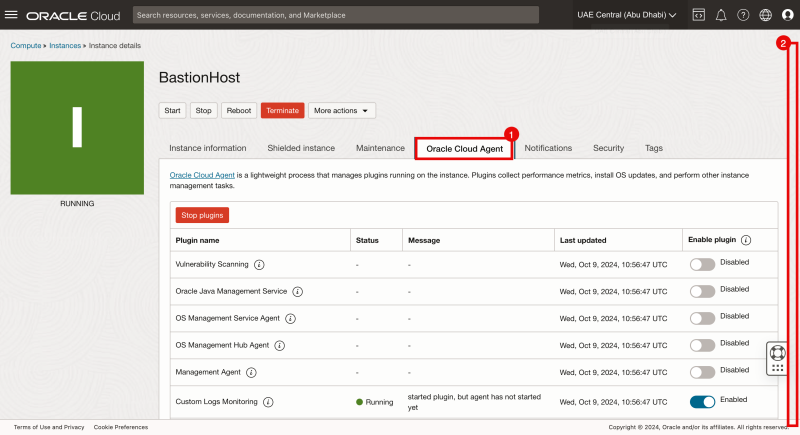
Browse to the Instance that we created in the previous step.
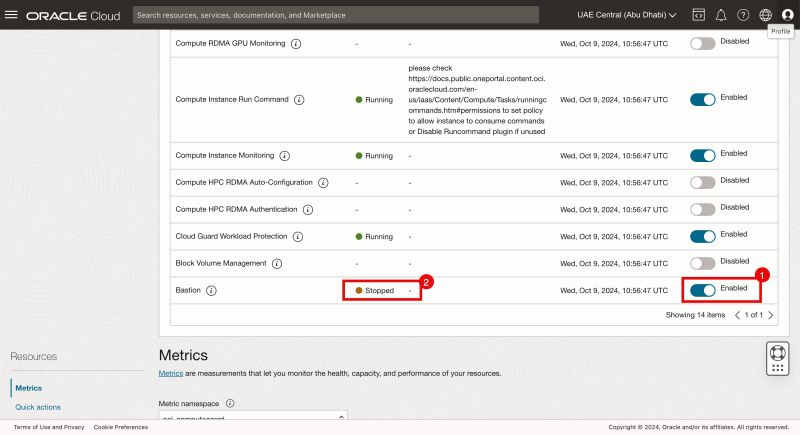
- Click on the Oracle Cloud Agent tab.
- Scroll down.
- Set the Bastion setting to Enabled.
- At first, you might see the service set to "stopped." This will change after a few minutes.
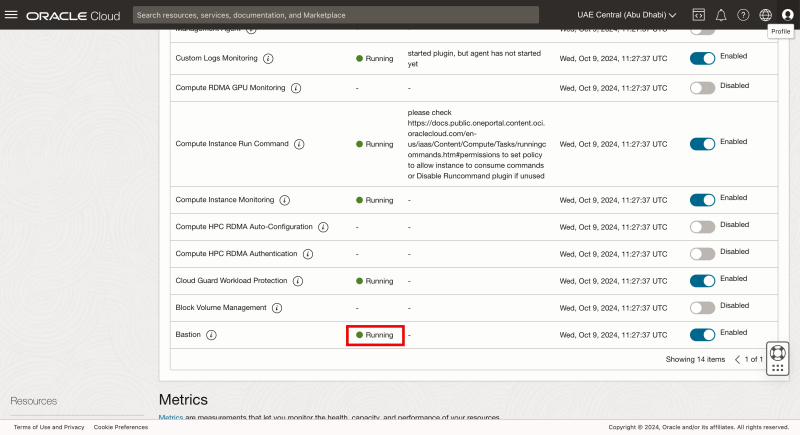
To deploy the Bastion plugin, the Instance needs access to the Internet through a NAT gateway or Internet Gateway, as the plugin is downloaded from the Internet. When the plugin status remains Stopped, check your internet connectivity.
> You can also try to [manually install the Oracle Cloud Agent Software].
When the Oracle Cloud Agent Software is installed successfully, the status will change to Running.
Create the Bastion
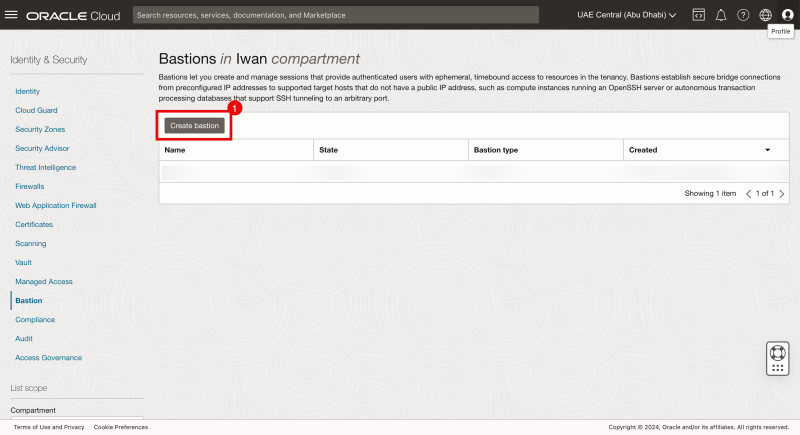
Navigate to Identity Security > Bastion.
- Click on the Create bastion button.
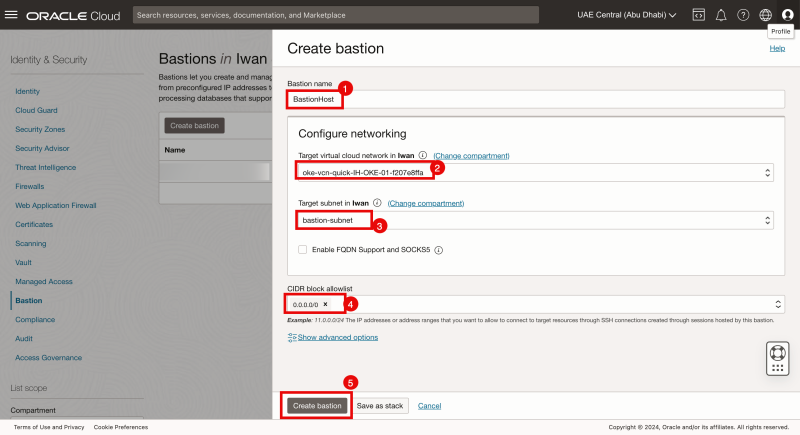
- Specify a name.
- Select the VCN where the Bastion Instance is in (and the Kubernetes Cluster).
- Select the Subnet where your Bastion Instance is located.
- Specify an allowlist. To allow everything, use 0.0.0.0/0.
- Click on the Create bastion button.
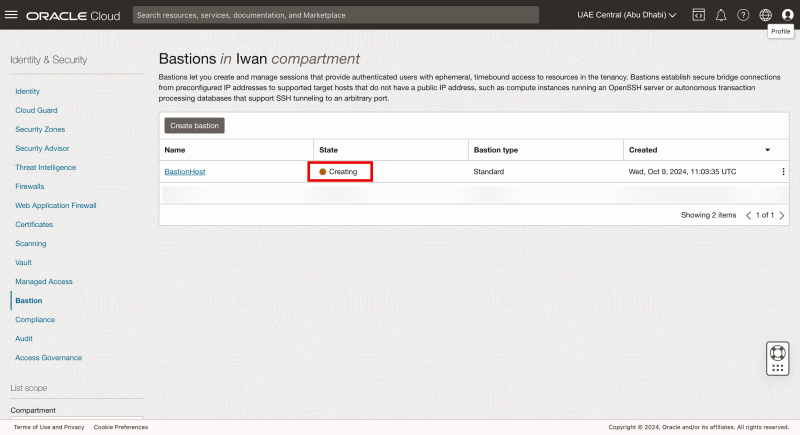
Notice the Bastion status is Creating.
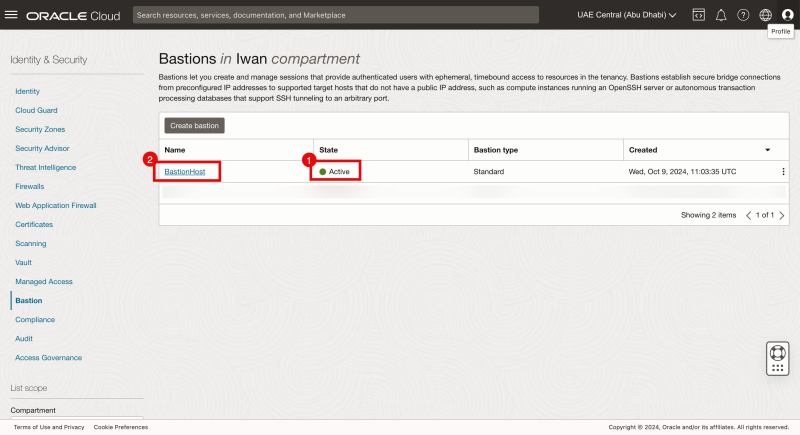
- When the Bastion has been created successfully, the status will change to Active.
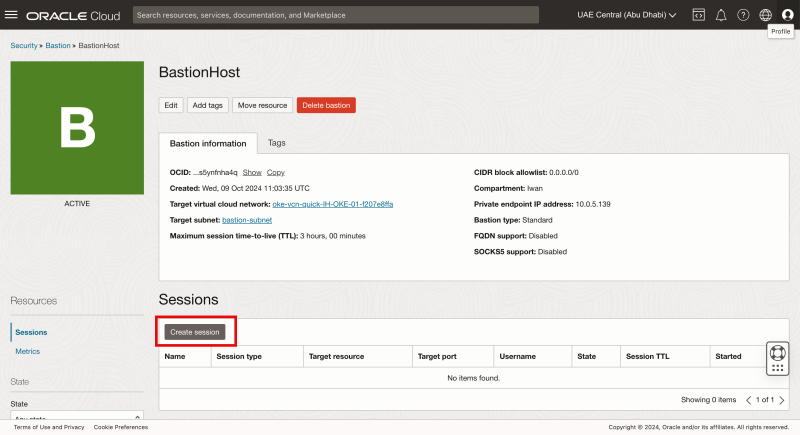
- Click on the Bastion.
Click on the Create session button.
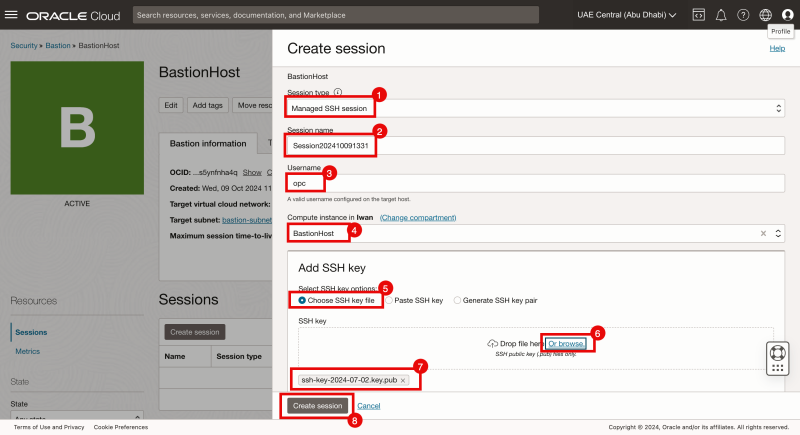
- Specify the session type to be: Managed SSH session.
- Provide a name.
- Provide the username of the Bastion Instance you created earlier.
- Select the Bastion Instance you created earlier
- Select: Choose SSH key file.
- Click browse.
- Make sure you select the public key of the Bastion Instance you created earlier.
- Click on the Create session button.
In this example, I am using the SAME SSH keypair I used for the Bastion Instance for simplicity. In your case, I suggest you create (or use) a keypair different from the one you used for the Bastion Instance.
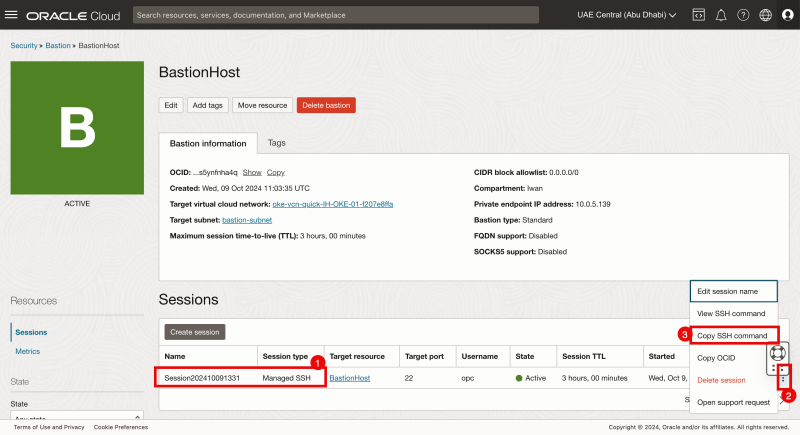
Get the SSH command of the bastion session
- Notice that the Bastion Session is created.
- Click on the three dots.
- Select Copy SSH command.
Login to bastion host as below
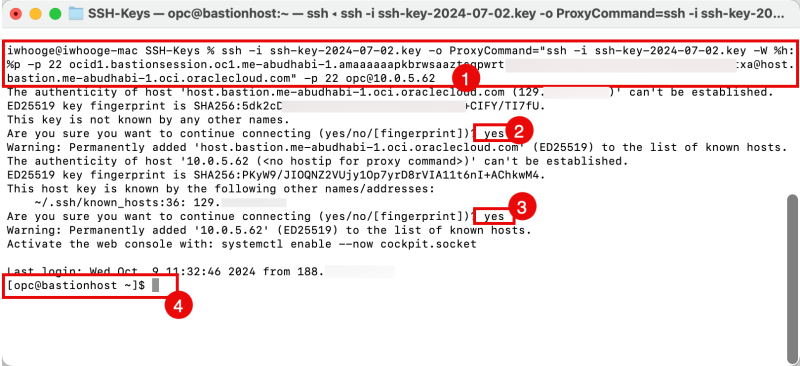
Open a terminal (or another application that you can use to set up SSH connections)
- Paste in the copied SSH command in the terminal.
- Type yes to continue (for the Bastion SSH Session).
- Type yes to continue (for the Instance SSH Session).
- Notice that you are now logged in to the Instance (through a Bastion Session).
This is a different way of connecting to the Bastion Instance that we showed earlier. Now, we are connecting to the Bastion Instance through a Bastion Session, and earlier, we connected directly with SSH to the Bastion Instance.
STEP 04 - Setup OCI CLI
Now that we have successfully set up the Bastion Instance, the Bastion, and the Bastion Session and verified connectivity, we need to set up OCI CLI so we can perform CRUD (create, read, update, and delete) operations inside our OCI environment.
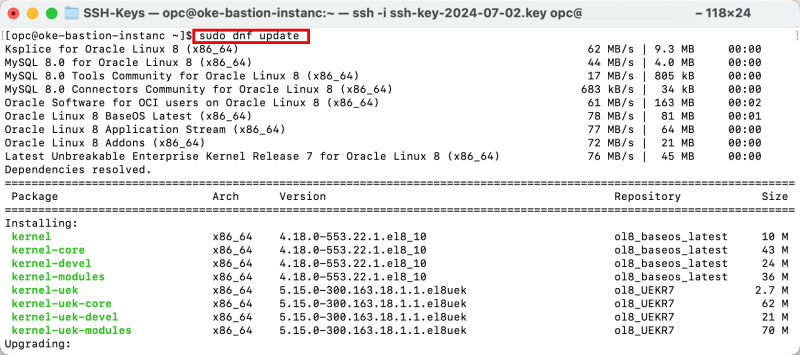
Issue the following command to update the installed software.
[opc@oke-bastion-instanc ~]$ sudo dnf update
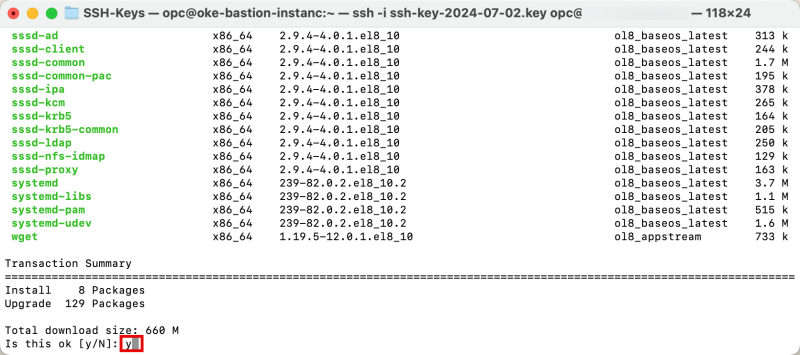
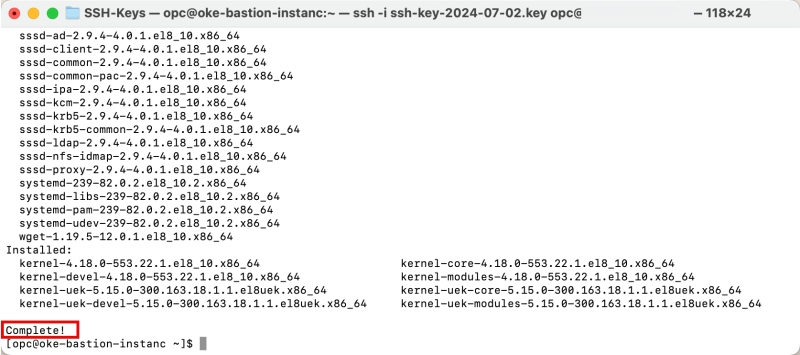
To confirm the update, type in: y
Notice that the update is completed.
- Issue the following command to install Oracle Developer Release.
- In my case, this is already installed. If this is not installed for you, please continue with the installation.
[opc@oke-bastion-instanc ~]$ sudo dnf -y install oraclelinux-developer-release-el8
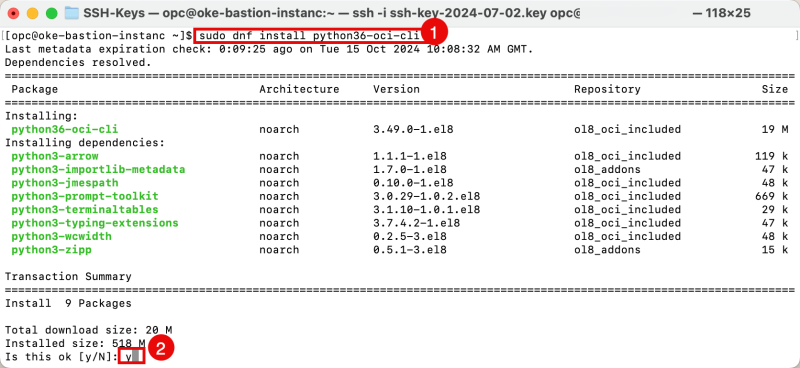
- Issue the following command to install OCI CLI.
- To confirm the installation type in: y
[opc@oke-bastion-instanc ~]$ sudo dnf install python36-oci-cli
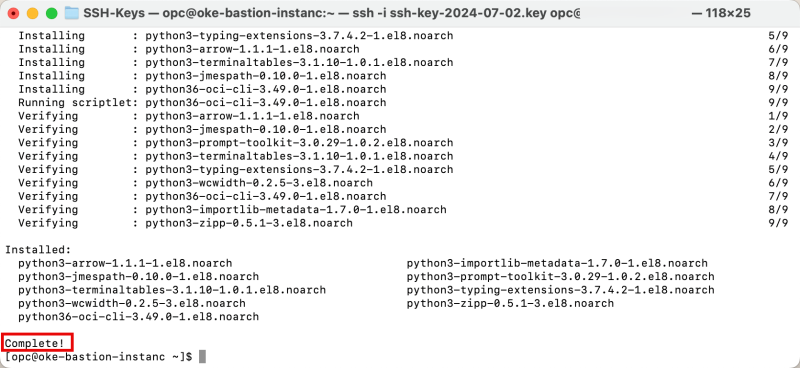
Notice that the installation is completed.
- Issue the following command to verify the installed OCI CLI version.
- Notice that the OCI CLI version is now 3.49.0.
[opc@oke-bastion-instanc ~]$ oci -v
STEP 05 - Configure OCI CLI
Now that the OCI CLI is installed, we need to add some configuration to ensure that the CLI can authenticate on your OCI tenant so you can perform CRUD operations.
Issue the following commands to create a new hidden directory inside your home folder.
[opc@oke-bastion-instanc ~]$ mkdir ~/.oci/
Issue the following command to change the directory to the one you just created.
[opc@oke-bastion-instanc ~]$ cd ~/.oci/
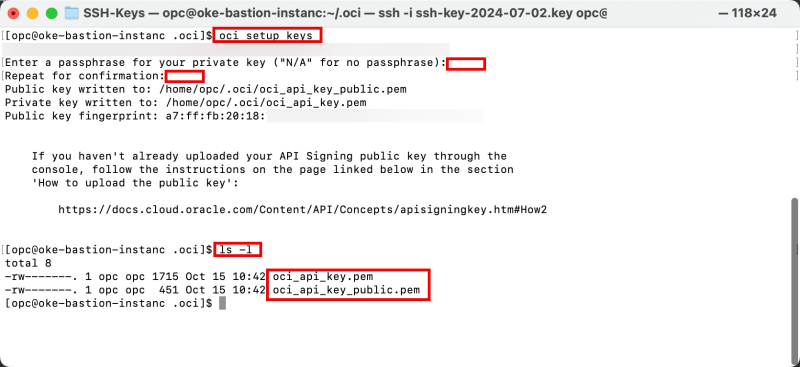
Issue the following command to generate a new key pair (public and private key). I am not using any passwords so that I will be typing "N/A" in the passphrase question.
[opc@oke-bastion-instanc .oci]$ oci setup keys
Issue the following command to verify if your keypair has been generated successfully.
[opc@oke-bastion-instanc .oci]$ ls -l
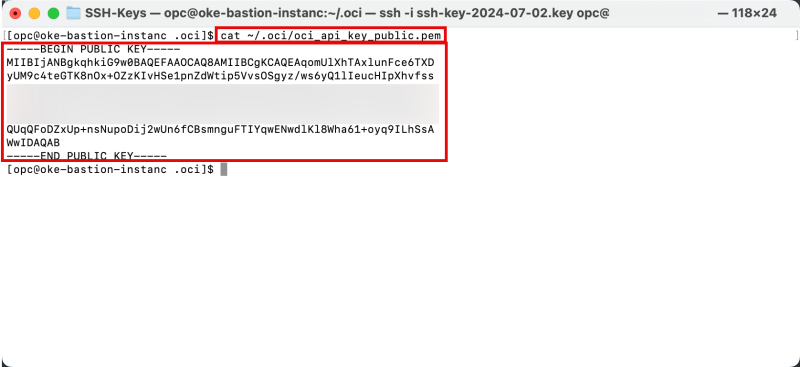
Issue the following command to get the public key's content. Make sure you copy this, as you will need it later.
[opc@oke-bastion-instanc .oci]$ cat ~/.oci/oci_api_key_public.pem
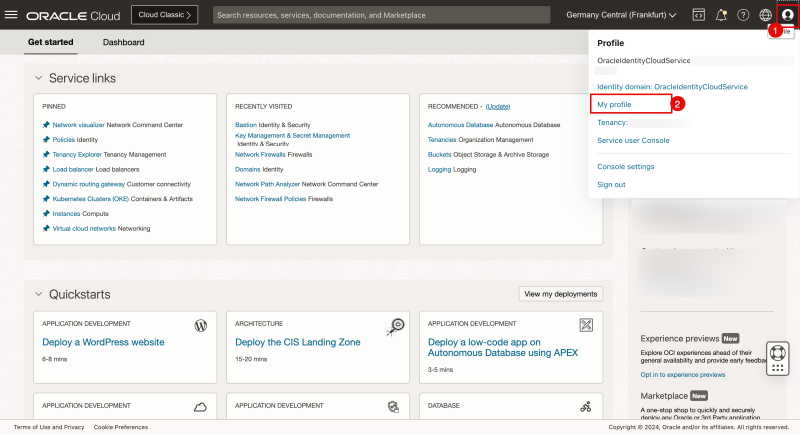
- Inside the OCI console, click on the profile button in the upper right corner.
- Click on My Profile.
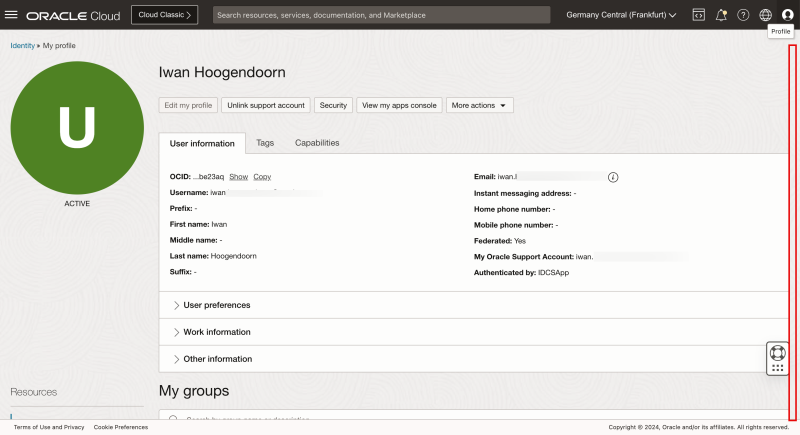
Scroll down.
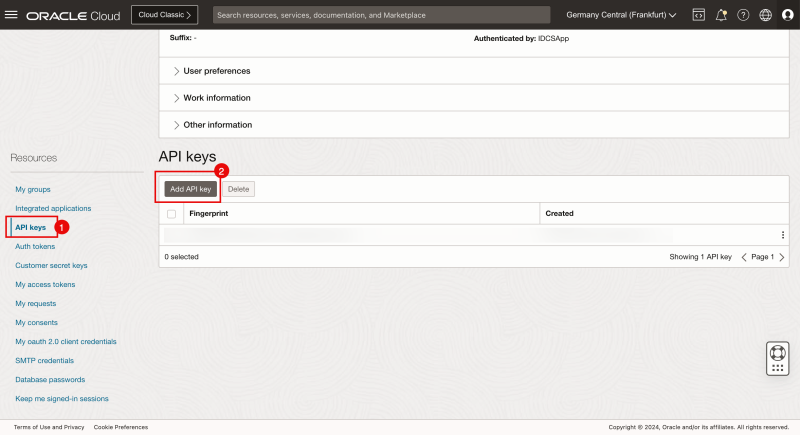
- Click on API keys.
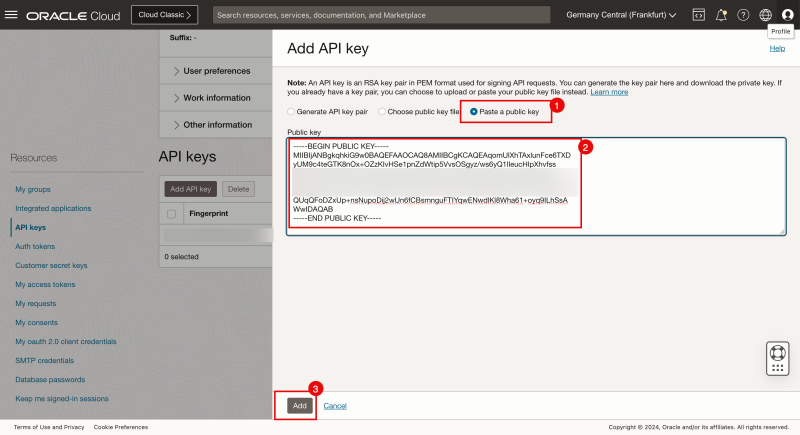
- Click on the Add API key button.
- Select the Paste a public key option.
- Paste the public key you just collected from the Bastion (Instance).
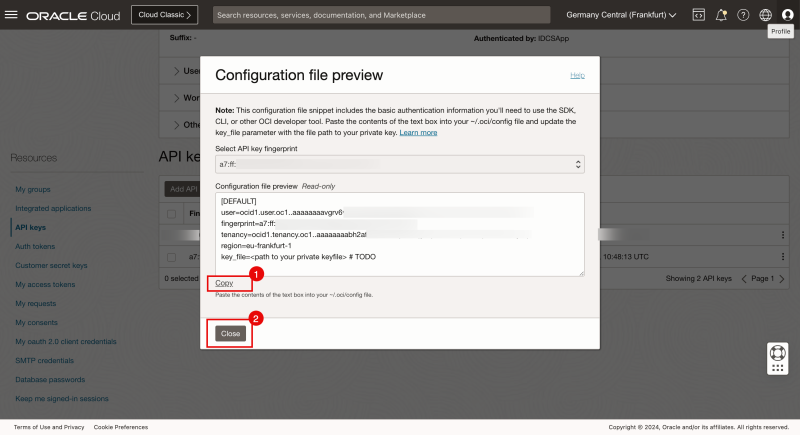
- Copy the configuration file.
- Click on the Close button.
Below, you will find an output of the copied configuration. Note that the only thing that needs to be changed is the path to your private key file (the one you just generated).
[DEFAULT]
user=ocid1.user.oc1..aaaaaaaavgrv6wsnnzhtwpjmyqtdqbq7kacfdfooz5uta3ludvfuwibe23aq
fingerprint=a7:ff:fb:20:18:75:31:7d:b0:7c:04:8f:0c:cb:98:23
tenancy=ocid1.tenancy.oc1..aaaaaaaabh2affulc4dt4tqs7lbojyhqi6hzn5mjllxlnuqnletufsofoyvq
region=eu-frankfurt-1
key_file=<path to your private keyfile> # TODO
Issue the following command to create the (OCI CLI) config file.
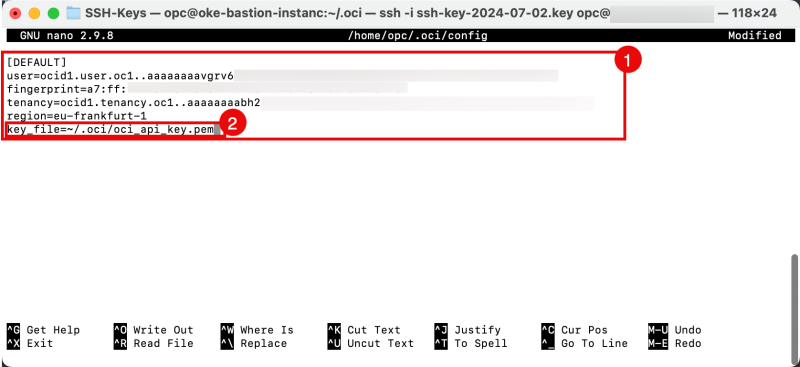
[opc@oke-bastion-instanc .oci]$ nano ~/.oci/config
- Copy the content of the config provided by the OCI console in the config file
- Change the private key file location.
[DEFAULT]
user=ocid1.user.oc1..aaaaaaaavgrv6wsnnzhtwpjmyqtdqbq7kacfdfooz5uta3ludvfuwibe23aq
fingerprint=a7:ff:fb:20:18:75:31:7d:b0:7c:04:8f:0c:cb:98:23
tenancy=ocid1.tenancy.oc1..aaaaaaaabh2affulc4dt4tqs7lbojyhqi6hzn5mjllxlnuqnletufsofoyvq
region=eu-frankfurt-1
key_file=~/.oci/oci_api_key.pem
Make sure you save and exit the config file correctly.
Issue the following command to make sure the config file is created.
[opc@oke-bastion-instanc .oci]$ ls -l
The [Oracle Cloud Infrastructure CLI Command Reference] is a good place to start and look up some commands you can use.
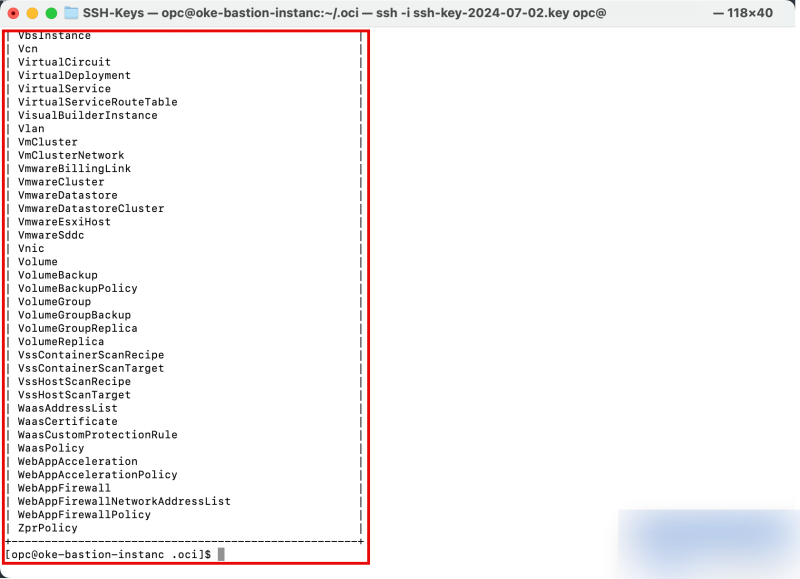
- Issue the following command to review all resource types that are configured in your tenant.
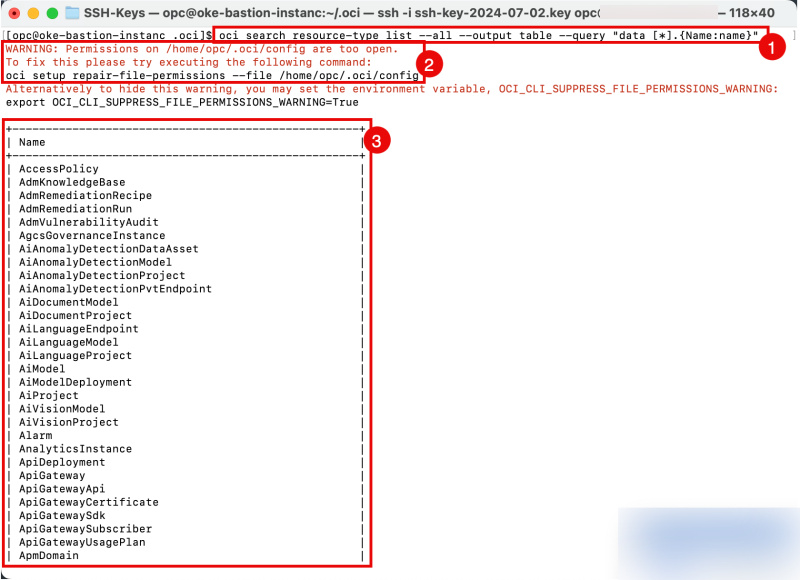
[opc@oke-bastion-instanc .oci]$ oci search resource-type list --all --output table --query "data [*].{Name:name}"
- Notice the warning that the permissions on the config file are too open; we will fix this later.
- Notice the output of all the resource types configured in your tenant.
Issue the following command to fix the file permissions of the config file.
[opc@oke-bastion-instanc .oci]$ oci setup repair-file-permissions --file /home/opc/.oci/config
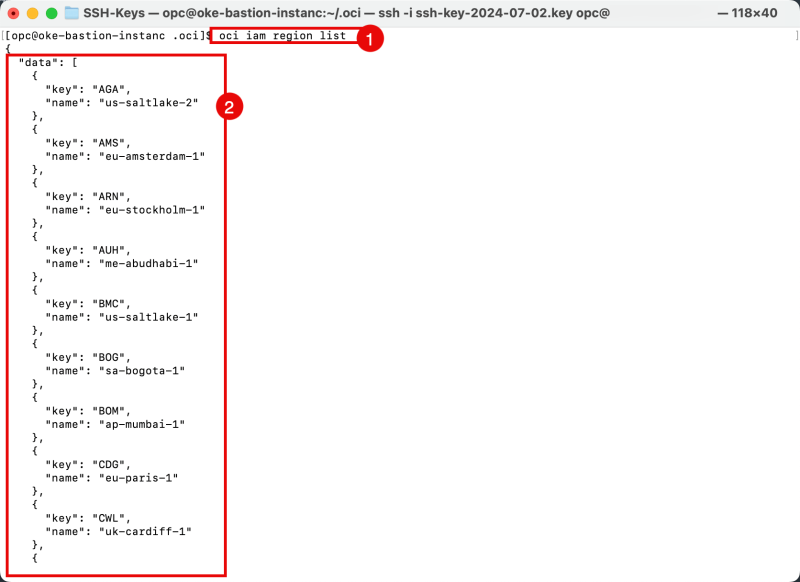
- Issue the following command to retrieve a list of all the Regions to which your tenant is subscribed.
[opc@oke-bastion-instanc .oci]$ oci iam region list
- Notice the output of all the Regions your tenant is subscribed to.
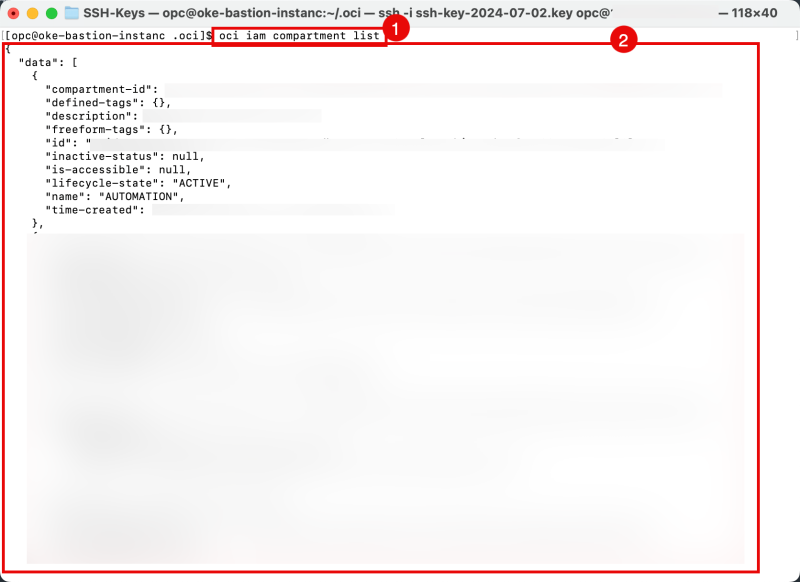
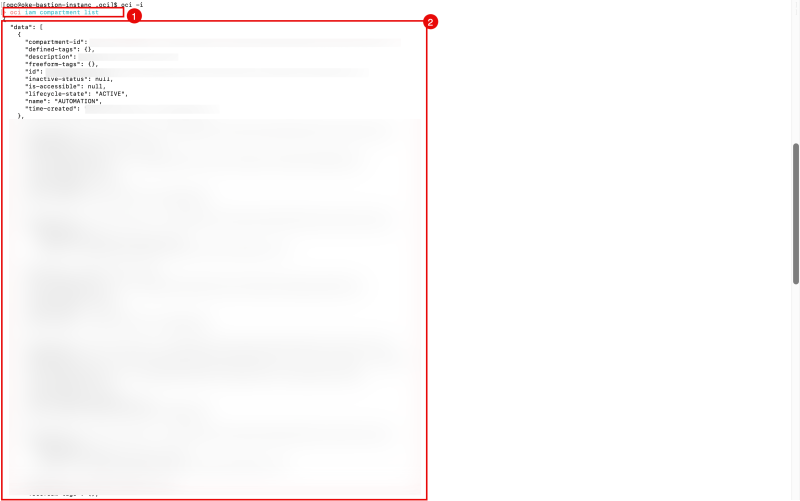
- Issue the following command to list your tenant's configured compartments.
[opc@oke-bastion-instanc .oci]$ oci iam compartment list
- Notice the output of all the Compartments of your tenant.
Using OCI CLI in Interactive Mode
You can also use OCI CLI in [Interactive Mode]. This way, OCI CLI will provide you the commands and following keywords in the command that you can use to get your full command that you require eventually.
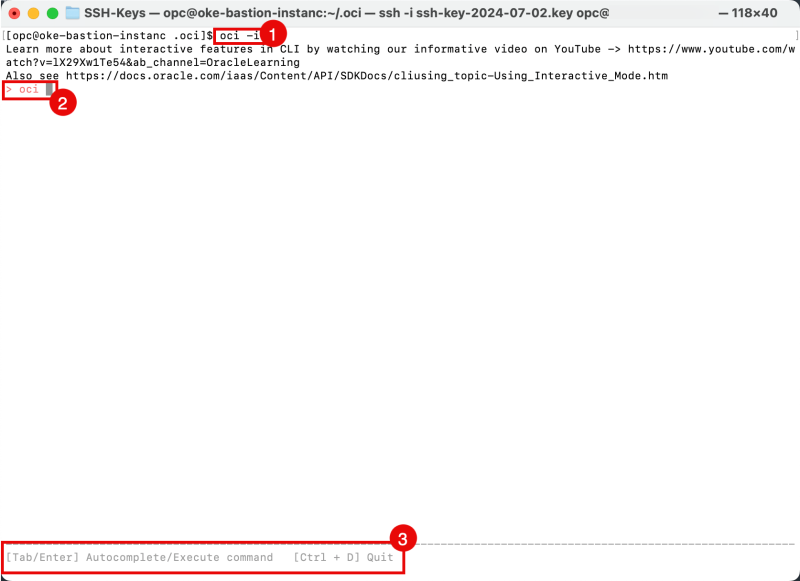
- Issue the following command to start OCI CLI in interactive mode.
[opc@oke-bastion-instanc .oci]$ oci -i
- Notice the OCI CLI interactive mode prompt.
- Notice the message to use Tab to autocomplete commands, and Enter to execute command, or the CTRL + D to quit the interactive mode.
- Press Tab to get the first level of commands.
- Notice the available first level of commands.
Type in ia and use Tab to show the available command options.
Type in iam compartment and use Tab to show the available command options.
Use Tab to autocomplete the word compartment. So you now have the command iam compartment.
Use Tab to show the next available option for the iam compartment command.
- Type in the list and execute the full command iam compartment list
- Notice the output of all the Compartments of your tenant.
STEP 06 - Access the Kubernetes cluster using Local CLI
If you are not sure if or what version of the OCI CLI you currently have installed, check with this command:
oci -v
If OCI CLI is not installed, use the previous steps to install and configure it.
- Create a directory to contain the kubeconfig file.
mkdir -p $HOME/.kube
- To access the kubeconfig for your cluster via the VCN-Native public endpoint, copy the following command:
oci ce cluster create-kubeconfig --cluster-id ocid1.cluster.oc1.eu-frankfurt-1.aaaaaaaagwiamspaz7h4prpgfn56boa7bgvobbicxj75gd7chc27su6o56kq --file $HOME/.kube/config --region eu-frankfurt-1 --token-version 2.0.0 --kube-endpoint PUBLIC_ENDPOINT
- To access the kubeconfig for your cluster via the VCN-Native private endpoint, copy the following command:
oci ce cluster create-kubeconfig --cluster-id ocid1.cluster.oc1.eu-frankfurt-1.aaaaaaaagwiamspaz7h4prpgfn56boa7bgvobbicxj75gd7chc27su6o56kq --file $HOME/.kube/config --region eu-frankfurt-1 --token-version 2.0.0 --kube-endpoint PRIVATE_ENDPOINT
- To set your KUBECONFIG environment variable to the file for this cluster, use:
export KUBECONFIG=$HOME/.kube/config
- Download the latest Kubernetes release with the command:
[opc@oke-bastion-instanc ~]$ curl -LO "https://storage.googleapis.com/kubernetes-release/release/$(curl -s https://storage.googleapis.com/kubernetes-release/release/stable.txt)/bin/linux/amd64/kubectl"
- Make the kubectl application executable with the command:
[opc@oke-bastion-instanc ~]$ chmod +x ./kubectl
- Move the kubectl application to a location where the $PATH variable is active so you can execute the kubectl command from anywhere.
[opc@oke-bastion-instanc ~]$ sudo mv ./kubectl /usr/local/bin/kubectl
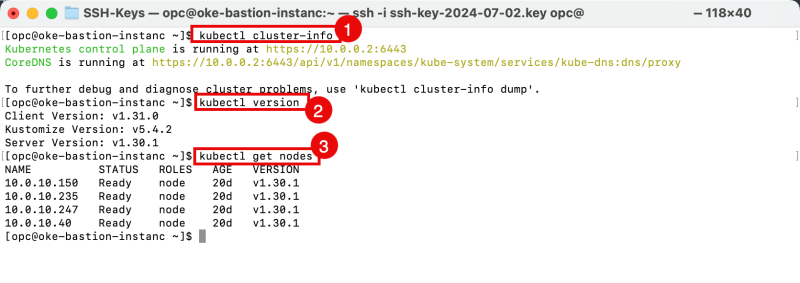
- Issue this command to get your Kubernetes Cluster Information:
[opc@oke-bastion-instanc ~]$ kubectl cluster-info
- Issue this command to get the Kubernetes Client and Server versions.
[opc@oke-bastion-instanc ~]$ kubectl version
- Issue this command to get all the worker nodes in the Kubernetes cluster.
[opc@oke-bastion-instanc ~]$ kubectl get nodes
Conclusion
In conclusion, connecting to your Oracle Kubernetes Engine (OKE) cluster using the local access option allows you to easily manage and interact with your cluster resources from your local environment. Following the steps outlined in this tutorial, you've set up a secure connection and can now deploy, monitor, and maintain applications on your OKE cluster. With this setup, you can efficiently handle administrative tasks, troubleshoot issues, and optimize your workflows. Keep these configurations handy for future reference, and feel free to explore further customization options to suit your specific needs.

