Access and manage your (Linux) Compute instance using OCI
In this article, I will explain how you can access the console of a Linux Instance to install your applications or perform management operations.
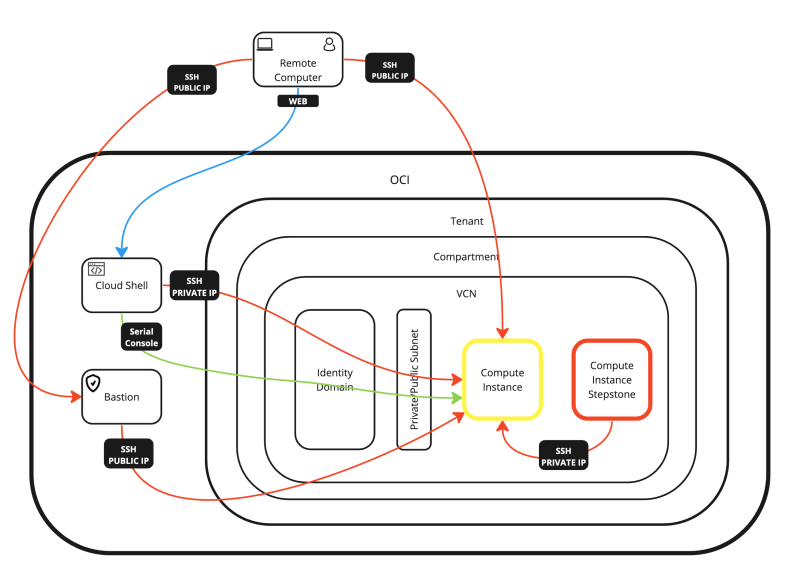
The Connectivity Options
Linux Compute Instances can be accessed using multiple methods. I have listed the most common options below:
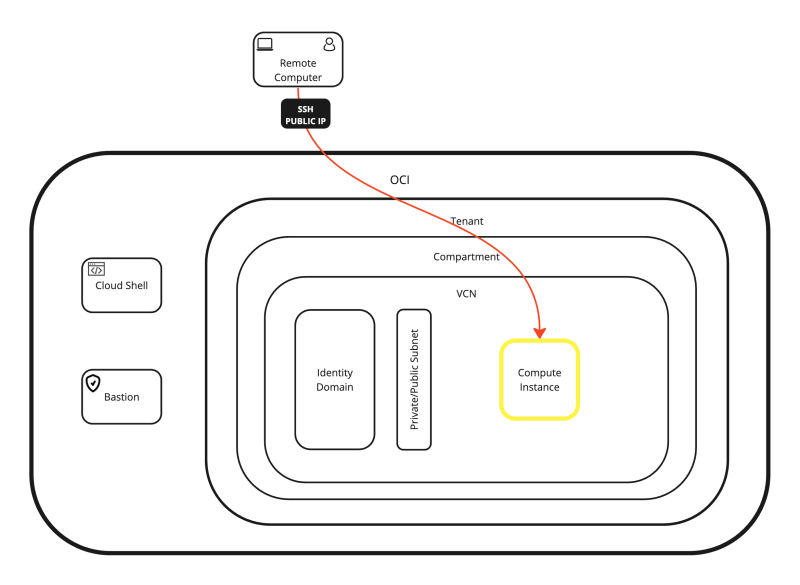
- OPTION 01: Connecting with SSH to the Public IP address of the Compute Instance using the SSH Private Key (with the OS X Terminal).
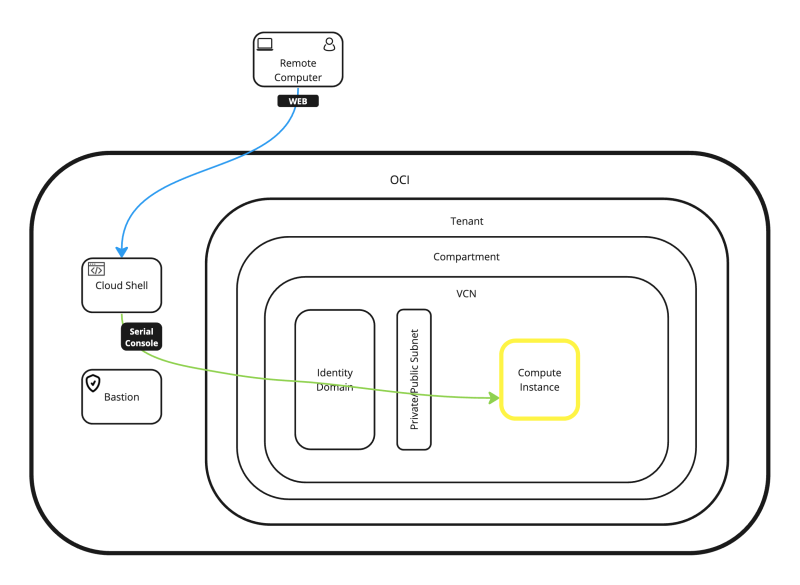
- OPTION 02: Connecting with the Terminal Console to the Compute Instance using the SSH Username + Password (through Cloud Shell Console).
- OPTION 03: Connecting with SSH to the Public IP address of the Compute Instance using the SSH Private Key (with the Royal TSX Application).
- OPTION 04: Connecting with SSH to the Private IP address of the Compute Instance using the SSH Private Key (through Cloud Shell).
- OPTION 05: Connecting with SSH to the Private IP address of the Compute Instance using the SSH Username + Password (through Cloud Shell).
- OPTION 06: Connecting with SSH to the Private IP address of the Compute Instance using the SSH Private Key (through a Bastion Host).
- OPTION 07: Working with a Stepstone Compute Instance inside your VCN.
OPTION 01» Connecting with SSH to the Public IP address to the Compute Instance using the SSH Private Key with the OS X Terminal
Here I will be connecting to my Linux Instance using SSH and the public IP address that is provided by OCI to connect directly to the Instance using the OSX Terminal.
- Use the CLI to navigate into the folder where my public and private keys are stored.
- Connect to the instance using the SSH command where you specify the private key.
- Restrict the permissions of the private key and make sure the access is restricted before it can be used.
- Connect to the instance using the SSH command where you specify the private key.
- Issue a command to verify the IP address.
- Verify the IP address.
The commands that I used can be found below.
cd Downloads

cd MyFreeInstanceKeys

ls -l

chmod 600 ssh-key-2024-01-31.key

ssh -i ssh-key-2024-01-31.key opc@xxx.xxx.xxx.229

ip a
OPTION 02» Connecting with the Terminal Console to the Compute Instance using the SSH Username and Password through Cloud Shell Console
Prerequisite for approach 2
To create this local username and password you FIRST need to log in with SSH using the private key. This is done in Approach 1, 3, 4, 5 and 6.
- When I log in with SSH using a private key, we can create a new local username and assign a password to that new username. Run the following command.
The commands that I used can be found below.
sudo useradd console
sudo passwd console
💡 It is also possible to create a new local username and password during the instance creation process. But I will show you this in another article.
Continue with approach 2
Now that we have created the local username and password we can continue with connecting via the Terminal Console to the Compute Instance using SSH Username and Password with the OCI Cloud Shell Console.
In this approach, we will connect to a Linux instance using the local console provided by OCI to connect directly to the instance using the OCI Cloud Shell.
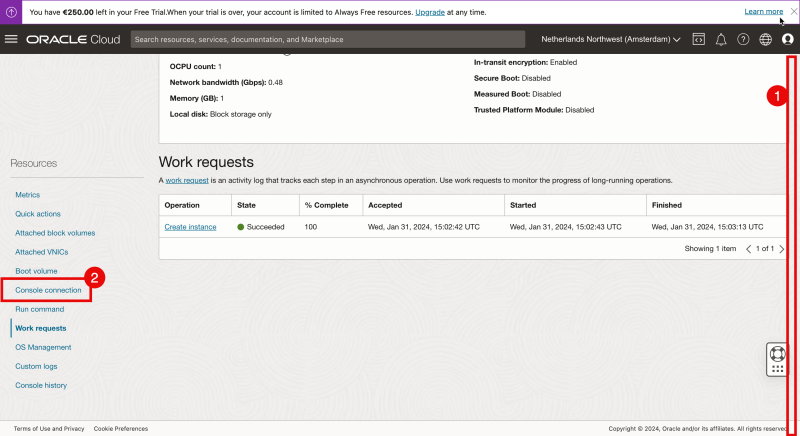
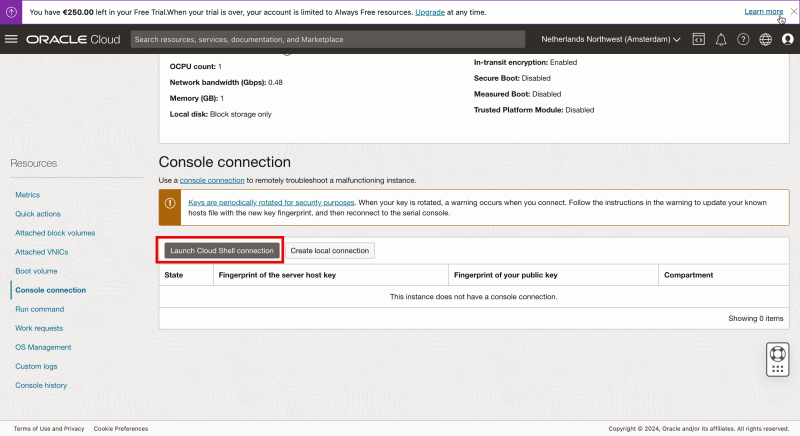
- Inside the instance details scroll down.
- Click on the “Console Connection” to start Cloud Shell and connect to the console.
Click on “Launch Cloud Shell connection”.
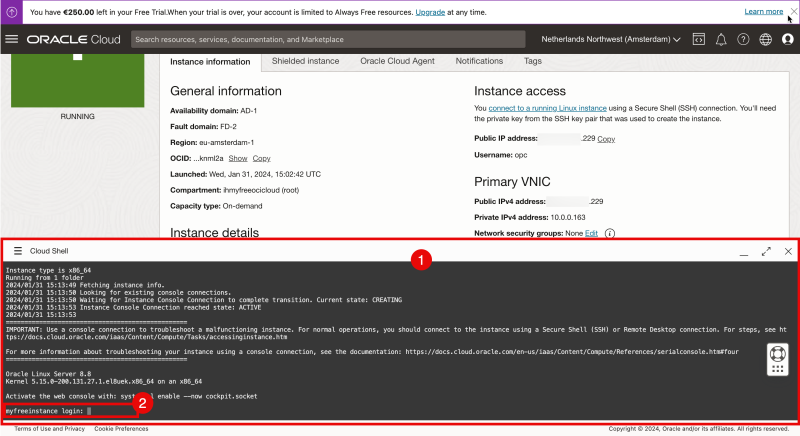
- Notice that the Cloud Shell window will be opened.
- Notice the prompt to provide a username.
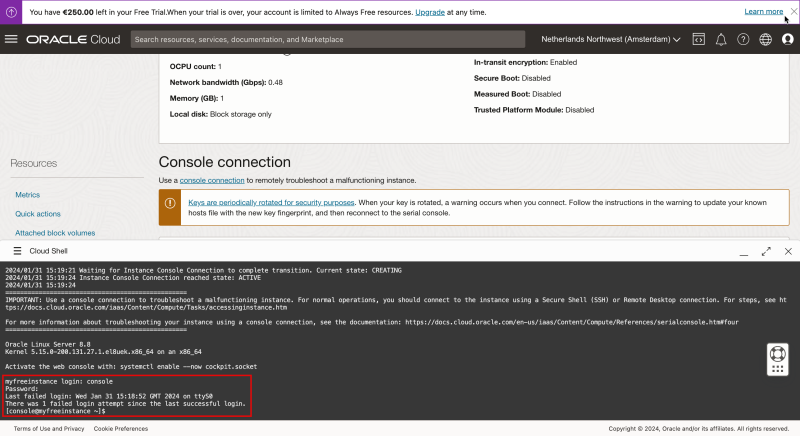
The OCI console only provides you a username and NOT a password. The only way to log into the Instance is to use a Private Key. So how do I log in?
Now that the new local username + password is created you can use these new credentials to log into the console.
OPTION 03» Connecting with SSH to the Public IP address to the Compute Instance using the SSH Private Key with the Royal TSX Application
Here I will be connecting to my Linux Instance using SSH and the public IP address that is provided by OCI to connect directly to the Instance using the Royal TSX Application.
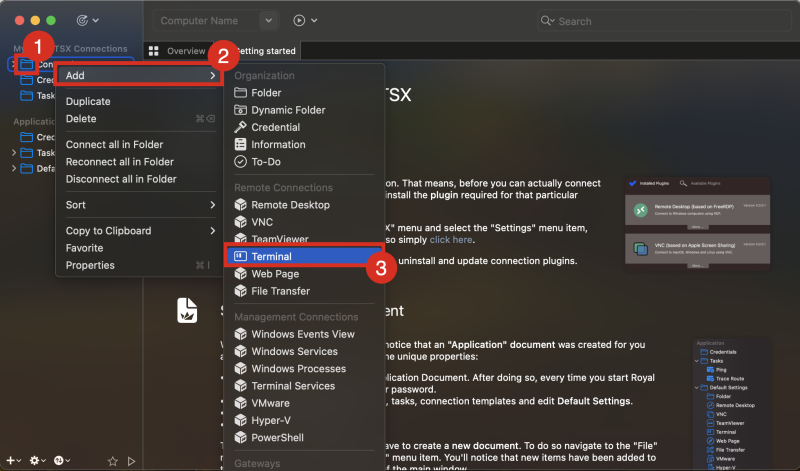
When the Royal TSX Application is opened and you have created a new “Document”
- right click on the “Connections” Folder.
- Click on “Add”.
- Click on “Terminal”.
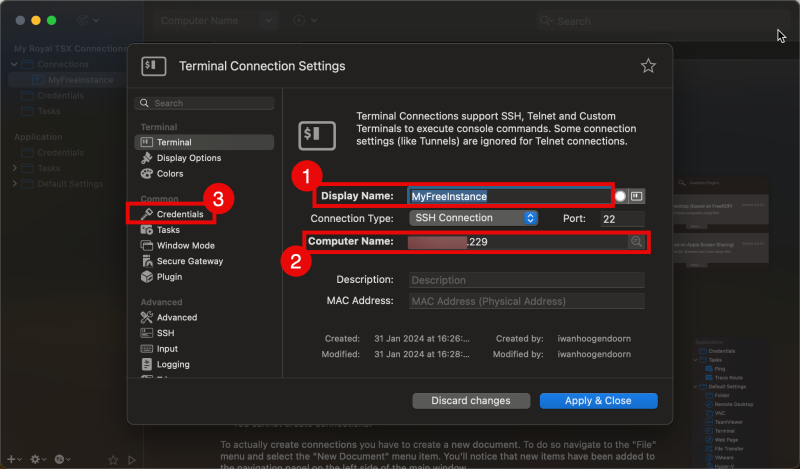
In the “Terminal” tab:
- Type in the (friendly) display name.
- Type in the public IP address (or FQDN) of the Instance.
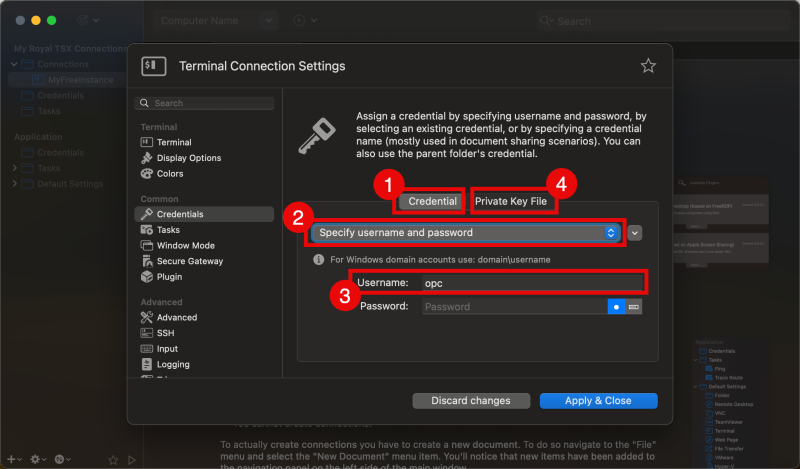
- Select the “Credentials” tab.
- Make sure the “Credential” subtab is selected.
- Select “Specify username and password”.
- Specify the username.
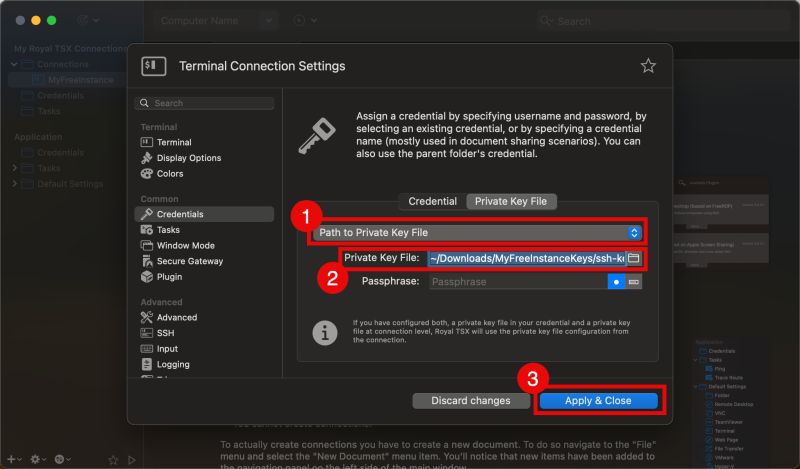
- Select the “Private Key File” subtab
- Select “Path to Private Key File”.
- Click on the folder to select the Path to Private Key File.
- Click on “Apply & Close”.
- Double-click on the newly created connection to log in.
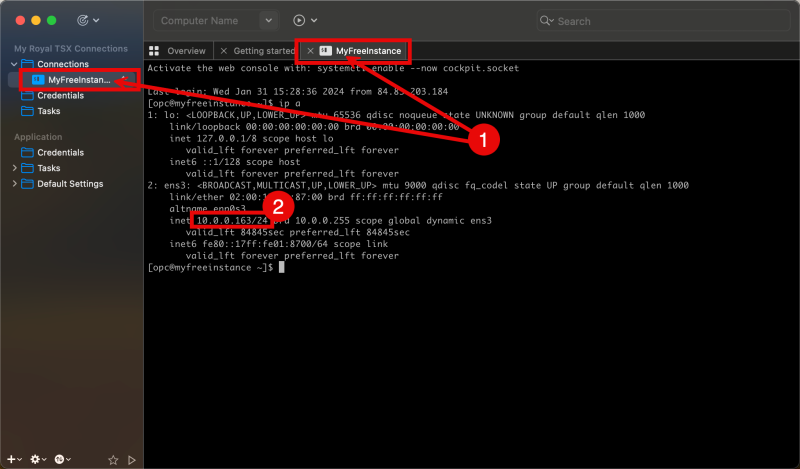
- Issue the command “ip a” to review the private IP address.
OPTION 04» Connecting with SSH to the Private IP address of the Compute Instance using the SSH Private Key through Cloud Shell
Here I will be connecting to my Linux Instance using the Cloud Shell provided by OCI and from there connect to the Instance using the private IP address.
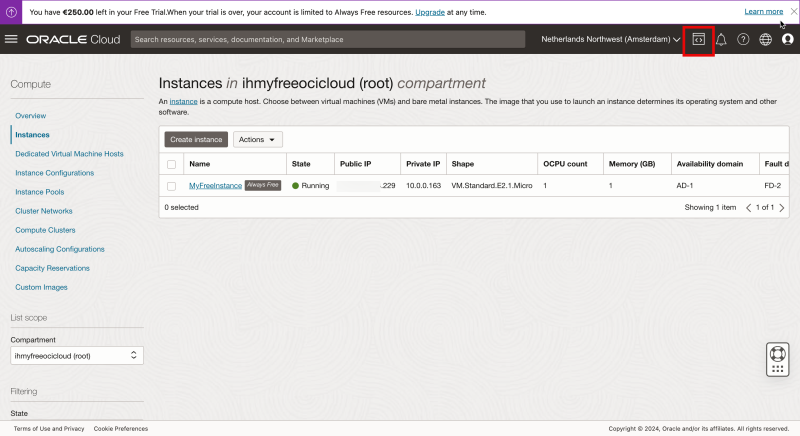
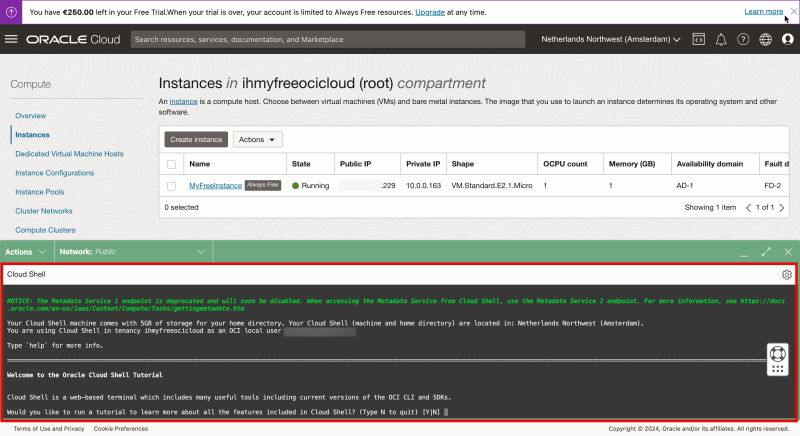
In the upper right corner of the OCI console, you can open Cloud Shell.
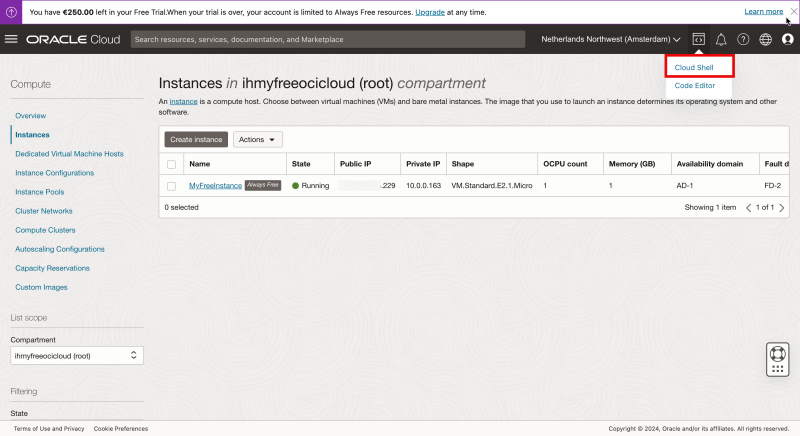
Select “Cloud Shell”.
Notice that the Cloud Shell window will be opened.
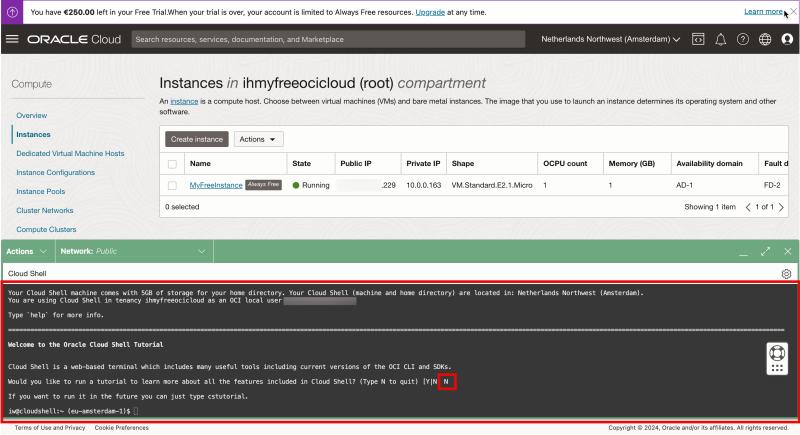
Type in “N” as I want to skip the tutorial for now.
To connect to your Linux Instance using the PRIVATE IP address the Cloud Shell must get access to the same subnet as where the Linux Instance is connected to.
We can do this by “plugging” the Cloud Shell into the same VCN + Subnet where the Linux Instance also resides.
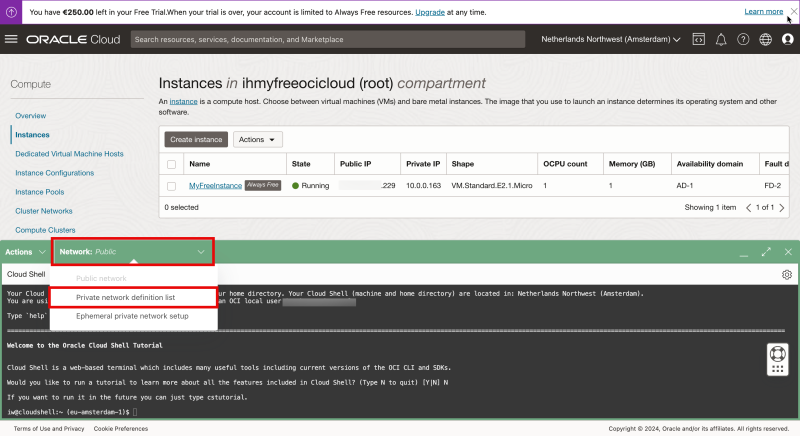
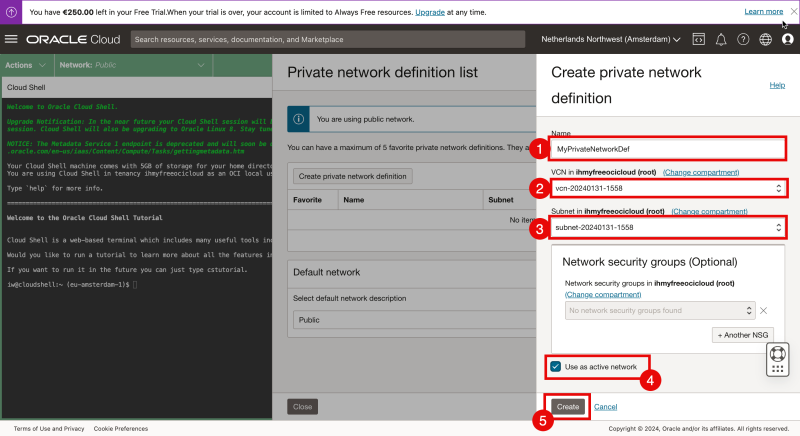
By default the network is set to “Public” but I am going to change this by creating a new Private Network (on the fly).
Click on “Network” and select “Private network definition list”.
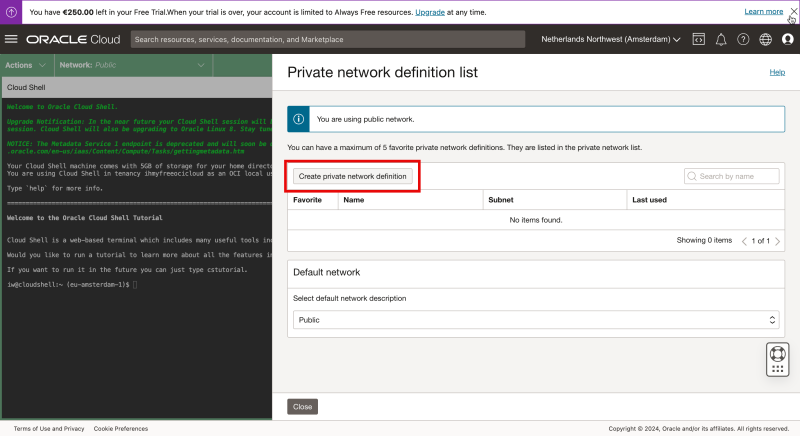
Click on “Create private network definition”.
- Type in a name.
- Select the corresponding VCN (where the Linux Instance resides in).
- Select the subnet (where the Linux Instance resides in).
- Check the box” Use active network” to activate the private network right away.
- Click on “create”.
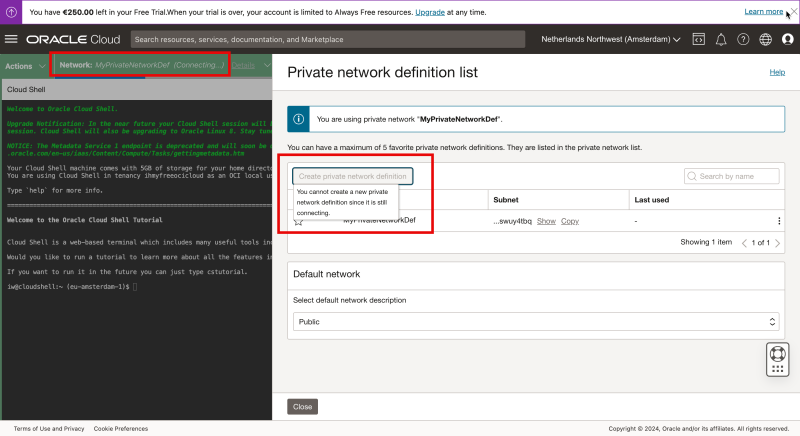
Notice that the status of the network will change to the newly created Private network with “Connecting”. This will take a few seconds to complete, so be patient”.
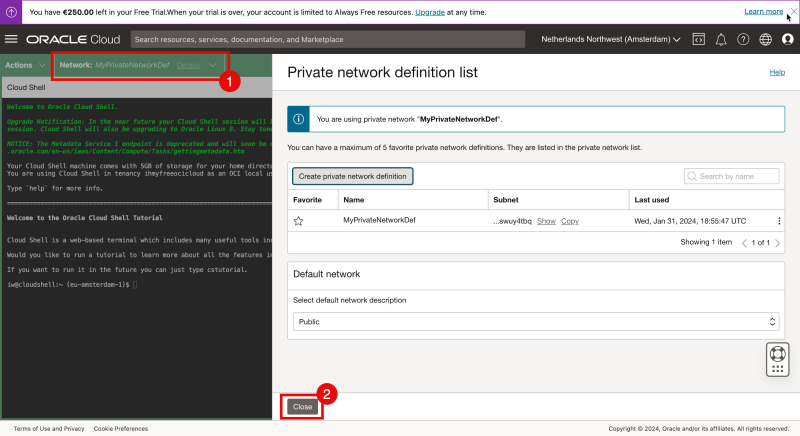
- Eventually the Private Network is connected.
- Click on “Close” to close the Private network definition list.
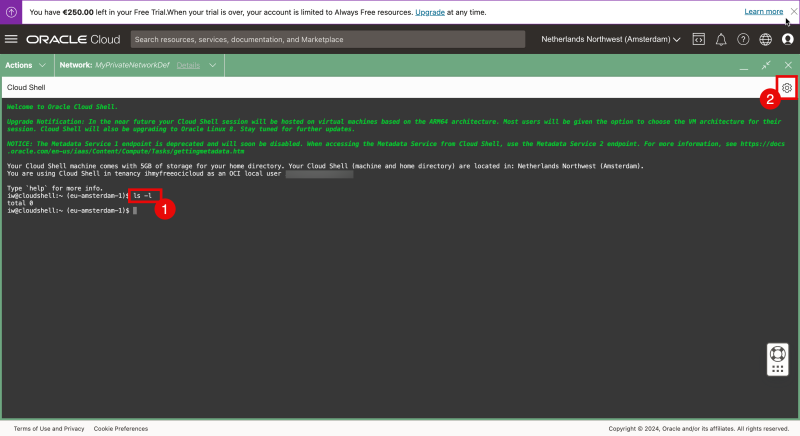
- Issue the command “ls-l” and notice that I do not have the private key in my home folder.
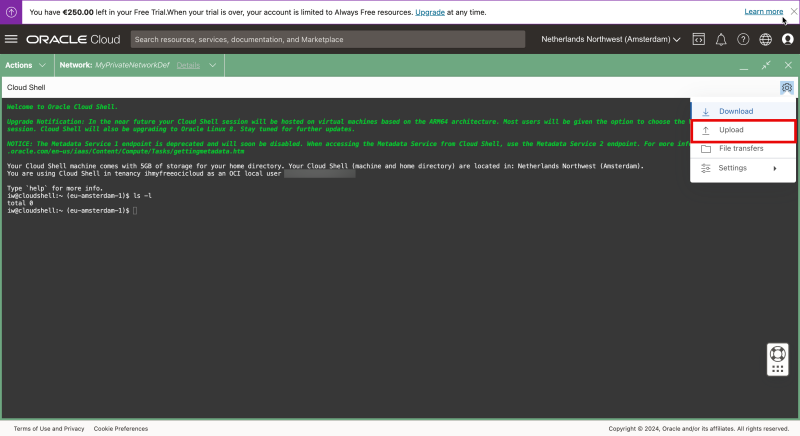
- To upload the private key click on the wheel in the right upper corner.
Select “Upload”.
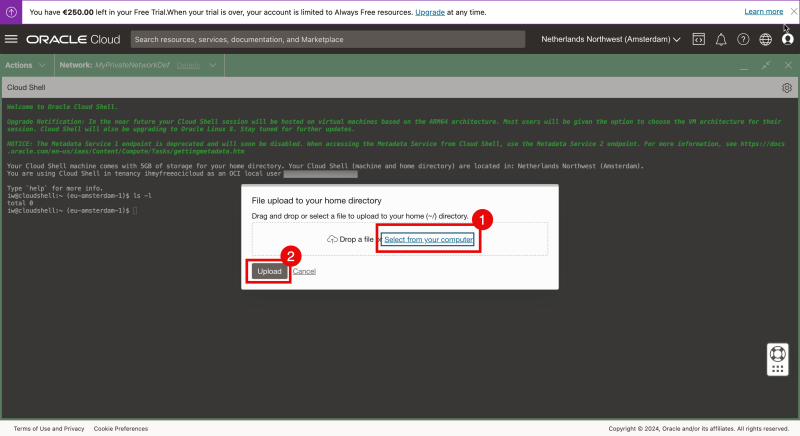
- Select “Select from your computer”.
- Click on “Upload”.
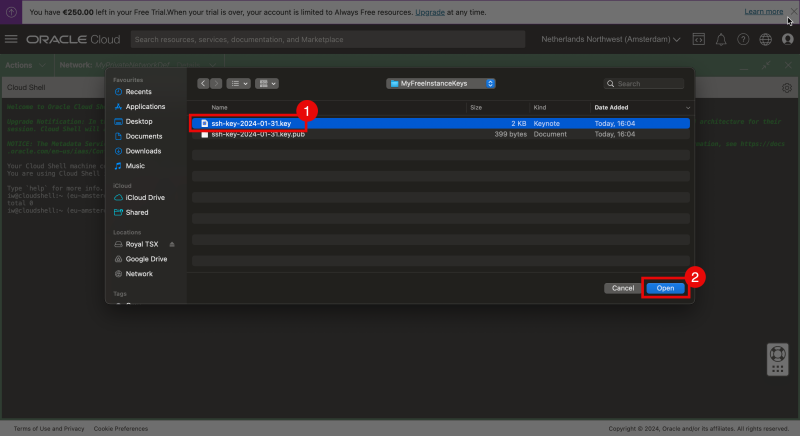
- Select the private key from your local computer.
- Click “Open”.
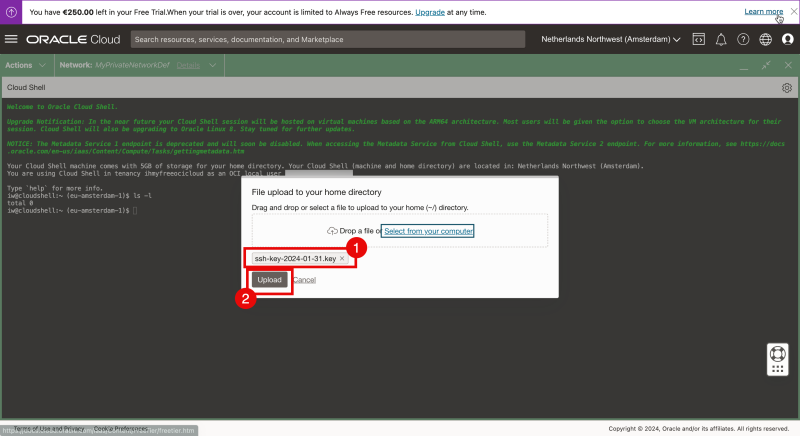
- Review is the key that you selected is listed.
- Click on “Upload”.
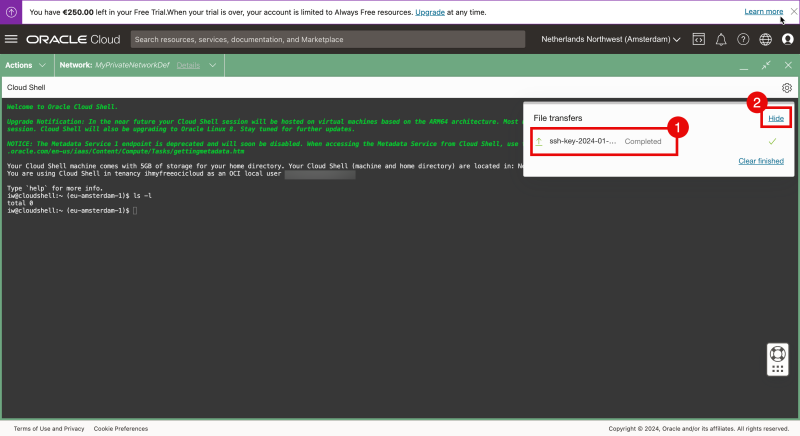
- Review is the upload is completed.
- Click on “Hide”.
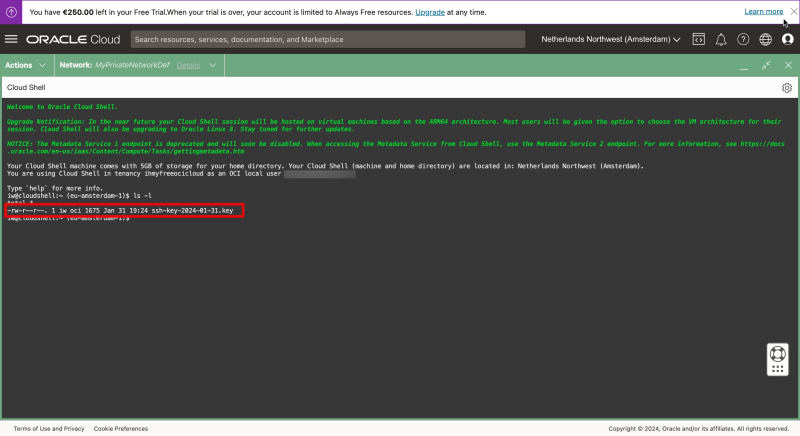
Issue the ls-l command again and now you can see the private key.
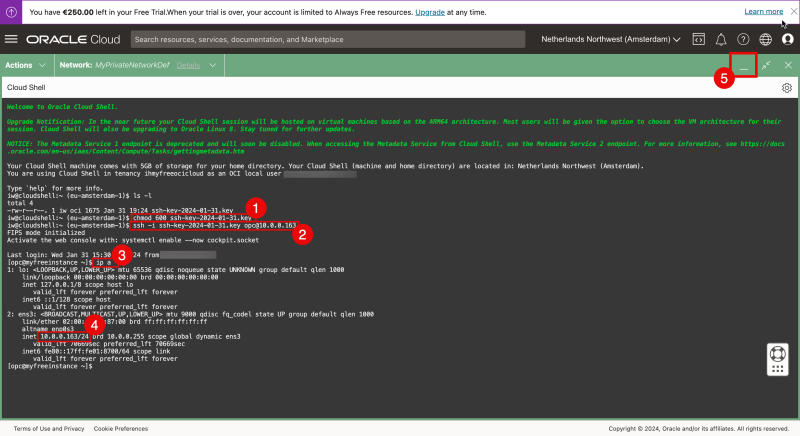
- Restrict the permissions of the private key and make sure the access is restricted before it can be used.
- Connect to the instance using the SSH command where you specify the private key.
- Issue a command to verify the IP address.
- Verify the IP address.
- You can minimize the Cloud Shell.
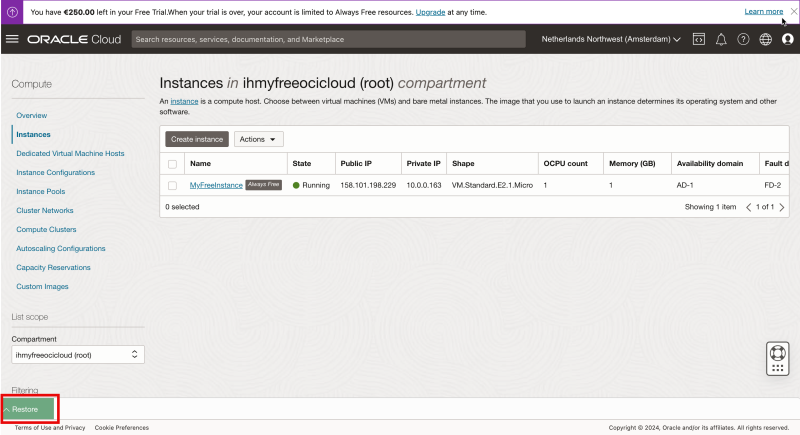
Notice that the Cloud Shell is minimized now and click on “Restore” to restore the Cloud Shell window.
Review the restored Cloud Shell window.
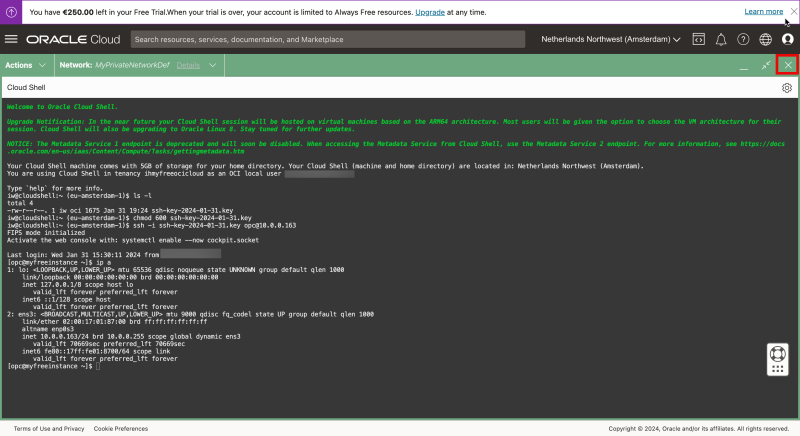
In the upper right corner click on the “X” to close the Cloud Shell window.
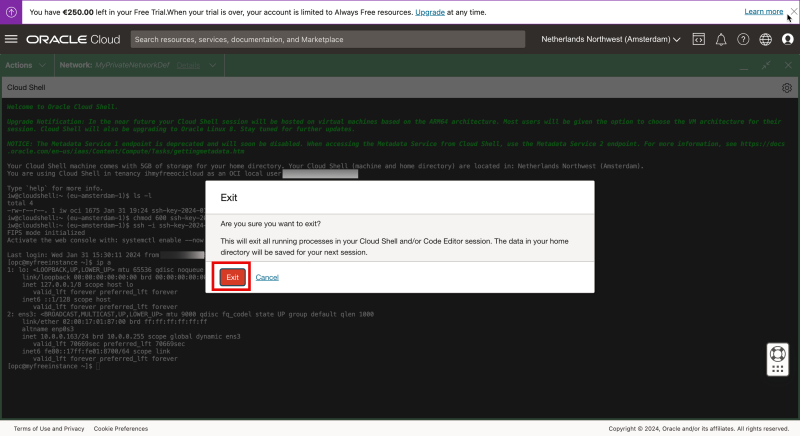
Click on “Exit” to close the Cloud Shell window.
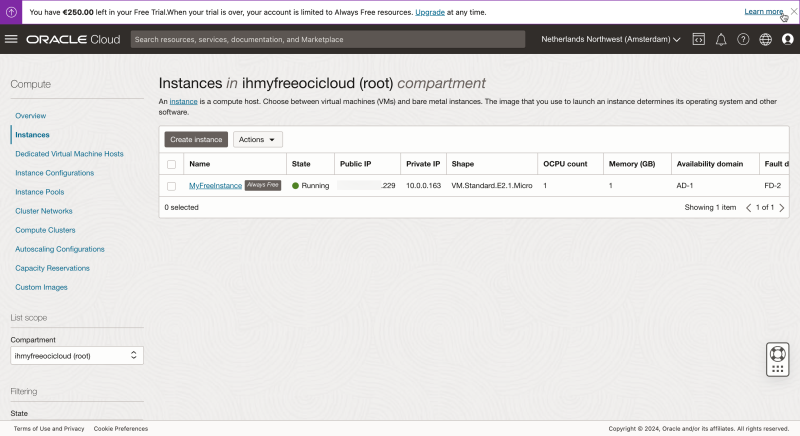
Now I am back in the instance overview of OCI.
OPTION 05» Connecting with SSH to the Private IP address of the Compute Instance using the SSH Username and Password through Cloud Shell
In the previous option, I used the Private Key to log in to my Linux Instance.
Now I am going to use the username and password.
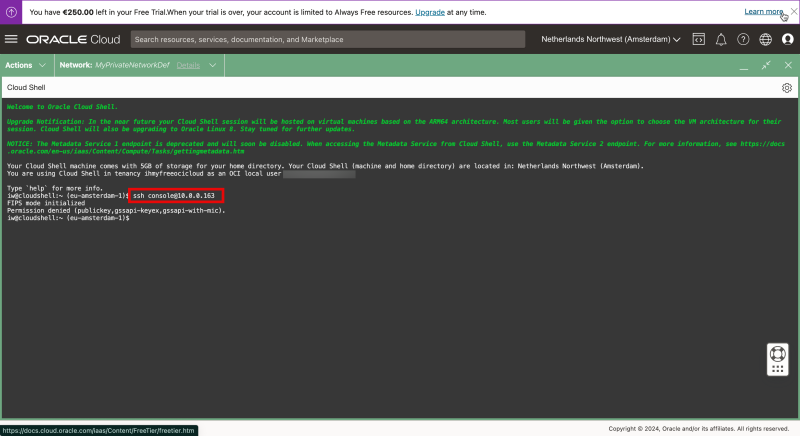
Log in with the SSH command using a username and notice that I am getting an error.
I am using the same user that I created previously (with the username “console”).
So why is this not working?
The commands that I used can be found below.
ssh console@10.0.0.163
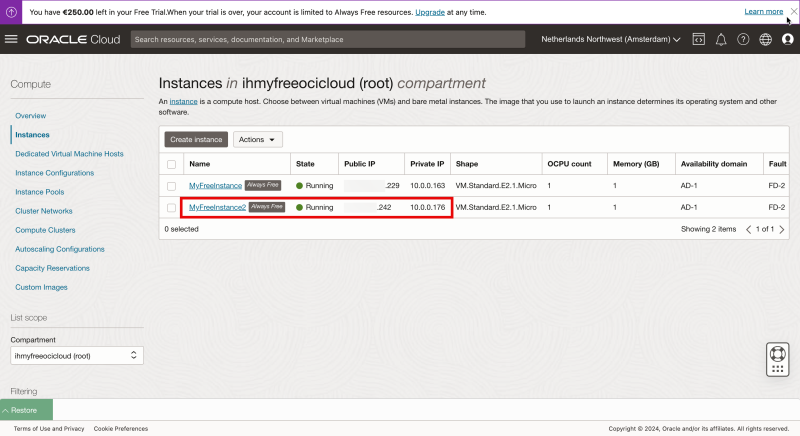
To test this (and fix this) I have created a new Linux Compute Instance.
I logged in with SSH using my Private Key, and I created a local username + password on the new Linux Instance.
Now BY DEFAULT, the Linux Image SSH configuration will only allow you to log in using the Private Key and not with a username and password (using SSH).
Previously I was able to use the username + password, but this was through a direct console connection.
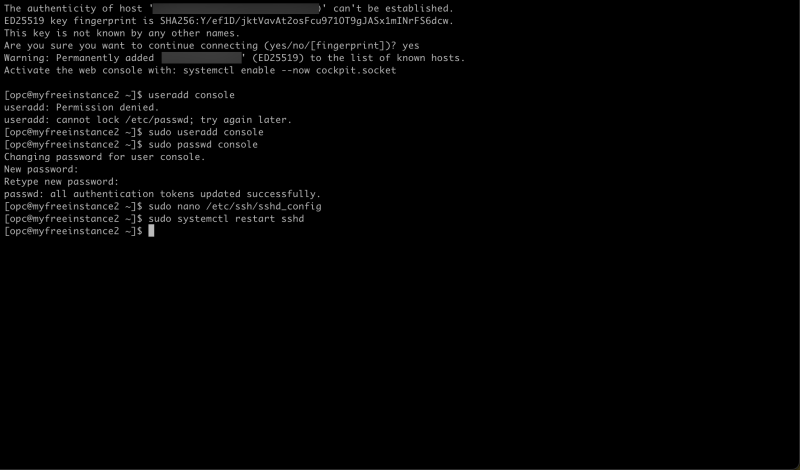
Now I need to change the settings in the /etc/ssh/sshd_config file.
The commands that I used (to change the sshd_config file) can be found below.
sudo more /etc/ssh/sshd_config
The original /etc/ssh/sshd_config file contains these settings
    [opc@myfreeinstance2 ssh]$ sudo more /etc/ssh/sshd_config
    #       $OpenBSD: sshd_config,v 1.103 208/04/09 20:41:22 tj Exp $

    # This is the sshd server system-wide configuration file.  See
    # sshd_config(5) for more information.

    # This sshd was compiled with PATH=/usr/local/bin:/usr/bin:/usr/local/sbin:/usr/sbin

    # The strategy used for options in the default sshd_config shipped with
    # OpenSSH is to specify options with their default value where
    # possible, but leave them comments.  Uncommented options override the
    # default value.

    # If you want to change the port on a SELinux system, you have to tell
    # SELinux about this change.
    # semanage port -a -t ssh_port_t -p tcp #PORTNUMBER
    #
    #Port 22
    #AddressFamily any
    #ListenAddress 0.0.0.0
    #ListenAddress ::

    HostKey /etc/ssh/ssh_host_rsa_key
    HostKey /etc/ssh/ssh_host_ecdsa_key
    HostKey /etc/ssh/ssh_host_ed25519_key

    # Ciphers and keying
    #RekeyLimit default none

    # This system is following system-wide crypto policy. The changes to
    # crypto properties (Ciphers, MACs, ...) will not have any effect here.
    # They will be overridden by command-line options passed to the server
    # on command line.
    # Please, check manual pages for update-crypto-policies(8) and sshd_config(5).

    # Logging
    #SyslogFacility AUTH
    SyslogFacility AUTHPRIV
    #LogLevel INFO

    # Authentication:

    #LoginGraceTime 2m
    PermitRootLogin yes
    #StrictModes yes
    #MaxAuthTries 6
    #MaxSessions 10

    #PubkeyAuthentication yes

    # The default is to check both .ssh/authorized_keys and .ssh/authorized_keys2
    # but this is overridden so installations will only check .ssh/authorized_keys
    AuthorizedKeysFile .ssh/authorized_keys

    #AuthorizedPrincipalsFile none

    #AuthorizedKeysCommand none
    #AuthorizedKeysCommandUser nobody

    # For this to work you will also need host keys in /etc/ssh/ssh_known_hosts
    #HostbasedAuthentication no
    # Change to yes if you don't trust ~/.ssh/known_hosts for
    # HostbasedAuthentication
    #IgnoreUserKnownHosts no
    # Don't read the user's ~/.rhosts and ~/.shosts files
    #IgnoreRhosts yes

    # To disable tunneled clear text passwords, change to no here!
    #PasswordAuthentication yes
    #PermitEmptyPasswords no
    PasswordAuthentication no

    # Change to no to disable s/key passwords
    #ChallengeResponseAuthentication yes
    ChallengeResponseAuthentication no

    # Kerberos options
    #KerberosAuthentication no
    #KerberosOrLocalPasswd yes
    #KerberosTicketCleanup yes
    #KerberosGetAFSToken no
    #KerberosUseKuserok yes

    # GSSAPI options
    GSSAPIAuthentication yes
    GSSAPICleanupCredentials no
    #GSSAPIStrictAcceptorCheck yes
    #GSSAPIKeyExchange no
    #GSSAPIEnablek5users no

    # Set this to 'yes' to enable PAM authentication, account processing,
    # and session processing. If this is enabled, PAM authentication will
    # be allowed through the ChallengeResponseAuthentication and
    # PasswordAuthentication.  Depending on your PAM configuration,
    # PAM authentication via ChallengeResponseAuthentication may bypass
    # the setting of "PermitRootLogin without-password".
    # If you just want the PAM account and session checks to run without
    # PAM authentication, then enable this but set PasswordAuthentication
    # and ChallengeResponseAuthentication to 'no'.
    # WARNING: 'UsePAM no' is not supported in RHEL and may cause several
    # problems.
    UsePAM yes

    #AllowAgentForwarding yes
    #AllowTcpForwarding yes
    #GatewayPorts no
    X11Forwarding yes
    #X11DisplayOffset 10
    #X11UseLocalhost yes
    #PermitTTY yes

    # It is recommended to use pam_motd in /etc/pam.d/sshd instead of PrintMotd,
    # as it is more configurable and versatile than the built-in version.
    PrintMotd no

    #PrintLastLog yes
    #TCPKeepAlive yes
    #PermitUserEnvironment no
    #Compression delayed
    #ClientAliveInterval 0
    #ClientAliveCountMax 3
    #UseDNS no
    #PidFile /var/run/sshd.pid
    #MaxStartups 10:30:100
    #PermitTunnel no
    #ChrootDirectory none
    #VersionAddendum none

    # no default banner path
    #Banner none

    # Accept locale-related environment variables
    AcceptEnv LANG LC_CTYPE LC_NUMERIC LC_TIME LC_COLLATE LC_MONETARY LC_MESSAGES
    AcceptEnv LC_PAPER LC_NAME LC_ADDRESS LC_TELEPHONE LC_MEASUREMENT
    AcceptEnv LC_IDENTIFICATION LC_ALL LANGUAGE
    AcceptEnv XMODIFIERS

    # override default of no subsystems
    Subsystem sftp  /usr/libexec/openssh/sftp-server

    # Example of overriding settings on a per-user basis
    #Match User anoncvs
    #       X11Forwarding no
    #       AllowTcpForwarding no
    #       PermitTTY no
    #       ForceCommand cvs server
    [opc@myfreeinstance2 ssh]$
#
I will add the following line to the file to ALLOW that I can log in with SSH with the username + password.
PasswordAuthentication yes
After the line above has been added and the file has been saved I need to restart the SSH server on the Linux Instance. The commands that I used for this can be found below.
sudo systemctl restart sshd
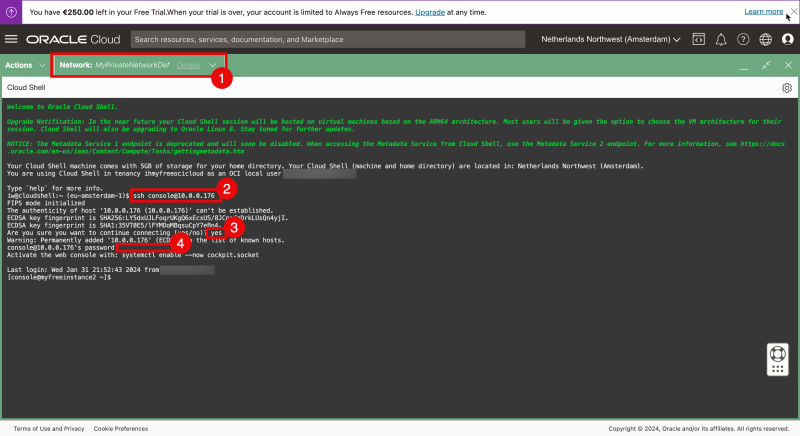
Now let's go back to Cloud Shell.
- Make sure Cloud Shell is still connected to the Private Network where the Linux Image is.
- Log in with the SSH command using a username
- Type “yes” to continue
- Type in the password to log in.
OPTION 06» Connecting with SSH to the Private IP address to the Compute Instance using the SSH Private Key through a Bastion Host
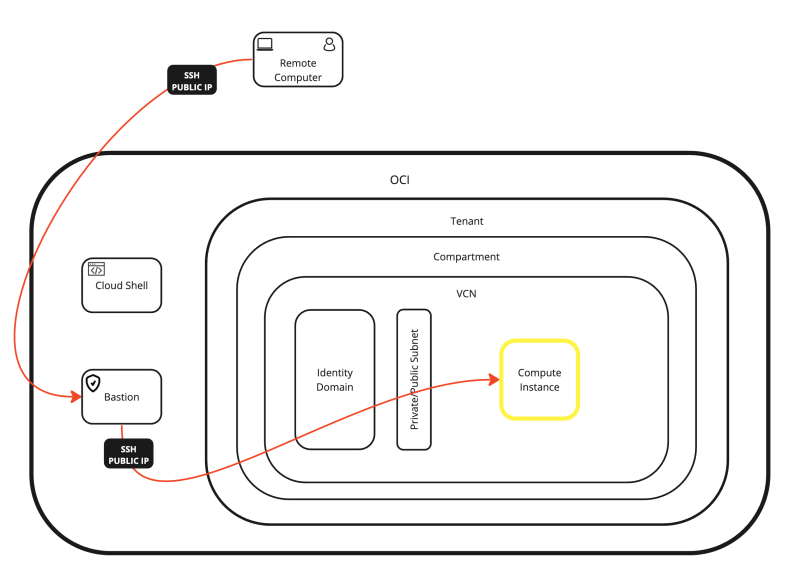
Here I will be connecting to my Linux Instance using the Bastion service and from there connect to the Instance using the private IP address through a tunnel connection.
Before I can use the Bastion service I need to create the Bastion Service first.
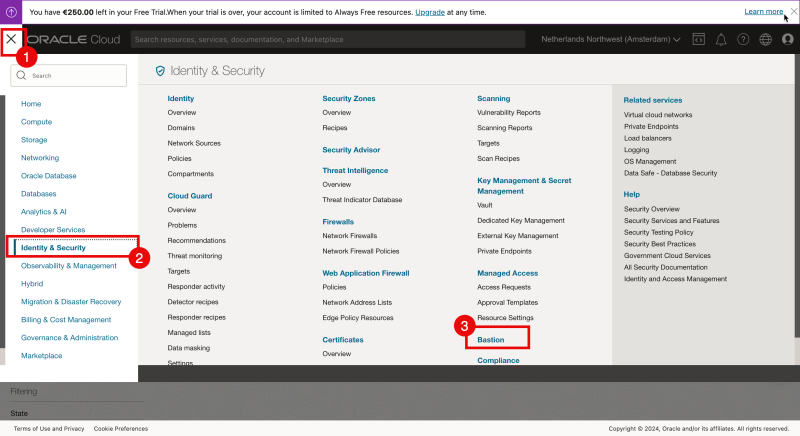
- On the OCI console open the hamburger menu in the upper left corner.
- Click on “Identity & Security”.
- Click on “Bastion”.
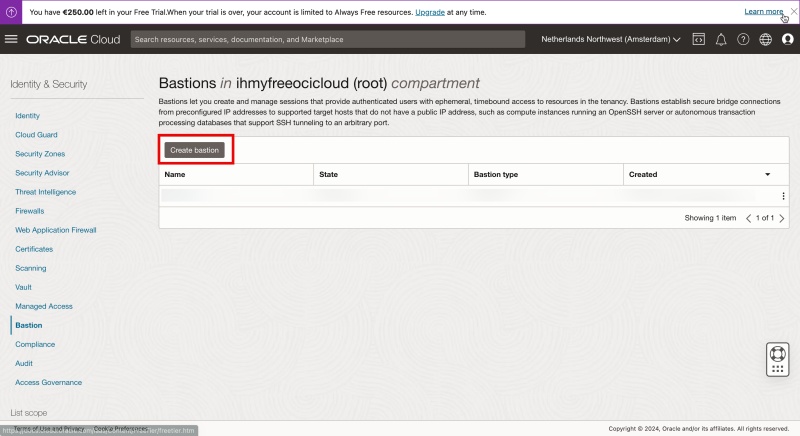
Click on “Create bastion”.
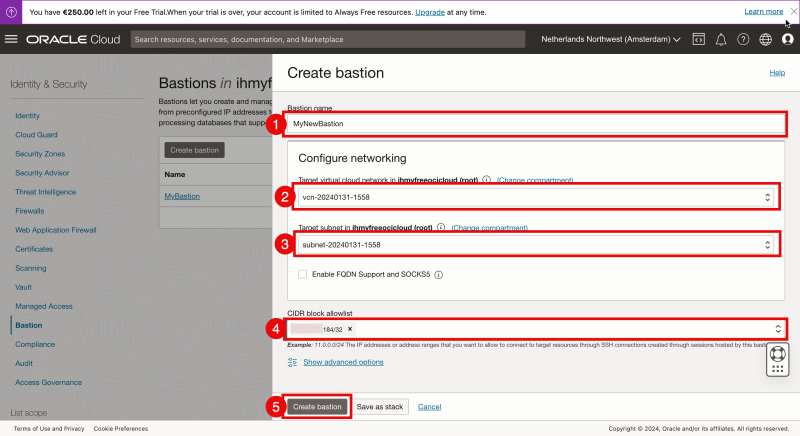
- Specify the Bastion name.
- Select the VCN that you want to access with the Bastion.
- Select the subnet that you want to access with the Bastion.
- Specify an IP address (or CIDR) that you want to allow to the Bastion.
# I am using my home IP address of my ISP connection.
- Click on “Create bastion”.
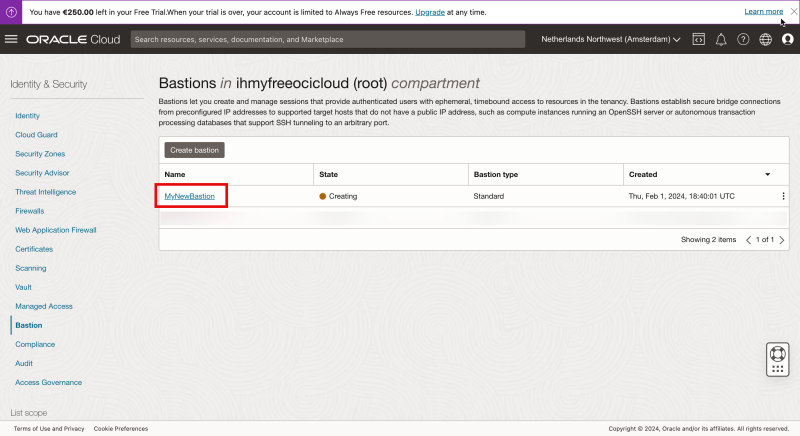
Click on the newly created Bastion.
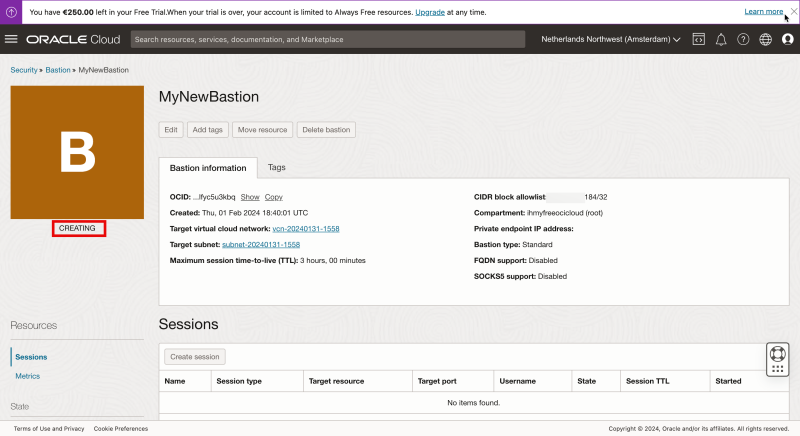
Notice that the status is set to “CREATING”.
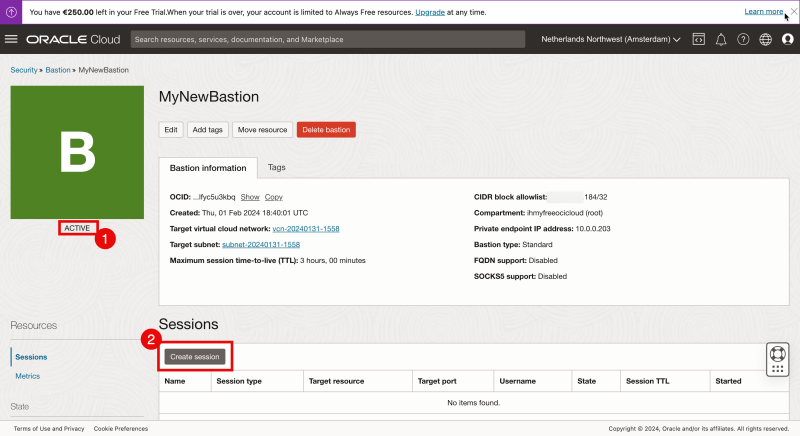
- After a few seconds you will see the status has been changed to “ACTIVE”.
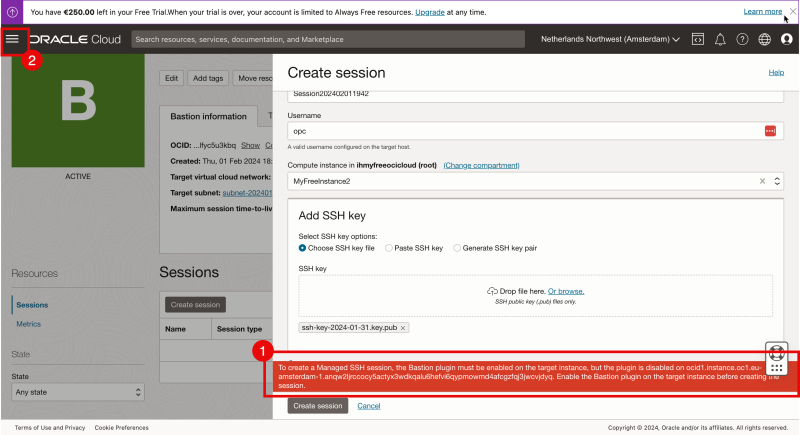
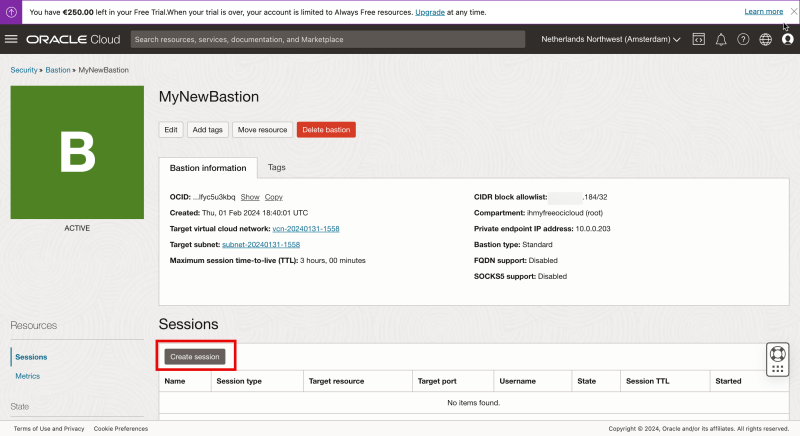
- Click on “Create session” to create a session for your Linux instance (that you want to manage).
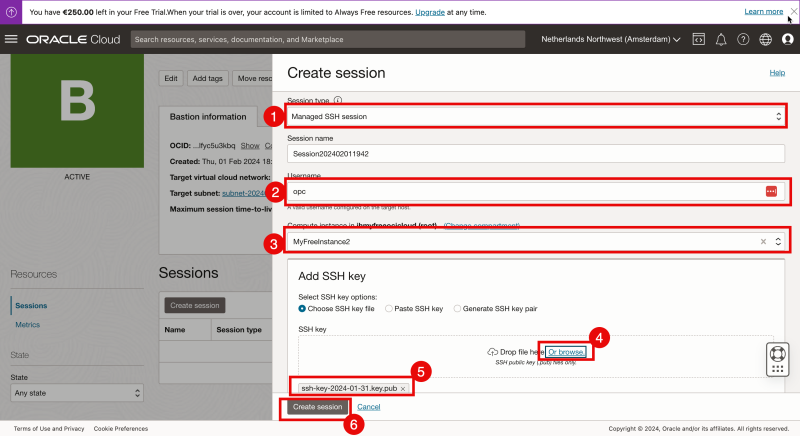
- Select the “Session Type” to be “Managed SSH session”.
- Specify the username.
- Select the Linux Compute Instance that I want to connect to (through the Bastion).
- Browse/Select a Public Key that I want to configure for this specific session.
- Make sure the Public Key is selected.
- Click on “Create Session”.
- Notice that an error is presented:
   # `To create a Managed SSH session, the Bastion plugin must be enabled on the target instance, but the plugin is disabled`.
   # This means that to connect to a Linux Instance using Bastion a piece of software (plug-in) needs to be installed on the Linux Instance and the plug-in needs to be enabled.
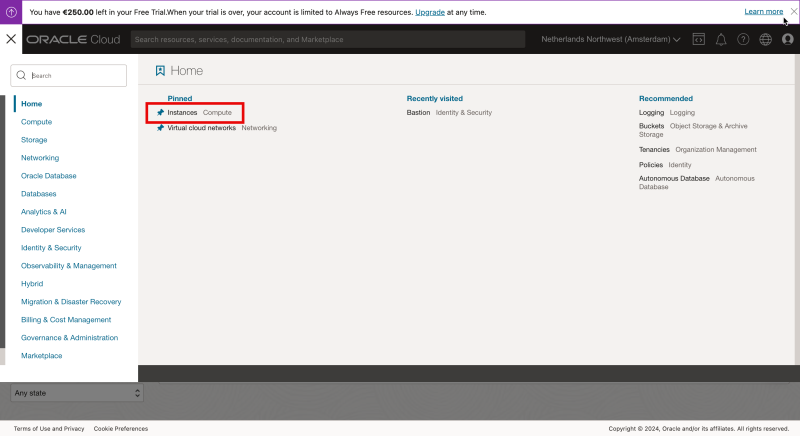
- Let’s enable this plug-in on the Linux Instance and the OCI console opens the hamburger menu in the upper left corner.
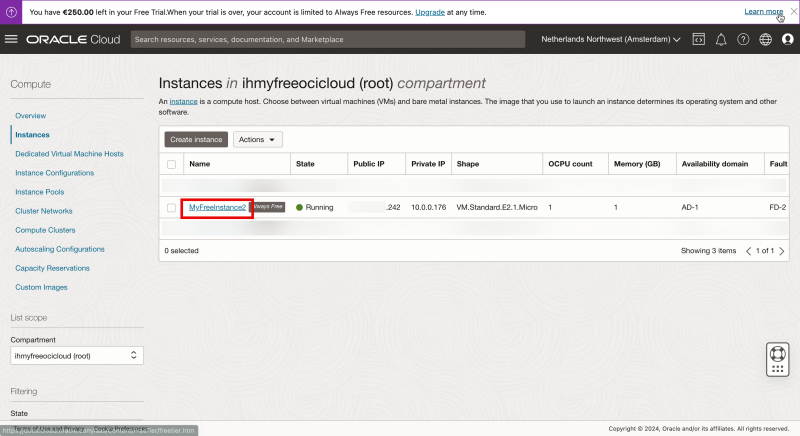
Select “Instances”.
Select the Linux Compute Instance.
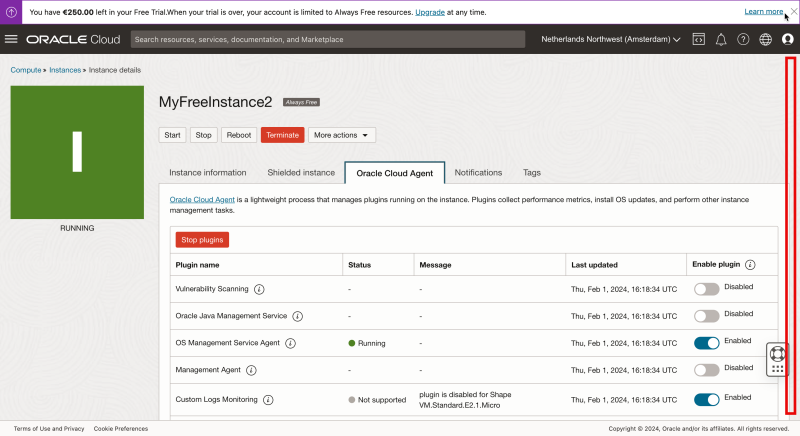
Scroll down.
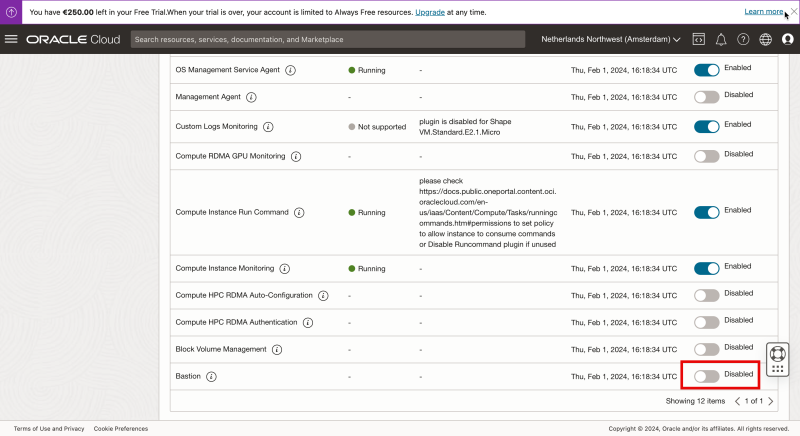
Notice that the Bastion plug-in is set to Disabled.
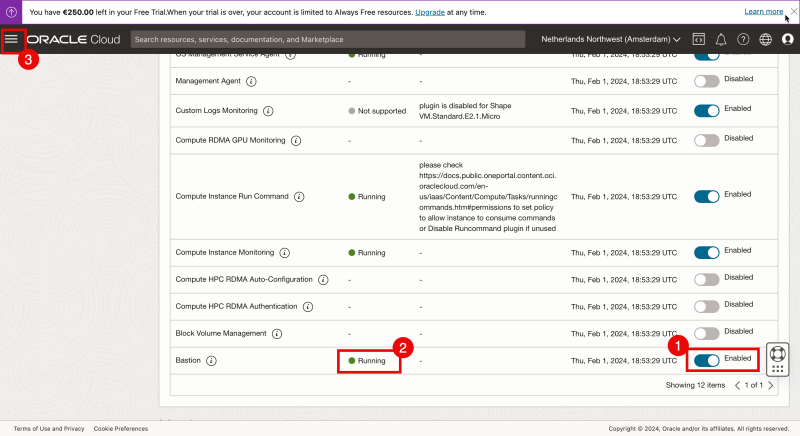
- Enable the Bastion plugin.
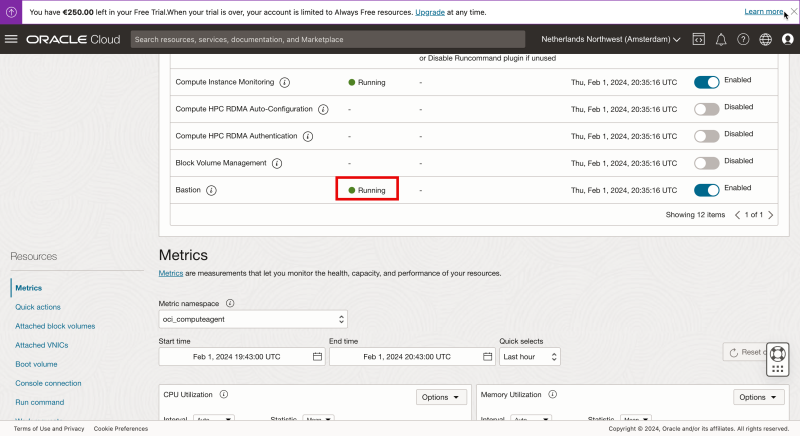
- Wait until the status shows “Running”.
# When you change the toggle from “Disabled” to “Enabled” it can take up to a minute before the status is changed. Because in the background the plug-in needs to be downloaded, installed, and started and this takes time.
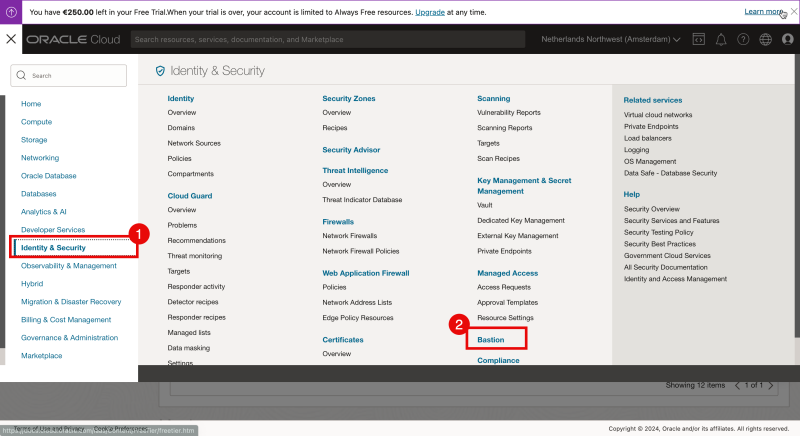
- Now let’s re-create the session on the Bastion. On the OCI console open the hamburger menu in the upper left corner.
- Click on “Identity & Security”.
- Click on “Bastion”.
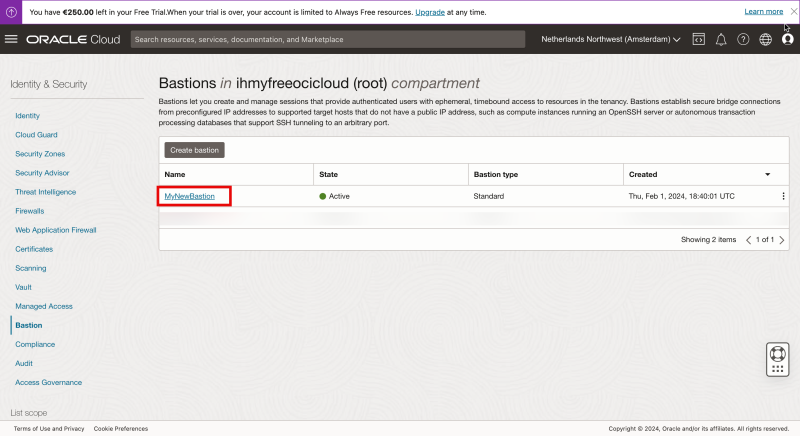
Click on the Bastion.
Click on “Create session” to create a session for your Linux instance (that you want to manage).
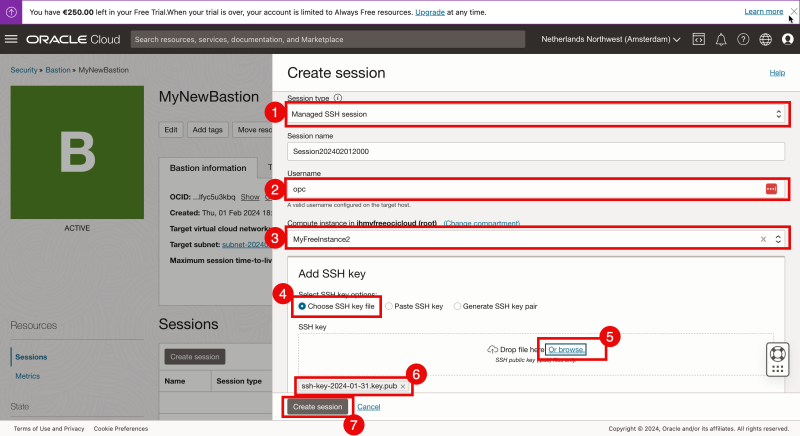
- Select the “Session Type” to be “Managed SSH session”.
- Specify the username.
- Select the Linux Compute Instance that I want to connect to (through the Bastion).
- Select “Choose SSH key file”
- Browse/Select a Public Key that I want to configure for this specific session.
- Make sure the Public Key is selected.
- Click on “Create Session”.
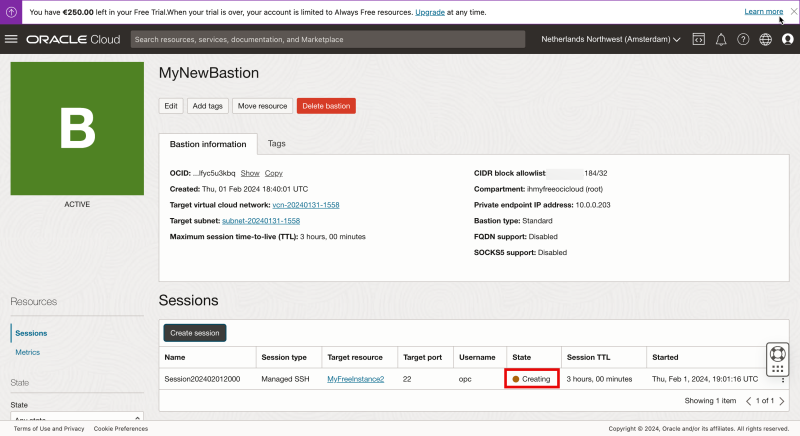
Notice the state is “Creating”.
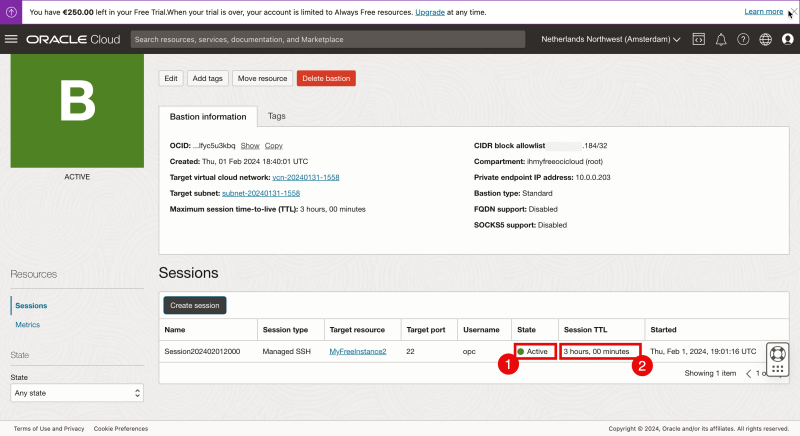
- When the session is created the state will be “Active”.
- Notice that the default time this session can be used is 3 hours. After 3 hours the session will be stopped automatically and you will not be able to use the session anymore and you need to create a new session.
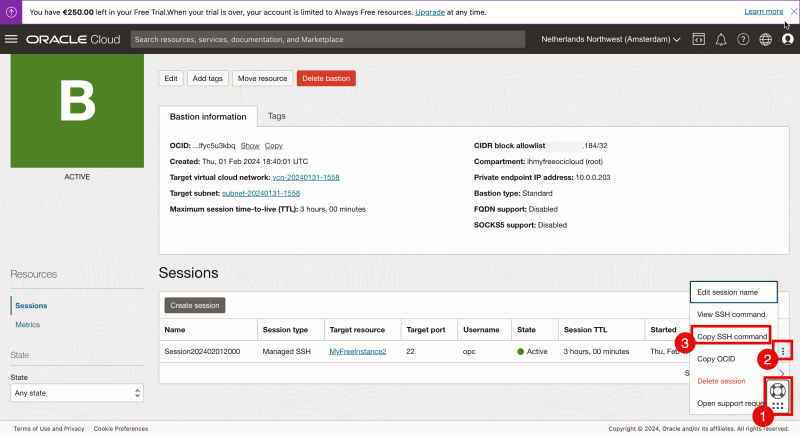
- Drag and drop the “help” menu to another spot so you can access the session menu.
- Click on the three dots to access the session menu.
- Select “Copy SSH command”
Paste that copied command into a text editor.
Notice the <private> key placeholders.
Replace the private key placeholders with the name of your private key.
Use the private key that corresponds with the public key used when the Basion session was created.
The (original) command that I copied can be found below.
ssh -i <privateKey> -o ProxyCommand="ssh -i <privateKey> -W %h:%p -p 22 ocid1.bastionsession.oc1.eu-amsterdam-1.amaaaaaaccocy5aapmrn66fdxdlg7lhefofhndmeq2ir6owe5afm2v7oghiq@host.bastion.eu-amsterdam-1.oci.oraclecloud.com" -p 22 opc@10.0.0.176
The command that I copied can be found below (with my private key added).
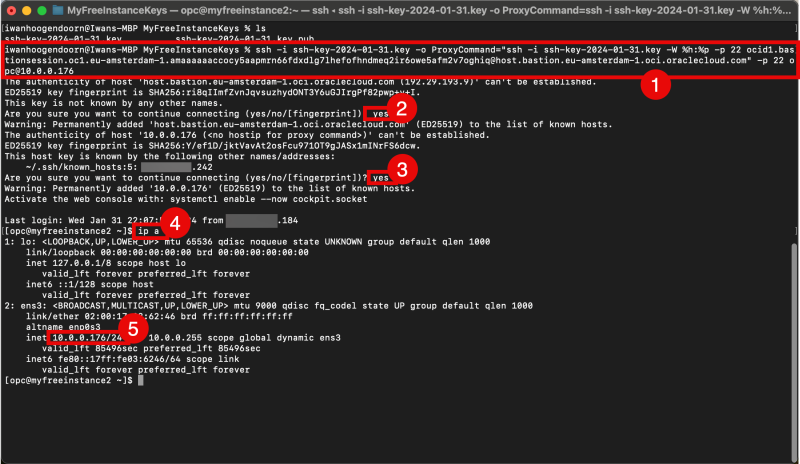
ssh -i ssh-key-2024-01-31.key -o ProxyCommand="ssh -i ssh-key-2024-01-31.key -W %h:%p -p 22 ocid1.bastionsession.oc1.eu-amsterdam-1.amaaaaaaccocy5aapmrn66fdxdlg7lhefofhndmeq2ir6owe5afm2v7oghiq@host.bastion.eu-amsterdam-1.oci.oraclecloud.com" -p 22 opc@10.0.0.176
- Use the full copied command with the private keys added from the computer where you have the private keys stored (using the OS X Terminal) to connect to the Linux Instance (through the Bastion (session)).
- Type in “yes” to continue.
- Type in “yes” to continue.
- Issue a command to verify the IP address.
- Verify the IP address.
Let’s go back to the Bastion session settings in the OCI console.
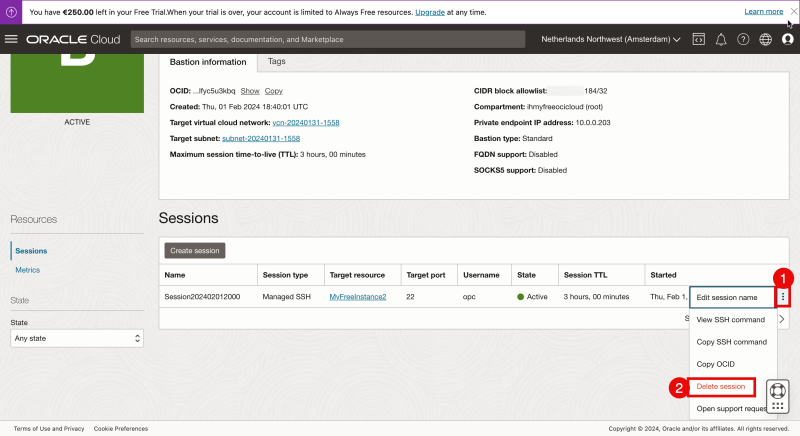
- Click on the three dots to access the session menu.
- Select “Delete session”.
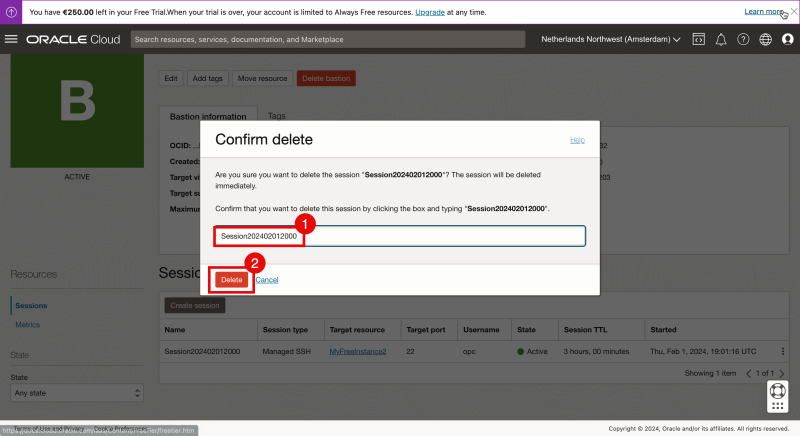
- Type in the “Session” name to confirm the session removal.
- Click on “Delete”.
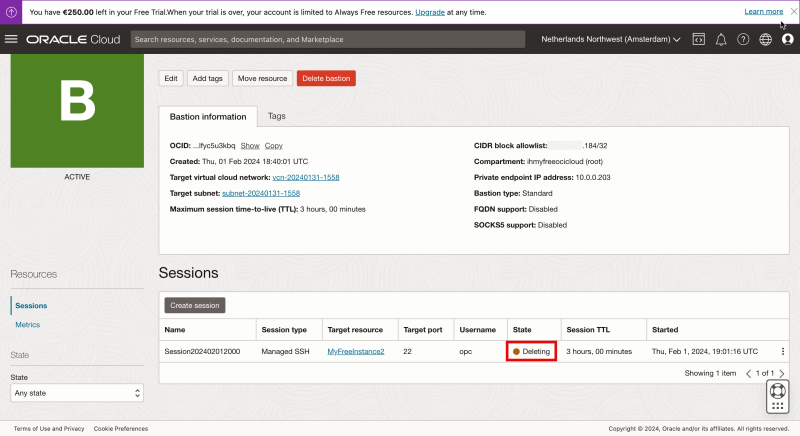
Review the state that is now “Deleting”.
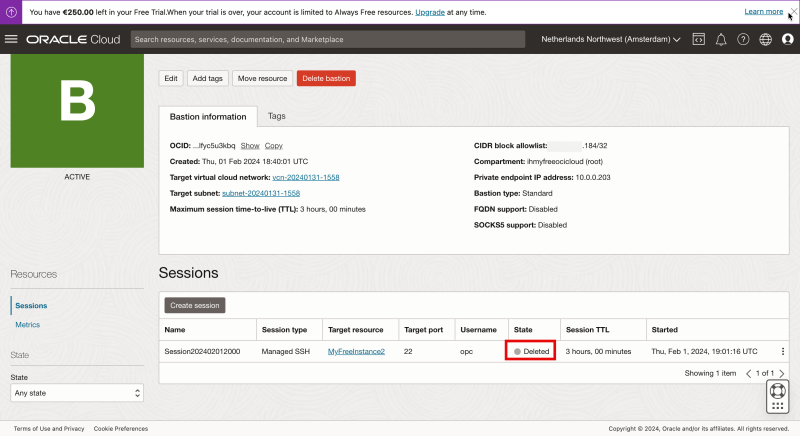
When the session is deleted the state that is set to “Deleted”.
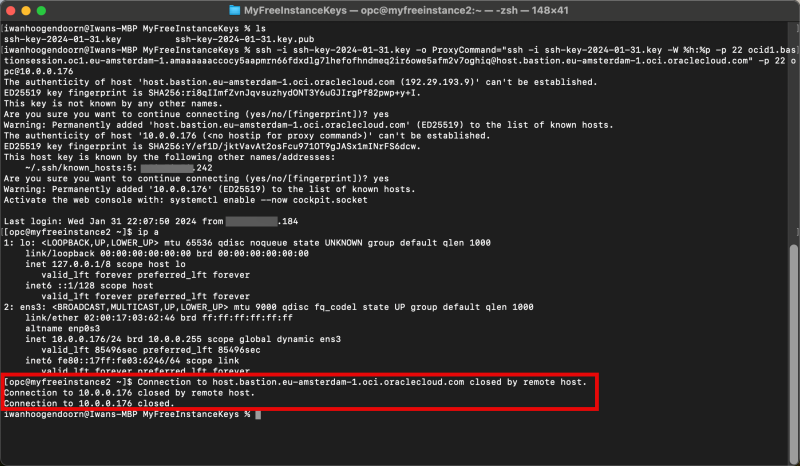
When the session is deleted the SSH session we opened through the OSX Terminal is now also terminated.
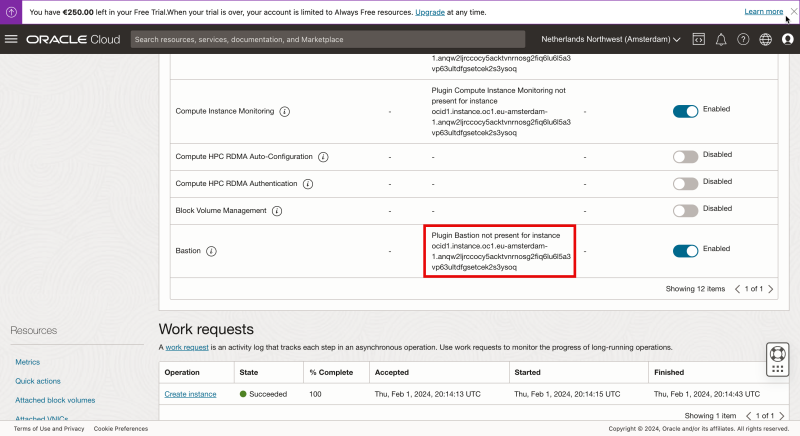
- Plugin Bastion not present
In the example above I have enabled the Bastion plug-in on an already-running Linux Instance
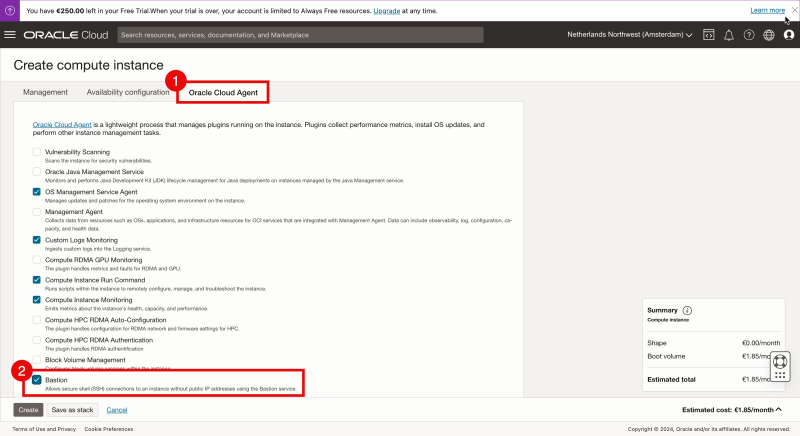
You can also enable the Bastion plug-in when you create an Instance from the start.
When you select the Advanced options
- Go to the tab “Oracle Cloud Agent”
- Check the box “Bastion”.
And then you continue with the Creation of the Instance.
When you create a new image from the start and you check the status after the Bastion plug-in right after the Instance has been created and the status is RUNNING you may see an error message with `“Plugin Bastion not present…”`
Please be patient as it can take up to a minute before the status is changed. Because in the background the plug-in needs to be downloaded, installed, and started and this takes time.
Wait for 5 minutes until the status is changed to “Running”.
When the status is not changed and the message stays`“Plugin Bastion not present…”` it may be the case that the Linux Instance is not able to reach the internet to download the Bastion plugin. Please check/troubleshoot the Internet, NAT, and/or Service Gateway inside your VCN to make sure your instance can access the Internet.
OPTION 07» Working with a Stepstone Compute Instance inside your VCN
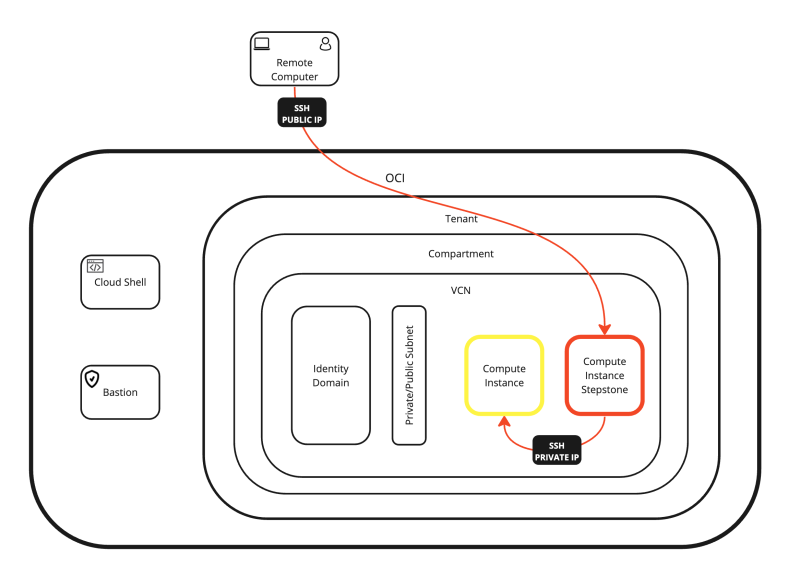
Here we create a dedicated Linux Instance that we use as some kind of Stepstone (or dedicated Bastion) and from there we will hop into the other Linux Instance.
In this case, you are using resources (that may cost additional money) compared to using the Bastion service that is offered for “free” by Oracle.
I will not go into great detail using this option as this is a combination of the options that I have explained above.
Conclusion
In this article, I have all the possible options to access and manage a Linux Instance inside OCI.
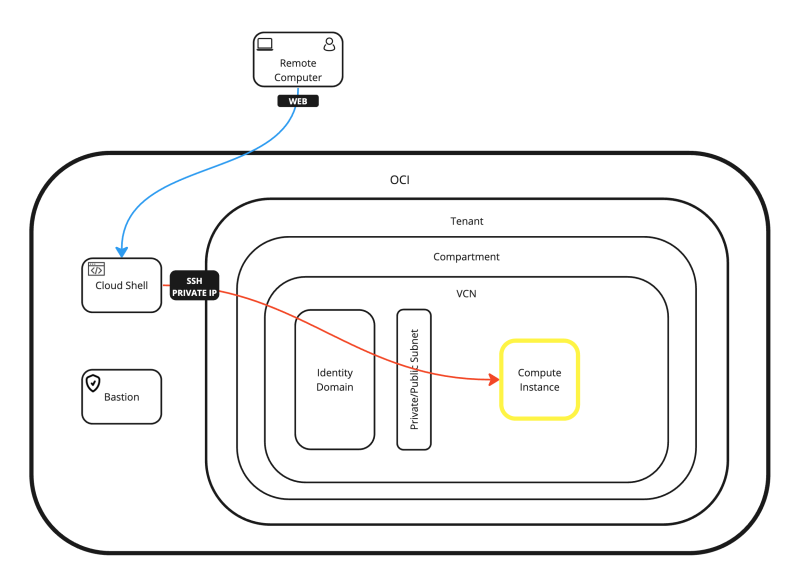
You can either access the Linux Instance directly from the internet and console, or you can use an intermediate Stepstone like Cloud Shell, Bastion, or a dedicated Instance.
I have also shown you how you can connect to the Instance with SSH using the Private/Public key and with a local username + password.
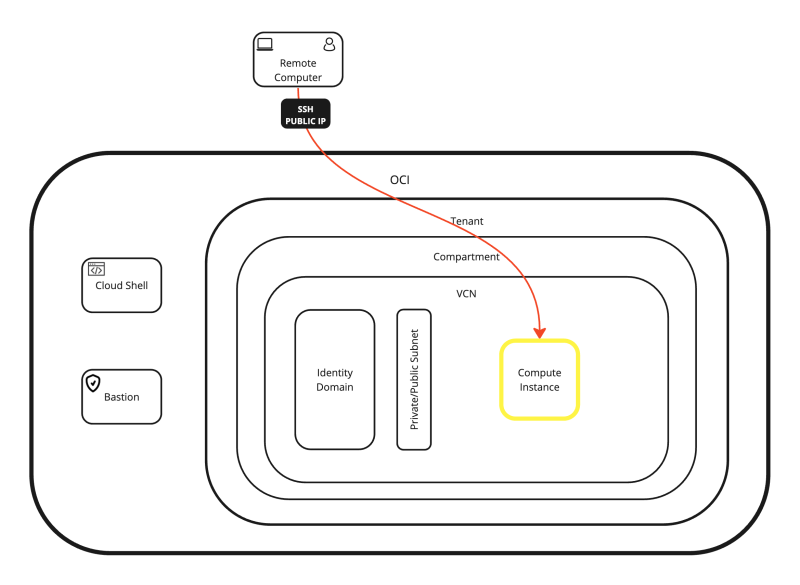
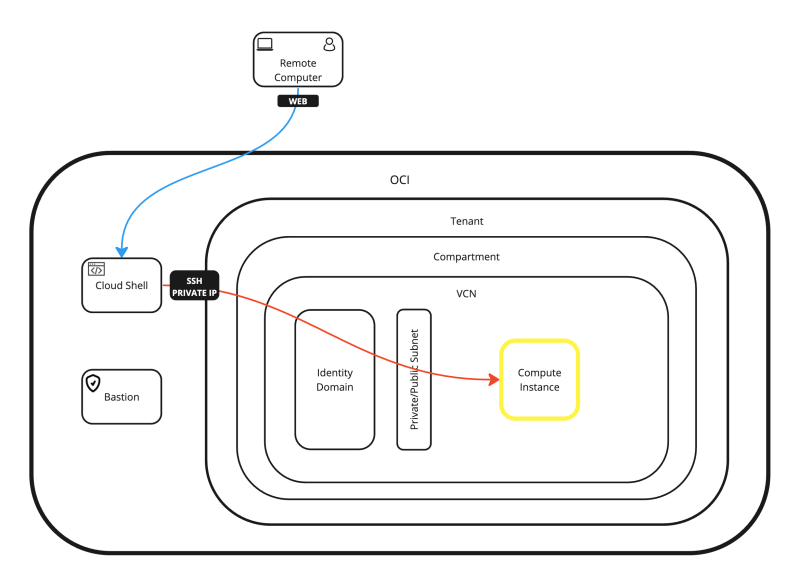
All the possible connection options are shown in the diagram below.

