Using the public facing OCI Network Load Balancer (NLB) to expose your web server pool to the internet: Difference between revisions
m (add) |
|||
| (2 intermediate revisions by one other user not shown) | |||
| Line 13: | Line 13: | ||
* STEP 05: Test out the new OCI Network Load Balancer | * STEP 05: Test out the new OCI Network Load Balancer | ||
= STEP 01 Create a new VCN = | = STEP 01{{fqm}} Create a new VCN = | ||
I already have a VCN in place but if you still need to create a new VCN, I have explained how to do this in [https://www.iwanhoogendoorn.nl/index.php/Using_OCI_to_publish_an_webserver_that_is_accessible_from_the_internet_(with_IPv6)#STEP_01:_Create_a_new_VCN_(with_IPv6_enabled) this] article. | I already have a VCN in place but if you still need to create a new VCN, I have explained how to do this in [https://www.iwanhoogendoorn.nl/index.php/Using_OCI_to_publish_an_webserver_that_is_accessible_from_the_internet_(with_IPv6)#STEP_01:_Create_a_new_VCN_(with_IPv6_enabled) this] article. | ||
| Line 23: | Line 23: | ||
[[File:oci-load-balancer-with-3-web-servers-202.png|800px]] | [[File:oci-load-balancer-with-3-web-servers-202.png|800px]] | ||
= STEP 02 Create a new Public Subnet and Private Subnet = | = STEP 02{{fqm}} Create a new Public Subnet and Private Subnet = | ||
I already have a Public and Private Subnet in place but if you still need to create new Subnets, I have explained how to do this in [https://www.iwanhoogendoorn.nl/index.php/Using_OCI_to_publish_an_webserver_that_is_accessible_from_the_internet_(with_IPv6)#STEP_02:_Create_a_new_Subnet_(with_IPv6_enabled) this] article (Public Subnet) and [https://www.iwanhoogendoorn.nl/index.php/Using_the_OCI_NAT_Gateway_to_allow_OCI_Instances_(connected_to_a_private_subnet)_to_access_the_internet#STEP_02:_Create_a_private_subnet_inside_the_VCN this] article (Private Subnet). | I already have a Public and Private Subnet in place but if you still need to create new Subnets, I have explained how to do this in [https://www.iwanhoogendoorn.nl/index.php/Using_OCI_to_publish_an_webserver_that_is_accessible_from_the_internet_(with_IPv6)#STEP_02:_Create_a_new_Subnet_(with_IPv6_enabled) this] article (Public Subnet) and [https://www.iwanhoogendoorn.nl/index.php/Using_the_OCI_NAT_Gateway_to_allow_OCI_Instances_(connected_to_a_private_subnet)_to_access_the_internet#STEP_02:_Create_a_private_subnet_inside_the_VCN this] article (Private Subnet). | ||
| Line 38: | Line 38: | ||
I will connect my OCI Compute Instance to the Public Subnet and I will connect the OCI Database to the Private Subnet. | I will connect my OCI Compute Instance to the Public Subnet and I will connect the OCI Database to the Private Subnet. | ||
= STEP 03 Create three new OCI Compute Instances = | = STEP 03{{fqm}} Create three new OCI Compute Instances = | ||
Click on “Instances” to create three new OCI Compute Instances. | Click on “Instances” to create three new OCI Compute Instances. | ||
| Line 74: | Line 74: | ||
{{important| | {{important| | ||
💡 If you do not have any custom image feel free to select the Oracle Linux 8 Image. Just make sure you follow these instructions [https://www.iwanhoogendoorn.nl/index.php/Using_OCI_to_publish_an_webserver_that_is_accessible_from_the_internet_(with_IPv6)#STEP_06:_Install_a_webserver_on_this_instance here]to manually install NGINX and PHP and use these instructions [https://www.iwanhoogendoorn.nl/index.php/Using_OCI_to_publish_an_webserver_that_is_accessible_from_the_internet_(with_IPv6)#STEP_08:_Create_a_custom_website_(with_NGINX_and_PHP) here] to install the custom web page for testing purposes.}} | 💡 If you do not have any custom image feel free to select the Oracle Linux 8 Image. Just make sure you follow these instructions [https://www.iwanhoogendoorn.nl/index.php/Using_OCI_to_publish_an_webserver_that_is_accessible_from_the_internet_(with_IPv6)#STEP_06:_Install_a_webserver_on_this_instance here] to manually install NGINX and PHP and use these instructions [https://www.iwanhoogendoorn.nl/index.php/Using_OCI_to_publish_an_webserver_that_is_accessible_from_the_internet_(with_IPv6)#STEP_08:_Create_a_custom_website_(with_NGINX_and_PHP) here] to install the custom web page for testing purposes.}} | ||
# Scroll down. | # Scroll down. | ||
| Line 124: | Line 124: | ||
[[File:oci-load-balancer-with-3-web-servers-217.png|800px]] | [[File:oci-load-balancer-with-3-web-servers-217.png|800px]] | ||
= Web server and website on instances = | == Web server and website on instances == | ||
In my case, I have deployed a custom image and this image already has a web server (NGINX and PHP installed. If you choose to deploy a new (vanilla) Oracle Linux Image you need to install NGINX with PHP and the custom webpage manually. | In my case, I have deployed a custom image and this image already has a web server (NGINX and PHP installed. If you choose to deploy a new (vanilla) Oracle Linux Image you need to install NGINX with PHP and the custom webpage manually. | ||
| Line 131: | Line 131: | ||
Make sure you do this on ALL three OCI Compute Instances. | Make sure you do this on ALL three OCI Compute Instances. | ||
= STEP 04 Create a new OCI Network Load Balancing NLB = | = STEP 04{{fqm}} Create a new OCI Network Load Balancing NLB = | ||
Now that I have my OCI Compute Instances in place let's create a new Network Load Balancer <nowiki>(NLB)<nowiki/>. | Now that I have my OCI Compute Instances in place let's create a new Network Load Balancer <nowiki>(NLB)<nowiki/>. | ||
| Line 225: | Line 225: | ||
[[File:oci-load-balancer-with-3-web-servers-233.png|800px]] | [[File:oci-load-balancer-with-3-web-servers-233.png|800px]] | ||
= STEP 05 Test out the new OCI Network Load Balancer = | = STEP 05{{fqm}} Test out the new OCI Network Load Balancer = | ||
Now that the OCI Instances are in place (all three of them) and the Network Load Balancer is in place it is time to test this. | Now that the OCI Instances are in place (all three of them) and the Network Load Balancer is in place it is time to test this. | ||
Latest revision as of 13:35, 9 March 2024
In this article, I will describe how to set up three OCI Instances that will act as a web server. These web servers will all be connected to a private subnet and will be made reachable from the internet using an OCI Network Load Balancer (NLB). The Network Load Balancer will not only make the websites available through the internet but will also balance the load of the incoming connections to these three OCI Instances.
The Steps
- STEP 01: Create a new VCN
- STEP 02: Create a new Public Subnet and Private Subnet
- STEP 03: Create three new OCI Compute Instances
- STEP 04: Create a new OCI Network Load Balancing (NLB)
- STEP 05: Test out the new OCI Network Load Balancer
STEP 01» Create a new VCN
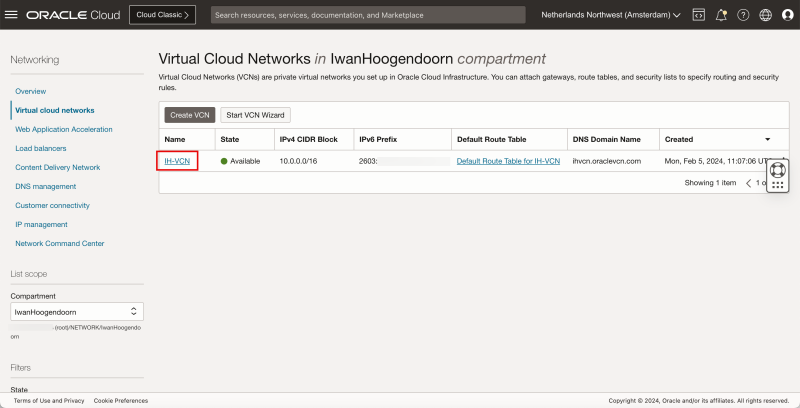
I already have a VCN in place but if you still need to create a new VCN, I have explained how to do this in this article.
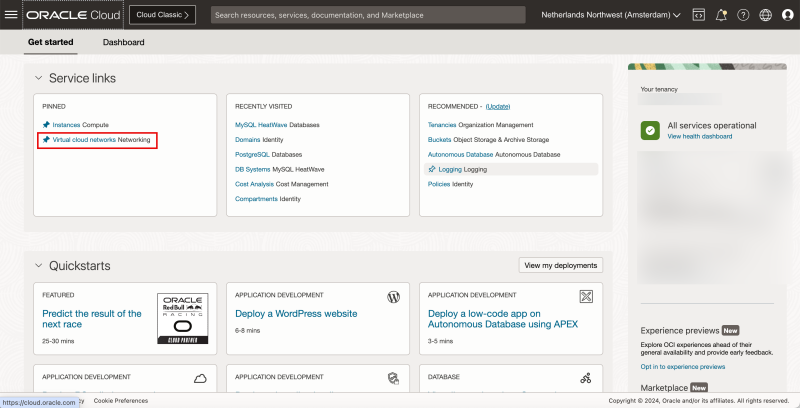
Click in the left upper corner of the hamburger menu.
Select “Virtual Cloud Networking” to verify if the Virtual Cloud Network exists.
STEP 02» Create a new Public Subnet and Private Subnet
I already have a Public and Private Subnet in place but if you still need to create new Subnets, I have explained how to do this in this article (Public Subnet) and this article (Private Subnet).
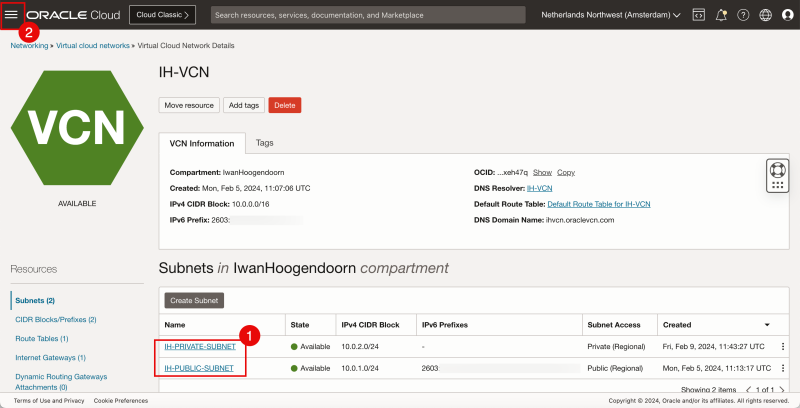
Click on the VCN to review the subnets.
- Inside my VCN I have a Public and Private Subnet available that I will be using.
- Click on the hamburger menu in the upper left corner to navigate to the OCI Instances.
I will connect my OCI Compute Instance to the Public Subnet and I will connect the OCI Database to the Private Subnet.
STEP 03» Create three new OCI Compute Instances
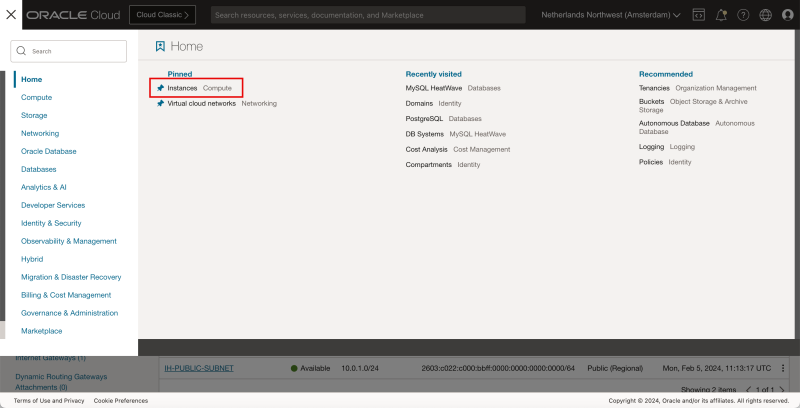
Click on “Instances” to create three new OCI Compute Instances.
Let’s start creating the first instance (out of 3).
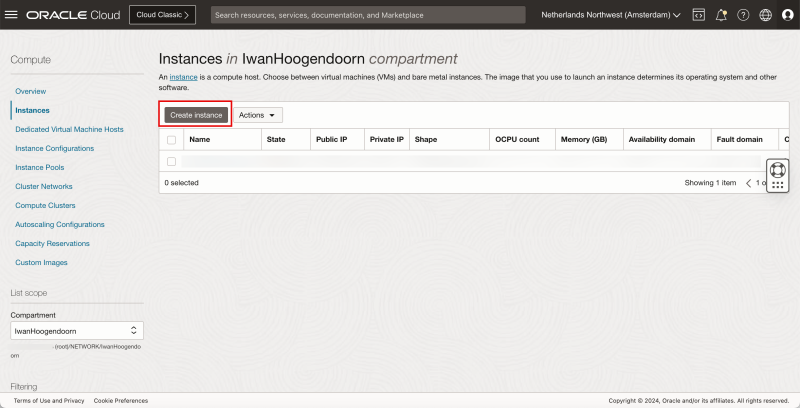
Click on “Create Instance”.
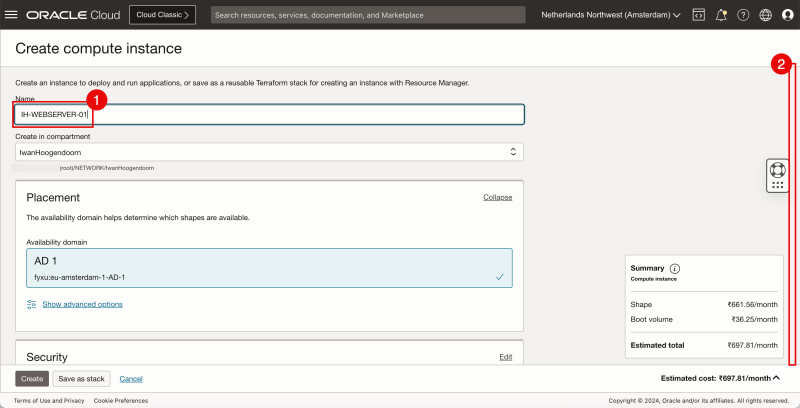
- Specify the Name for the instance.
- Scroll Down.
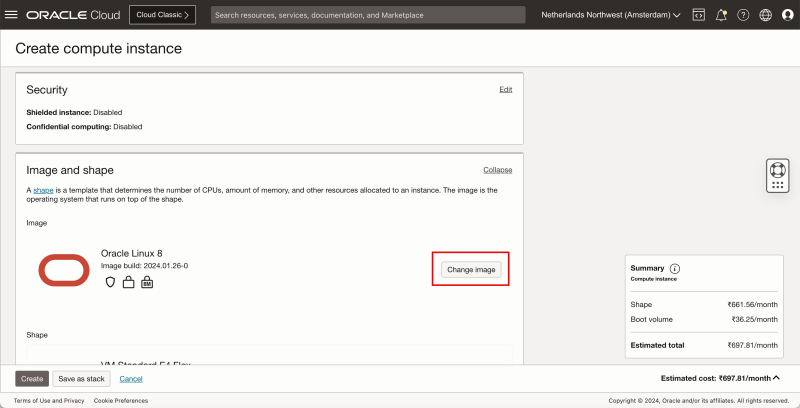
Click on “Change Image”.
💡 The reason why I am deploying a custom image is because the Instance that I am deploying needs to have a web server installed. In one of my previously written articles I have already created an Instance where I installed the NGINX web server with PHP and I have created a Custom Image based on this Instance so that I do not have to install NGINX with PHP on three separate instances. The article that I have installed the NGINX web server with PHP can be found here.
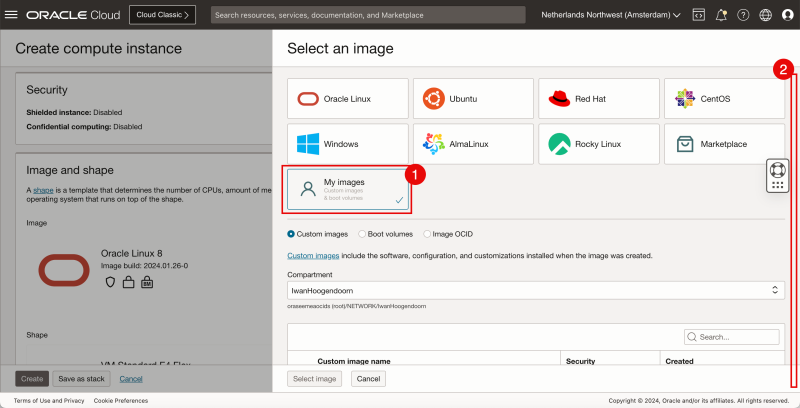
- Select My Images.
- Scroll Down.
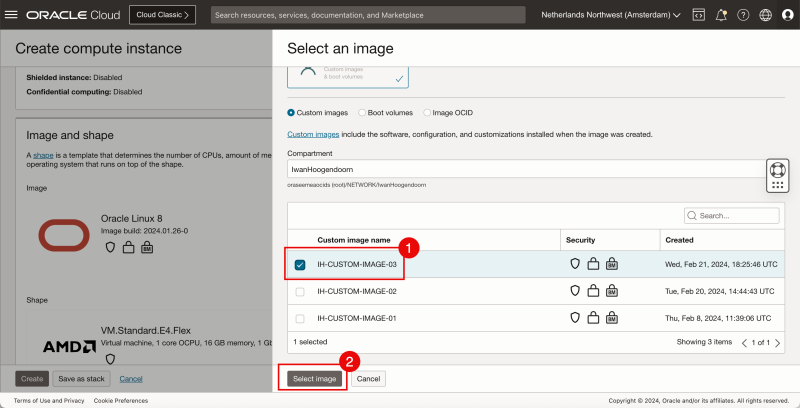
- In my case I will select a custom image that I have created before (that has the NGINX web server with PHP pre-installed).
- Click on “Select Image”.
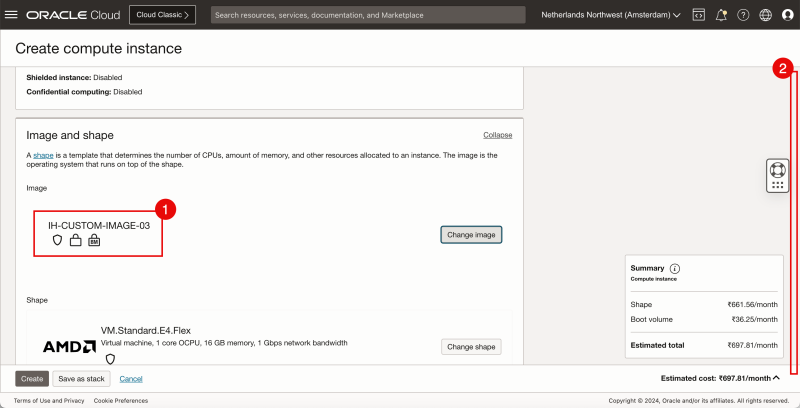
- Review that the custom image is selected.
💡 If you do not have any custom image feel free to select the Oracle Linux 8 Image. Just make sure you follow these instructions here to manually install NGINX and PHP and use these instructions here to install the custom web page for testing purposes.
- Scroll down.
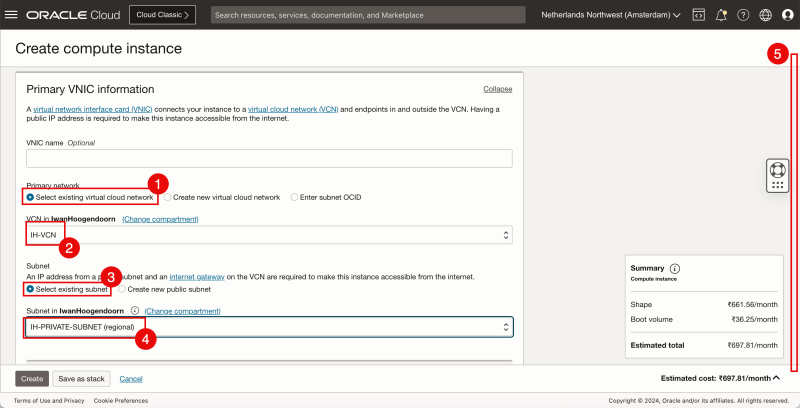
- For the Primary network select “Select existing virtual cloud network”.
- I selected the VCN that I have created earlier.
- For the PRIVATE subnet select “Select existing subnet”.
- I select the subnet that I have created earlier.
- Scroll down.
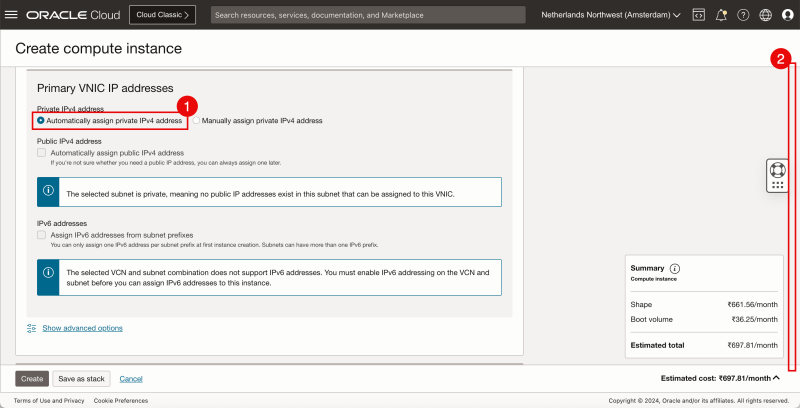
- For the Private IPv4 address select “Automatically assign private IPv4 address”. The box also needs to be checked.
- Scroll down.
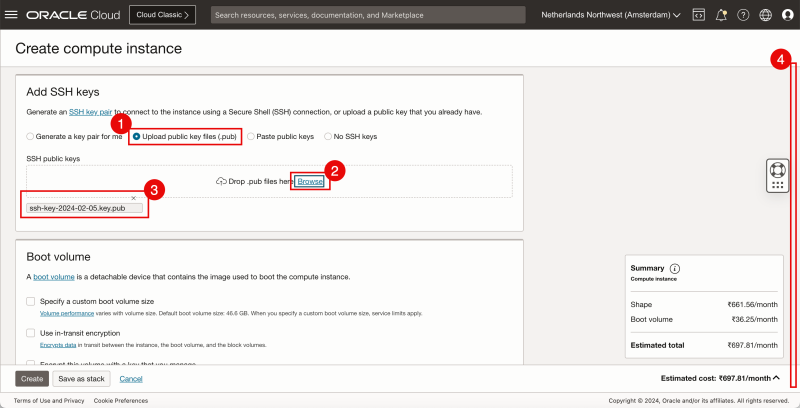
I will use existing SSH keys that I have generated before.
- Select “Upload public key files (.pub)”.
- Click on “Browse”. Select the public key that is already available.
- Make sure the .pub SSH key is selected.
- Scroll down.
💡 When you do not have any existing keys you can select “Generate a key pair for me”. This is explained in this article here.
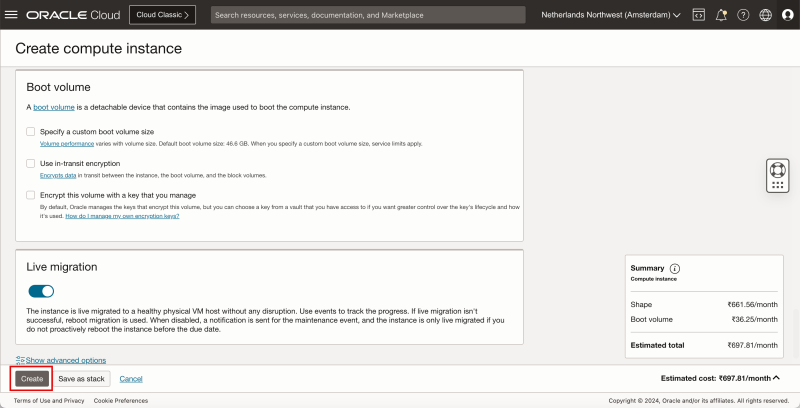
Click on “Create”.
When the first OCI Compute Instance is created repeat the above steps another two times to create two additional Instances.
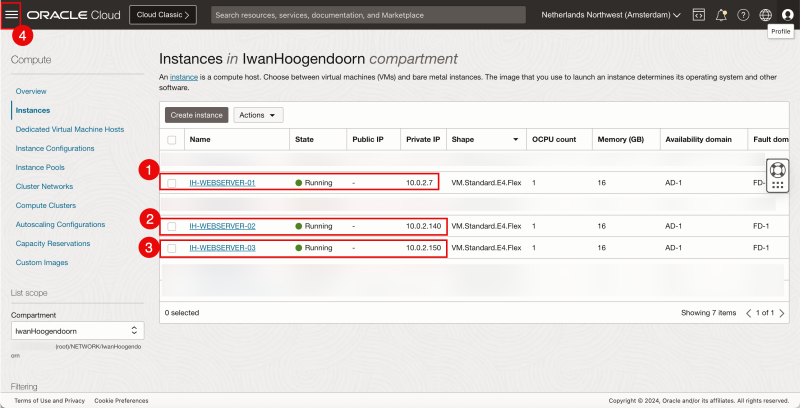
So the result should be that THREE OCI Instances are running.
- Make sure the first OCI Compute Instance is running. In my case, this will be IH-WEBSERVER-01.
- Make sure the second OCI Compute Instance is running. In my case, this will be IH-WEBSERVER-02.
- Make sure the third OCI Compute Instance is running. In my case, this will be IH-WEBSERVER-03.
- Click on the hamburger menu in the upper left corner to navigate to the Network Load Balancers.
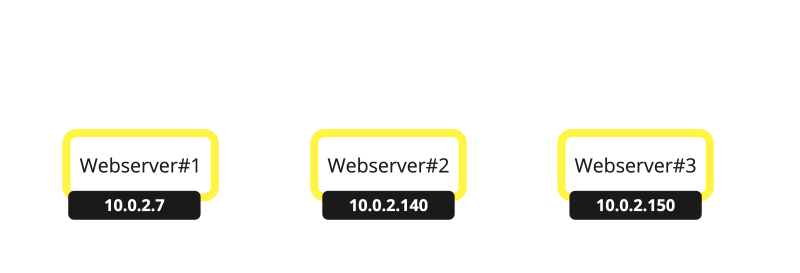
At this point, I have three web servers all with a private IP address assigned.
Web server and website on instances
In my case, I have deployed a custom image and this image already has a web server (NGINX and PHP installed. If you choose to deploy a new (vanilla) Oracle Linux Image you need to install NGINX with PHP and the custom webpage manually. This is required to test the Network Load Balancer. If you do not have any custom image feel free to select the Oracle Linux 8 Image. Just make sure you follow these instructions this article to manually install NGINX and PHP. Please use this article to create the custom web page for testing purposes.
Make sure you do this on ALL three OCI Compute Instances.
STEP 04» Create a new OCI Network Load Balancing NLB
Now that I have my OCI Compute Instances in place let's create a new Network Load Balancer <nowiki>(NLB).
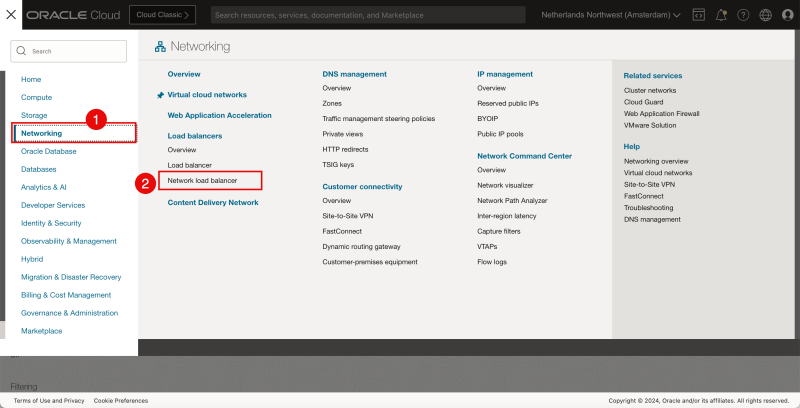
- Click on “Networking”.
- Click on “Network load balancer”.
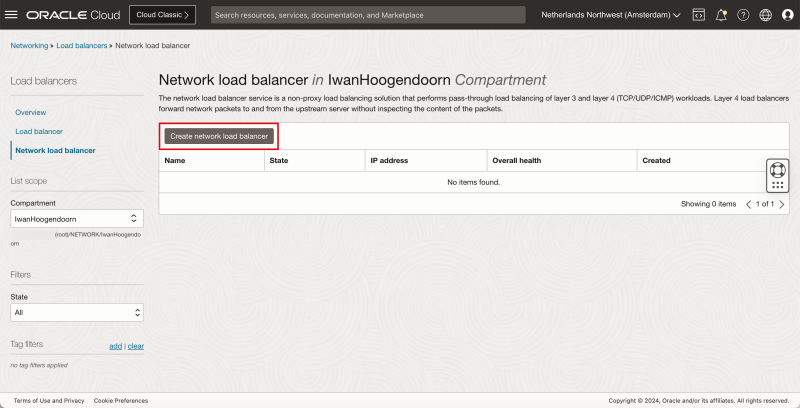
Click on “Create network load balancer”.
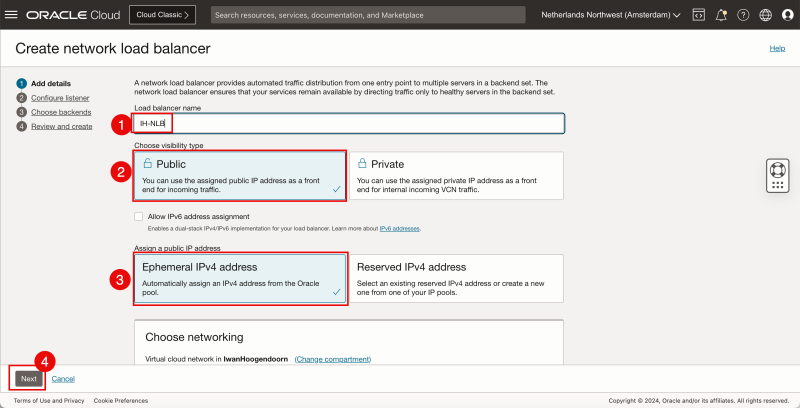
- Specify a Load balancer name.
- Select “Public” for the visibility type (as we want this Network load balancer to be reachable from the internet).
- Select “Ephemeral IPv4 address” as the public IP address.
- Click on “Next”.
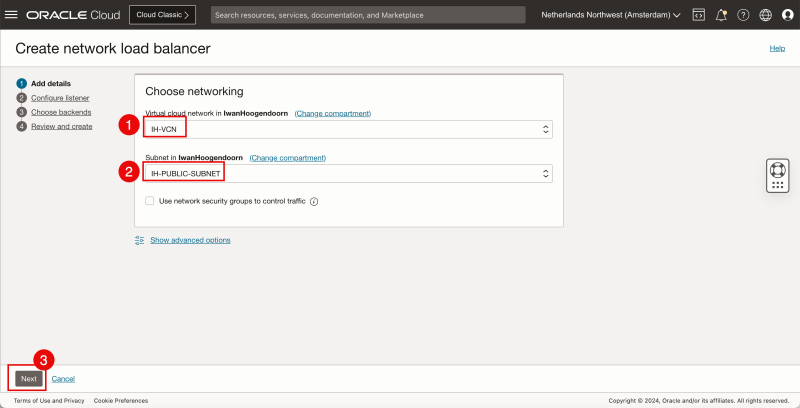
- I selected the VCN that I have created earlier.
- I select the PUBLIC subnet that I have created earlier.
- Click on “Next”.
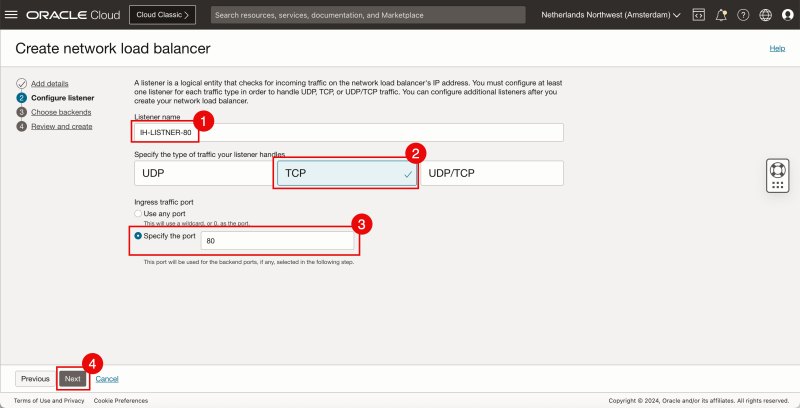
- Specify a Lister name.
- Select “TCP” for the type of traffic that the Network load balancer needs to listen to.
- Select “Specify the port” and specify port “80” as I want the Network load balancer will listen on TCP port 80 for incoming connections.
- Click on “Next”.
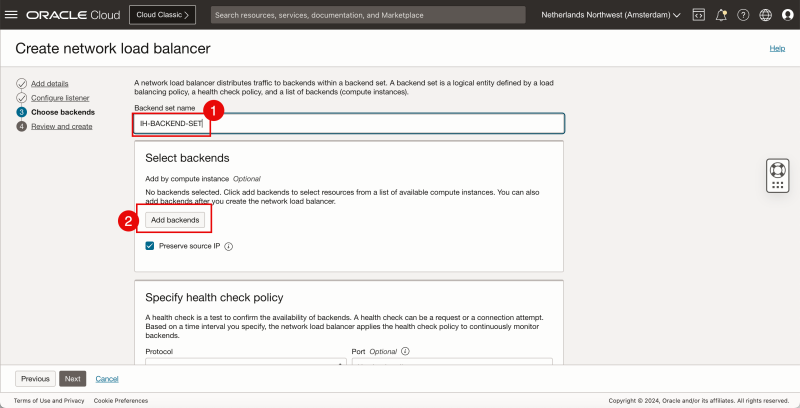
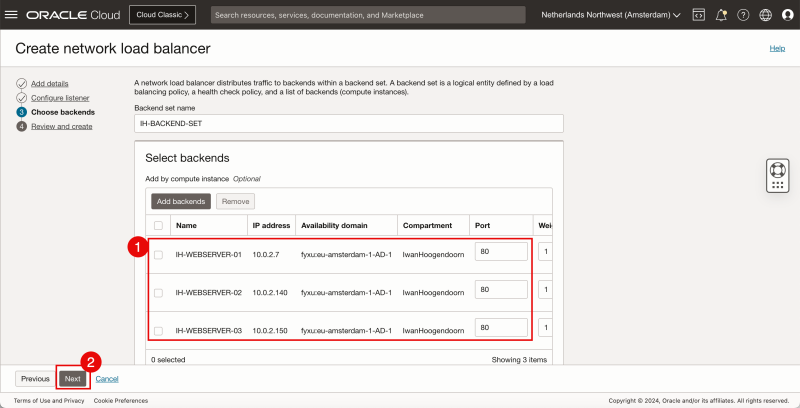
- Specify a Backend set name.
- Click on “Add backends”.
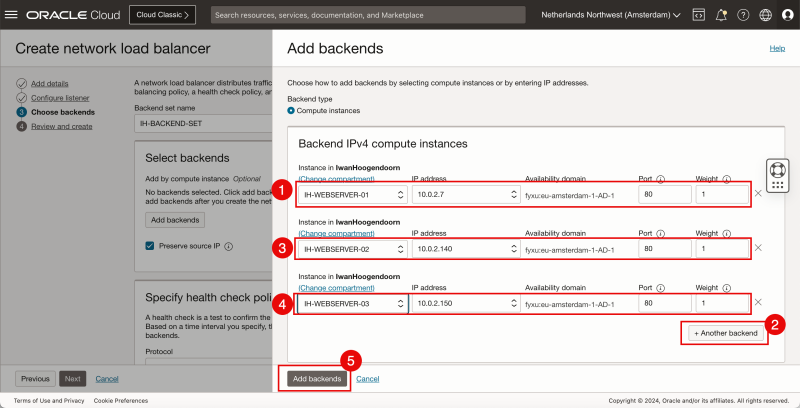
- Make sure the first OCI Compute Instance is selected with the correct port. The weight I will keep default for now.
- Click on “+ Another backend”
- Make sure the second OCI Compute Instance is selected with the correct port. The weight I will keep default for now.
- Make sure the third OCI Compute Instance is selected with the correct port. The weight I will keep default for now.
- Click on “Add backends”.
- Review the backends.
- Click on “Next”.
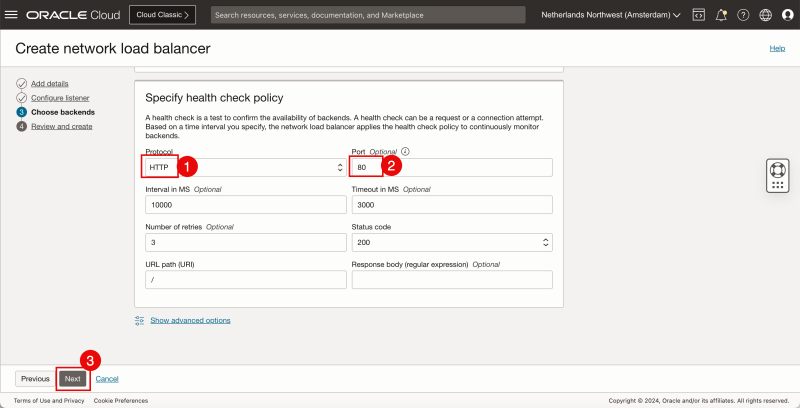
For the health check policy:
- Specify HTTP as the protocol to use for checking the backend servers.
- Specify port 80 as the port to use for checking the backend servers.
- Click on “Next”.
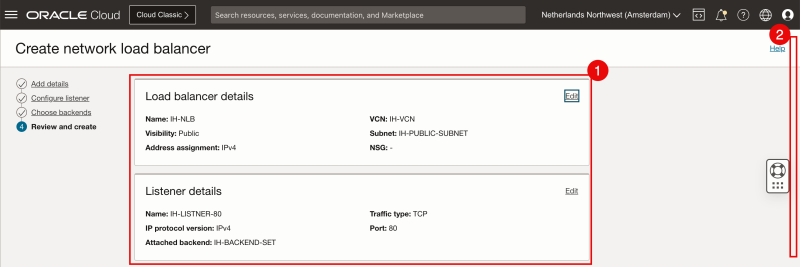
- Review the Load balancer details and the Listener details
- Scroll down.
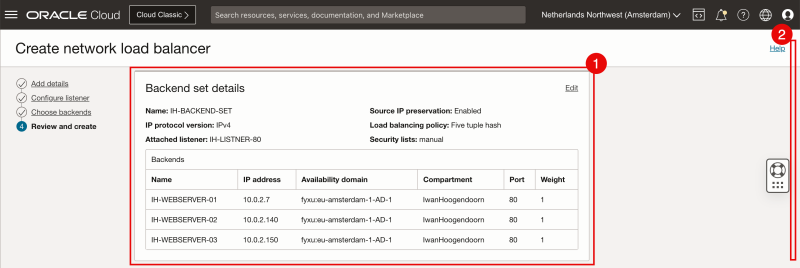
- Review the Backend set details.
- Scroll down.
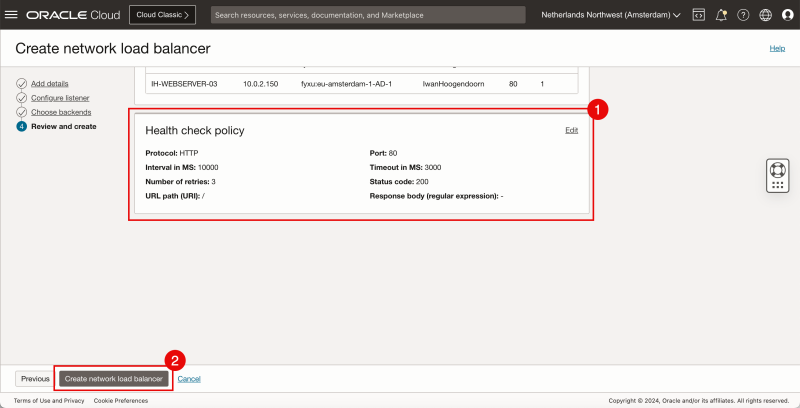
- Review the Health check policy details.
- Click on “Create network load balancer”.
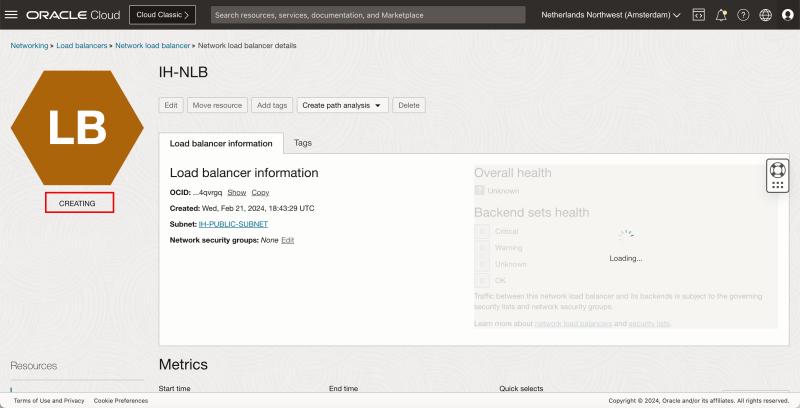
When the Network load balancer is created the status will start with “CREATING”.
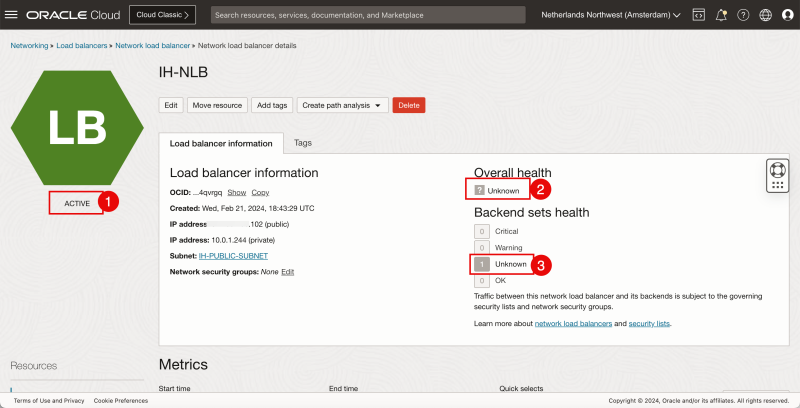
- After a few minutes the status will be changed to “ACTIVE”.
- Because the Health check policy still needs to kick in it may be that the overall health is started with the “Unknown” status.
- And the same goes for the Backend set health that may start with the “Unknown” status.
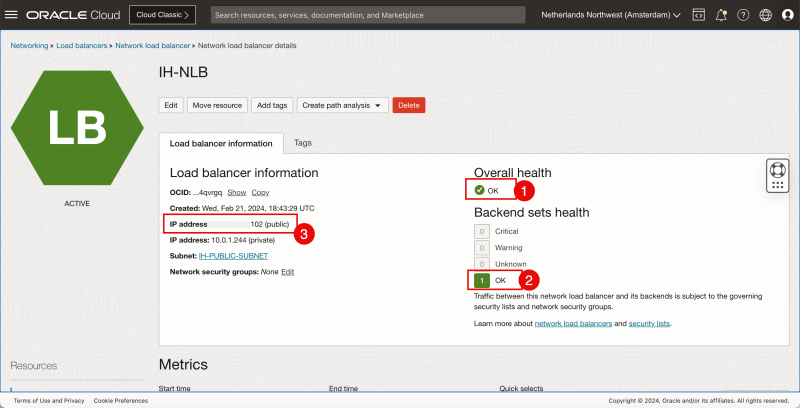
- At some point the overall health is set to “OK”.
- And the Backend set health is also set to “OK”
- Make a note of the PUBLIC IP address that is assigned to the Network Load Balancer.
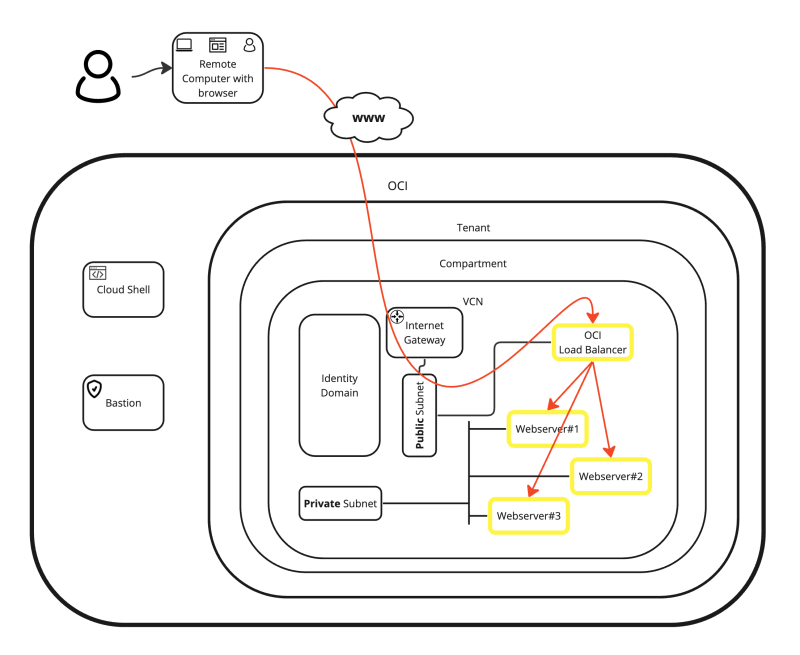
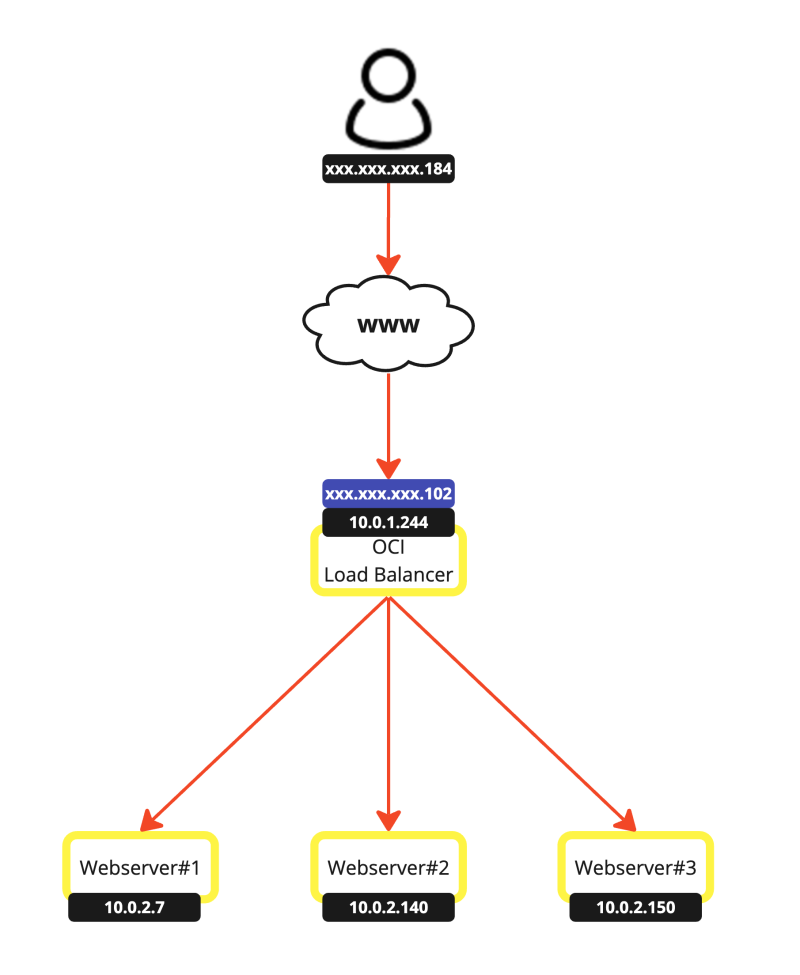
Now I have built the following setup:
STEP 05» Test out the new OCI Network Load Balancer
Now that the OCI Instances are in place (all three of them) and the Network Load Balancer is in place it is time to test this.
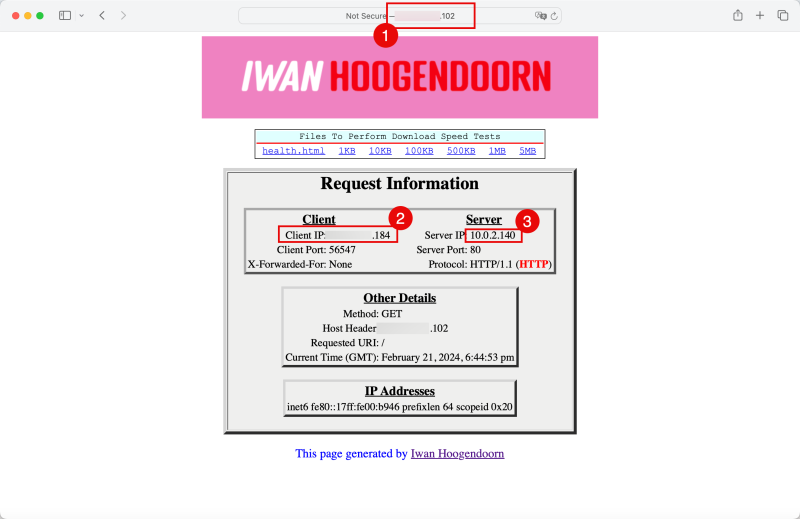
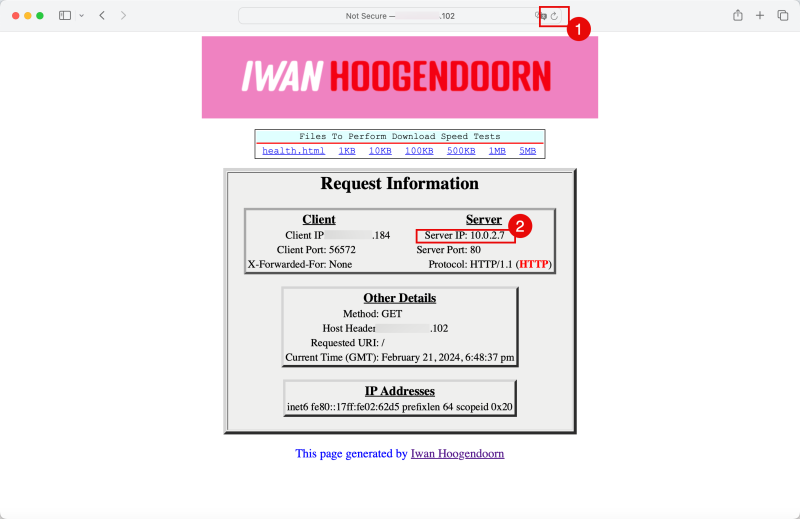
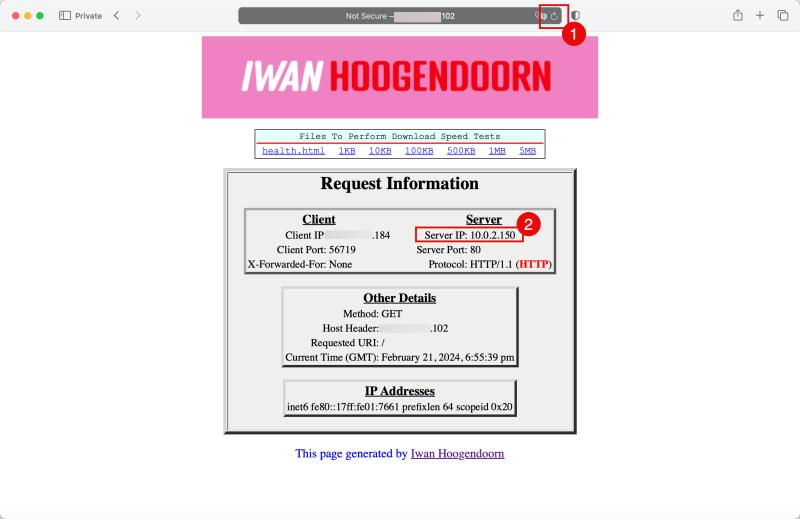
- Open a web browser and browse to the PUBLIC IP address of the Network Load Balancer.
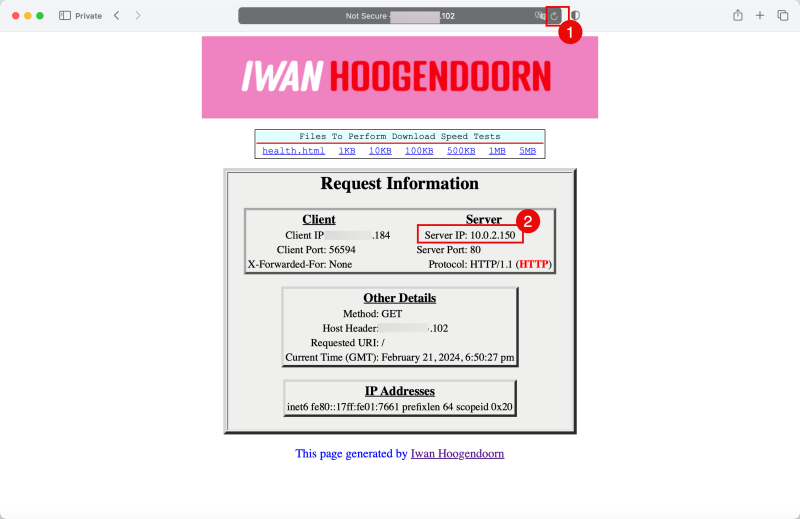
- Notice the PUBLIC client IP address that I am browsing from (this is the Public IP address of my (home) ISP.
- Notice the PRIVATE Server IP address which is the IP address of one of the OCI compute Instances.
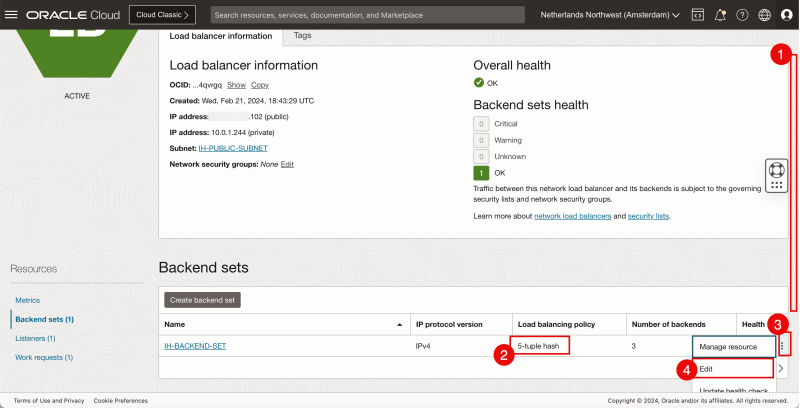
So what is the algorithm that is used for the OCI Compute Instance selection?
- Scroll down
- Notice that the default Load balancing policy is set to “5-tuple-hash”.
- To change this (or review the other options) click on the three dots.
- Click on “Edit”.
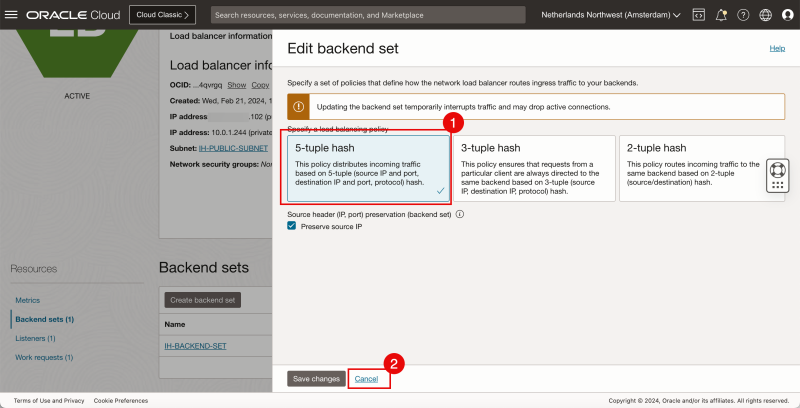
- Notice that “5-tuple-hash” is selected.
- Click on “Cancel”.
Go back to the browser.
- Click on Refresh.
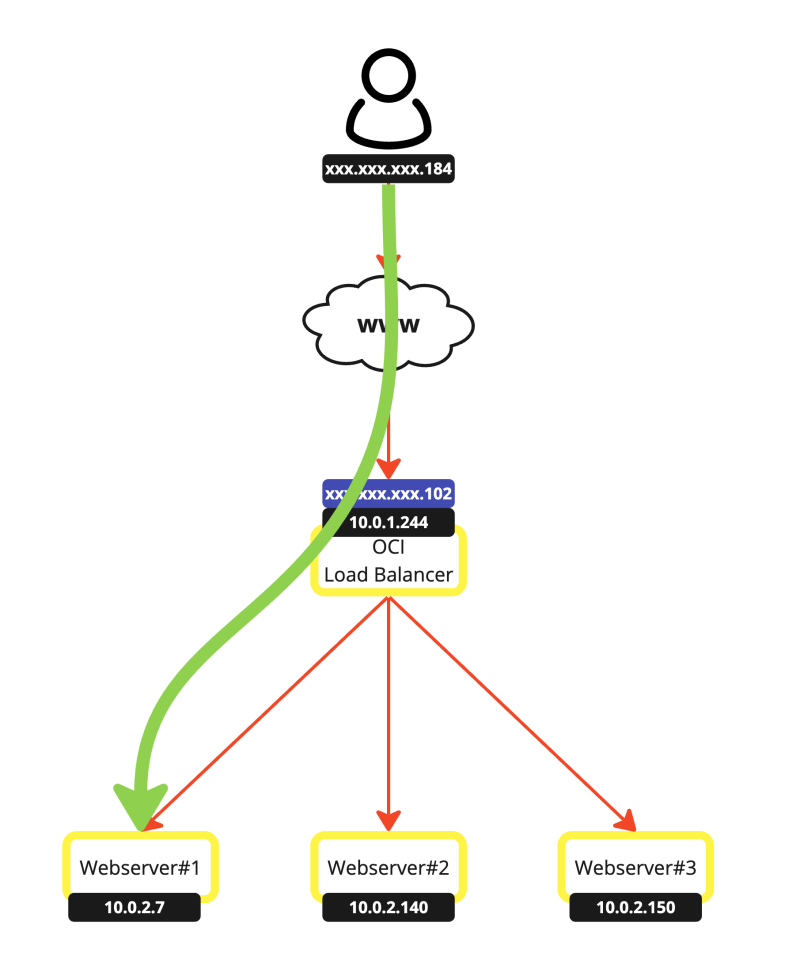
- Notice that the PRIVATE Server IP address which is the IP address of one of the OCI compute Instances has been changed from 10.0.2.140 to 10.0.2.7. This confirms that the Network Load Balancer is working.
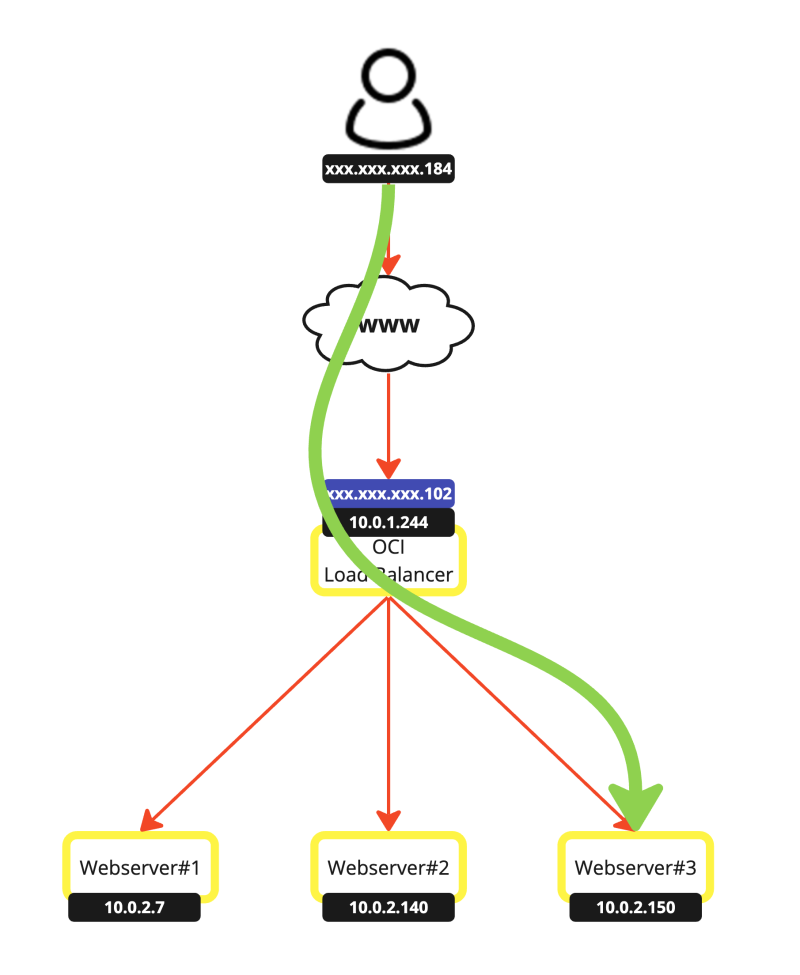
This is a visual representation of the path that is taken.
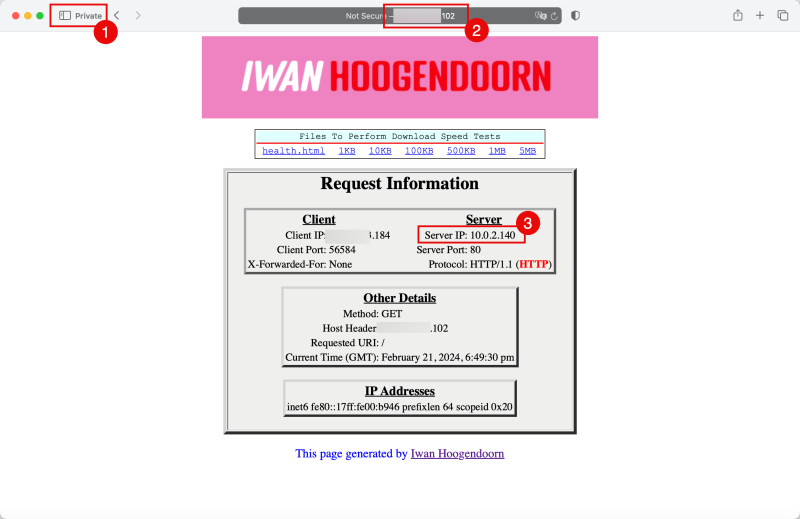
- Open a Private (or Incognito) browser window.
- Browse to the PUBLIC IP address of the Network Load Balancer.
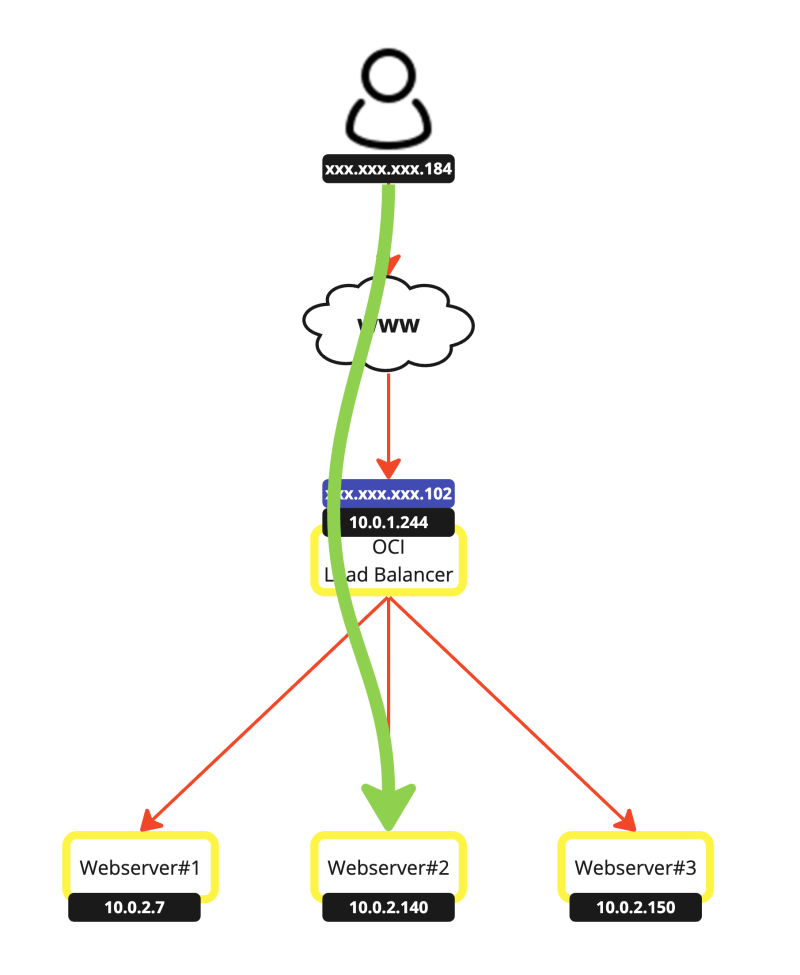
- Notice that the PRIVATE Server IP address which is the IP address of one of the OCI compute Instances has been changed from 10.0.2.7 to 10.0.2.140.
This is a visual representation of the path that is taken.
- Click on Refresh.
- Notice that the PRIVATE Server IP address which is the IP address of one of the OCI compute Instances has been changed from 10.0.2.140 to 10.0.2.150.
This is a visual representation of the path that is taken.
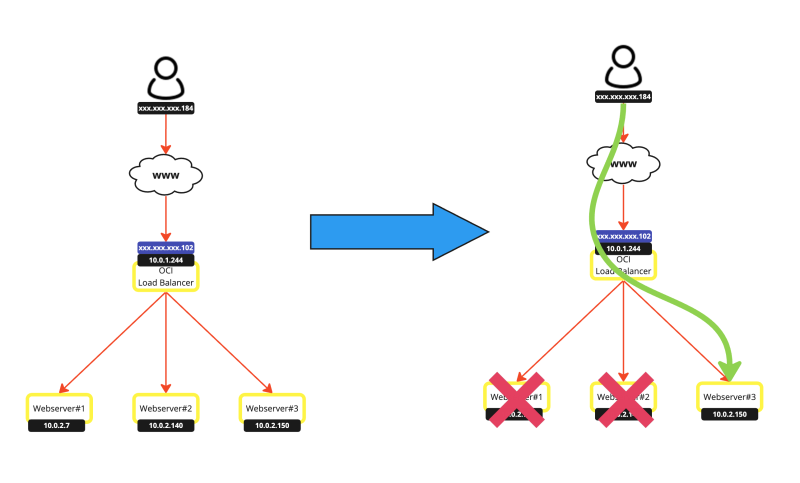
Now let's do one final test and bring down two OCI Compute Instances.
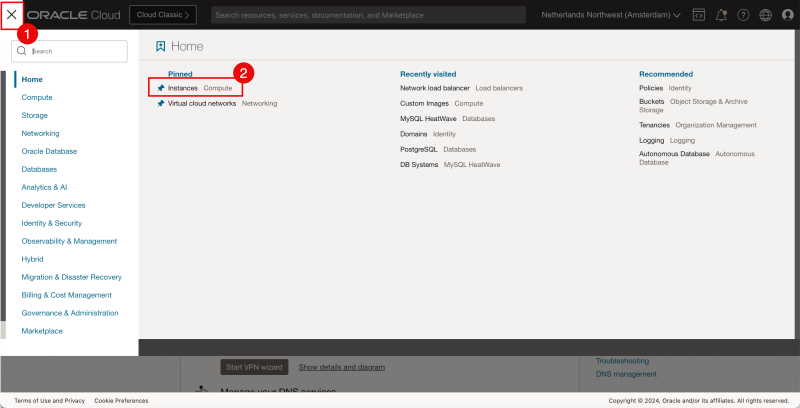
- Click on the hamburger menu in the upper left corner
- Click on Instances.
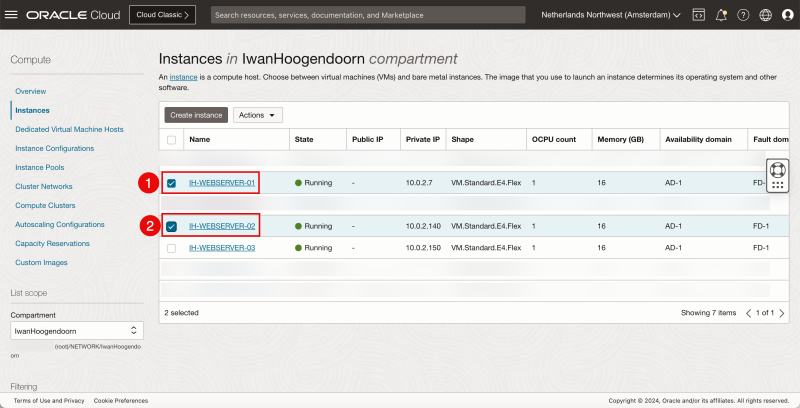
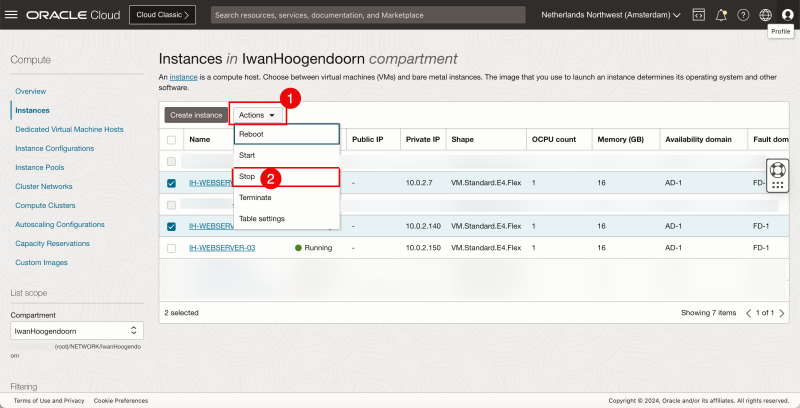
- Select the first OCI Compute Instance.
- Select the second OCI Compute Instance.
- Click on “Actions”.
- Click on “Stop”.
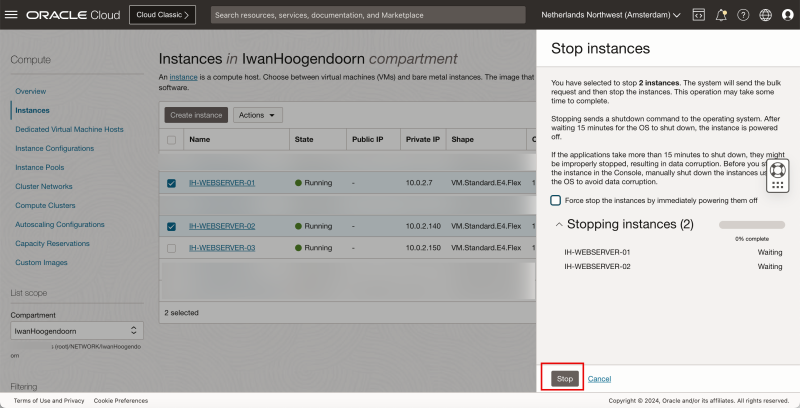
Click on “Stop”.
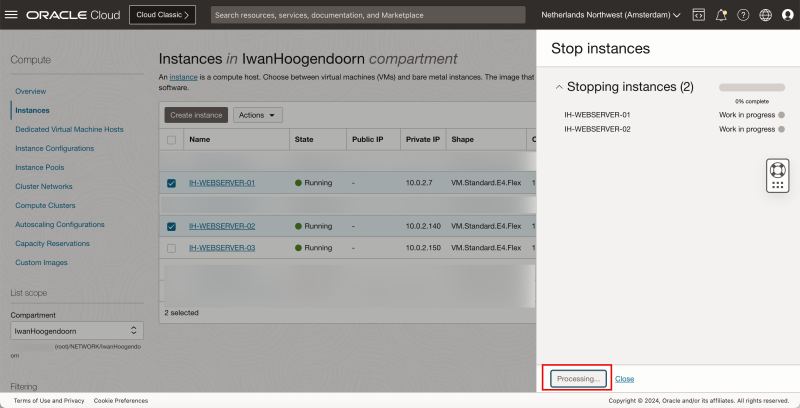
The stop is being processed.
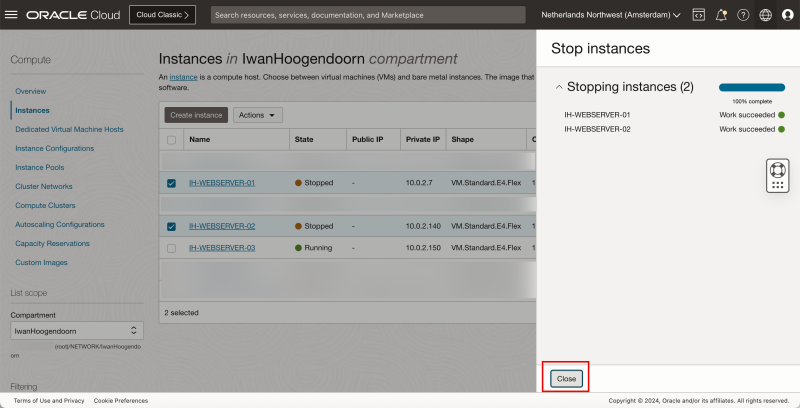
Click on “Close”.
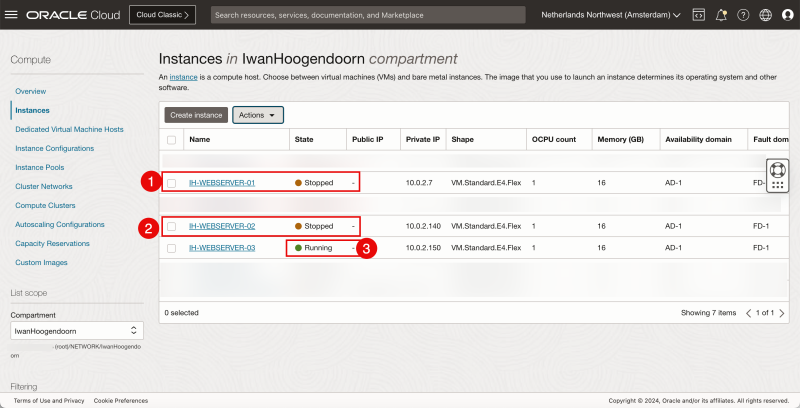
- Notice that the first OCI Compute Instance is stopped.
- Notice that the second OCI Compute Instance is stopped.
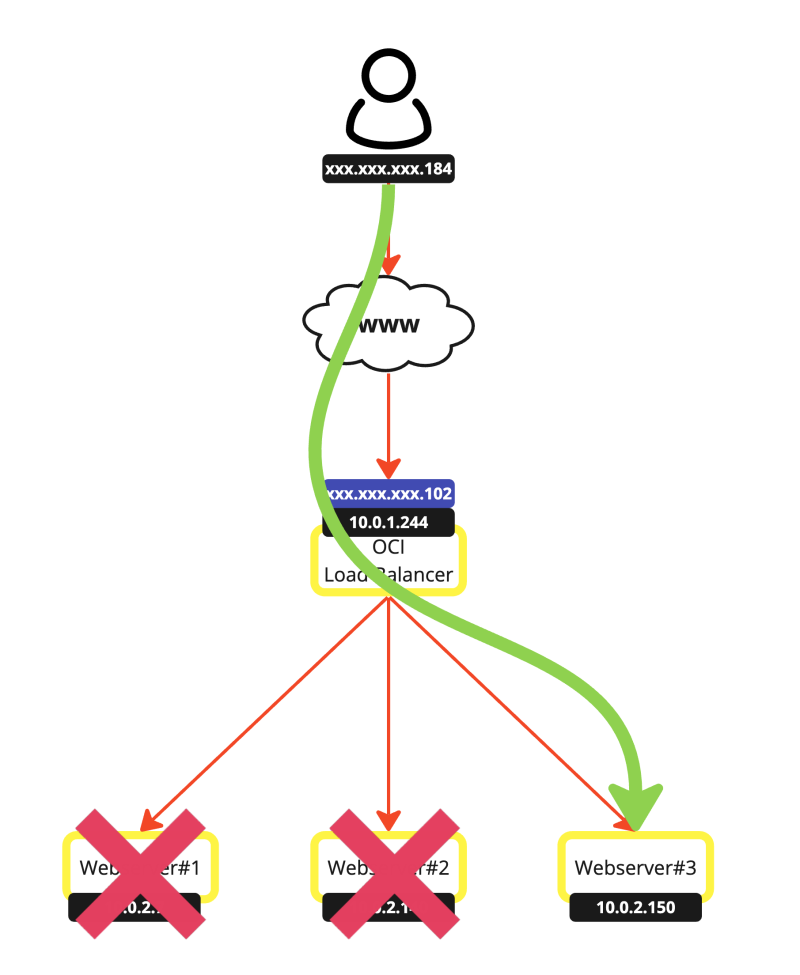
- Notice that the third OCI Compute Instance is still running.
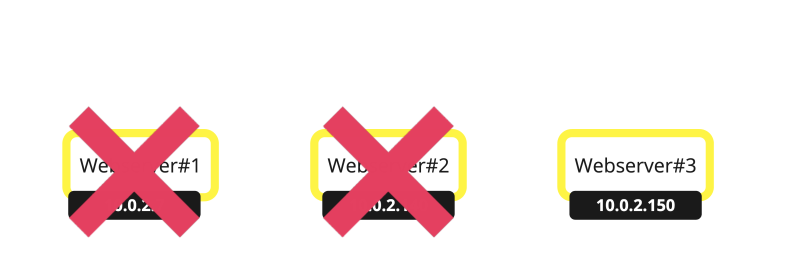
This is a visual representation of the OCI Compute Instances.
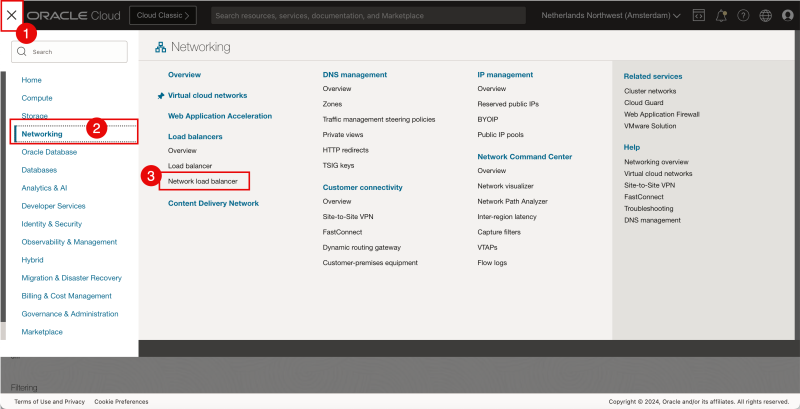
- Click on the hamburger menu in the upper left corner
- Click on “Networking”.
- Click on “Network load balancer”.
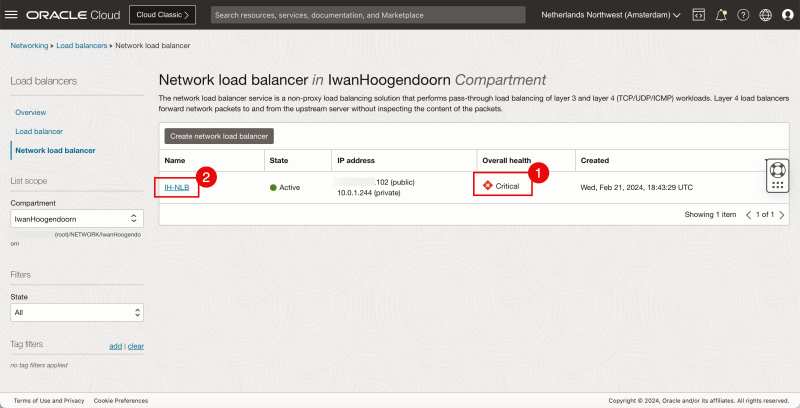
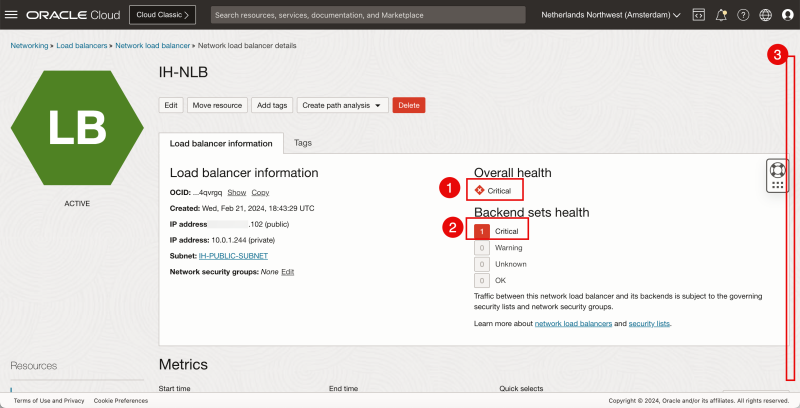
- Review the “Overall health” this is now “Critical”.
- Click on the Network load balancer.
- Review the “Overall health” this is now “Critical”.
- Review the “Backend sets health” this is now “Critical”.
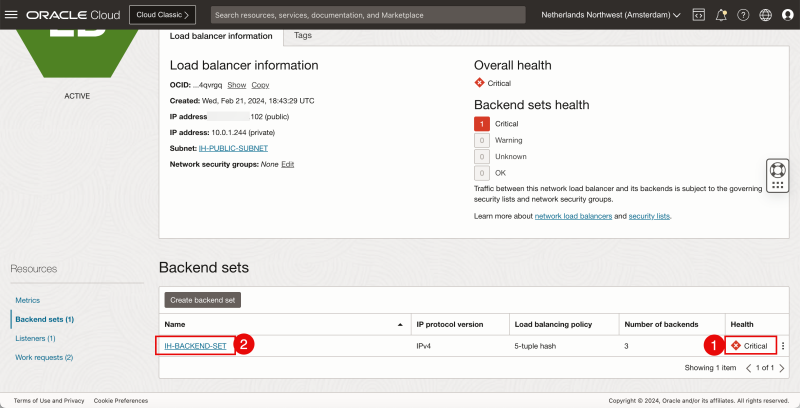
- Scroll down.
- Review the “health” this is now “Critical”.
- Click on the Backend set.
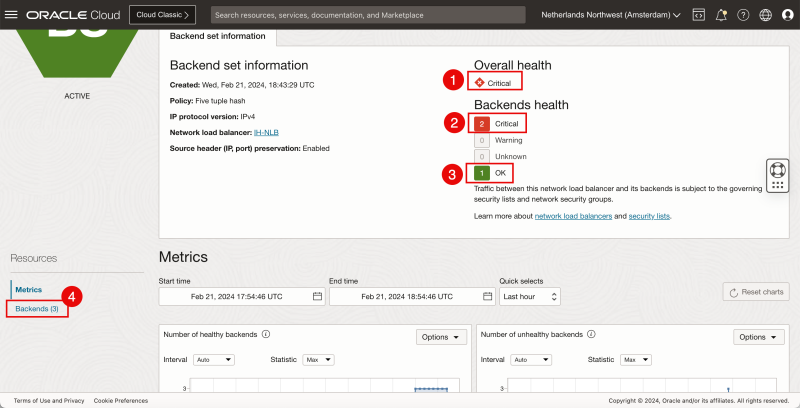
- Review the “Health” this is now “Critical”.
- The backend health has a “2” set next to Critical and this corresponds with the OCI Compute Instances that have gone down.
- The “1” that is OK is the only OCI Compute Instance that is still up.
- Click on “Backends”.
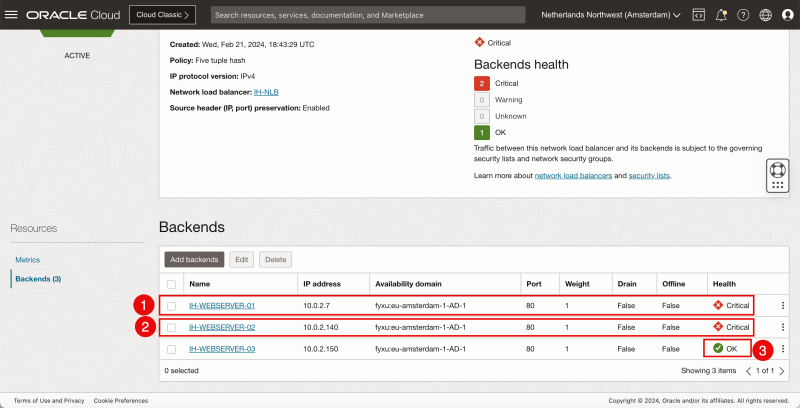
- Notice that the first OCI Compute Instance has a Critical Health.
- Notice that the second OCI Compute Instance has a Critical Health.
- Notice that the third OCI Compute Instance has an OK Health.
- Now let's refresh the web page.
- Notice the PRIVATE Server IP address which is the IP address of the only OCI compute Instance that is up.
This is a visual representation of the path that is taken.
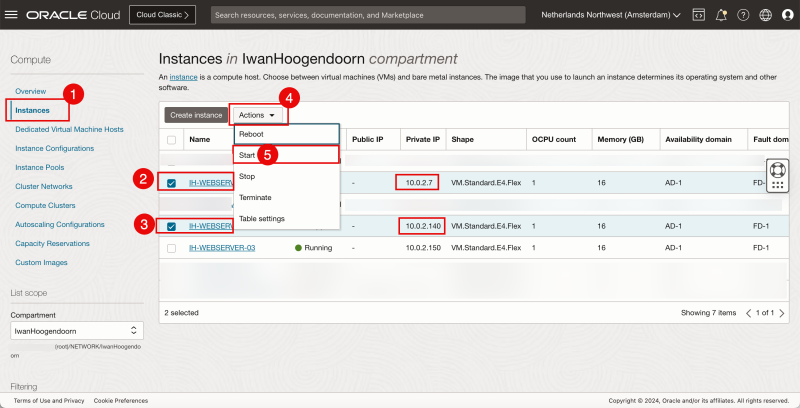
- Now let's go back to the instance page
- Select the first OCI Compute Instance.
- Select the second OCI Compute Instance.
- Click on “Actions”.
- Click on “Start”.
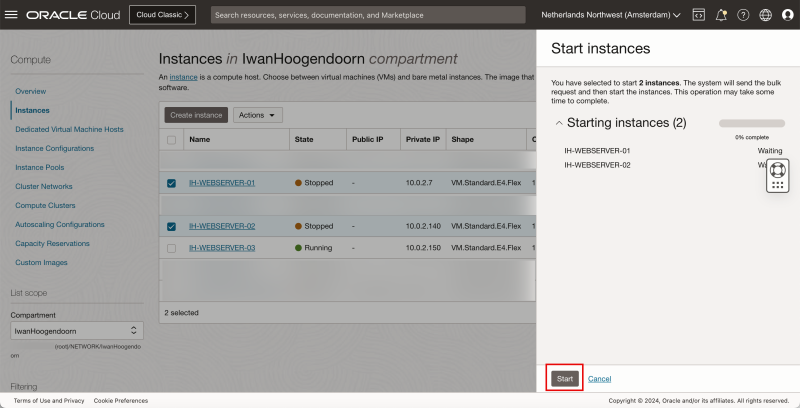
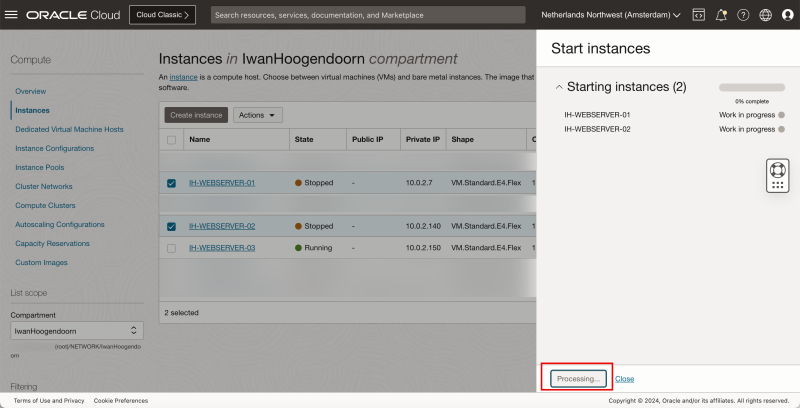
Click on “Start”.
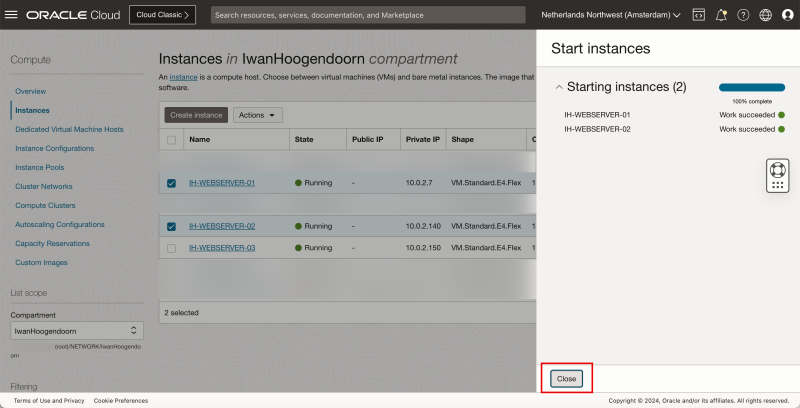
The start is being processed.
Click on “Close”.
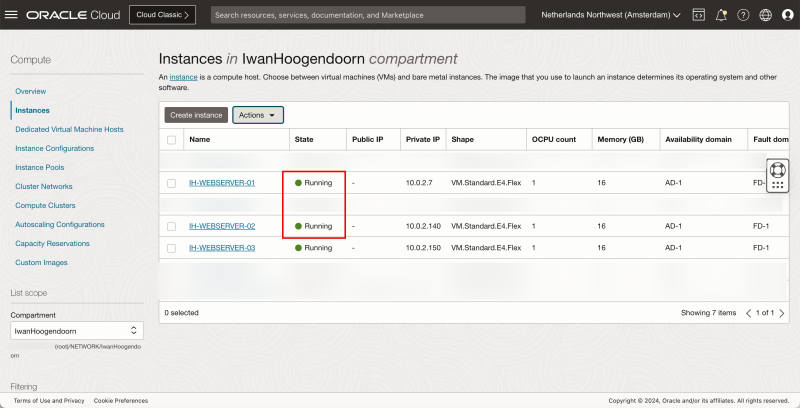
Notice that the first and second OCI Compute Instances are running again.
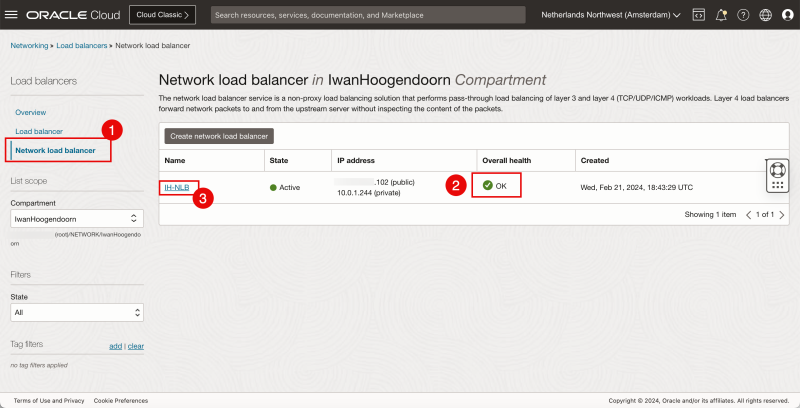
- Now let's go back to the Network Load Balancer page.
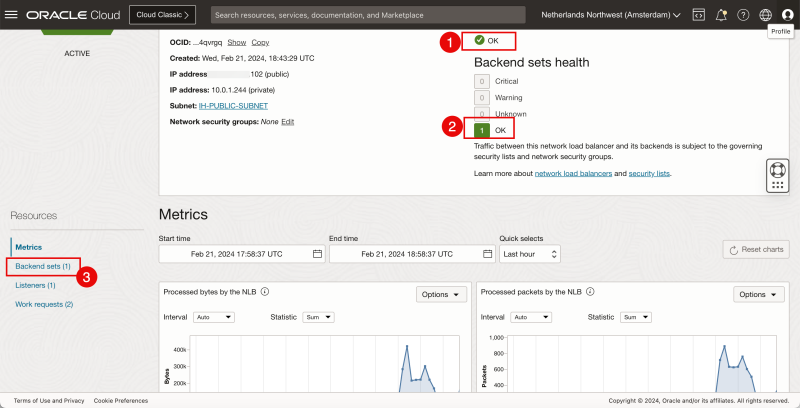
- Review the “Overall health” this is now “OK”.
- Click on the Network load balancer.
- Review the “health” this is now “OK”.
- Review the “Backend set health” this is now “OK”.
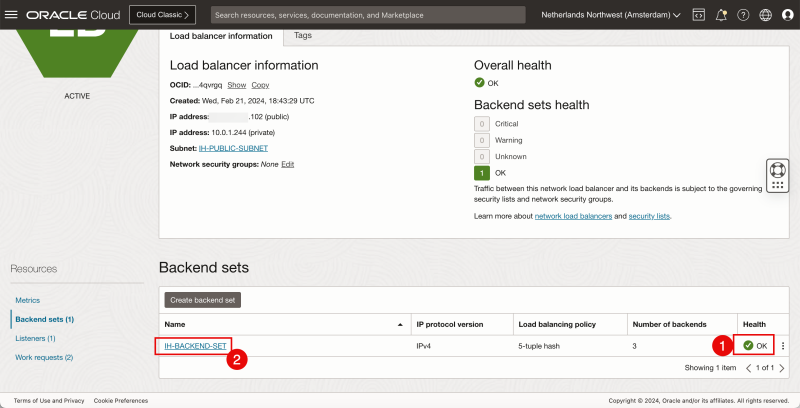
- Click on “Backend sets”.
- Review the “health” this is now “OK”.
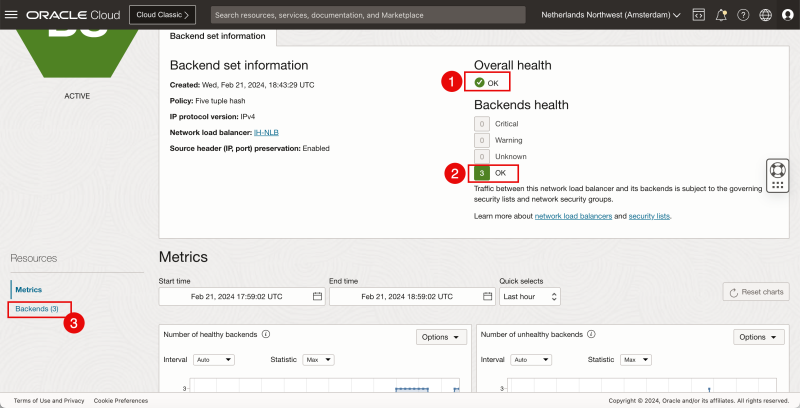
- Click on the Backend set.
- Review the “Health” this is now “Critical”.
- The “3” that is OK is the only OCI Compute Instance that is up.
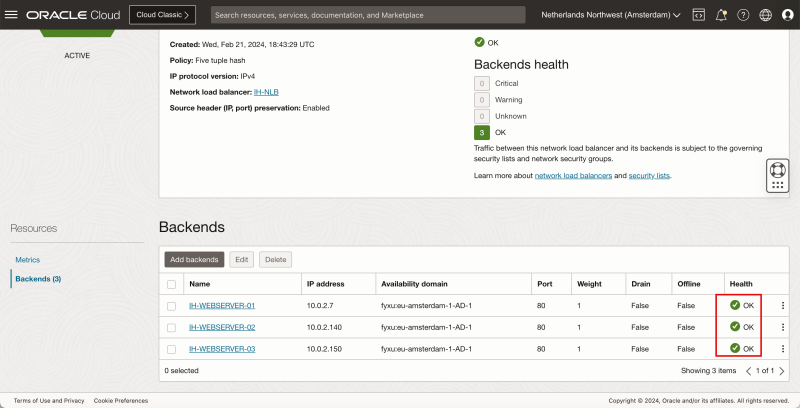
- Click on “Backends”.
Notice that all OCI Compute Instances have an OK Health.
Conclusion
In this article, I have created three (webserver) OCI Compute Instances and attached these to a private subnet. I then created an OCI Network Load Balancer (NLB) that is accessible from the internet. With this, the OCI Network Load Balancer will balance the load based on the 5-tuple load balancing policy to the OCI Compute Instances. I also did some extensive testing by bringing down two of the three OCI Compute Instances and verified if the OCI Network Load Balancer would see this and act as expected.
