Deploy a Windows Instance in Oracle Cloud Infrastructure: Difference between revisions
No edit summary |
No edit summary |
||
| (7 intermediate revisions by the same user not shown) | |||
| Line 1: | Line 1: | ||
In this tutorial, we will deploy a Windows Instance (hop on machine, OCI Bastion host) in Oracle Cloud Infrastructure (OCI) which can be used as the first point of entry into your OCI environment and can be used to connect to other private instances inside your OCI environment or for testing purposes. | In this tutorial, we will deploy a Windows Instance (hop on machine, OCI Bastion host) in Oracle Cloud Infrastructure (OCI) which can be used as the first point of entry into your OCI environment and can be used to connect to other private instances inside your OCI environment or for testing purposes. | ||
| Line 21: | Line 16: | ||
- See [[this tutorial-CHANGE LINK]] to create the VCNs, public subnet and internet gateway. | - See [[this tutorial-CHANGE LINK]] to create the VCNs, public subnet and internet gateway. | ||
= Task 1 | = Task 1 - Create a Windows Instance = | ||
- Create an OCI Compute instances. | - Create an OCI Compute instances. | ||
1. Click the Oracle Cloud logo to return to the OCI Console homepage. | 1. Click the Oracle Cloud logo to return to the OCI Console homepage. | ||
<br> | |||
2. Click '''Instances''' or click hamburger menu and then navigate to '''Compute''', '''Instances'''. | 2. Click '''Instances''' or click hamburger menu and then navigate to '''Compute''', '''Instances'''. | ||
| Line 35: | Line 31: | ||
1. Enter the '''name''' of instance. | 1. Enter the '''name''' of instance. | ||
<br> | |||
2. Scroll down. | 2. Scroll down. | ||
| Line 44: | Line 41: | ||
1. In the '''Select an Image''' page, select '''Windows'''. | 1. In the '''Select an Image''' page, select '''Windows'''. | ||
<br> | |||
2. Scroll down. | 2. Scroll down. | ||
| Line 49: | Line 47: | ||
1. Select '''Windows Server 2022 Standard'''. | 1. Select '''Windows Server 2022 Standard'''. | ||
<br> | |||
2. Select '''I have reviewed and accept the following documents'''. | 2. Select '''I have reviewed and accept the following documents'''. | ||
<br> | |||
3. Click '''Select Image'''. | 3. Click '''Select Image'''. | ||
| Line 55: | Line 55: | ||
1. Notice that the '''Windows Server 2022 Standard''' Image is selected. | 1. Notice that the '''Windows Server 2022 Standard''' Image is selected. | ||
<br> | |||
2. Scroll down. | 2. Scroll down. | ||
| Line 60: | Line 61: | ||
1. Select the '''VCN''' that you want to attach to the instance. | 1. Select the '''VCN''' that you want to attach to the instance. | ||
<br> | |||
2. Select a '''Subnet'''. | 2. Select a '''Subnet'''. | ||
<br> | |||
3. Scroll down. | 3. Scroll down. | ||
| Line 80: | Line 83: | ||
1. After a few minutes, the status is changed to '''RUNNING'''. | 1. After a few minutes, the status is changed to '''RUNNING'''. | ||
<br> | |||
2. Note your '''Public IP address''' and your login credentials. You will need this in the later task when you try to log in to the instance. | 2. Note your '''Public IP address''' and your login credentials. You will need this in the later task when you try to log in to the instance. | ||
| Line 88: | Line 92: | ||
[[File:d776a4edd6be0208141e04b99f746ee4.png|800px]] | [[File:d776a4edd6be0208141e04b99f746ee4.png|800px]] | ||
= Task 2 | = Task 2 - Allow TCP 3389 Port on the Security List = | ||
We need to allow the TCP/`3389` Microsoft Remote Desktop Protocol (RDP) port on the security list that is currently attached to the VCN that includes your new Windows instance. | We need to allow the TCP/`3389` Microsoft Remote Desktop Protocol (RDP) port on the security list that is currently attached to the VCN that includes your new Windows instance. | ||
| Line 95: | Line 99: | ||
1. Click the hamburger menu (≡) in the OCI Console. | 1. Click the hamburger menu (≡) in the OCI Console. | ||
<br> | |||
2. Click '''Virtual cloud networks'''. | 2. Click '''Virtual cloud networks'''. | ||
| Line 105: | Line 109: | ||
1. Scroll down. | 1. Scroll down. | ||
<br> | |||
2. Click '''Security Lists'''. | 2. Click '''Security Lists'''. | ||
<br> | |||
3. Click the '''Default Security List for HUB-VCN''' for the VCN. | 3. Click the '''Default Security List for HUB-VCN''' for the VCN. | ||
| Line 117: | Line 123: | ||
1. '''Source:''' Enter '''CIDR'''. | 1. '''Source:''' Enter '''CIDR'''. | ||
<br> | |||
2. '''Source CIDR:''' Enter `0.0.0.0/0`. | 2. '''Source CIDR:''' Enter `0.0.0.0/0`. | ||
<br> | |||
3. '''IP Protocol:''' Enter '''TCP'''. | 3. '''IP Protocol:''' Enter '''TCP'''. | ||
<br> | |||
4. '''Destination Port Range:''' Enter `3389`. | 4. '''Destination Port Range:''' Enter `3389`. | ||
<br> | |||
5. Click '''Add Ingress Rules'''. | 5. Click '''Add Ingress Rules'''. | ||
| Line 132: | Line 142: | ||
[[File:6e3c61832b4c8306192400ffb6184871.png|800px]] | [[File:6e3c61832b4c8306192400ffb6184871.png|800px]] | ||
= Task 3 | = Task 3 - Add a Default Route towards the Internet Gateway = | ||
A public subnet and the VCN is not routing traffic to the internet. So you need to make sure that a route is present to route all traffic from the public subnet to the internet gateway. | A public subnet and the VCN is not routing traffic to the internet. So you need to make sure that a route is present to route all traffic from the public subnet to the internet gateway. | ||
| Line 143: | Line 153: | ||
1. Click '''Route Tables'''. | 1. Click '''Route Tables'''. | ||
<br> | |||
2. Click the '''Default Route Table''' for the VCN. | 2. Click the '''Default Route Table''' for the VCN. | ||
| Line 154: | Line 165: | ||
1. '''Target Type:''' Enter '''Internet Gateway'''. | 1. '''Target Type:''' Enter '''Internet Gateway'''. | ||
<br> | |||
2. '''Destination CIDR Block:''' Enter `0.0.0.0/0`. | 2. '''Destination CIDR Block:''' Enter `0.0.0.0/0`. | ||
<br> | |||
3. '''Target Internet Gateway:''' For this tutorial, it is `hub-internet-gw`. | 3. '''Target Internet Gateway:''' For this tutorial, it is `hub-internet-gw`. | ||
<br> | |||
4. Click '''Add Route Rules'''. | 4. Click '''Add Route Rules'''. | ||
| Line 171: | Line 185: | ||
[[File:3c76ff2c4145395db42a96d0bffa983e.png|800px]] | [[File:3c76ff2c4145395db42a96d0bffa983e.png|800px]] | ||
= Task 4 | = Task 4 - Connect to the Windows Instance using Microsoft Remote Desktop Protocol -RDP- = | ||
We have done instance creation, allowed TCP/`3389` port to the security list, and configured routing towards the internet. Now, we can connect to the Windows instance from the internet. | We have done instance creation, allowed TCP/`3389` port to the security list, and configured routing towards the internet. Now, we can connect to the Windows instance from the internet. | ||
| Line 180: | Line 194: | ||
1. Enter '''Display Name'''. | 1. Enter '''Display Name'''. | ||
<br> | |||
2. In '''Computer Name''', enter the IP address of the Windows instance created in Task 1. | 2. In '''Computer Name''', enter the IP address of the Windows instance created in Task 1. | ||
<br> | |||
3. In '''Port''', specify the RDP port. | 3. In '''Port''', specify the RDP port. | ||
<br> | |||
4. Click '''Credentials'''. | 4. Click '''Credentials'''. | ||
| Line 187: | Line 204: | ||
1. Select '''Specify username and passwords'''. | 1. Select '''Specify username and passwords'''. | ||
<br> | |||
2. Enter '''Username''' created in the Task 1. | 2. Enter '''Username''' created in the Task 1. | ||
<br> | |||
3. Enter '''Password''' create in the Task 1. | 3. Enter '''Password''' create in the Task 1. | ||
<br> | |||
4. Click '''Apply & Close''' to save the session. | 4. Click '''Apply & Close''' to save the session. | ||
[[File:186d941fa8f22db9688702eb515bbf90.png|800px]] | |||
- Double-click on the saved session to connect to the Windows instance. When you can successfully connect you will get a prompt to change your initial password. | - Double-click on the saved session to connect to the Windows instance. When you can successfully connect you will get a prompt to change your initial password. | ||
| Line 200: | Line 220: | ||
1. Enter old password. | 1. Enter old password. | ||
<br> | |||
2. Enter new password. | 2. Enter new password. | ||
<br> | |||
3. Enter new password again. | 3. Enter new password again. | ||
<br> | |||
4. Click right arrow (→). | 4. Click right arrow (→). | ||
[[File:8db6e19e3d3d04b3ea31c88502865529.png|800px]] | |||
- When you changed your password successfully, click '''OK'''. | - When you changed your password successfully, click '''OK'''. | ||
| Line 221: | Line 244: | ||
[[File:0bfc3be8e78d51ca1b0eddaebe465445.png|800px]] | [[File:0bfc3be8e78d51ca1b0eddaebe465445.png|800px]] | ||
= Conclusion = | |||
In this tutorial, you have deployed a Windows step stone Instance (hop on machine, bastion host) into OCI. You have also made the necessary Infrastructure changes on the VCN like allowing the RDP port on the Security List and adding a default route towards the Internet Gateway. | |||
[[Category:Oracle Cloud]] | |||
Latest revision as of 23:20, 13 June 2024
In this tutorial, we will deploy a Windows Instance (hop on machine, OCI Bastion host) in Oracle Cloud Infrastructure (OCI) which can be used as the first point of entry into your OCI environment and can be used to connect to other private instances inside your OCI environment or for testing purposes.
The following image illustrates how the environment will look like when we finish with the deployment and configuration.
Objective
- Deploy a Windows instance in OCI. We will make the necessary infrastructure changes on the VCN like allowing the RDP port on the security list and adding a default route towards the internet gateway.
Prerequisites
- VCN, a public subnet, and internet gateway. - See this tutorial-CHANGE LINK to create the VCNs, public subnet and internet gateway.
Task 1 - Create a Windows Instance
- Create an OCI Compute instances.
1. Click the Oracle Cloud logo to return to the OCI Console homepage.
2. Click Instances or click hamburger menu and then navigate to Compute, Instances.
- Click Create Instance.
1. Enter the name of instance.
2. Scroll down.
- Click Change Image to change from the default Oracle Linux 8 Image to a Windows Image.
1. In the Select an Image page, select Windows.
2. Scroll down.
1. Select Windows Server 2022 Standard.
2. Select I have reviewed and accept the following documents.
3. Click Select Image.
1. Notice that the Windows Server 2022 Standard Image is selected.
2. Scroll down.
1. Select the VCN that you want to attach to the instance.
2. Select a Subnet.
3. Scroll down.
- Scroll down.
- Click Create to create the instance.
- Notice that the status of the instance is PROVISIONING.
1. After a few minutes, the status is changed to RUNNING.
2. Note your Public IP address and your login credentials. You will need this in the later task when you try to log in to the instance.
- The following image illustrates the visual representation of what we have created.
Task 2 - Allow TCP 3389 Port on the Security List
We need to allow the TCP/`3389` Microsoft Remote Desktop Protocol (RDP) port on the security list that is currently attached to the VCN that includes your new Windows instance.
- Add ingress rules.
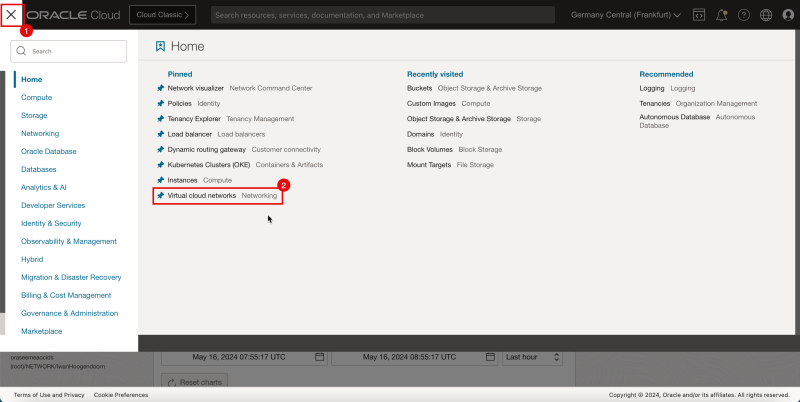
1. Click the hamburger menu (≡) in the OCI Console.
2. Click Virtual cloud networks.
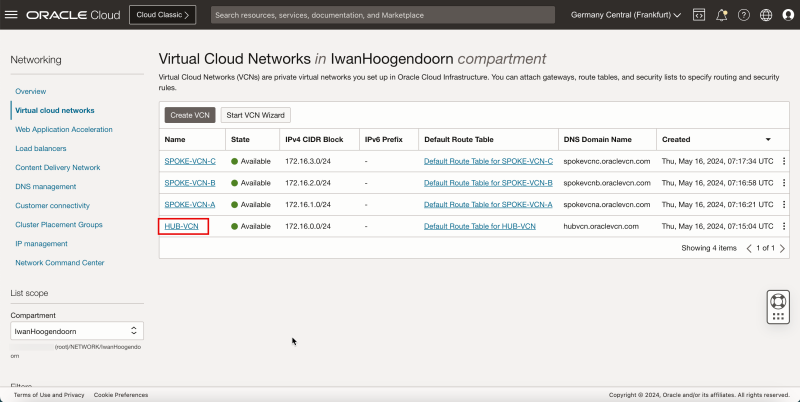
- Click the VCN that includes your instance. In this tutorial, it is `HUB-VCN`.
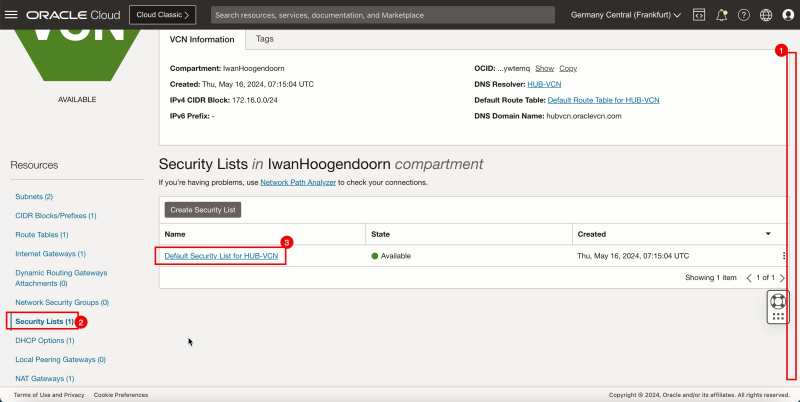
1. Scroll down.
2. Click Security Lists.
3. Click the Default Security List for HUB-VCN for the VCN.
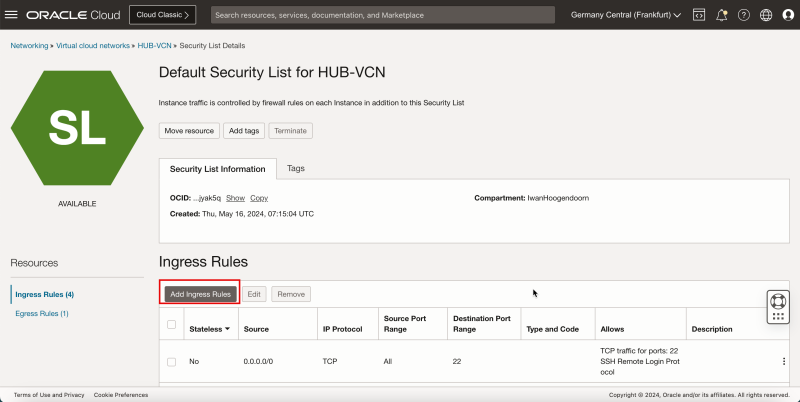
- Click Add Ingress Rules.
- Enter the following information.
1. Source: Enter CIDR.
2. Source CIDR: Enter `0.0.0.0/0`.
3. IP Protocol: Enter TCP.
4. Destination Port Range: Enter `3389`.
5. Click Add Ingress Rules.
- Notice that the security rule is added to allow the TCP/`3389` port on the security list that is attached to VCN. This will allow you to set up an RDP connection from the internet towards this new Windows instance.
- The following image illustrates the visual representation of what we have created.
Task 3 - Add a Default Route towards the Internet Gateway
A public subnet and the VCN is not routing traffic to the internet. So you need to make sure that a route is present to route all traffic from the public subnet to the internet gateway.
- Go to Networking and Virtual Cloud networks.
- Click the VCN that includes your instance. In this tutorial, it is `HUB-VCN`.
1. Click Route Tables.
2. Click the Default Route Table for the VCN.
- Click Add Route Rules.
- Enter the following information.
1. Target Type: Enter Internet Gateway.
2. Destination CIDR Block: Enter `0.0.0.0/0`.
3. Target Internet Gateway: For this tutorial, it is `hub-internet-gw`.
4. Click Add Route Rules.
- Notice that the default route towards the internet gateway is added.
The route tables you configured at the VCN level are attached to a subnet. By default the VCN has the default route table and that the Default Route Table is associated with all the subnets. As this is also the case for your public subnet, instances attached to the public subnet will know how to route traffic towards the internet.
note
- The following image illustrates visual representation of what we have created. Notice that the colors of the routing table match the association of the subnets (The orange blocks with "RT").
Task 4 - Connect to the Windows Instance using Microsoft Remote Desktop Protocol -RDP-
We have done instance creation, allowed TCP/`3389` port to the security list, and configured routing towards the internet. Now, we can connect to the Windows instance from the internet.
In this tutorial, we are using an application called Royal TSX for the connection but you can use any RDP client.
- In the Remote Desktop Connection Settings page, enter the following information.
1. Enter Display Name.
2. In Computer Name, enter the IP address of the Windows instance created in Task 1.
3. In Port, specify the RDP port.
4. Click Credentials.
1. Select Specify username and passwords.
2. Enter Username created in the Task 1.
3. Enter Password create in the Task 1.
4. Click Apply & Close to save the session.
- Double-click on the saved session to connect to the Windows instance. When you can successfully connect you will get a prompt to change your initial password.
- Click OK.
1. Enter old password.
2. Enter new password.
3. Enter new password again.
4. Click right arrow (→).
- When you changed your password successfully, click OK.
- Click Yes.
- Now, you can use your new Windows instance as your first point of entry into your OCI environment and use it to connect to other private instances inside your OCI environment, or for testing purposes.
- The following image illustrates the visual representation of what we have created so far.
Conclusion
In this tutorial, you have deployed a Windows step stone Instance (hop on machine, bastion host) into OCI. You have also made the necessary Infrastructure changes on the VCN like allowing the RDP port on the Security List and adding a default route towards the Internet Gateway.


