Install a pfSense Firewall in Oracle Cloud Infrastructure: Difference between revisions
No edit summary |
No edit summary |
||
| (7 intermediate revisions by the same user not shown) | |||
| Line 1: | Line 1: | ||
pfSense is a firewall that can be used for production or testing purposes where you can simulate the Oracle Cloud Infrastructure (OCI) native firewall services. This pfSense firewall set up can be used inside a hub and spoke VCN routing scenario. | |||
{{note|pfSense is not officially supported on Oracle Cloud Infrastructure by Netgate or Oracle. Contact the pfSense support team before trying this tutorial. | {{note|pfSense is not officially supported on Oracle Cloud Infrastructure by Netgate or Oracle. Contact the pfSense support team before trying this tutorial. | ||
}} | }} | ||
[[File:a7b7f599c0c1f48e71d51d651a7c92f5.png|800px]] | [[File:a7b7f599c0c1f48e71d51d651a7c92f5.png|800px]] | ||
| Line 23: | Line 18: | ||
- Before we start setting up the pfSense firewall inside OCI it is important to have another instance that can connect to the new pfSense firewall using its web browser to perform management on the pfSense firewall. In this tutorial, we have created a Windows instance to do this. Make sure you have something similar. | - Before we start setting up the pfSense firewall inside OCI it is important to have another instance that can connect to the new pfSense firewall using its web browser to perform management on the pfSense firewall. In this tutorial, we have created a Windows instance to do this. Make sure you have something similar. | ||
= Task 1 | = Task 1 - Download the pfSense Image = | ||
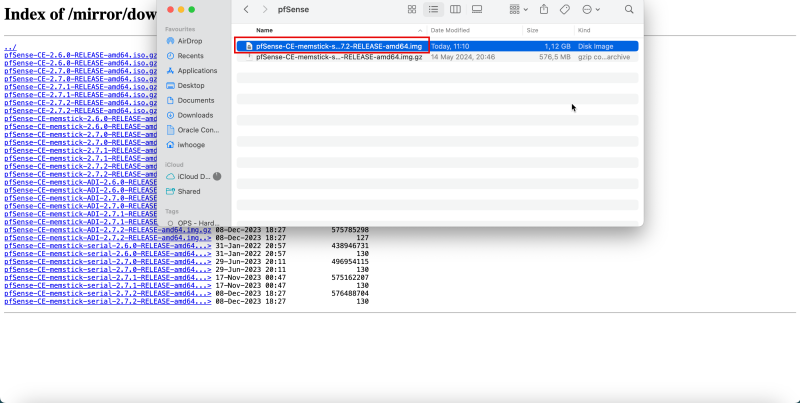
- Download the pfSense image from the Netgate website. Ensure to download the `memstick-serial` version. The filename of the image that we are using is `pfSense-CE-memstick-serial-2.7.2-RELEASE-amd64.img.gz`. For more information, see [[https://sgpfiles.netgate.com/mirror/downloads Netgate]]. | - Download the pfSense image from the Netgate website. Ensure to download the `memstick-serial` version. The filename of the image that we are using is `pfSense-CE-memstick-serial-2.7.2-RELEASE-amd64.img.gz`. For more information, see [[https://sgpfiles.netgate.com/mirror/downloads Netgate]]. | ||
| Line 30: | Line 25: | ||
1. The image will be in the `.gz` format. | 1. The image will be in the `.gz` format. | ||
<br> | |||
2. If you are using OS X, right-click on the compressed file and click '''Open with'''. | 2. If you are using OS X, right-click on the compressed file and click '''Open with'''. | ||
<br> | |||
3. Select '''Archive Utility (default)''' to uncompress the image. | 3. Select '''Archive Utility (default)''' to uncompress the image. | ||
| Line 39: | Line 36: | ||
[[File:cfb7d8789ef6a753c2e393d0b35ff9bb.png|800px]] | [[File:cfb7d8789ef6a753c2e393d0b35ff9bb.png|800px]] | ||
= Task 2 | = Task 2 - Create an OCI Object Storage Bucket = | ||
In this task, we will create an OCI Object Storage bucket that will use to upload the pfSense image and used to create a custom image. | In this task, we will create an OCI Object Storage bucket that will use to upload the pfSense image and used to create a custom image. | ||
| Line 46: | Line 43: | ||
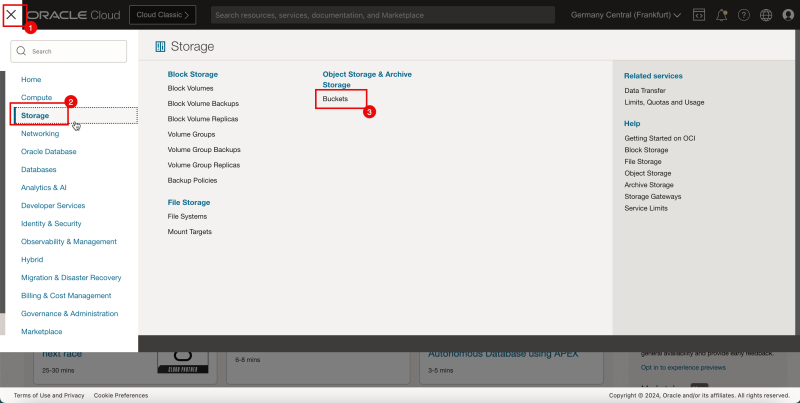
1. Click the hamburger menu (≡) from the upper left corner. | 1. Click the hamburger menu (≡) from the upper left corner. | ||
<br> | |||
2. Click '''Storage'''. | 2. Click '''Storage'''. | ||
<br> | |||
3. Click '''Buckets'''. | 3. Click '''Buckets'''. | ||
| Line 56: | Line 55: | ||
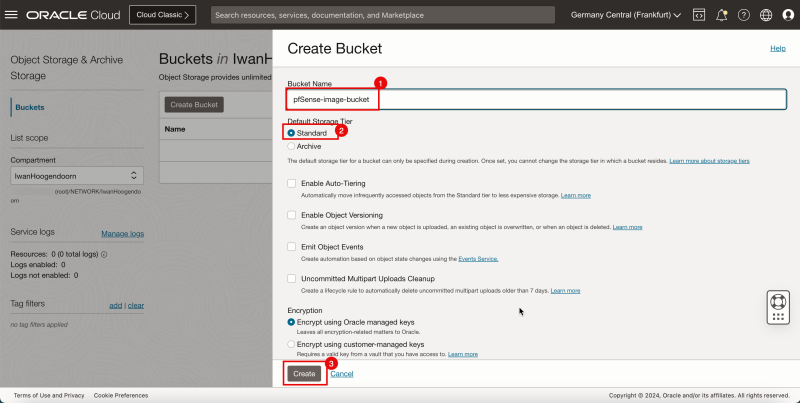
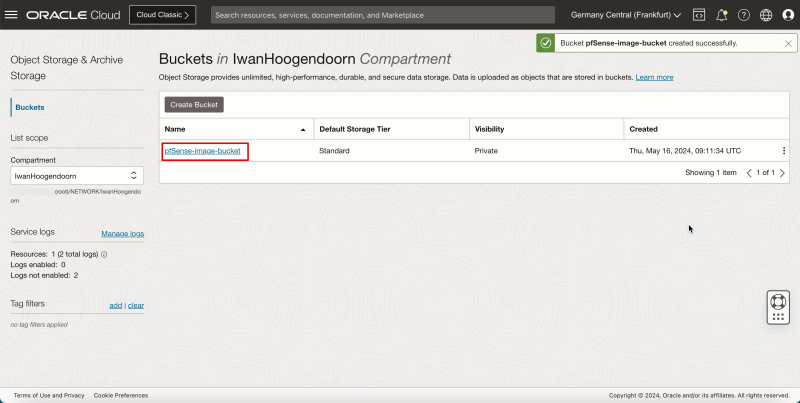
1. Enter a '''Bucket name'''. | 1. Enter a '''Bucket name'''. | ||
<br> | |||
2. Select '''Standard''' storage tier as '''Default Storage Tier'''. | 2. Select '''Standard''' storage tier as '''Default Storage Tier'''. | ||
<br> | |||
3. Click '''Create'''. | 3. Click '''Create'''. | ||
| Line 65: | Line 66: | ||
[[File:d85e73fe9d7a2fbc9cad040ce82cb1d4.png|800px]] | [[File:d85e73fe9d7a2fbc9cad040ce82cb1d4.png|800px]] | ||
= Task 3 | = Task 3 - Upload the pfSense Image to the Storage Bucket = | ||
- Upload the image that we have downloaded in Task 1. | - Upload the image that we have downloaded in Task 1. | ||
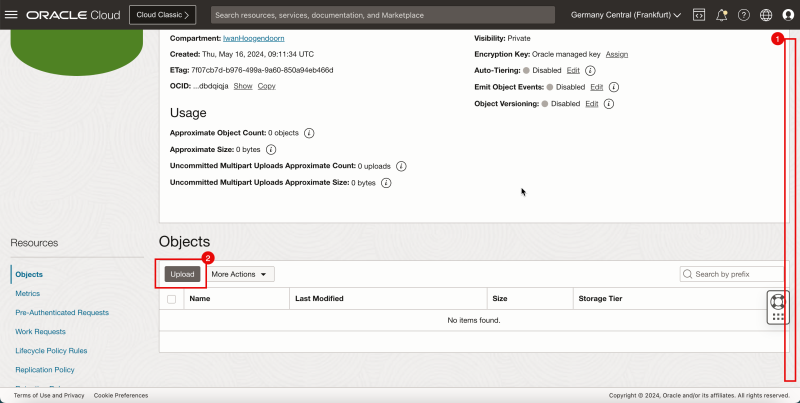
1. Scroll down. | 1. Scroll down. | ||
<br> | |||
2. Click '''Upload'''. | 2. Click '''Upload'''. | ||
| Line 77: | Line 79: | ||
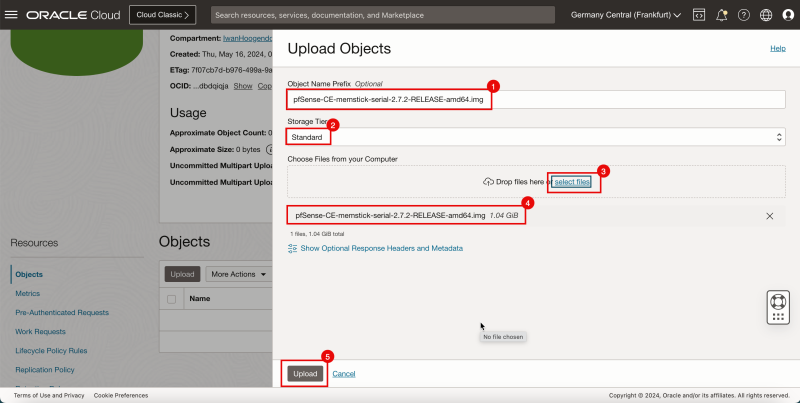
1. Enter '''Object Name Prefix'''. | 1. Enter '''Object Name Prefix'''. | ||
<br> | |||
2. Select '''Standard''' as the '''Storage Tier'''. | 2. Select '''Standard''' as the '''Storage Tier'''. | ||
<br> | |||
3. Click '''select files''' and select the pfSense image. | 3. Click '''select files''' and select the pfSense image. | ||
<br> | |||
4. When you have selected the pfSense image you will see it in the following section. | 4. When you have selected the pfSense image you will see it in the following section. | ||
<br> | |||
5. Click '''Upload'''. | 5. Click '''Upload'''. | ||
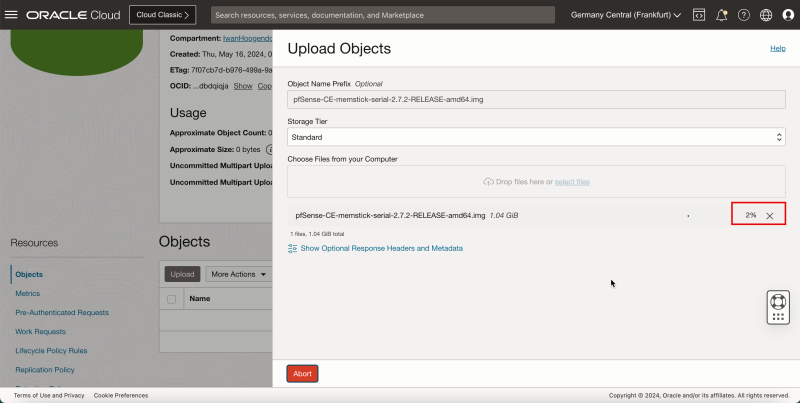
| Line 93: | Line 99: | ||
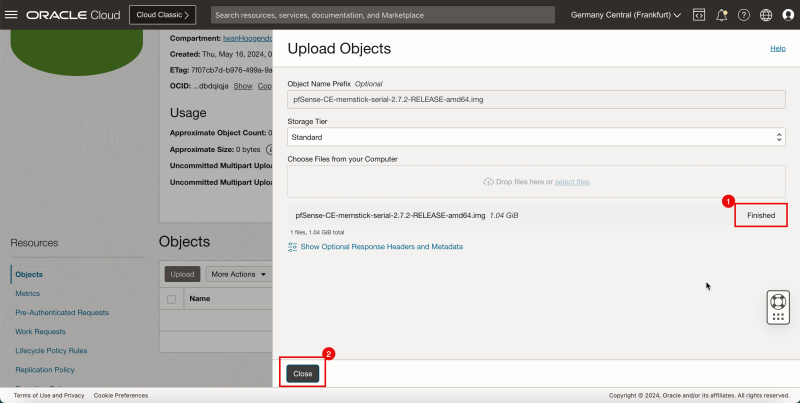
[[File:5d8b7405a40cf0291fd81f2352881bcb.png|800px]] | [[File:5d8b7405a40cf0291fd81f2352881bcb.png|800px]] | ||
= Task 4 | = Task 4 - Create a Custom Image = | ||
We have uploaded the pfSense image. Now, we need to create a custom OCI image from this uploaded image. This custom OCI image will be used to create the pfSense firewall instance. | We have uploaded the pfSense image. Now, we need to create a custom OCI image from this uploaded image. This custom OCI image will be used to create the pfSense firewall instance. | ||
| Line 100: | Line 106: | ||
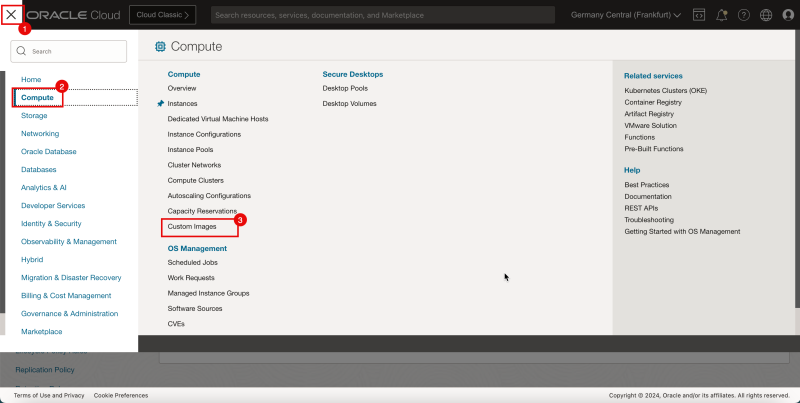
1. Click the hamburger menu (≡) from the upper left corner. | 1. Click the hamburger menu (≡) from the upper left corner. | ||
<br> | |||
2. Click '''Compute'''. | 2. Click '''Compute'''. | ||
<br> | |||
3. Click '''Custom Image'''. | 3. Click '''Custom Image'''. | ||
| Line 112: | Line 120: | ||
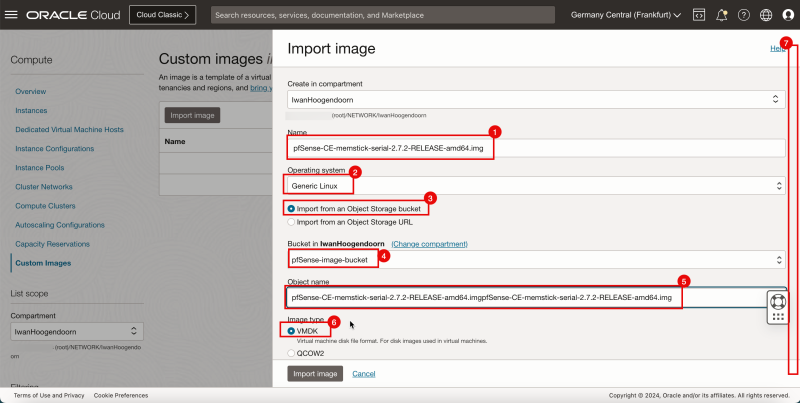
1. Enter a '''name'''. | 1. Enter a '''name'''. | ||
<br> | |||
2. Select '''Generic Linux''' as '''Operating system'''. | 2. Select '''Generic Linux''' as '''Operating system'''. | ||
<br> | |||
3. Select '''Import from an Object Storage bucket'''. | 3. Select '''Import from an Object Storage bucket'''. | ||
<br> | |||
4. Select the storage bucket where you uploaded the image. | 4. Select the storage bucket where you uploaded the image. | ||
<br> | |||
5. In '''Object name''', select the pfSense image. | 5. In '''Object name''', select the pfSense image. | ||
<br> | |||
6. Select '''VMDK''' as '''Image type'''. | |||
<br> | |||
7. Scroll down. | |||
[[File:cecb9a114524ba7d59bb680bdae266f6.png|800px]] | [[File:cecb9a114524ba7d59bb680bdae266f6.png|800px]] | ||
| Line 126: | Line 140: | ||
1. Notice that the status is '''IMPORTING'''. | 1. Notice that the status is '''IMPORTING'''. | ||
<br> | |||
2. Scroll down. | 2. Scroll down. | ||
| Line 131: | Line 146: | ||
1. Notice the state is '''In progress'''. | 1. Notice the state is '''In progress'''. | ||
<br> | |||
2. Monitor the progress. | 2. Monitor the progress. | ||
| Line 136: | Line 152: | ||
1. After a few minutes, status is '''AVAILABLE''' the state will change to '''Succeeded'''. | 1. After a few minutes, status is '''AVAILABLE''' the state will change to '''Succeeded'''. | ||
<br> | |||
2. The '''% Complete''' will be '''100%'''. | 2. The '''% Complete''' will be '''100%'''. | ||
[[File:3fdc8da3e9086b02f51c987a5607a179.png|800px]] | [[File:3fdc8da3e9086b02f51c987a5607a179.png|800px]] | ||
= Task 5 | = Task 5 - Create an Instance with the Custom pfSense Image = | ||
- Create an instance. | - Create an instance. | ||
1. Click the hamburger menu (≡) from the upper left corner. | 1. Click the hamburger menu (≡) from the upper left corner. | ||
<br> | |||
2. Click '''Compute'''. | 2. Click '''Compute'''. | ||
<br> | |||
3. Click '''Instances'''. | 3. Click '''Instances'''. | ||
| Line 155: | Line 174: | ||
1. Enter the instance '''Name'''. | 1. Enter the instance '''Name'''. | ||
<br> | |||
2. Scroll down. | 2. Scroll down. | ||
| Line 164: | Line 184: | ||
1. Select '''My images'''. | 1. Select '''My images'''. | ||
<br> | |||
2. Select '''Custom images'''. | 2. Select '''Custom images'''. | ||
<br> | |||
3. Scroll down. | 3. Scroll down. | ||
| Line 170: | Line 192: | ||
1. Select the custom image created in Task 4. | 1. Select the custom image created in Task 4. | ||
<br> | |||
2. Click '''Select image'''. | 2. Click '''Select image'''. | ||
| Line 175: | Line 198: | ||
1. Notice that the pfSense image is selected. | 1. Notice that the pfSense image is selected. | ||
<br> | |||
2. Scroll down. | 2. Scroll down. | ||
| Line 180: | Line 204: | ||
1. In '''Primary network''', select '''Select existing Virtual cloud network'''. | 1. In '''Primary network''', select '''Select existing Virtual cloud network'''. | ||
<br> | |||
2. Select the '''VCN''' that you want to attach to the pfSense instance. | 2. Select the '''VCN''' that you want to attach to the pfSense instance. | ||
<br> | |||
3. In '''Subnet''', select an '''Select existing subnet'''. | 3. In '''Subnet''', select an '''Select existing subnet'''. | ||
<br> | |||
4. Select the '''Subnet''' that you want to attach to the pfSense instance. | 4. Select the '''Subnet''' that you want to attach to the pfSense instance. | ||
<br> | |||
5. Scroll down. | 5. Scroll down. | ||
| Line 188: | Line 216: | ||
1. Select '''Manually assign private IPv4 address'''. | 1. Select '''Manually assign private IPv4 address'''. | ||
<br> | |||
2. Enter an '''IPv4 address'''. | 2. Enter an '''IPv4 address'''. | ||
<br> | |||
3. Scroll down. | 3. Scroll down. | ||
| Line 194: | Line 224: | ||
1. Select '''No SSH Keys'''. | 1. Select '''No SSH Keys'''. | ||
<br> | |||
2. Scroll down. | 2. Scroll down. | ||
| Line 214: | Line 245: | ||
[[File:f6acd8267ac8b00ea865faeed934db7c.png|800px]] | [[File:f6acd8267ac8b00ea865faeed934db7c.png|800px]] | ||
= Task 6 | = Task 6 - Install pfSense on the Instance = | ||
We need to do the initial installation and set up of the pfSense firewall. We already have the running instance. | We need to do the initial installation and set up of the pfSense firewall. We already have the running instance. | ||
| Line 221: | Line 252: | ||
1. Scroll down. | 1. Scroll down. | ||
<br> | |||
2. Click '''Console connection'''. | 2. Click '''Console connection'''. | ||
<br> | |||
3. Click '''Launch Cloud Shell connection'''. | 3. Click '''Launch Cloud Shell connection'''. | ||
| Line 239: | Line 272: | ||
1. Select '''Install pfSense'''. | 1. Select '''Install pfSense'''. | ||
<br> | |||
2. Select '''OK''' and press '''ENTER'''. | 2. Select '''OK''' and press '''ENTER'''. | ||
[[File:fe381ab3d9fae94a0d245b6242f1e4d4.png|800px]] | |||
1. Select '''Manual Disk Setup (experts)'''. | 1. Select '''Manual Disk Setup (experts)'''. | ||
<br> | |||
2. Select '''OK''' and press '''ENTER'''. | 2. Select '''OK''' and press '''ENTER'''. | ||
| Line 249: | Line 284: | ||
1. Select '''da0 - 47 GB MBR'''. | 1. Select '''da0 - 47 GB MBR'''. | ||
<br> | |||
2. Select '''Create''' and press '''ENTER'''. | 2. Select '''Create''' and press '''ENTER'''. | ||
| Line 254: | Line 290: | ||
1. In '''Type''', enter '''freebsd'''. | 1. In '''Type''', enter '''freebsd'''. | ||
<br> | |||
2. In '''Size''', enter '''46 GB'''. | 2. In '''Size''', enter '''46 GB'''. | ||
<br> | |||
3. Enter '''Mountpoint'''. | 3. Enter '''Mountpoint'''. | ||
<br> | |||
4. Select '''OK''' and press '''ENTER'''. | 4. Select '''OK''' and press '''ENTER'''. | ||
| Line 261: | Line 300: | ||
1. In '''da0s4''', select '''46 GB BSD'''. | 1. In '''da0s4''', select '''46 GB BSD'''. | ||
<br> | |||
2. Select '''Create''' and press '''ENTER'''. | 2. Select '''Create''' and press '''ENTER'''. | ||
| Line 266: | Line 306: | ||
1. In '''Type''', enter '''freebsd-ufs'''. | 1. In '''Type''', enter '''freebsd-ufs'''. | ||
<br> | |||
2. In '''Size''', enter '''40 GB'''. | 2. In '''Size''', enter '''40 GB'''. | ||
<br> | |||
3. In '''Mountpoint''', enter '''/'''. | 3. In '''Mountpoint''', enter '''/'''. | ||
<br> | |||
4. Select '''OK''' and press '''ENTER'''. | 4. Select '''OK''' and press '''ENTER'''. | ||
| Line 273: | Line 316: | ||
1. Notice that the mountpoint is created for `/`. | 1. Notice that the mountpoint is created for `/`. | ||
<br> | |||
2. In '''da0s4''', enter '''46 GB BSD'''. | 2. In '''da0s4''', enter '''46 GB BSD'''. | ||
<br> | |||
3. Select '''Create''' and press '''ENTER'''. | 3. Select '''Create''' and press '''ENTER'''. | ||
| Line 279: | Line 324: | ||
1. In '''Type''', enter '''freebsd-swap'''. | 1. In '''Type''', enter '''freebsd-swap'''. | ||
<br> | |||
2. In '''Size''', enter '''5770 MB'''. | 2. In '''Size''', enter '''5770 MB'''. | ||
<br> | |||
3. Enter '''Mountpoint'''. | 3. Enter '''Mountpoint'''. | ||
<br> | |||
4. Select '''OK''' and press '''ENTER'''. | 4. Select '''OK''' and press '''ENTER'''. | ||
| Line 286: | Line 334: | ||
1. Notice that the mountpoint is created for swap. | 1. Notice that the mountpoint is created for swap. | ||
<br> | |||
2. Select '''Finish''' and press '''ENTER''' | 2. Select '''Finish''' and press '''ENTER''' | ||
| Line 298: | Line 347: | ||
[[File:c751769adb65d7d3aae163d7d8afae2e.png|800px]] | [[File:c751769adb65d7d3aae163d7d8afae2e.png|800px]] | ||
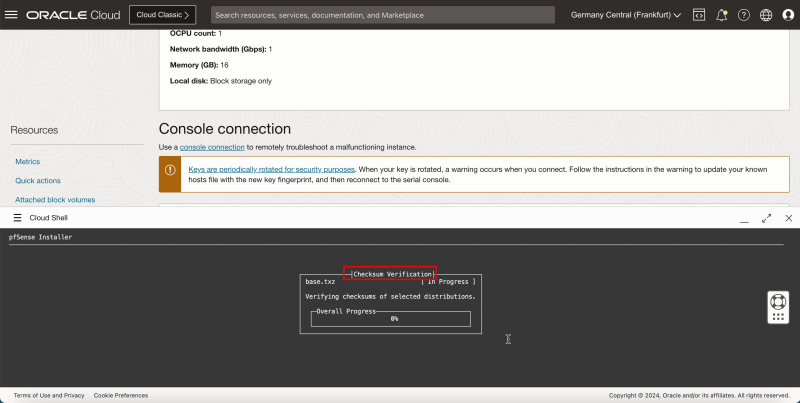
The installation will do a quick '''Checksum verification'''. | |||
[[File:244c423b81dbc67911da0437b7c05608.png|800px]] | [[File:244c423b81dbc67911da0437b7c05608.png|800px]] | ||
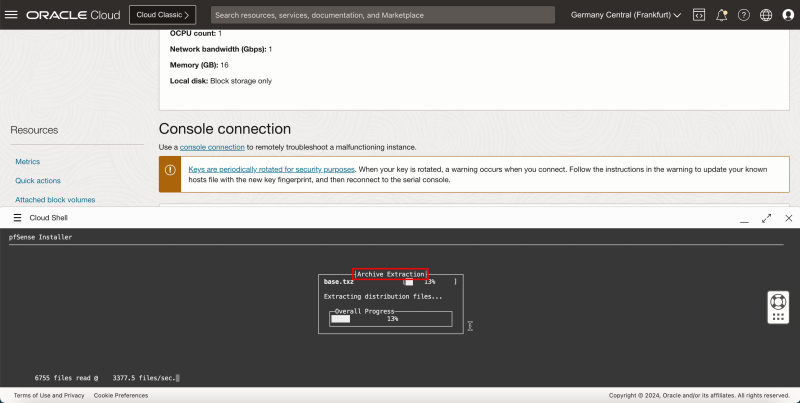
The installation will do an '''Archive Extraction'''. | |||
[[File:dffe649a041f36287807e619c04419c4.png|800px]] | [[File:dffe649a041f36287807e619c04419c4.png|800px]] | ||
| Line 329: | Line 378: | ||
1. Verify the WAN interface name. | 1. Verify the WAN interface name. | ||
<br> | |||
2. For '''Do you want to proceed''', enter '''y''' and press '''ENTER'''. | 2. For '''Do you want to proceed''', enter '''y''' and press '''ENTER'''. | ||
| Line 342: | Line 392: | ||
1. You will see that the IP address will be configured using DHCP. | 1. You will see that the IP address will be configured using DHCP. | ||
<br> | |||
2. Note the pfSense menu to do some additional basic configuration. | 2. Note the pfSense menu to do some additional basic configuration. | ||
[[File:8a6d29053288f769ca23c79bf62ae9db.png|800px]] | [[File:8a6d29053288f769ca23c79bf62ae9db.png|800px]] | ||
= Task 7 | = Task 7 - Connect to the pfSense Web Graphic User Interface -GUI- and Complete the Initial Set up = | ||
The installation is finished, now we need to connect to the web interface of the pfSense firewall. But before this, we need to open some ports on the security list of the VCN. | The installation is finished, now we need to connect to the web interface of the pfSense firewall. But before this, we need to open some ports on the security list of the VCN. | ||
| Line 353: | Line 404: | ||
1. Click the hamburger menu (≡) from the upper left corner. | 1. Click the hamburger menu (≡) from the upper left corner. | ||
<br> | |||
2. Click '''Virtual Cloud Networks''' or navigate to '''Networking''' and '''Virtual Cloud Networks'''. | 2. Click '''Virtual Cloud Networks''' or navigate to '''Networking''' and '''Virtual Cloud Networks'''. | ||
| Line 362: | Line 414: | ||
1. Scroll down. | 1. Scroll down. | ||
<br> | |||
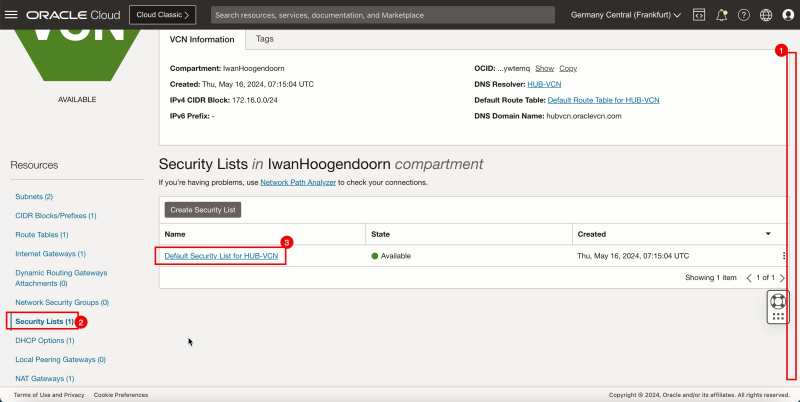
2. Click '''Security Lists'''. | 2. Click '''Security Lists'''. | ||
<br> | |||
3. Click the '''Default Security List for HUB-VCN'''. | 3. Click the '''Default Security List for HUB-VCN'''. | ||
| Line 372: | Line 426: | ||
1. In '''Source Type''', enter '''CIDR'''. | 1. In '''Source Type''', enter '''CIDR'''. | ||
<br> | |||
2. In '''Source CIDR''', for this tutorial, enter `172.16.0.128/25`. This is the subnet which has the Windows instance, that we will be using to connect to the pfSense firewall using the browser. | 2. In '''Source CIDR''', for this tutorial, enter `172.16.0.128/25`. This is the subnet which has the Windows instance, that we will be using to connect to the pfSense firewall using the browser. | ||
<br> | |||
3. In '''IP Protocol''', enter '''TCP'''. | 3. In '''IP Protocol''', enter '''TCP'''. | ||
<br> | |||
4. In '''Destination Port Range''', enter `80,443`. | 4. In '''Destination Port Range''', enter `80,443`. | ||
<br> | |||
5. Click '''Add Ingress Rules''' . | 5. Click '''Add Ingress Rules''' . | ||
| Line 384: | Line 442: | ||
1. Navigate to the '''Compute''' and '''Instances'''. | 1. Navigate to the '''Compute''' and '''Instances'''. | ||
<br> | |||
2. Make a note of your pfSense firewall IP address. | 2. Make a note of your pfSense firewall IP address. | ||
| Line 389: | Line 448: | ||
1. In your Windows instance, open a browser and navigate to the pfSense firewall IP using HTTPS. | 1. In your Windows instance, open a browser and navigate to the pfSense firewall IP using HTTPS. | ||
<br> | |||
2. Click '''Advanced'''. | 2. Click '''Advanced'''. | ||
| Line 398: | Line 458: | ||
1. Enter default username as `admin`. | 1. Enter default username as `admin`. | ||
<br> | |||
2. Enter default password as `pfsense`. | 2. Enter default password as `pfsense`. | ||
<br> | |||
3. Click '''Sign In'''. | 3. Click '''Sign In'''. | ||
| Line 412: | Line 474: | ||
1. Enter a hostname. | 1. Enter a hostname. | ||
<br> | |||
2. Enter a domain name or keep domain name default. | 2. Enter a domain name or keep domain name default. | ||
<br> | |||
3. Scroll down. | 3. Scroll down. | ||
| Line 429: | Line 493: | ||
1. In '''Configure WAN interface''', select '''DHCP'''. | 1. In '''Configure WAN interface''', select '''DHCP'''. | ||
<br> | |||
2. Scroll down. | 2. Scroll down. | ||
| Line 434: | Line 499: | ||
1. Keep all the IP address settings default. | 1. Keep all the IP address settings default. | ||
<br> | |||
2. Scroll down. | 2. Scroll down. | ||
| Line 447: | Line 513: | ||
1. Enter a new admin password. | 1. Enter a new admin password. | ||
<br> | |||
2. Enter a admin password again. | 2. Enter a admin password again. | ||
<br> | |||
3. Click '''Next'''. | 3. Click '''Next'''. | ||
| Line 487: | Line 555: | ||
1. Notice that the pfSense firewall is installed and the dashboard is visible. | 1. Notice that the pfSense firewall is installed and the dashboard is visible. | ||
<br> | |||
2. Notice that the support information is not available. This is because the pfSense firewall is installed on a private subnet and this private subnet is not able to reach the internet by default. | 2. Notice that the support information is not available. This is because the pfSense firewall is installed on a private subnet and this private subnet is not able to reach the internet by default. | ||
| Line 494: | Line 563: | ||
1. Click the hamburger menu (≡) from the upper left corner. | 1. Click the hamburger menu (≡) from the upper left corner. | ||
<br> | |||
2. Click '''Virtual Cloud Networks''' or navigate to '''Networking''' and '''Virtual Cloud Networks'''. | 2. Click '''Virtual Cloud Networks''' or navigate to '''Networking''' and '''Virtual Cloud Networks'''. | ||
| Line 503: | Line 573: | ||
1. Click '''Route Tables'''. | 1. Click '''Route Tables'''. | ||
<br> | |||
2. Click '''Default Route Table for HUB-VCN'''. | 2. Click '''Default Route Table for HUB-VCN'''. | ||
| Line 508: | Line 579: | ||
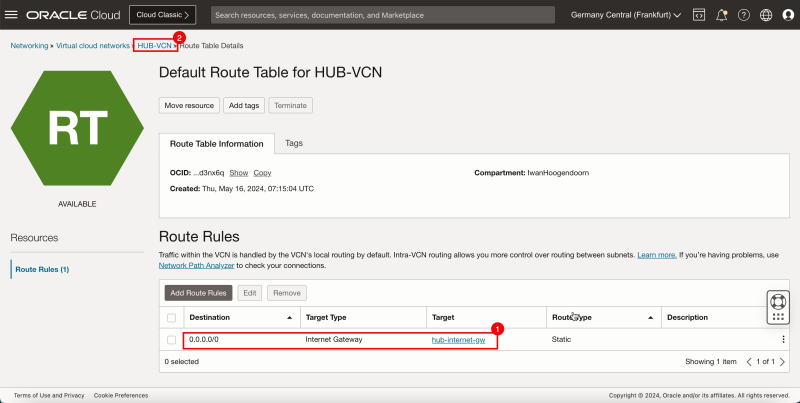
1. Notice that the default route table has a route in there that will route all the traffic towards the internet gateway. This is not usable for us as we need to route the traffic for the private subnet towards the NAT gateway. | 1. Notice that the default route table has a route in there that will route all the traffic towards the internet gateway. This is not usable for us as we need to route the traffic for the private subnet towards the NAT gateway. | ||
<br> | |||
2. Click '''HUB-VCN''' to go back one page from '''Route Table Details''' page. | 2. Click '''HUB-VCN''' to go back one page from '''Route Table Details''' page. | ||
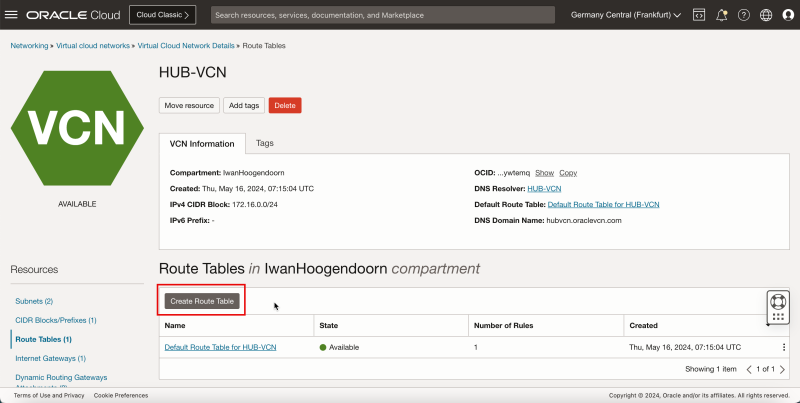
| Line 517: | Line 589: | ||
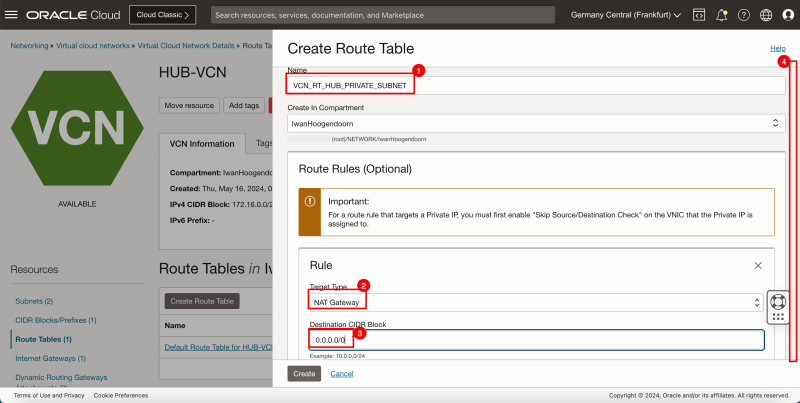
1. Enter a name. | 1. Enter a name. | ||
<br> | |||
2. In '''Target Type''', enter '''NAT Gateway'''. | 2. In '''Target Type''', enter '''NAT Gateway'''. | ||
<br> | |||
3. In '''Destination CIDR Block''', enter `0.0.0.0/0`. | 3. In '''Destination CIDR Block''', enter `0.0.0.0/0`. | ||
<br> | |||
4. Scroll down. | 4. Scroll down. | ||
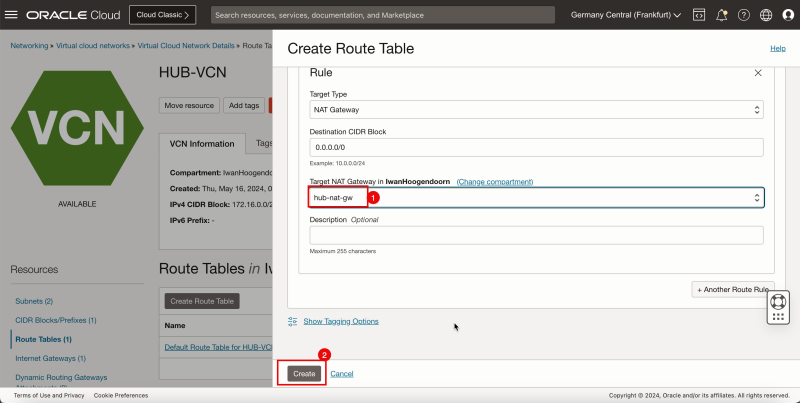
| Line 524: | Line 599: | ||
1. Select the '''NAT Gateway''' that you already have available in the VCN. If you do not have a NAT gateway, click '''Cancel''' and create a NAT gateway. | 1. Select the '''NAT Gateway''' that you already have available in the VCN. If you do not have a NAT gateway, click '''Cancel''' and create a NAT gateway. | ||
<br> | |||
2. Click '''Create'''. | 2. Click '''Create'''. | ||
| Line 529: | Line 605: | ||
1. Notice that the static route towards the NAT gateway is now created. | 1. Notice that the static route towards the NAT gateway is now created. | ||
<br> | |||
2. Click '''HUB-VCN''' to go back one page from '''Route Table Details''' page. | 2. Click '''HUB-VCN''' to go back one page from '''Route Table Details''' page. | ||
| Line 540: | Line 617: | ||
1. Click '''Subnets'''. | 1. Click '''Subnets'''. | ||
<br> | |||
2. Click '''Private subnet''', the subnet to where the pfSense instance is currently attached. | 2. Click '''Private subnet''', the subnet to where the pfSense instance is currently attached. | ||
| Line 549: | Line 627: | ||
1. Select the route table you just created. | 1. Select the route table you just created. | ||
<br> | |||
2. Click '''Save Changes'''. | 2. Click '''Save Changes'''. | ||
| Line 560: | Line 639: | ||
1. Refresh the page. | 1. Refresh the page. | ||
<br> | |||
2. Scroll down. | 2. Scroll down. | ||
| Line 573: | Line 653: | ||
- Notice that the '''Netgate Services and Support''' section will change. | - Notice that the '''Netgate Services and Support''' section will change. | ||
- The response time of the dashboard page will also be quicker. | - The response time of the dashboard page will also be quicker. | ||
| Line 596: | Line 677: | ||
[[File:335255883f0a0bbee0ed469eaaf3e292.png|800px]] | [[File:335255883f0a0bbee0ed469eaaf3e292.png|800px]] | ||
= Task 8 | = Task 8 - Verify the Connectivity with Ping = | ||
- Verifying the connectivity using ping (ICMP) is a good starting point for testing. | - Verifying the connectivity using ping (ICMP) is a good starting point for testing. | ||
1. In the Windows instance, open the '''Command Prompt''' and try to ping the pfSense firewall IP address. | 1. In the Windows instance, open the '''Command Prompt''' and try to ping the pfSense firewall IP address. | ||
<br> | |||
2. Notice that the ping results are showing a '''100% packet loss'''. | 2. Notice that the ping results are showing a '''100% packet loss'''. | ||
| Line 608: | Line 690: | ||
- Open Internet Control Message Protocol (ICMP) on the default security list that is attached to the VCN. | - Open Internet Control Message Protocol (ICMP) on the default security list that is attached to the VCN. | ||
- Open ICMP on the pfSense firewall. | - Open ICMP on the pfSense firewall. | ||
| Line 613: | Line 696: | ||
1. Click the hamburger menu (≡) from the upper left corner. | 1. Click the hamburger menu (≡) from the upper left corner. | ||
<br> | |||
2. Click '''Virtual Cloud Networks''' or navigate to '''Networking''' and '''Virtual Cloud Networks'''. | 2. Click '''Virtual Cloud Networks''' or navigate to '''Networking''' and '''Virtual Cloud Networks'''. | ||
| Line 622: | Line 706: | ||
1. Scroll down. | 1. Scroll down. | ||
<br> | |||
2. Click '''Security Lists'''. | 2. Click '''Security Lists'''. | ||
<br> | |||
3. Click '''Default Security List for HUB-VCN'''. | 3. Click '''Default Security List for HUB-VCN'''. | ||
| Line 632: | Line 718: | ||
1. In '''Source Type''', enter '''CIDR'''. | 1. In '''Source Type''', enter '''CIDR'''. | ||
<br> | |||
2. In '''Source CIDR''', enter `0.0.0.0/0`. | 2. In '''Source CIDR''', enter `0.0.0.0/0`. | ||
<br> | |||
3. In '''IP Protocol''', enter '''ICMP'''. | 3. In '''IP Protocol''', enter '''ICMP'''. | ||
<br> | |||
4. Click '''Add Ingress Rules'''. | 4. Click '''Add Ingress Rules'''. | ||
| Line 649: | Line 738: | ||
1. '''Action:''' Select '''Pass'''. | 1. '''Action:''' Select '''Pass'''. | ||
<br> | |||
2. '''Protocol:''' Select '''ICMP'''. | 2. '''Protocol:''' Select '''ICMP'''. | ||
<br> | |||
3. '''ICMP Subtypes:''' Select '''Any'''. | 3. '''ICMP Subtypes:''' Select '''Any'''. | ||
<br> | |||
4. Scroll down. | 4. Scroll down. | ||
| Line 656: | Line 748: | ||
1. '''Source:''' Select '''Any'''. | 1. '''Source:''' Select '''Any'''. | ||
<br> | |||
2. '''Destination:''' Select '''Any'''. | 2. '''Destination:''' Select '''Any'''. | ||
<br> | |||
3. Click '''Save'''. | 3. Click '''Save'''. | ||
| Line 662: | Line 756: | ||
1. Notice that the new ICMP rule is in place. | 1. Notice that the new ICMP rule is in place. | ||
<br> | |||
2. Click '''Apply Changes''' to commit the changes. | 2. Click '''Apply Changes''' to commit the changes. | ||
| Line 671: | Line 766: | ||
1. In the Windows instance, open the '''Command Prompt''' and try to ping the pfSense firewall IP address. | 1. In the Windows instance, open the '''Command Prompt''' and try to ping the pfSense firewall IP address. | ||
<br> | |||
2. Notice that the ping results are showing a '''0% packet loss'''. | 2. Notice that the ping results are showing a '''0% packet loss'''. | ||
| Line 678: | Line 774: | ||
1. Click '''Diagnostics'''. | 1. Click '''Diagnostics'''. | ||
<br> | |||
2. Click '''Ping'''. | 2. Click '''Ping'''. | ||
| Line 683: | Line 780: | ||
1. In '''Hostname''', enter `8.8.8.8`. | 1. In '''Hostname''', enter `8.8.8.8`. | ||
<br> | |||
2. Click '''Ping'''. | 2. Click '''Ping'''. | ||
| Line 694: | Line 792: | ||
[[File:a3bd4b61a66c61bbf201306bf950a9eb.png|800px]] | [[File:a3bd4b61a66c61bbf201306bf950a9eb.png|800px]] | ||
= Conclusion = | |||
In this tutorial, we explained all the necessary steps that you required to set up a pfSense firewall inside OCI. We made adjustments to routing and security lists so that the pfSense firewall can be managed properly and we also did some ICMP tests to verify connectivity. This pfSense firewall setup can be used inside a Hub and Spoke VCN Routing scenario. | |||
[[Category:Oracle Cloud]] | |||
Latest revision as of 23:20, 13 June 2024
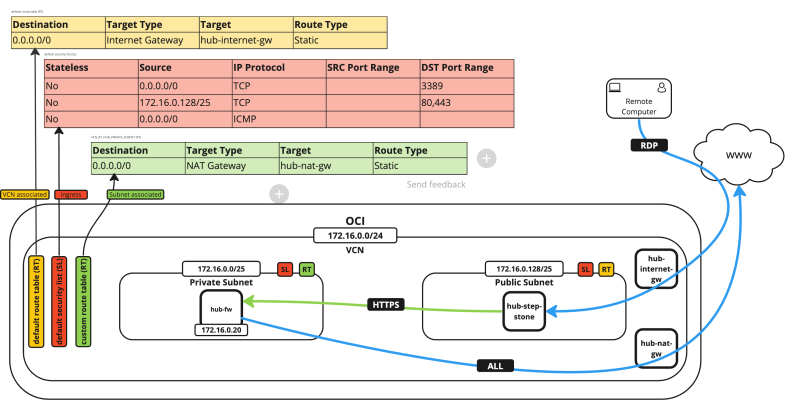
pfSense is a firewall that can be used for production or testing purposes where you can simulate the Oracle Cloud Infrastructure (OCI) native firewall services. This pfSense firewall set up can be used inside a hub and spoke VCN routing scenario.
pfSense is not officially supported on Oracle Cloud Infrastructure by Netgate or Oracle. Contact the pfSense support team before trying this tutorial.
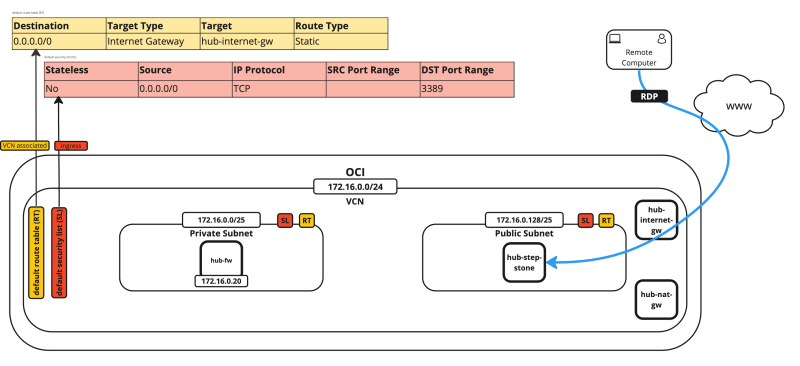
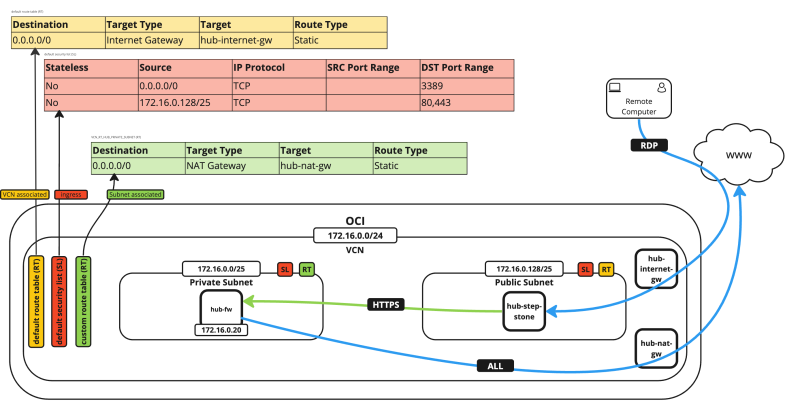
The following image illustrates how the environment will look like when you are finished with the deployment and configuration.
Objectives
- Set up a pfSense firewall inside OCI. We will make adjustments to routing and security lists so that the pfSense firewall can be managed properly and we will do some ICMP tests to verify connectivity.
Prerequisites
- Before we start setting up the pfSense firewall inside OCI it is important to have another instance that can connect to the new pfSense firewall using its web browser to perform management on the pfSense firewall. In this tutorial, we have created a Windows instance to do this. Make sure you have something similar.
Task 1 - Download the pfSense Image
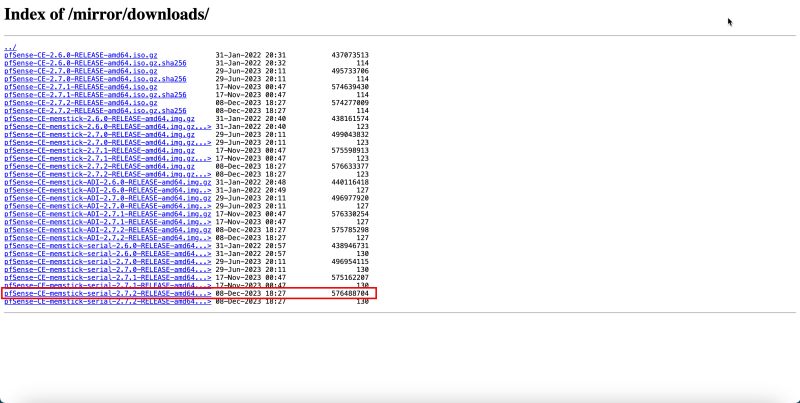
- Download the pfSense image from the Netgate website. Ensure to download the `memstick-serial` version. The filename of the image that we are using is `pfSense-CE-memstick-serial-2.7.2-RELEASE-amd64.img.gz`. For more information, see [Netgate].
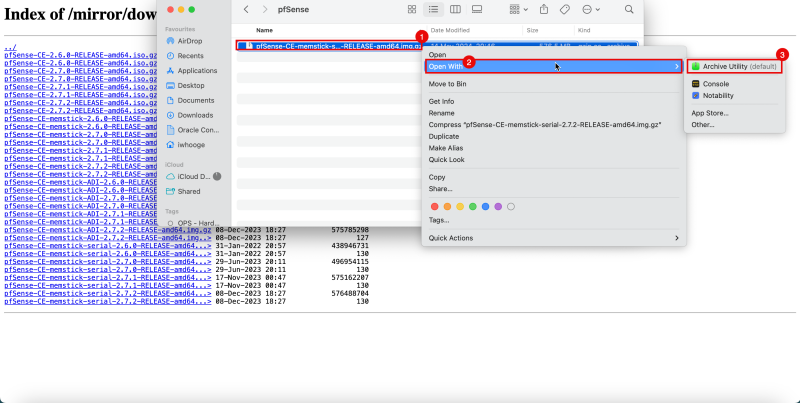
1. The image will be in the `.gz` format.
2. If you are using OS X, right-click on the compressed file and click Open with.
3. Select Archive Utility (default) to uncompress the image.
- Notice that the image filename is `pfSense-CE-memstick-serial-2.7.2-RELEASE-amd64.img`.
Task 2 - Create an OCI Object Storage Bucket
In this task, we will create an OCI Object Storage bucket that will use to upload the pfSense image and used to create a custom image.
- Create a storage bucket.
1. Click the hamburger menu (≡) from the upper left corner.
2. Click Storage.
3. Click Buckets.
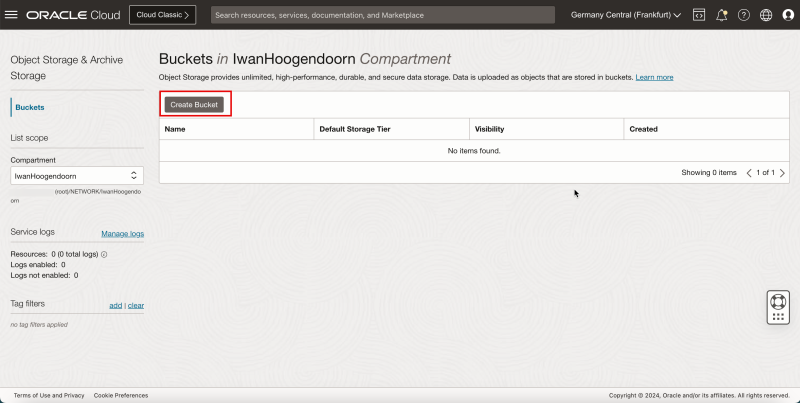
- Click Create Bucket.
1. Enter a Bucket name.
2. Select Standard storage tier as Default Storage Tier.
3. Click Create.
- Notice that the storage bucket is created.
Task 3 - Upload the pfSense Image to the Storage Bucket
- Upload the image that we have downloaded in Task 1.
1. Scroll down.
2. Click Upload.
- In the Upload Objects screen, enter the following information.
1. Enter Object Name Prefix.
2. Select Standard as the Storage Tier.
3. Click select files and select the pfSense image.
4. When you have selected the pfSense image you will see it in the following section.
5. Click Upload.
- While the pfSense image is uploading into the storage bucket, you can monitor the progress.
1. When the pfSense image is fully uploaded the progress status will be Finished. 2. Click Close.
Task 4 - Create a Custom Image
We have uploaded the pfSense image. Now, we need to create a custom OCI image from this uploaded image. This custom OCI image will be used to create the pfSense firewall instance.
- Create a custom image.
1. Click the hamburger menu (≡) from the upper left corner.
2. Click Compute.
3. Click Custom Image.
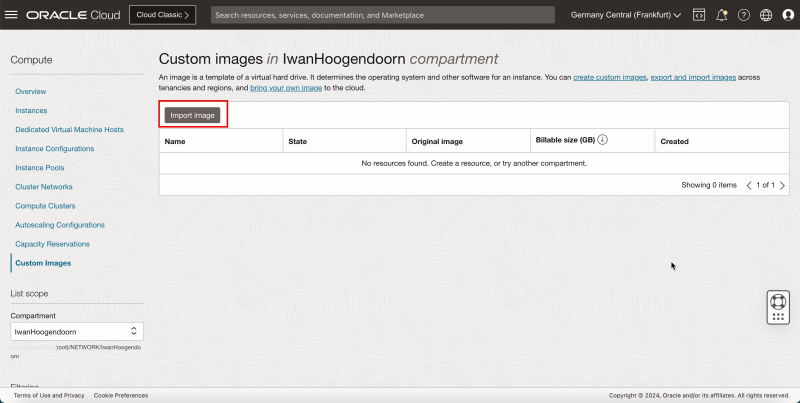
- Click Import Image.
- In the Import image section, enter the following information.
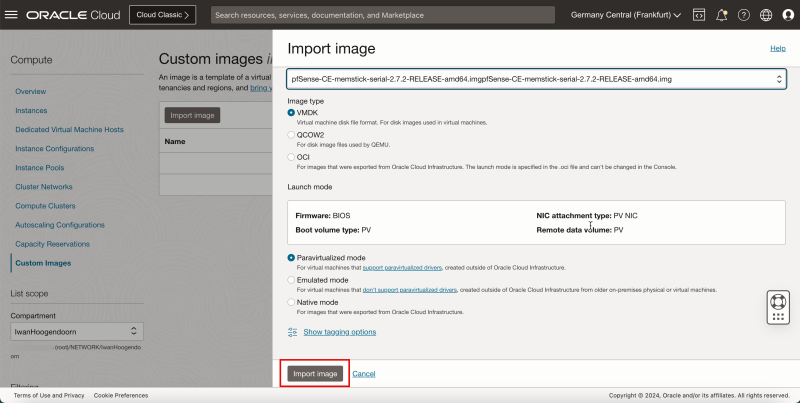
1. Enter a name.
2. Select Generic Linux as Operating system.
3. Select Import from an Object Storage bucket.
4. Select the storage bucket where you uploaded the image.
5. In Object name, select the pfSense image.
6. Select VMDK as Image type.
7. Scroll down.
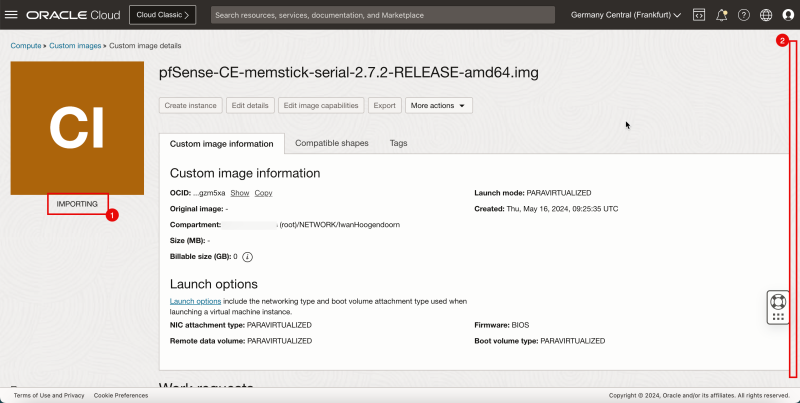
- Keep other fields default and click Import Image.
1. Notice that the status is IMPORTING.
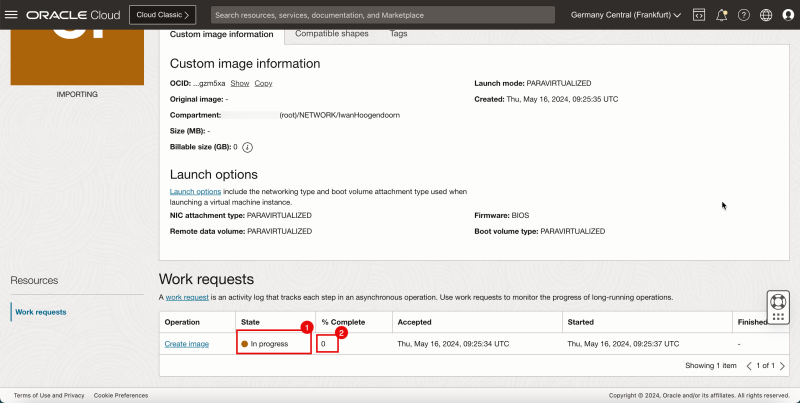
2. Scroll down.
1. Notice the state is In progress.
2. Monitor the progress.
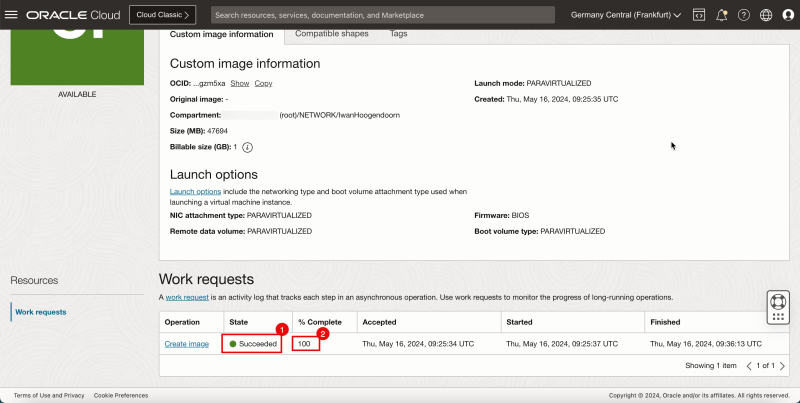
1. After a few minutes, status is AVAILABLE the state will change to Succeeded.
2. The % Complete will be 100%.
Task 5 - Create an Instance with the Custom pfSense Image
- Create an instance.
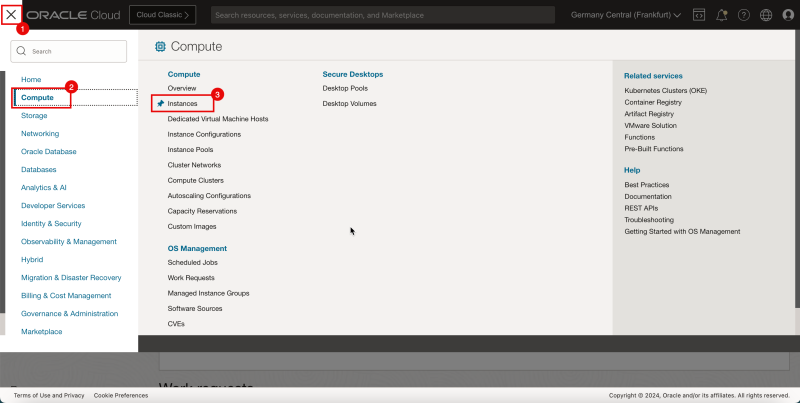
1. Click the hamburger menu (≡) from the upper left corner.
2. Click Compute.
3. Click Instances.
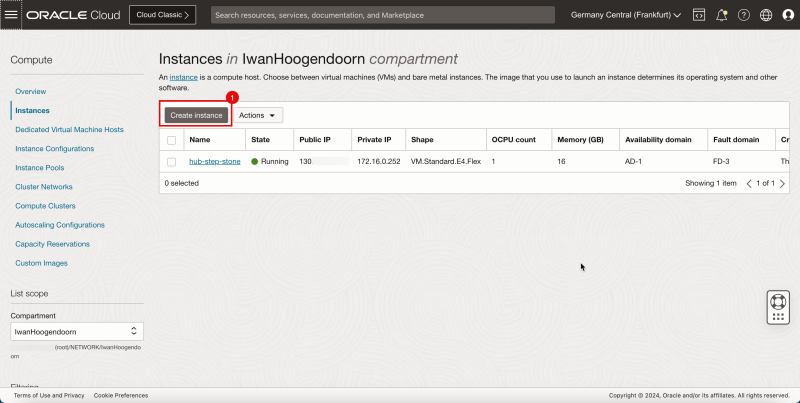
1. Click Create instance.
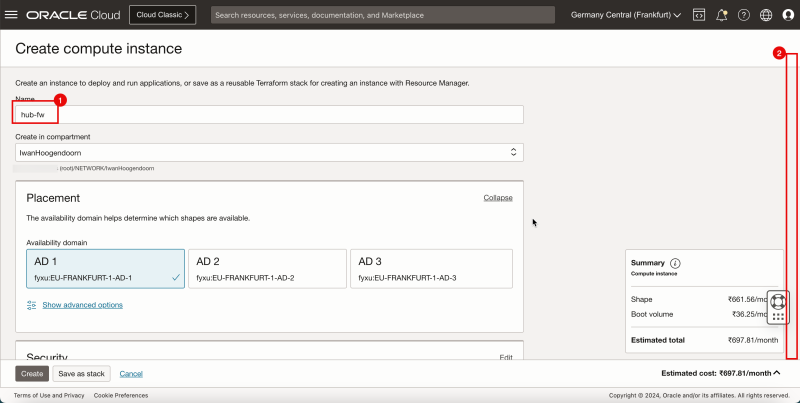
1. Enter the instance Name.
2. Scroll down.
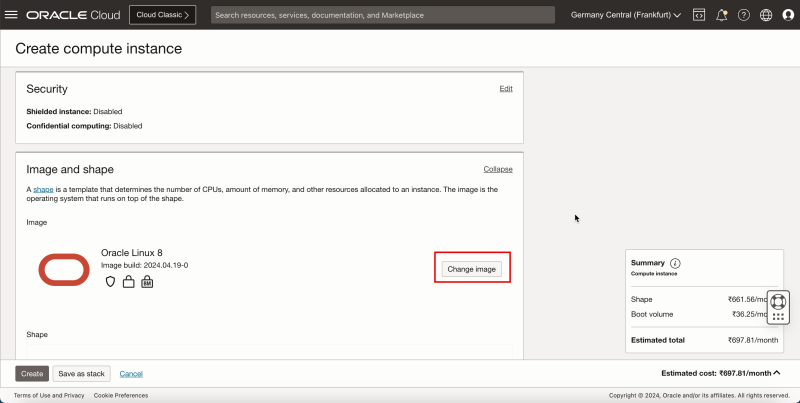
- Click Change Image.
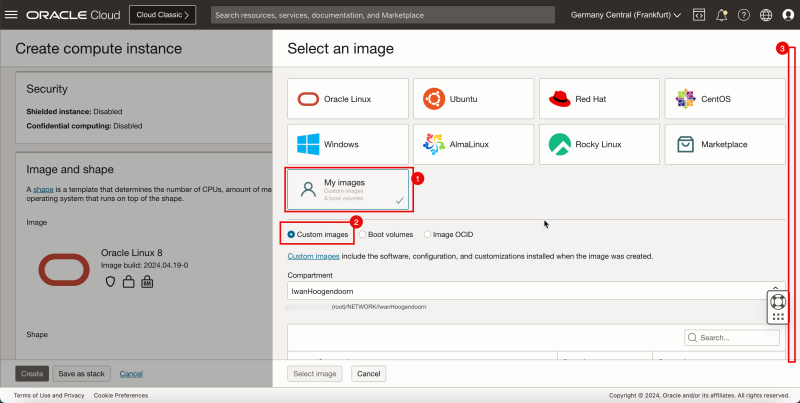
1. Select My images.
2. Select Custom images.
3. Scroll down.
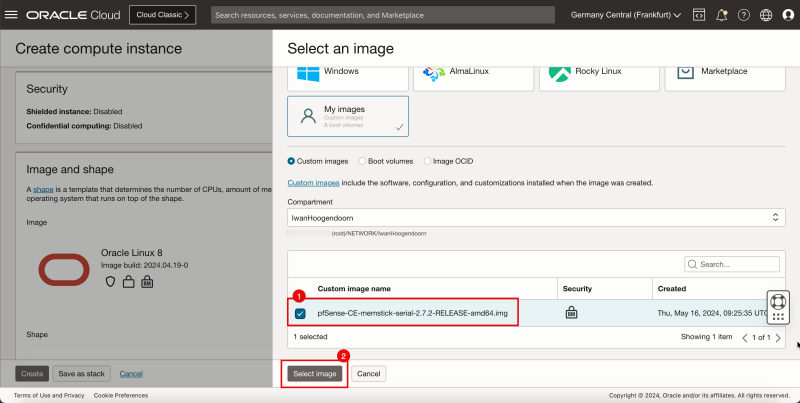
1. Select the custom image created in Task 4.
2. Click Select image.
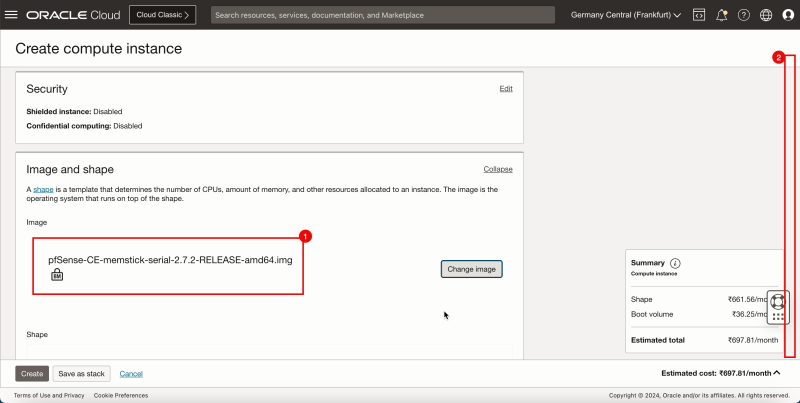
1. Notice that the pfSense image is selected.
2. Scroll down.
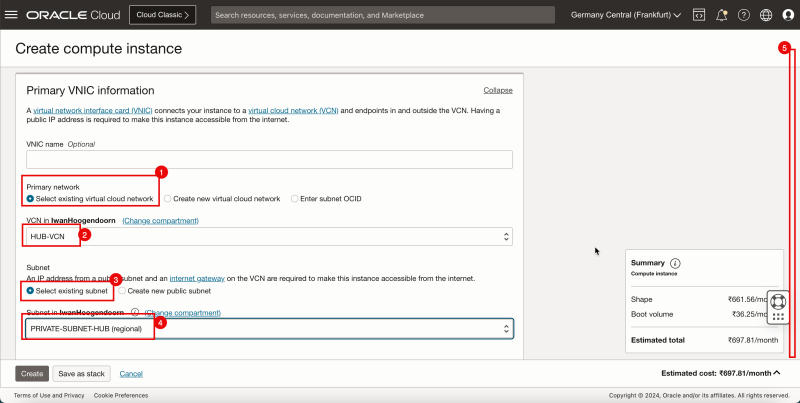
1. In Primary network, select Select existing Virtual cloud network.
2. Select the VCN that you want to attach to the pfSense instance.
3. In Subnet, select an Select existing subnet.
4. Select the Subnet that you want to attach to the pfSense instance.
5. Scroll down.
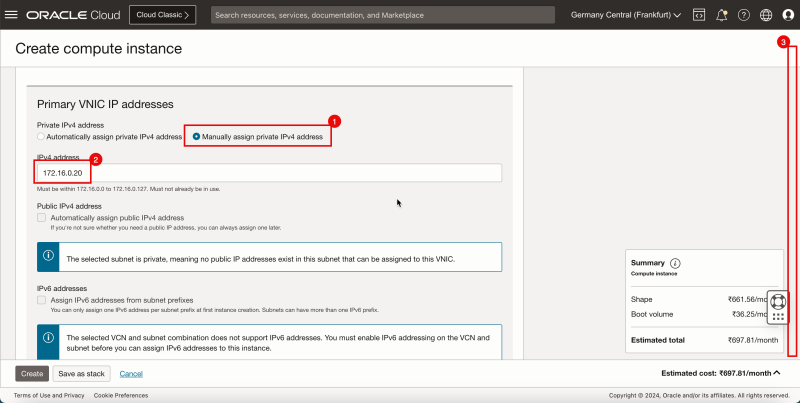
1. Select Manually assign private IPv4 address.
2. Enter an IPv4 address.
3. Scroll down.
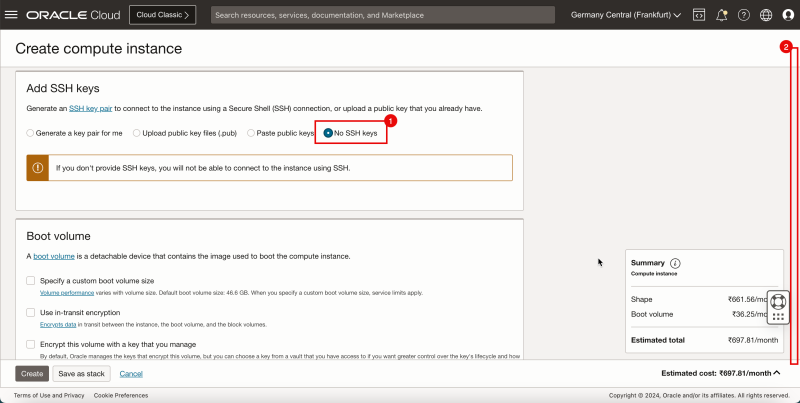
1. Select No SSH Keys.
2. Scroll down.
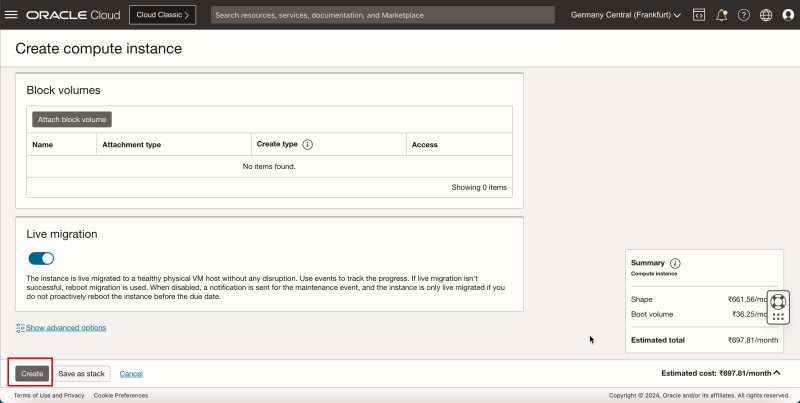
- Click Create.
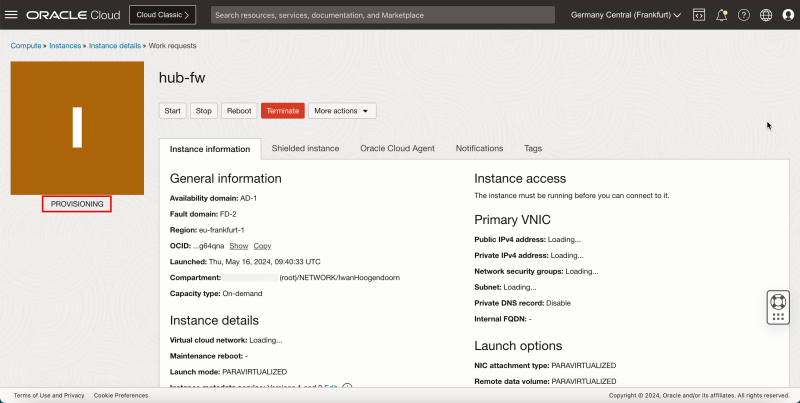
- Notice the status is PROVISIONING.
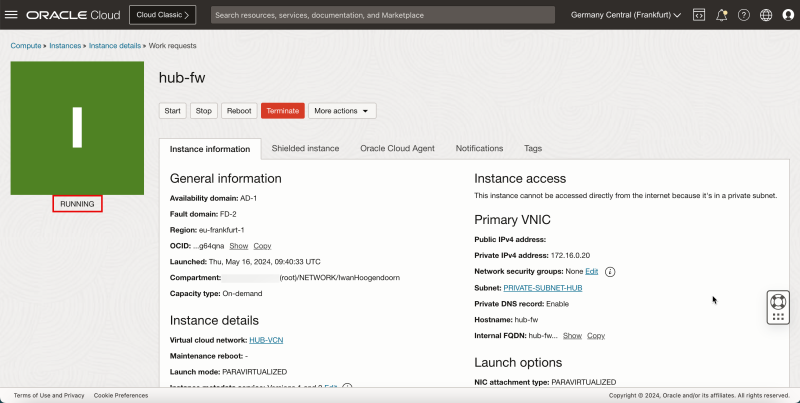
- After a few minutes, the status will change to RUNNING.
- The following image illustrates the visual representation of what you have created.
Task 6 - Install pfSense on the Instance
We need to do the initial installation and set up of the pfSense firewall. We already have the running instance.
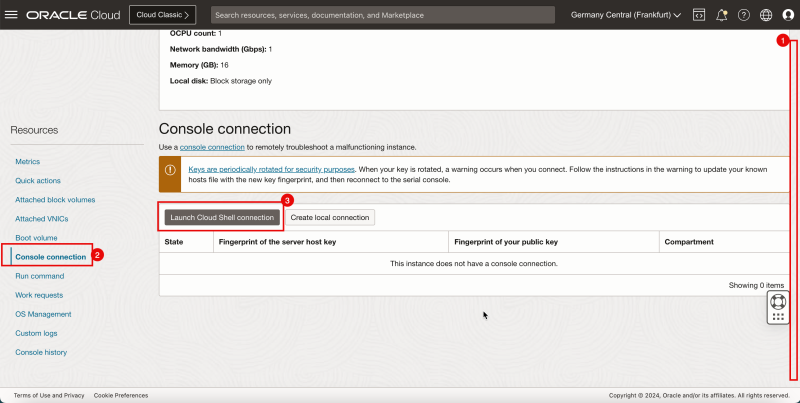
- To install the pfSense firewall software, we need to create a console connection.
1. Scroll down.
2. Click Console connection.
3. Click Launch Cloud Shell connection.
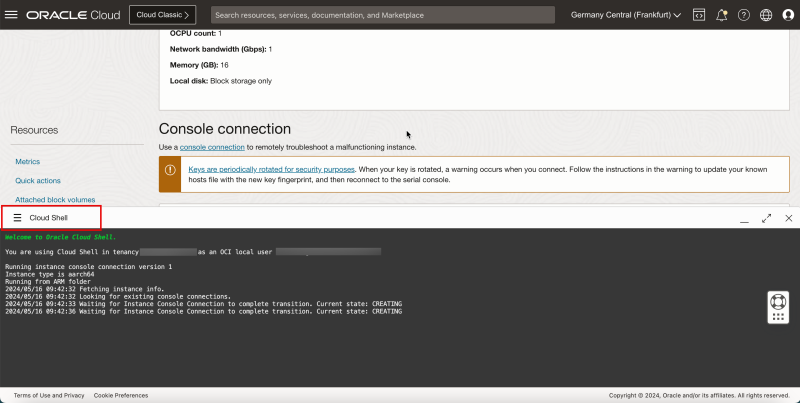
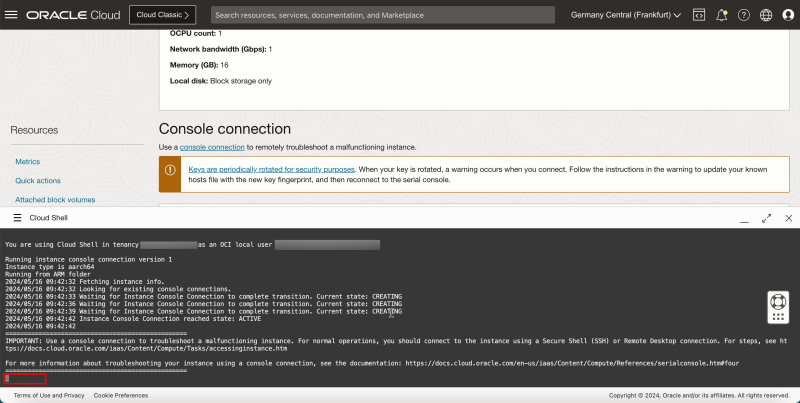
- Notice that the Cloud Shell window will open.
- A few startup messages will show up. Press ENTER.
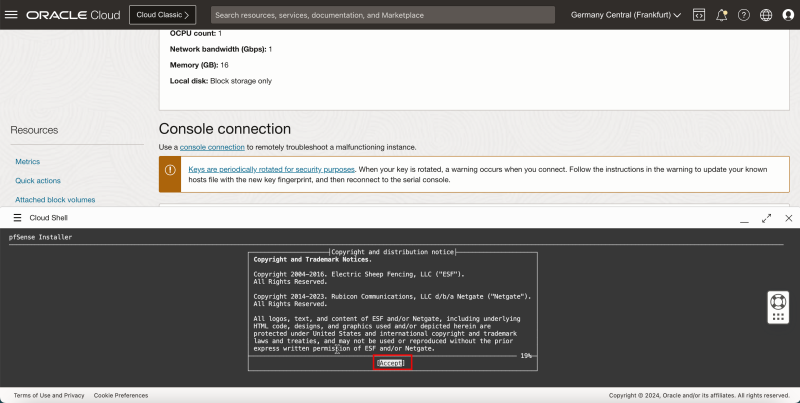
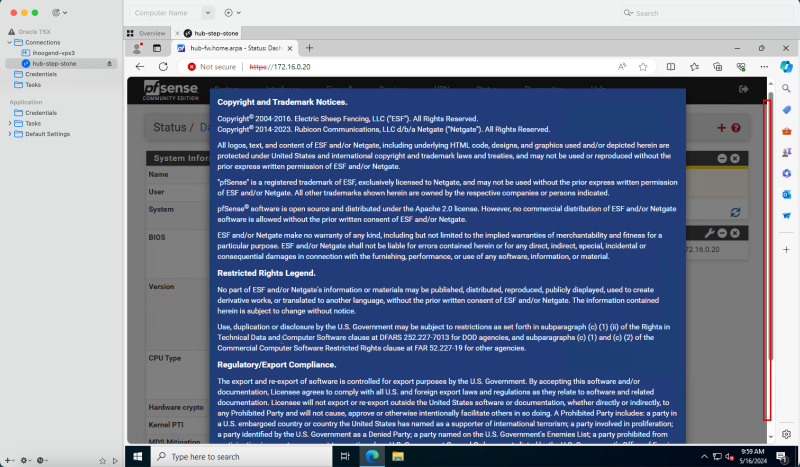
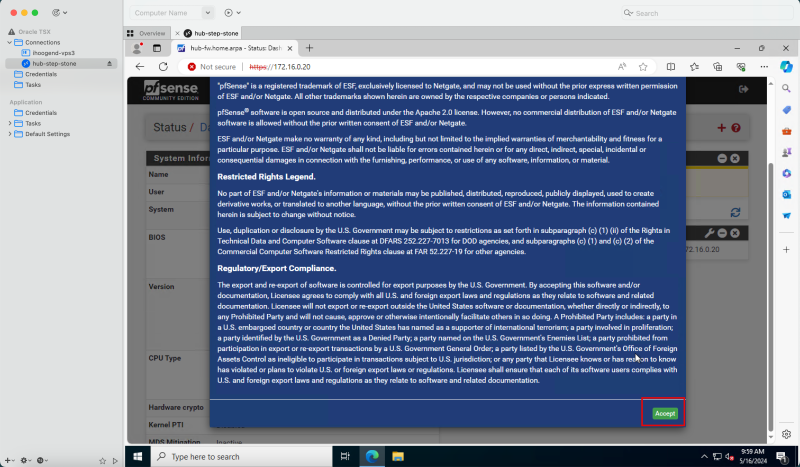
- Read the copyright messages and select Accept and then press ENTER.
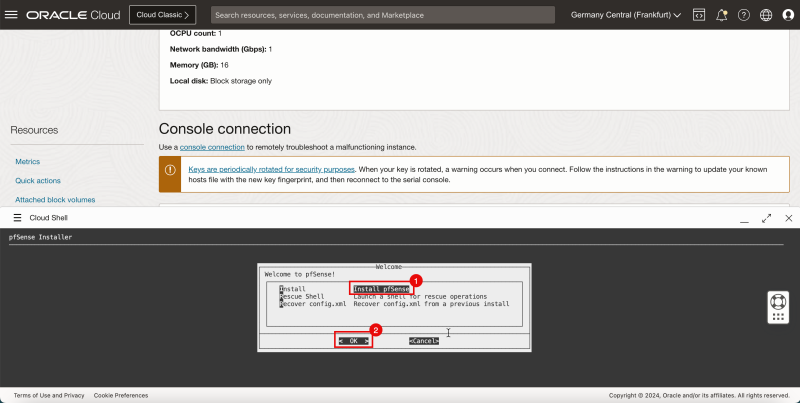
1. Select Install pfSense.
2. Select OK and press ENTER.
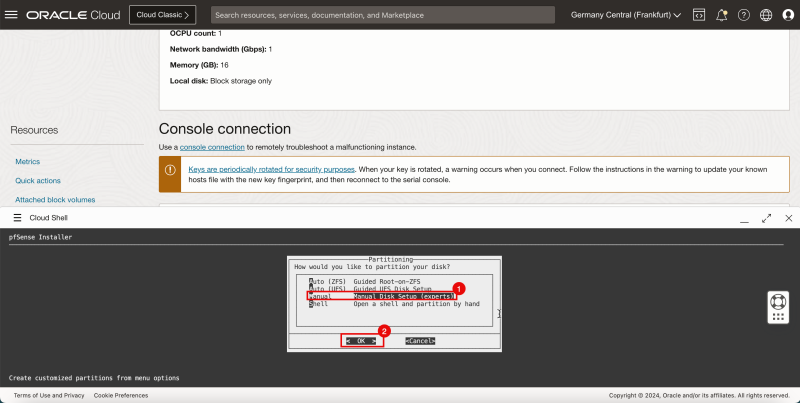
1. Select Manual Disk Setup (experts).
2. Select OK and press ENTER.
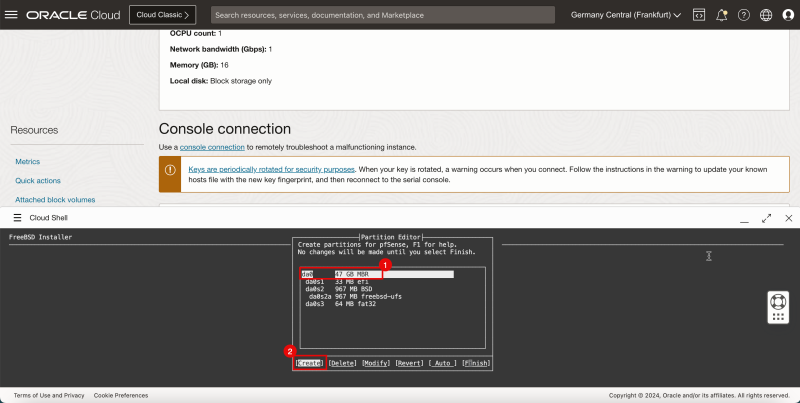
1. Select da0 - 47 GB MBR.
2. Select Create and press ENTER.
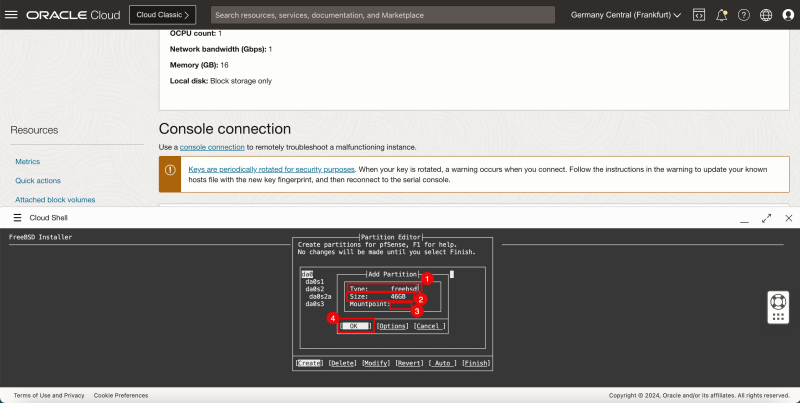
1. In Type, enter freebsd.
2. In Size, enter 46 GB.
3. Enter Mountpoint.
4. Select OK and press ENTER.
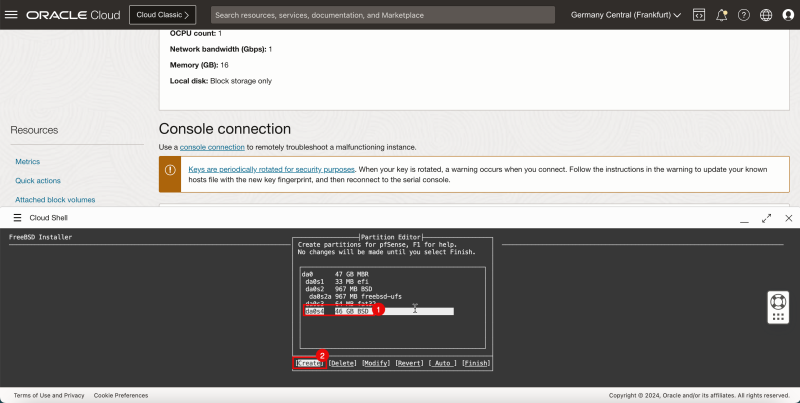
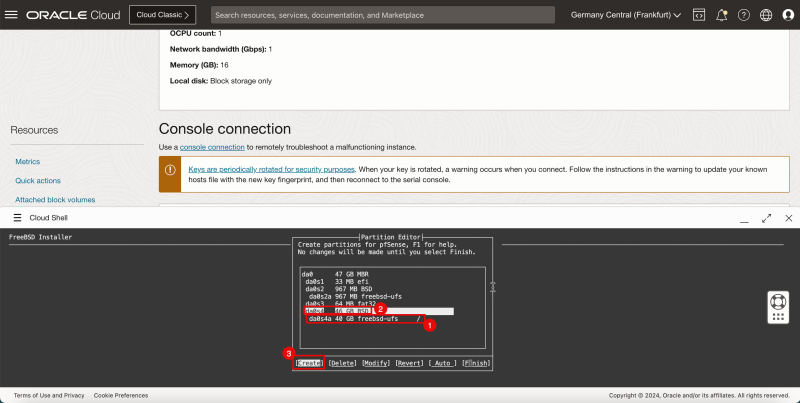
1. In da0s4, select 46 GB BSD.
2. Select Create and press ENTER.
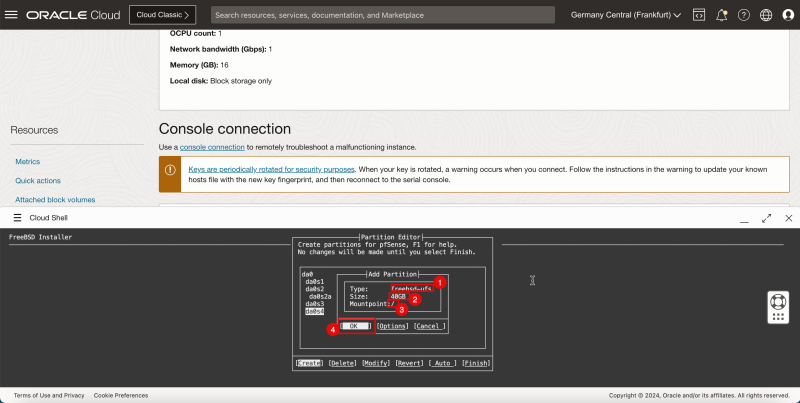
1. In Type, enter freebsd-ufs.
2. In Size, enter 40 GB.
3. In Mountpoint, enter /.
4. Select OK and press ENTER.
1. Notice that the mountpoint is created for `/`.
2. In da0s4, enter 46 GB BSD.
3. Select Create and press ENTER.
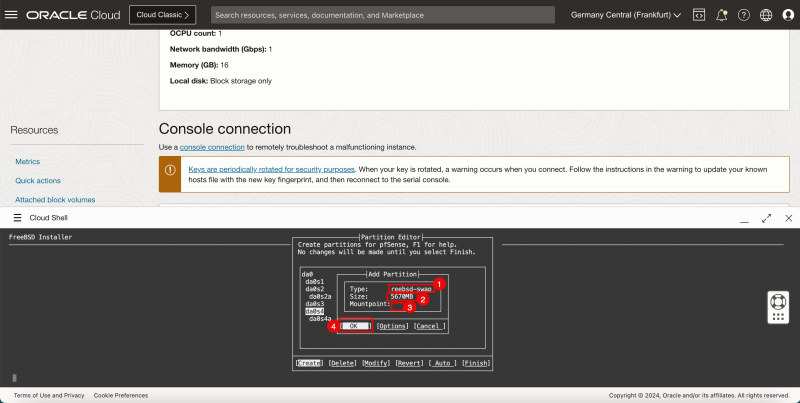
1. In Type, enter freebsd-swap.
2. In Size, enter 5770 MB.
3. Enter Mountpoint.
4. Select OK and press ENTER.
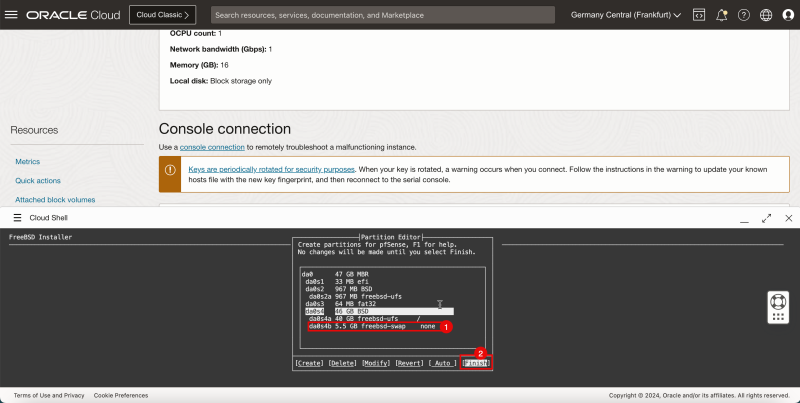
1. Notice that the mountpoint is created for swap.
2. Select Finish and press ENTER
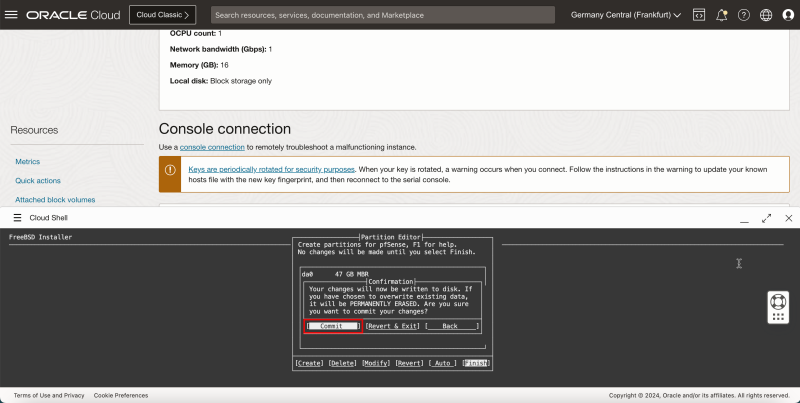
- Select Commit and press ENTER.
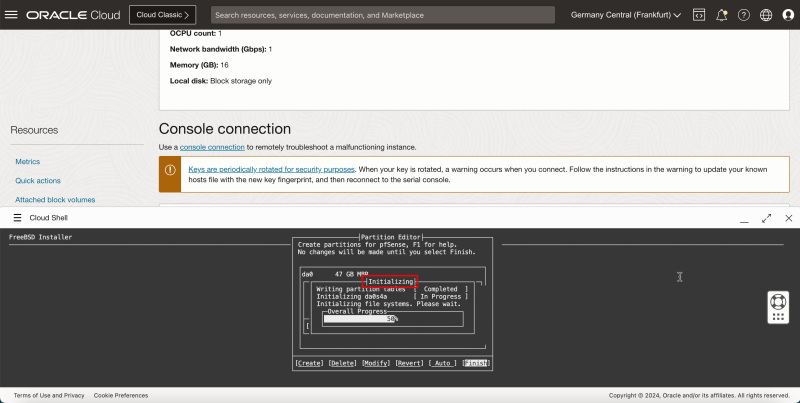
- The installation will start Initializing the set up.
The installation will do a quick Checksum verification.
The installation will do an Archive Extraction.
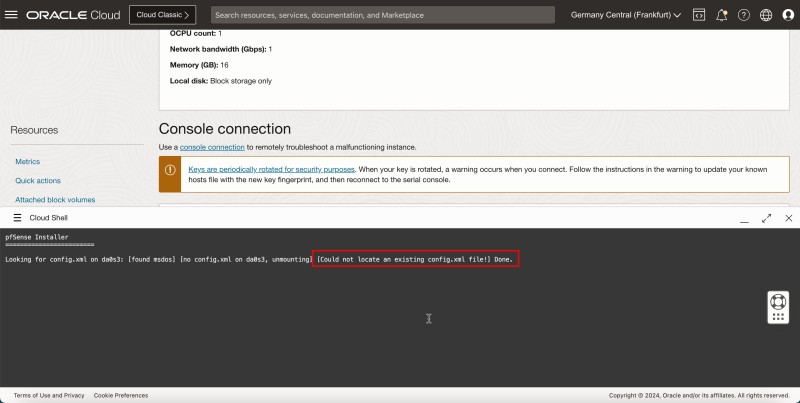
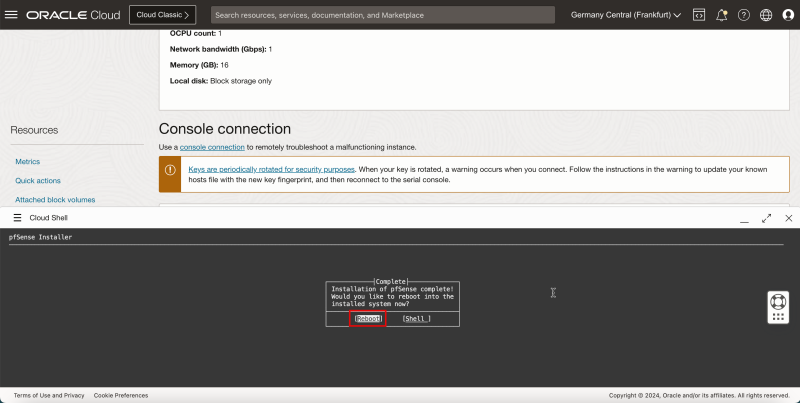
- You will get a message Could not locate an existing `config.xml` file! as this is a new installation.
- Select Reboot and press ENTER.
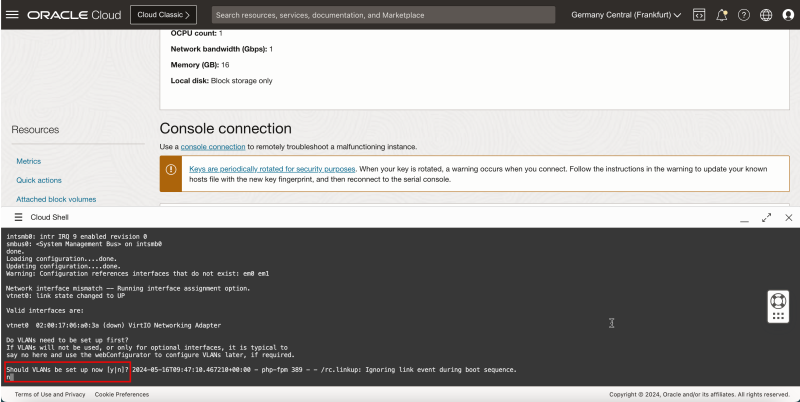
- After the first reboot you will get a few configuration options to configure the WAN interface.
- For Should VLANS be set up, enter n and press ENTER.
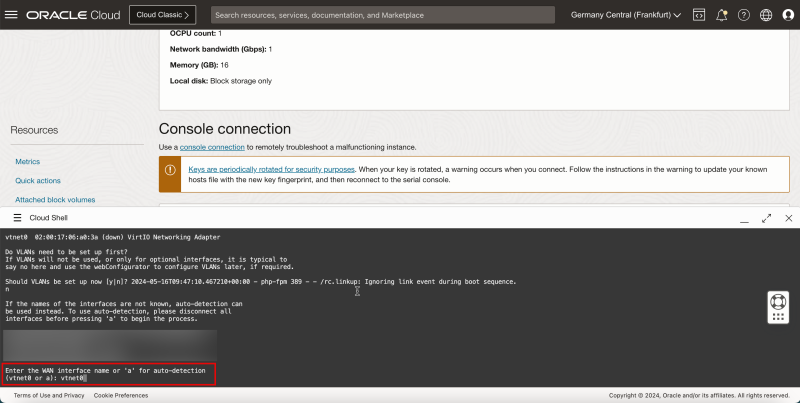
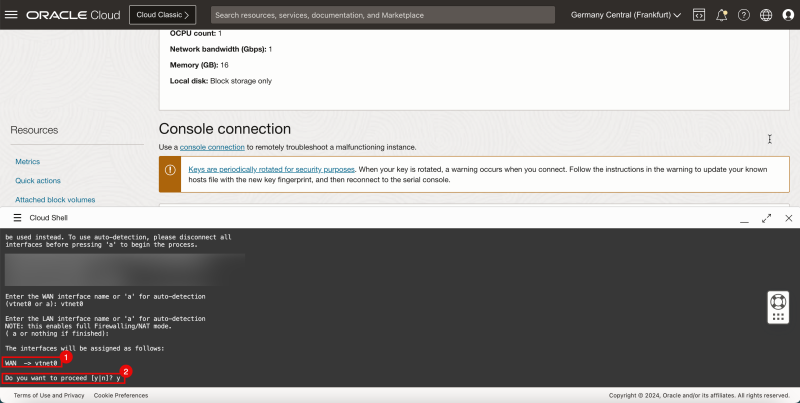
- For Enter the WAN interface name or 'a' for auto-detection (vtnet0 or a), enter `vtnet0`.
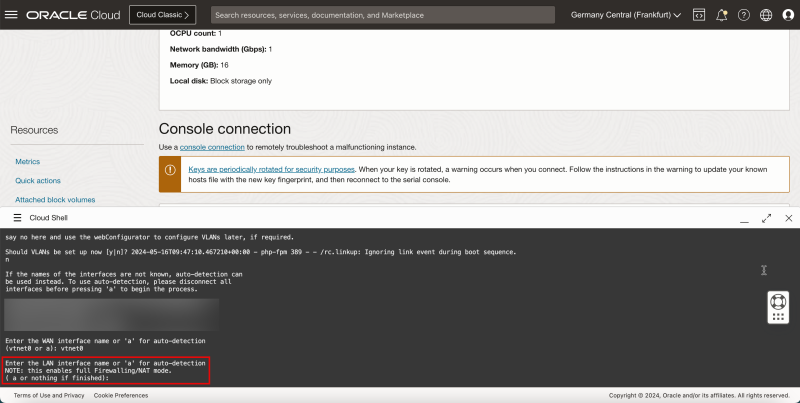
- In this set up, we are creating a firewall with only one interface, so we will not configure the LAN interface, therefore, for Enter the LAN interface name or 'a' for auto-detection, press ENTER to skip this interface set up.
1. Verify the WAN interface name.
2. For Do you want to proceed, enter y and press ENTER.
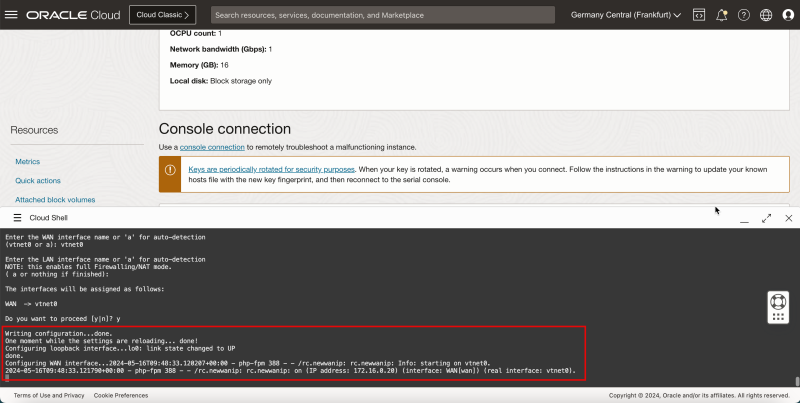
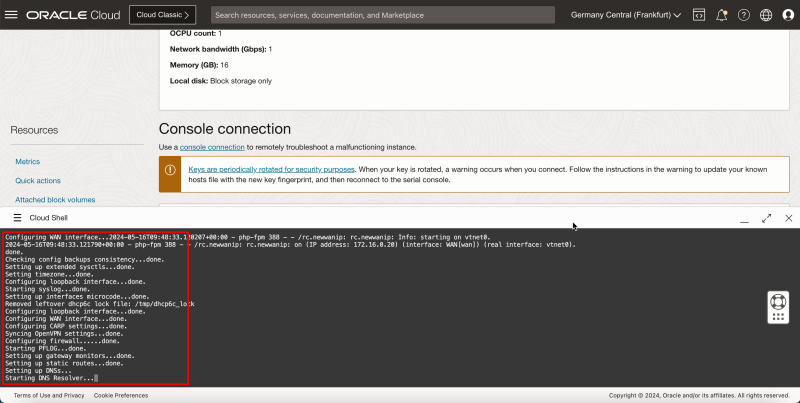
- Notice some messages and the configuration will be done.
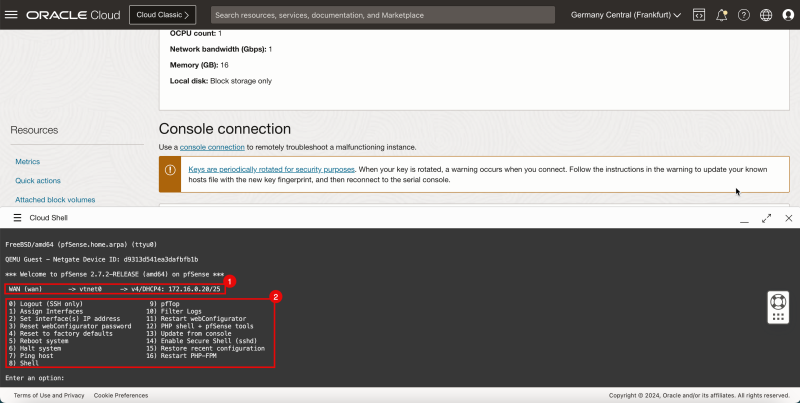
- The pfSense OS will do a full boot.
1. You will see that the IP address will be configured using DHCP.
2. Note the pfSense menu to do some additional basic configuration.
Task 7 - Connect to the pfSense Web Graphic User Interface -GUI- and Complete the Initial Set up
The installation is finished, now we need to connect to the web interface of the pfSense firewall. But before this, we need to open some ports on the security list of the VCN.
- Add ingress rule.
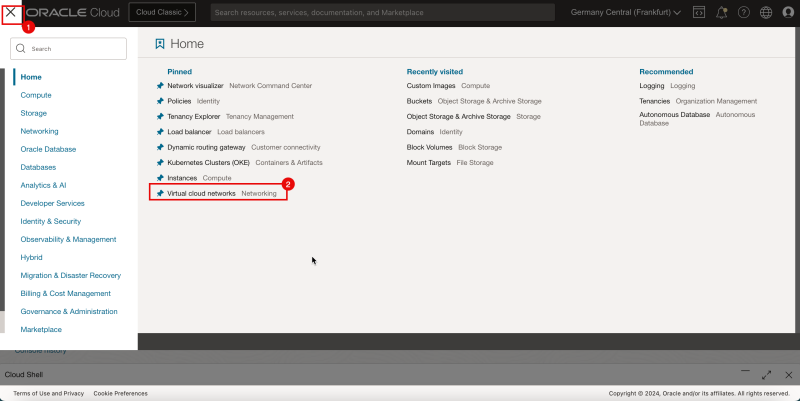
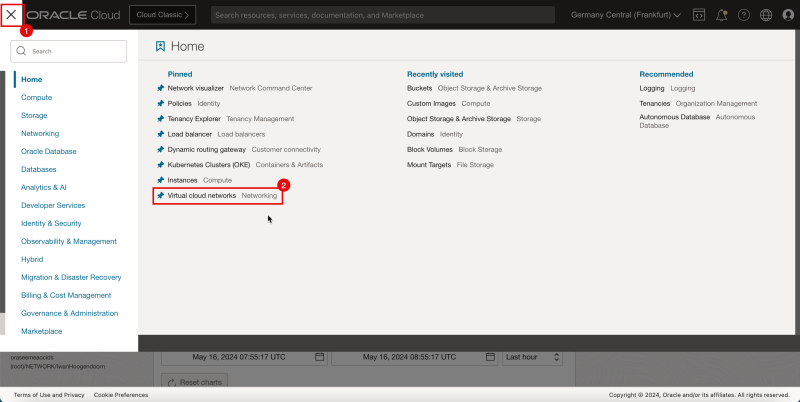
1. Click the hamburger menu (≡) from the upper left corner.
2. Click Virtual Cloud Networks or navigate to Networking and Virtual Cloud Networks.
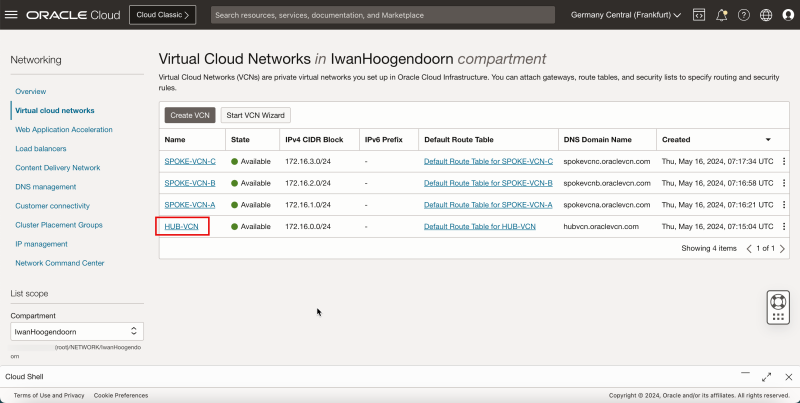
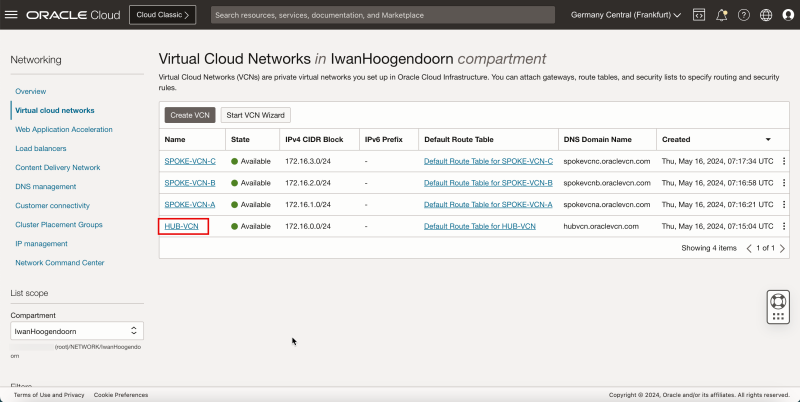
- Select the VCN to which your pfSense firewall is attached.
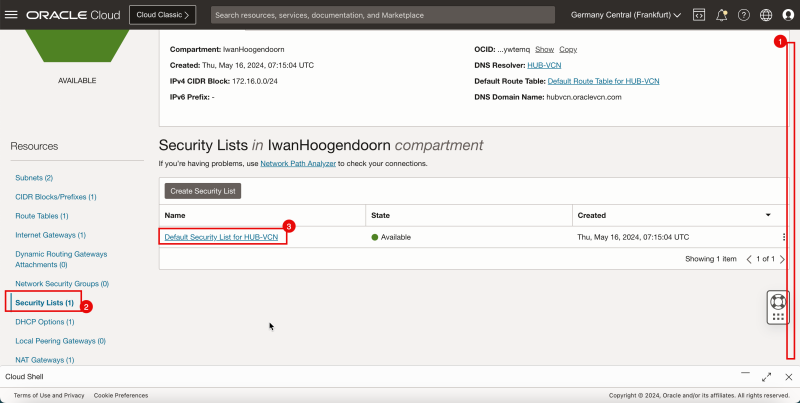
1. Scroll down.
2. Click Security Lists.
3. Click the Default Security List for HUB-VCN.
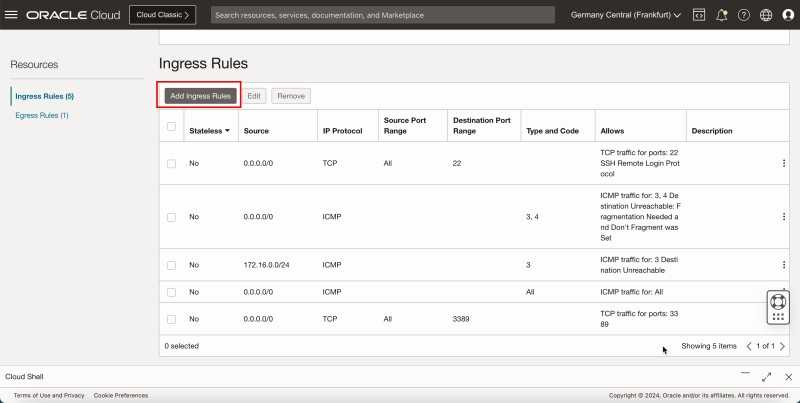
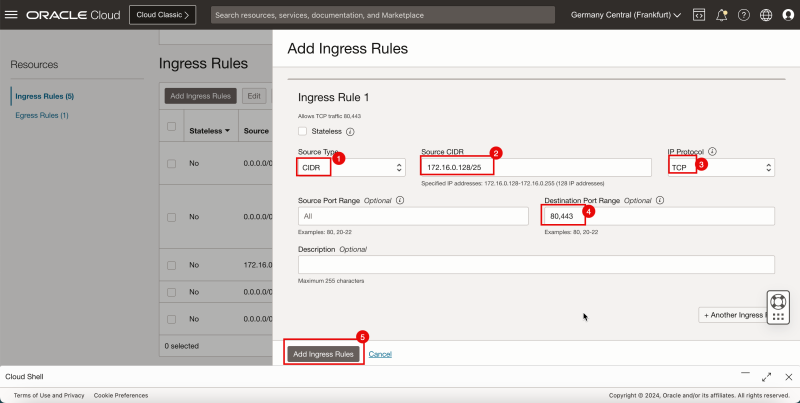
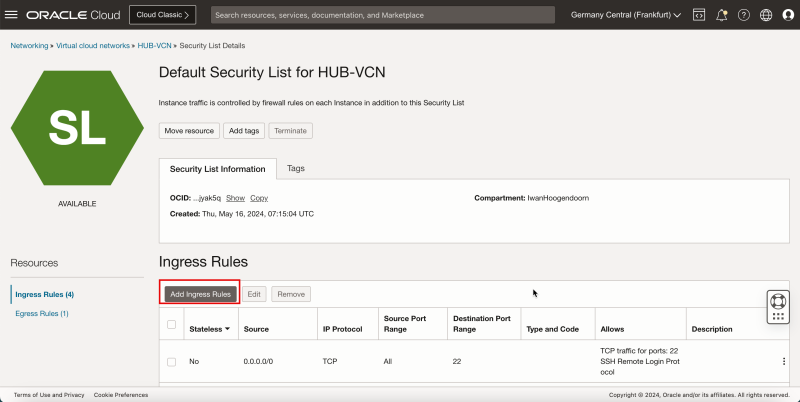
- Click Add Ingress Rules to create the ingress rule.
1. In Source Type, enter CIDR.
2. In Source CIDR, for this tutorial, enter `172.16.0.128/25`. This is the subnet which has the Windows instance, that we will be using to connect to the pfSense firewall using the browser.
3. In IP Protocol, enter TCP.
4. In Destination Port Range, enter `80,443`.
5. Click Add Ingress Rules .
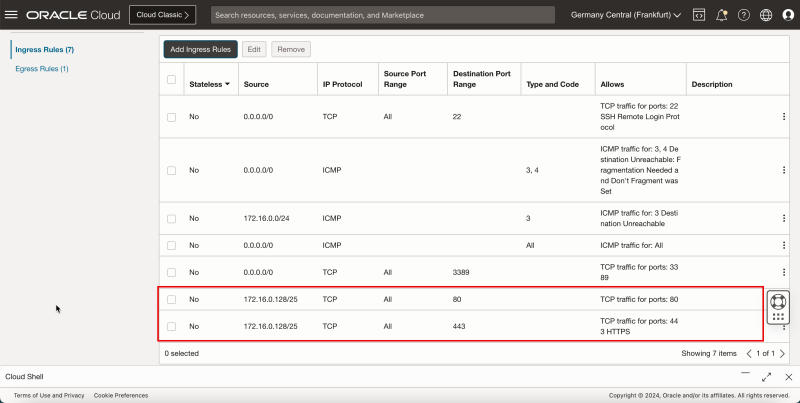
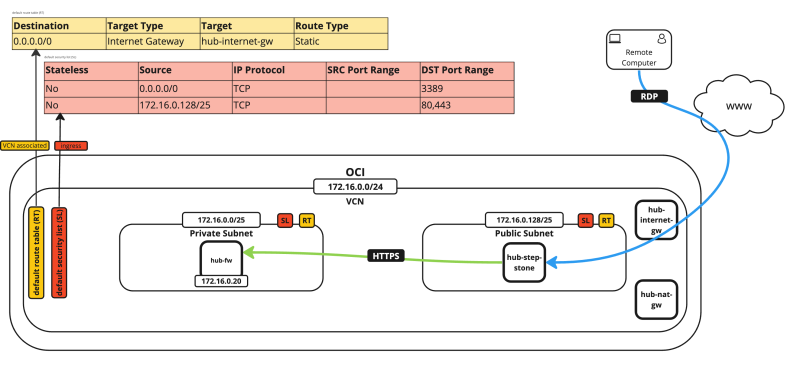
- Notice that the Security Rule is added to allow the TCP/`80` and TCP/`443` ports on the security list that is attached to VCN. This will allow you to set up an HTTP and HTTPS connection from the Windows instance to this new pfSense firewall instance.
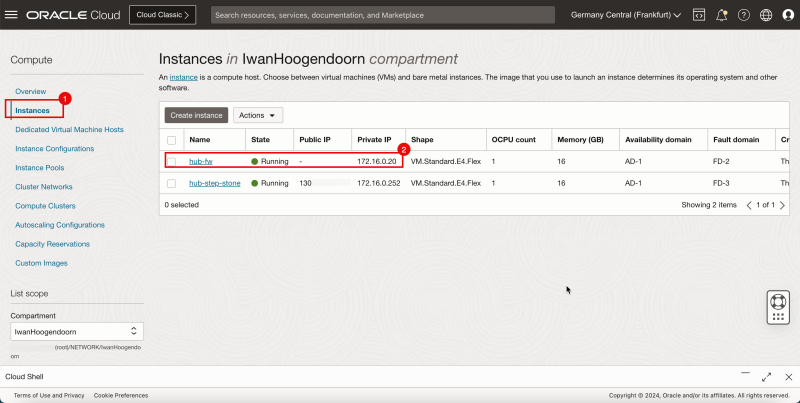
1. Navigate to the Compute and Instances.
2. Make a note of your pfSense firewall IP address.
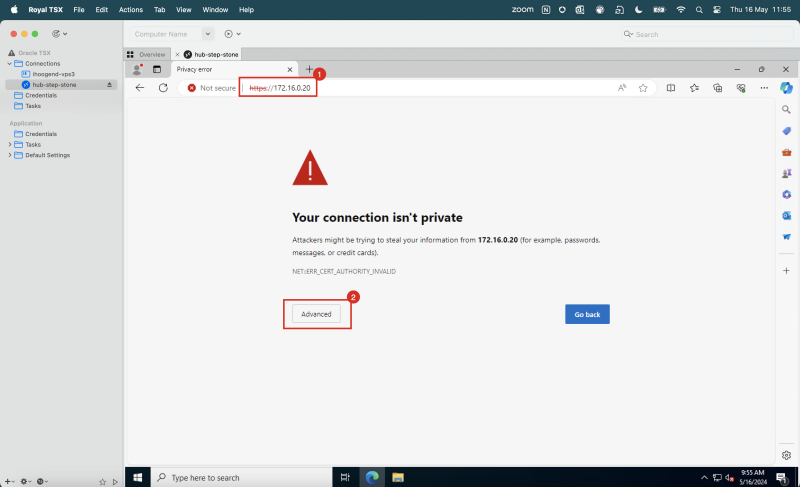
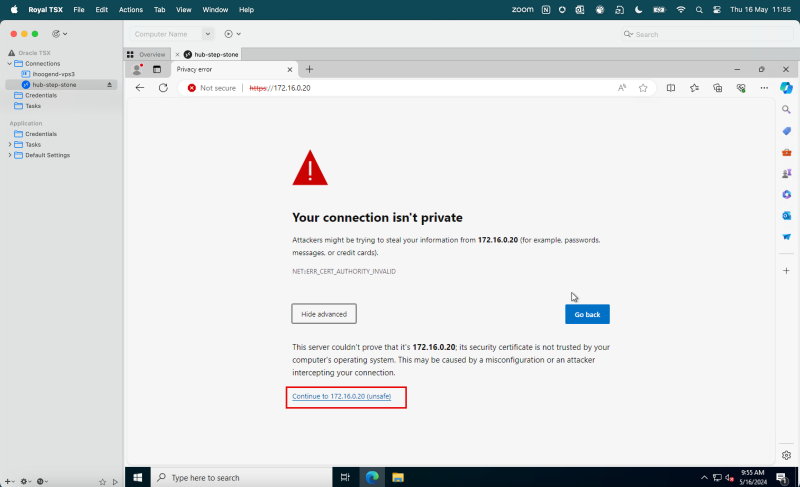
1. In your Windows instance, open a browser and navigate to the pfSense firewall IP using HTTPS.
2. Click Advanced.
- Click Continue.
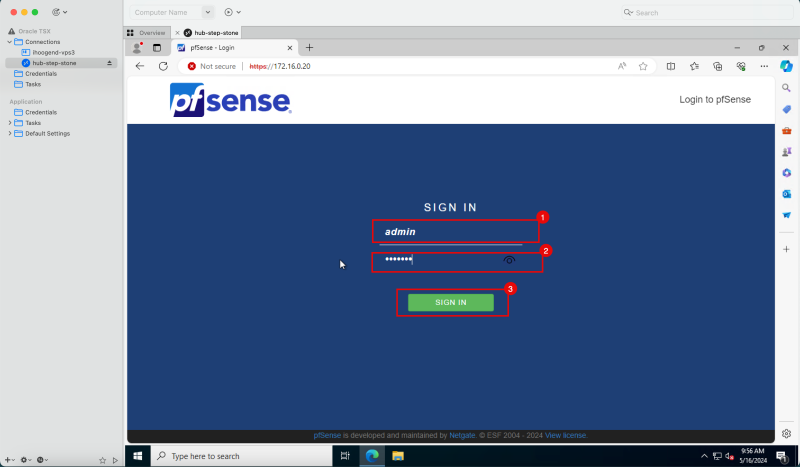
1. Enter default username as `admin`.
2. Enter default password as `pfsense`.
3. Click Sign In.
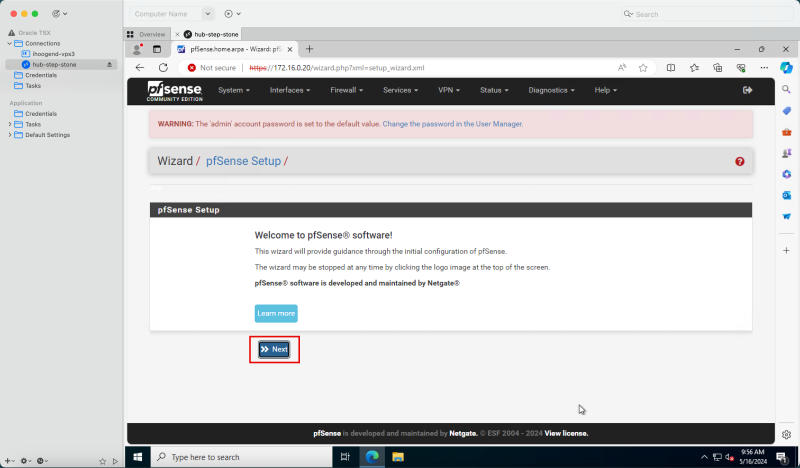
- Click Next.
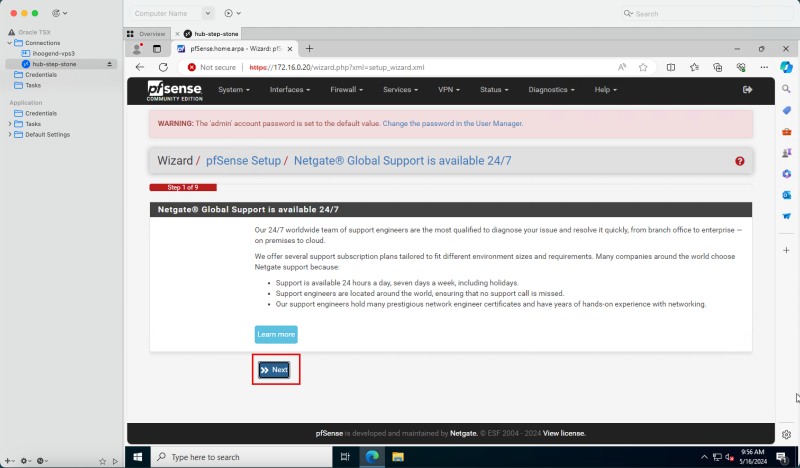
- Click Next.
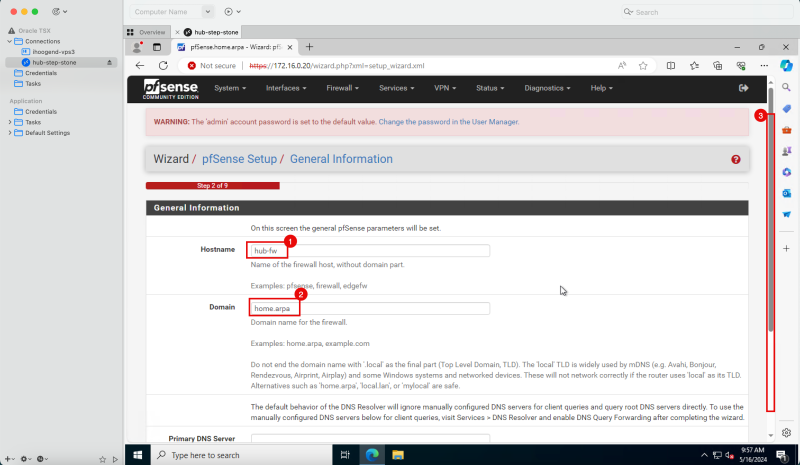
1. Enter a hostname.
2. Enter a domain name or keep domain name default.
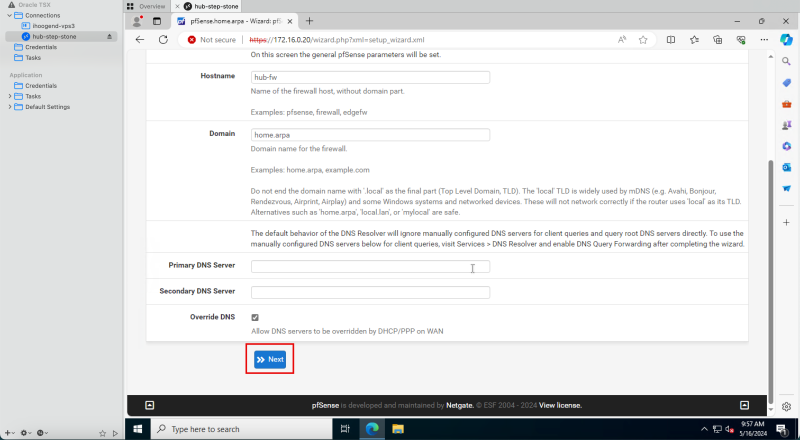
3. Scroll down.
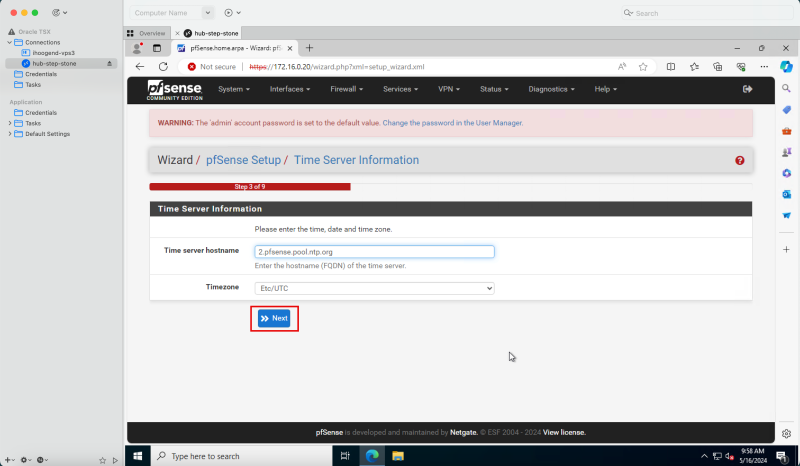
- Click Next.
- Click Next.
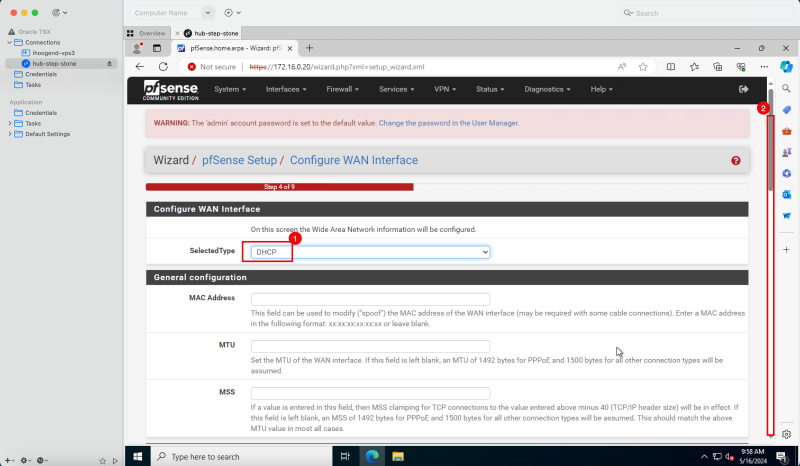
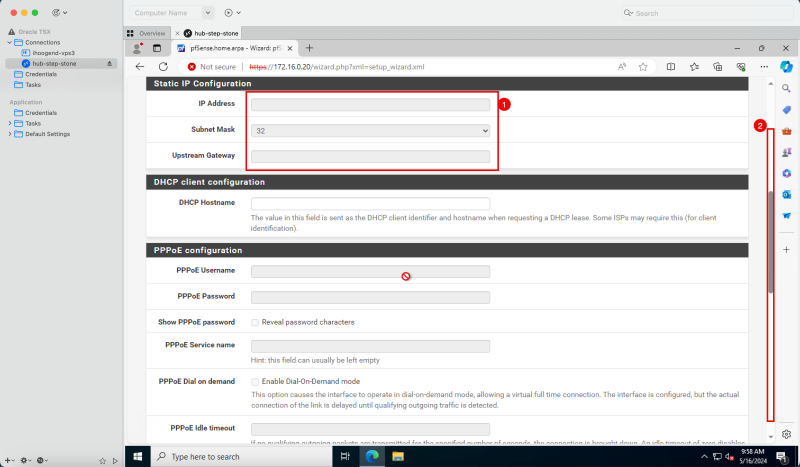
If you are into networks this may look a bit weird as we have specified to use a static IPv4 address during the instance creation. The way how it works in this particular case is that Oracle will reserve the static IP in its DHCP server, and will assign this address to the pfSense firewall. So the pfSense firewall will always get the same IP address, but from the OCI perspective, this will be a static IP, and from the pfSense perspective this will be a DHCP address.
1. In Configure WAN interface, select DHCP.
2. Scroll down.
1. Keep all the IP address settings default.
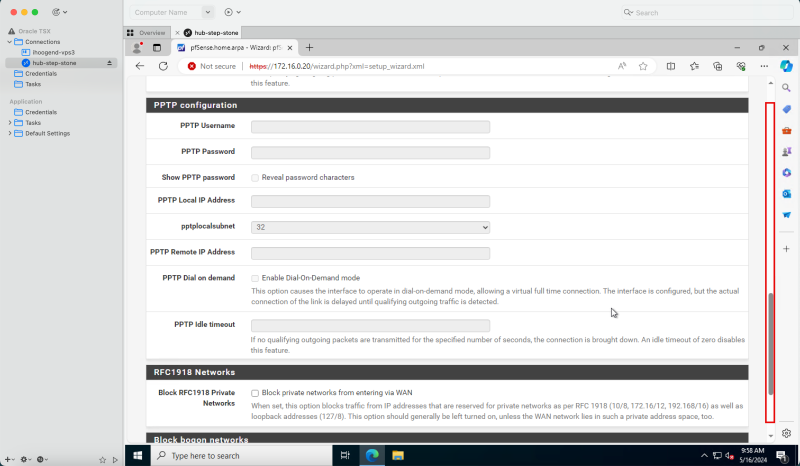
2. Scroll down.
- Scroll down.
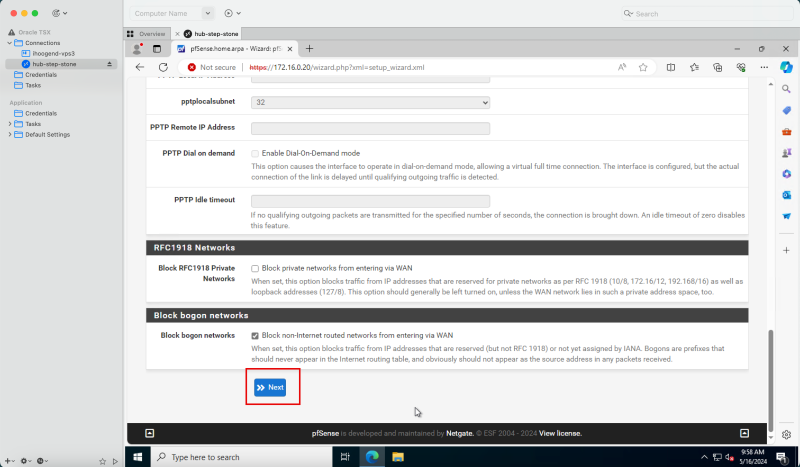
- Click Next.
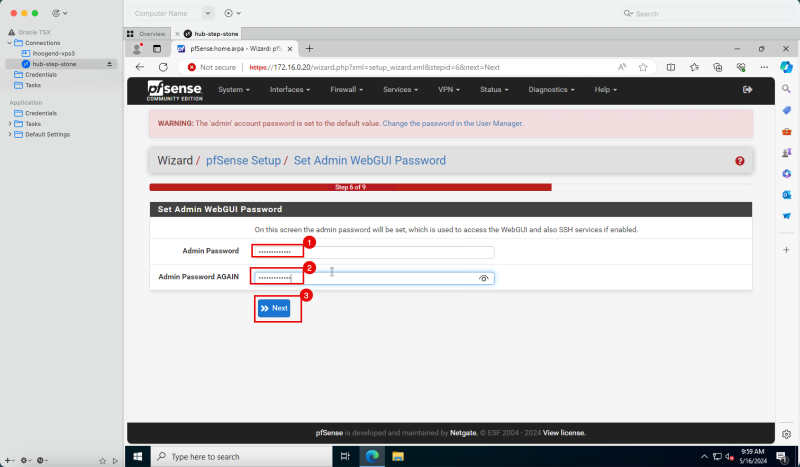
1. Enter a new admin password.
2. Enter a admin password again.
3. Click Next.
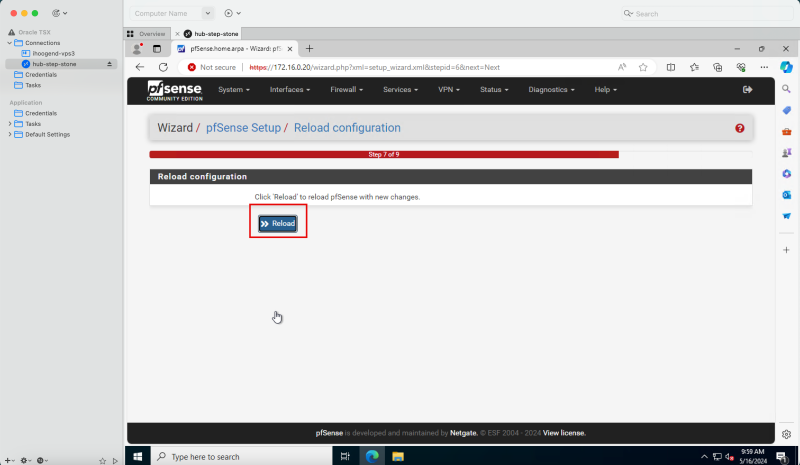
- Click Reload.
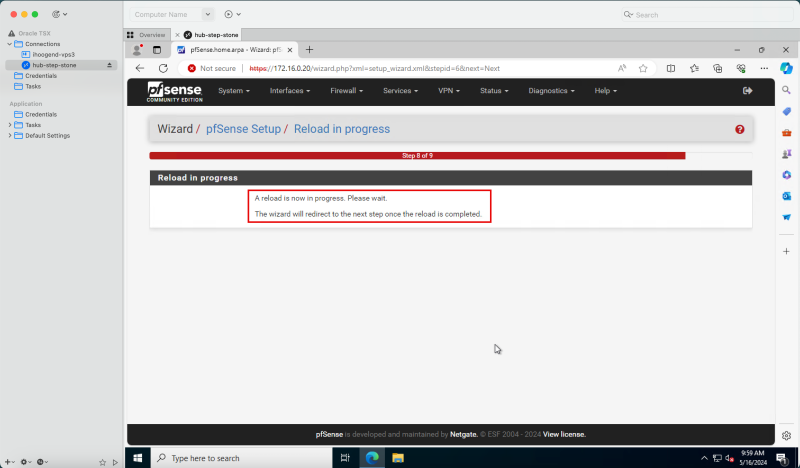
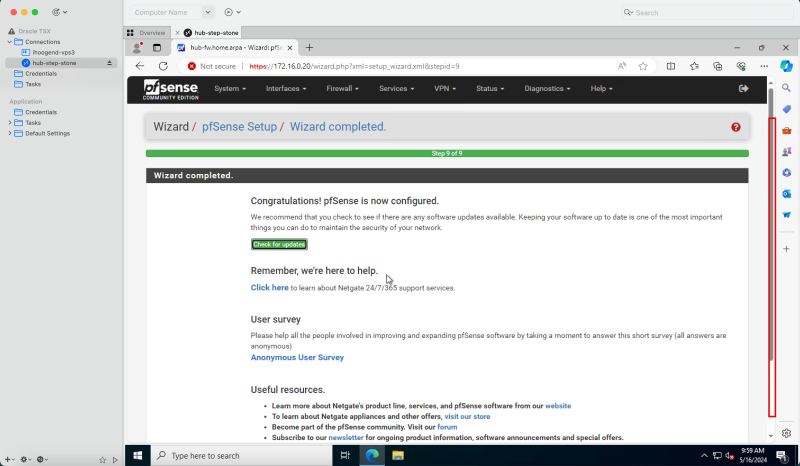
- Notice that the pfSense firewall configuration is reloaded.
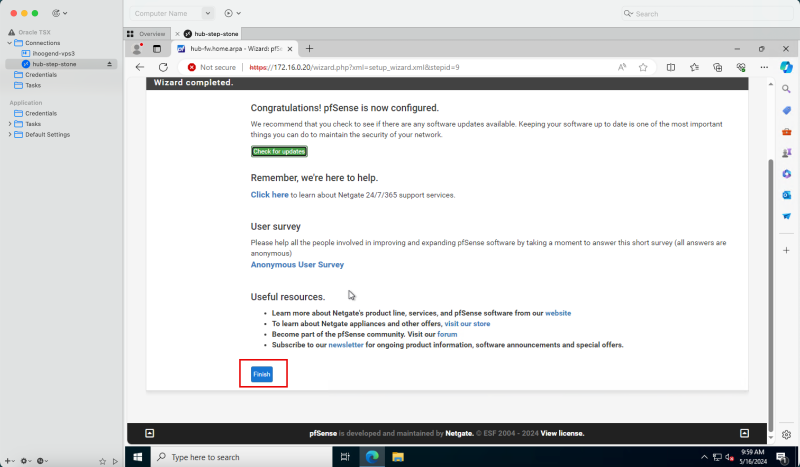
- Scroll down.
- Click Finish.
- Scroll down.
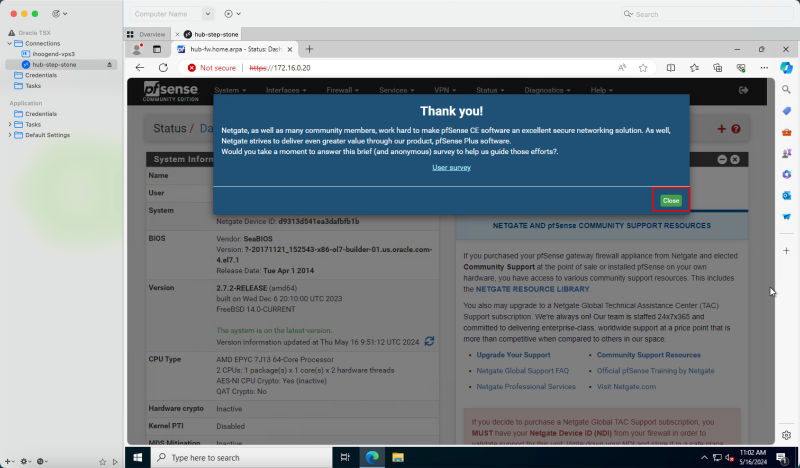
- Click Accept.
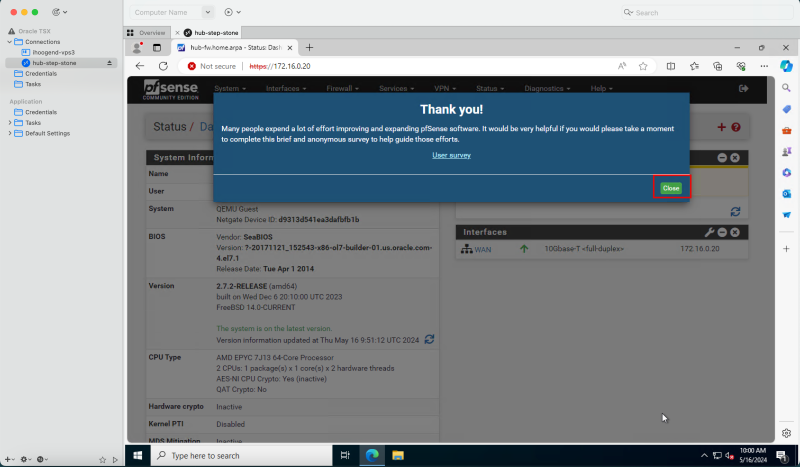
- Click Close.
- The following image illustrates a visual representation of what you have created. Notice that we will use the Windows stepping stone to connect to the pfSense firewall.
- If the pfSense firewall is not able to reach the internet, the dashboard page will take a bit longer to load. But this can be fixed by allowing the pfSense firewall to the internet by using the OCI NAT gateway.
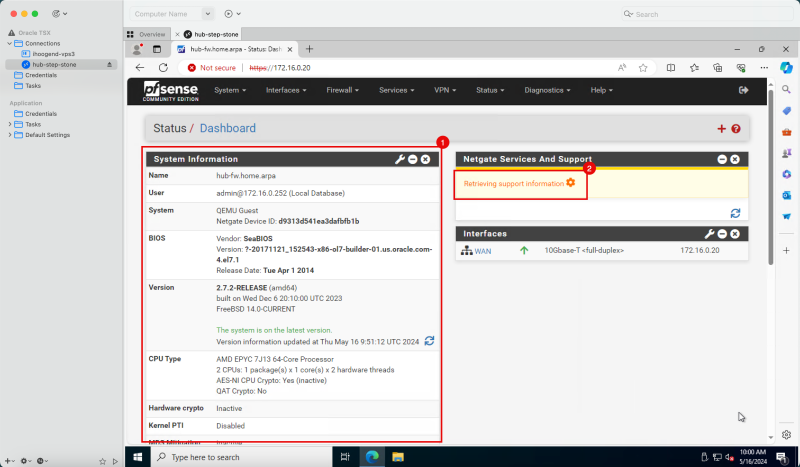
1. Notice that the pfSense firewall is installed and the dashboard is visible.
2. Notice that the support information is not available. This is because the pfSense firewall is installed on a private subnet and this private subnet is not able to reach the internet by default.
- Let us route the internet traffic towards the NAT gateway. Make sure you have a NAT gateway present in the VCN.
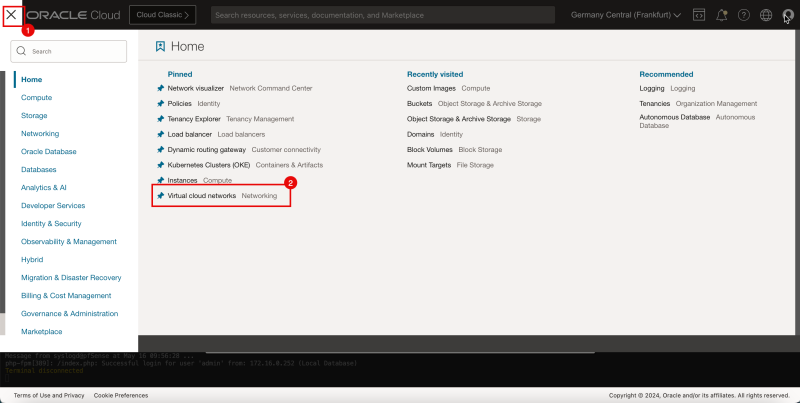
1. Click the hamburger menu (≡) from the upper left corner.
2. Click Virtual Cloud Networks or navigate to Networking and Virtual Cloud Networks.
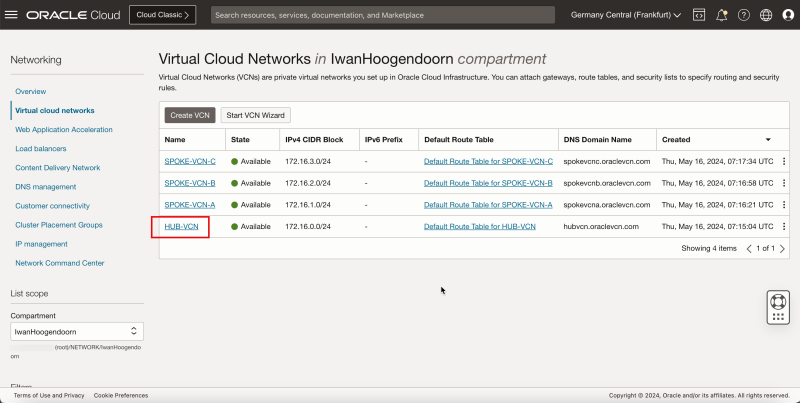
- Select the VCN where your pfSense firewall is attached to and the NAT gateway is present.
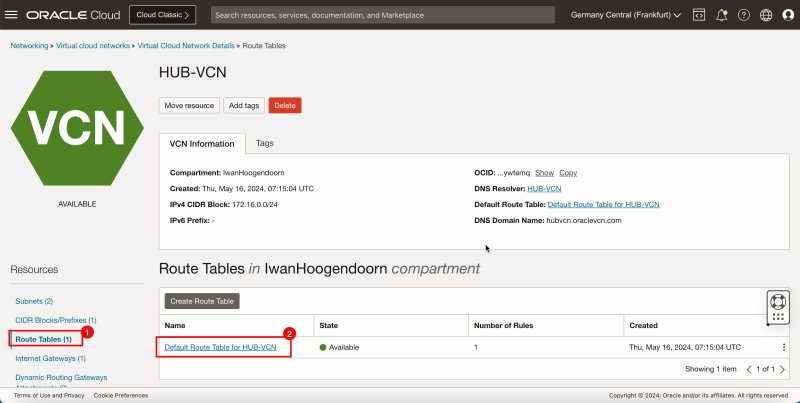
1. Click Route Tables.
2. Click Default Route Table for HUB-VCN.
1. Notice that the default route table has a route in there that will route all the traffic towards the internet gateway. This is not usable for us as we need to route the traffic for the private subnet towards the NAT gateway.
2. Click HUB-VCN to go back one page from Route Table Details page.
- To route the traffic towards the NAT gateway for a specific subnet we need to create a new route table and attach that route table to the private subnet. Click Create Route Table.
1. Enter a name.
2. In Target Type, enter NAT Gateway.
3. In Destination CIDR Block, enter `0.0.0.0/0`.
4. Scroll down.
1. Select the NAT Gateway that you already have available in the VCN. If you do not have a NAT gateway, click Cancel and create a NAT gateway.
2. Click Create.
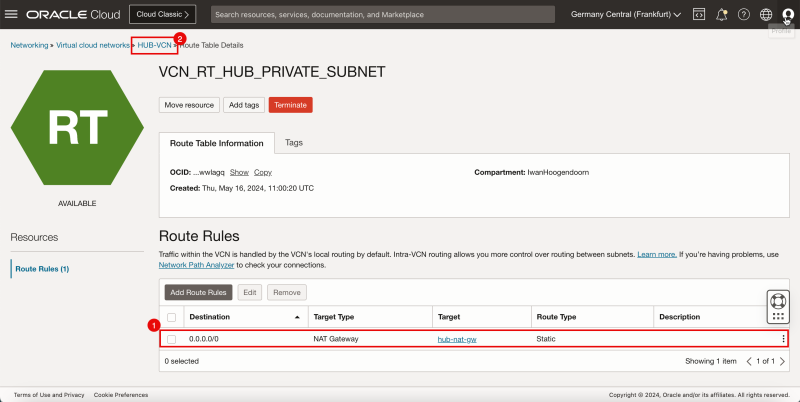
1. Notice that the static route towards the NAT gateway is now created.
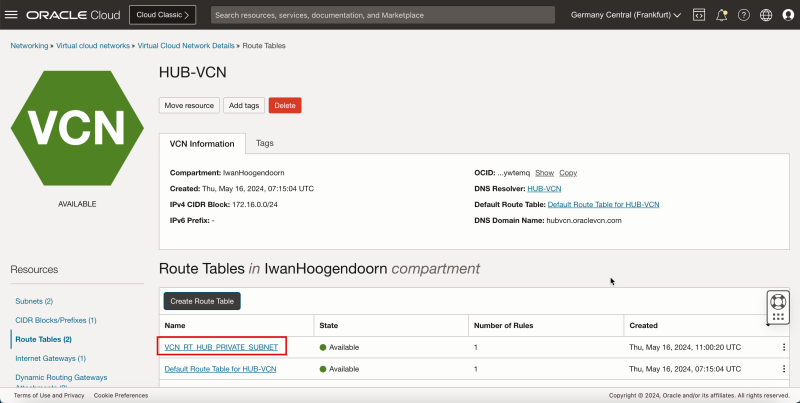
2. Click HUB-VCN to go back one page from Route Table Details page.
- Notice that you have created a new route table.
- Now, it is time to bind that route table to the subnet.
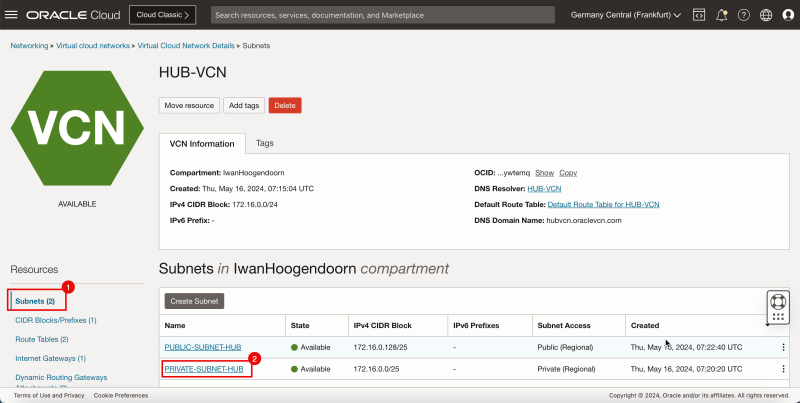
1. Click Subnets.
2. Click Private subnet, the subnet to where the pfSense instance is currently attached.
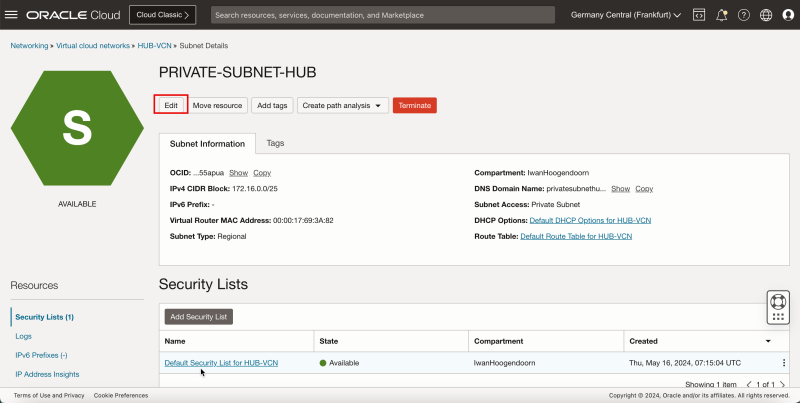
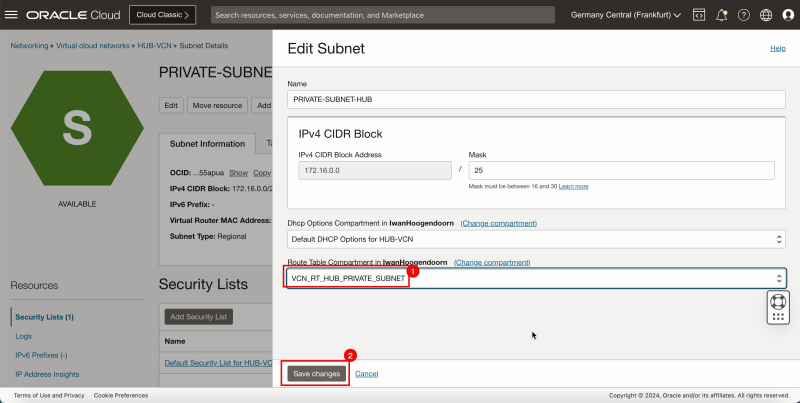
- Click Edit.
1. Select the route table you just created.
2. Click Save Changes.
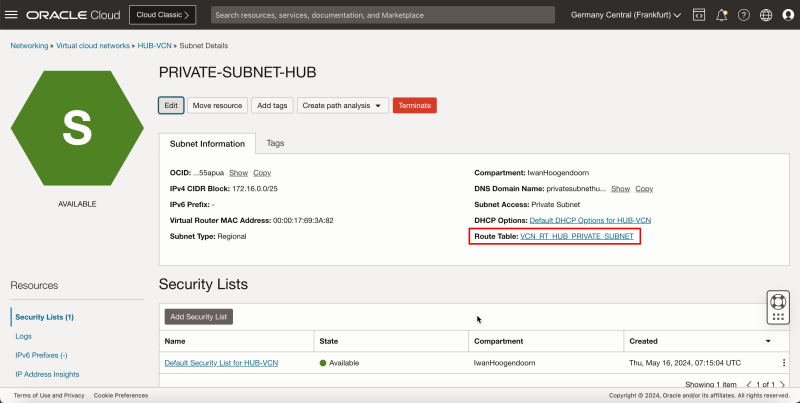
- Notice that the route table has been changed for the private subnet.
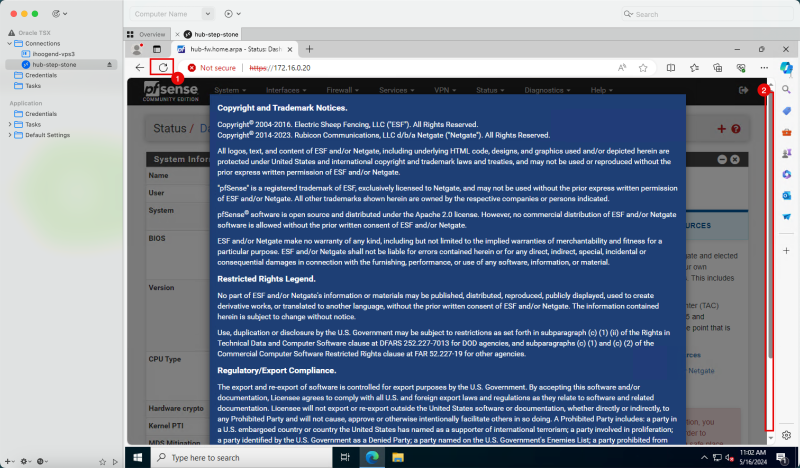
- Go back to the Windows instance.
1. Refresh the page.
2. Scroll down.
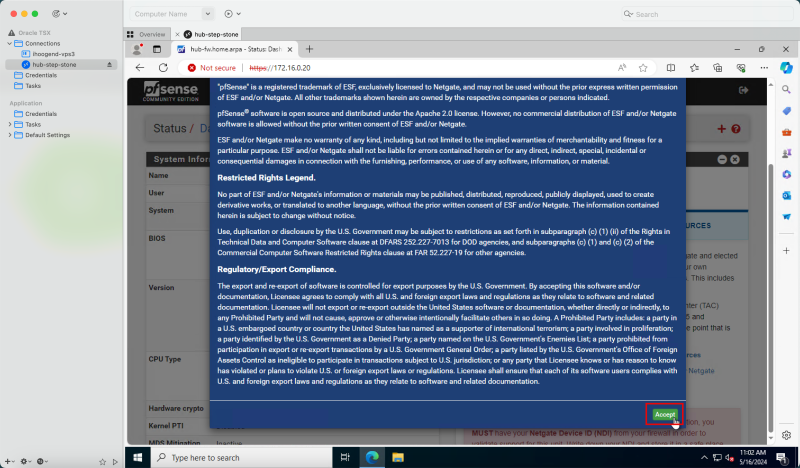
- Click Accept.
- Click Close.
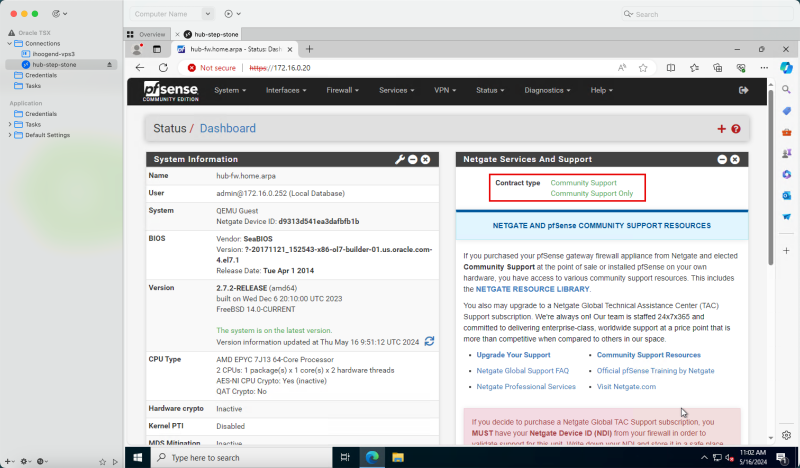
- Notice that the Netgate Services and Support section will change.
- The response time of the dashboard page will also be quicker.
- Use the pfSense web management interface.
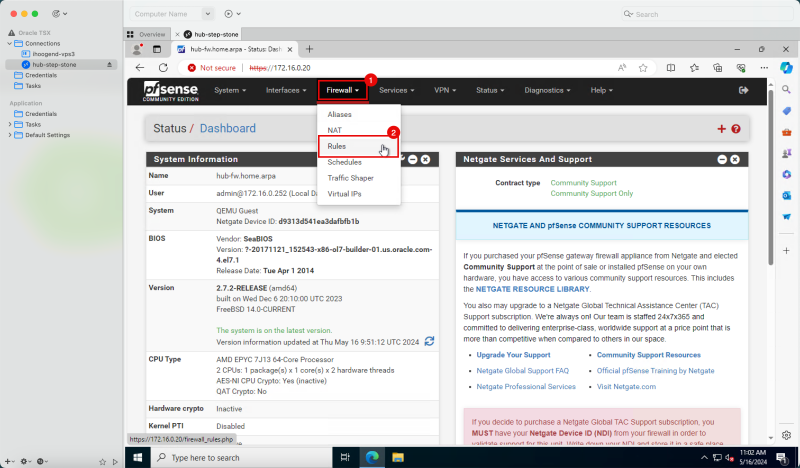
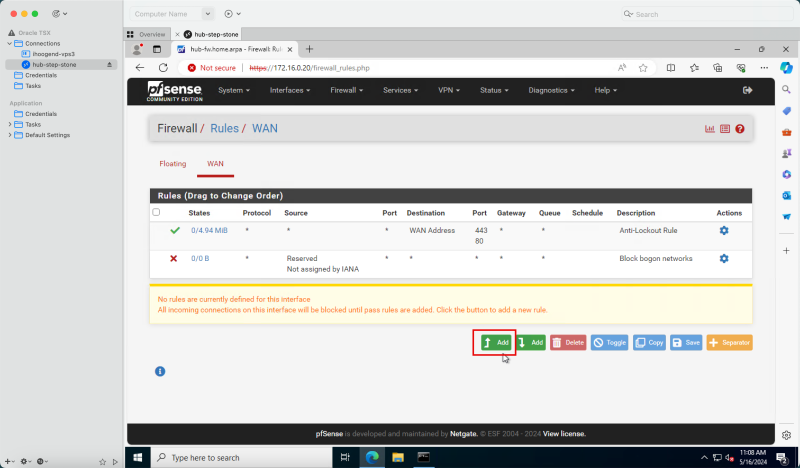
1. Click Firewall. 2. Click Rules.
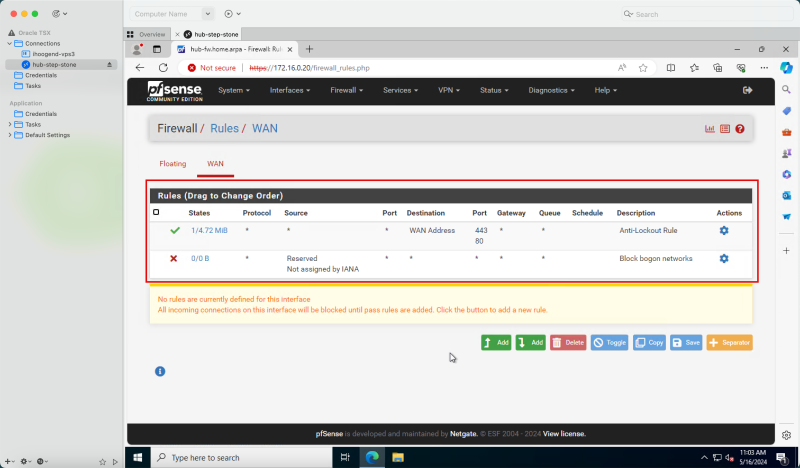
- Notice the default rules of the pfSense firewall.
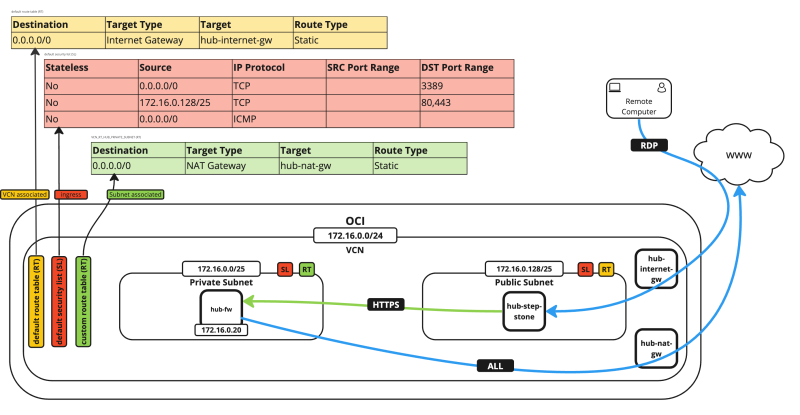
- The following image illustrates a visual representation of what you have created.
- Notice that the NAT gateway will be used so that the pfSense firewall can communicate with the internet.
- Notice we have also opened ports TCP/`80` and TCP/`443` on the default security list.
Task 8 - Verify the Connectivity with Ping
- Verifying the connectivity using ping (ICMP) is a good starting point for testing.
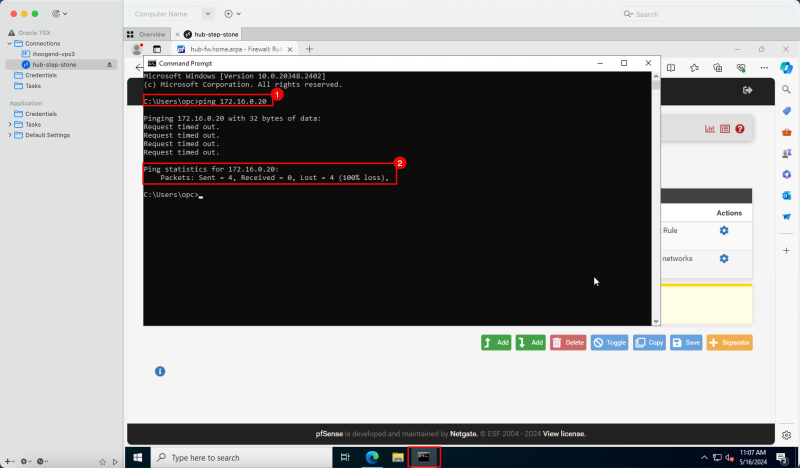
1. In the Windows instance, open the Command Prompt and try to ping the pfSense firewall IP address.
2. Notice that the ping results are showing a 100% packet loss.
- To solve this, we need to:
- Open Internet Control Message Protocol (ICMP) on the default security list that is attached to the VCN.
- Open ICMP on the pfSense firewall.
- Let us first start with the default security list.
1. Click the hamburger menu (≡) from the upper left corner.
2. Click Virtual Cloud Networks or navigate to Networking and Virtual Cloud Networks.
- Select the VCN, where your pfSense firewall is attached and has the NAT gateway.
1. Scroll down.
2. Click Security Lists.
3. Click Default Security List for HUB-VCN.
- Click Add Ingress Rules to create the ingress rule.
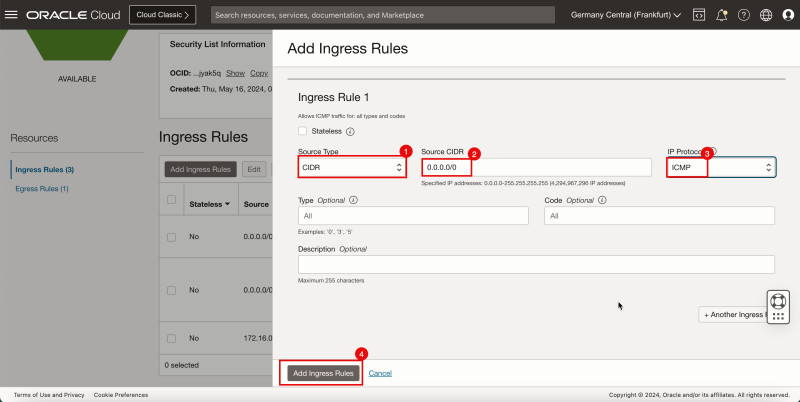
1. In Source Type, enter CIDR.
2. In Source CIDR, enter `0.0.0.0/0`.
3. In IP Protocol, enter ICMP.
4. Click Add Ingress Rules.
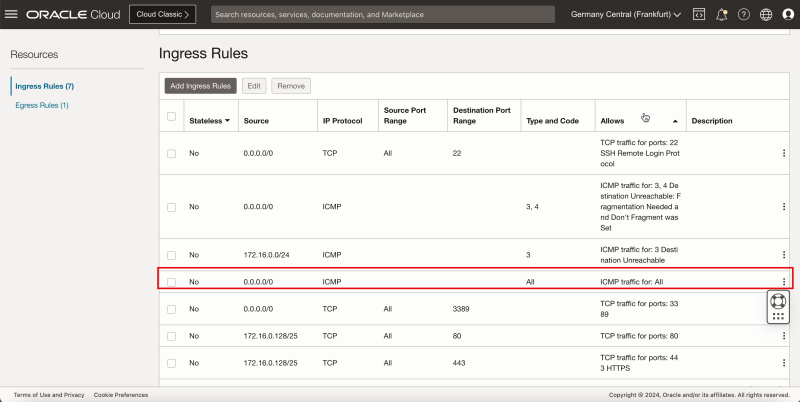
- Notice the ICMP rules we have just added.
- In the pfSense firewall management interface, click Firewall, Rules and Add to add a new rule.
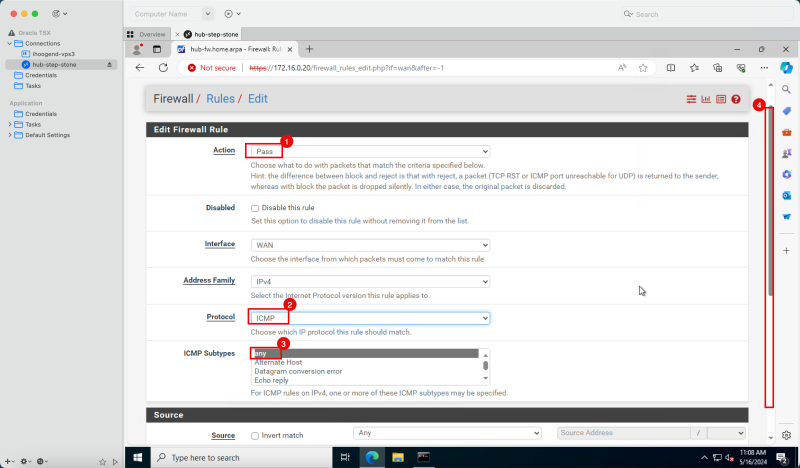
- Enter the following information.
1. Action: Select Pass.
2. Protocol: Select ICMP.
3. ICMP Subtypes: Select Any.
4. Scroll down.
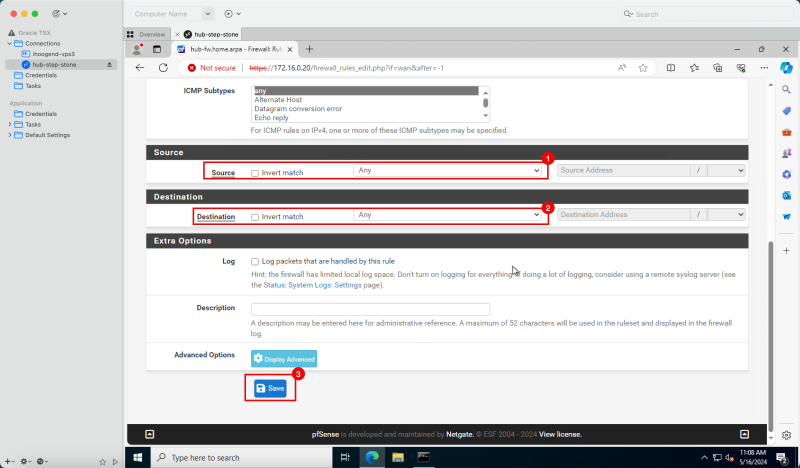
1. Source: Select Any.
2. Destination: Select Any.
3. Click Save.
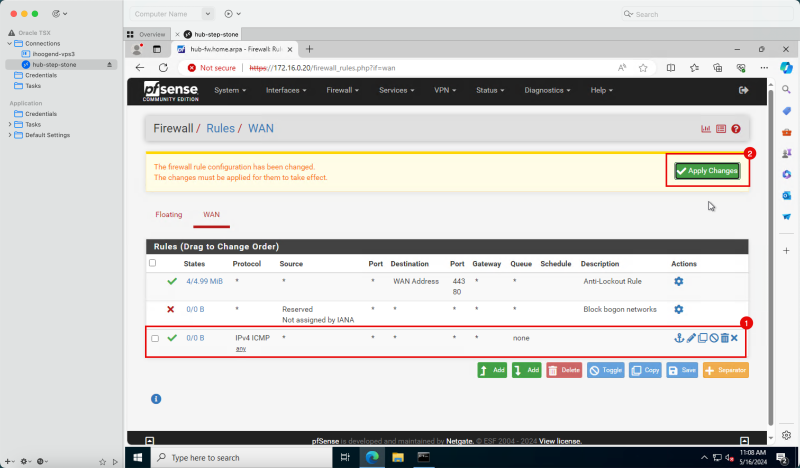
1. Notice that the new ICMP rule is in place.
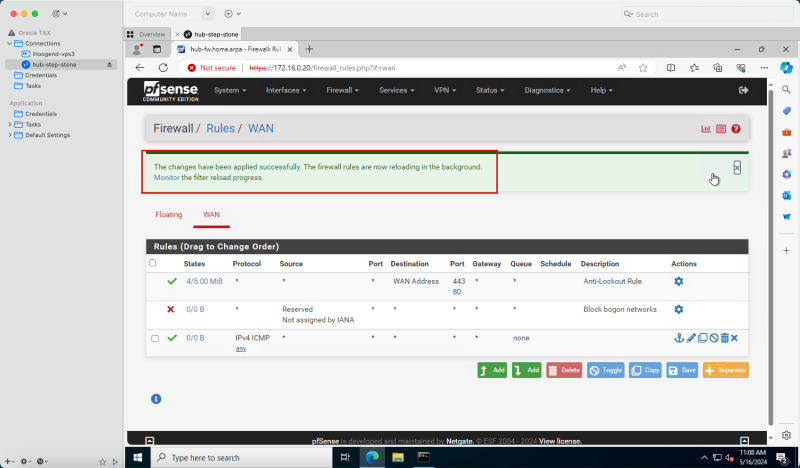
2. Click Apply Changes to commit the changes.
- Notice that the changes have been applied successfully.
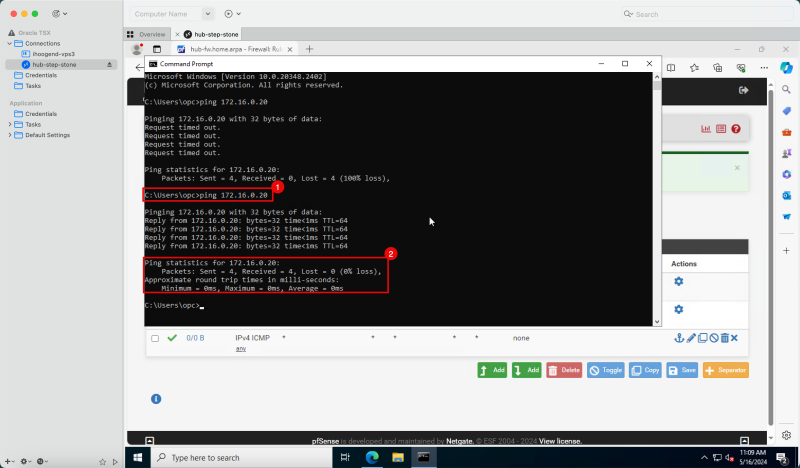
1. In the Windows instance, open the Command Prompt and try to ping the pfSense firewall IP address.
2. Notice that the ping results are showing a 0% packet loss.
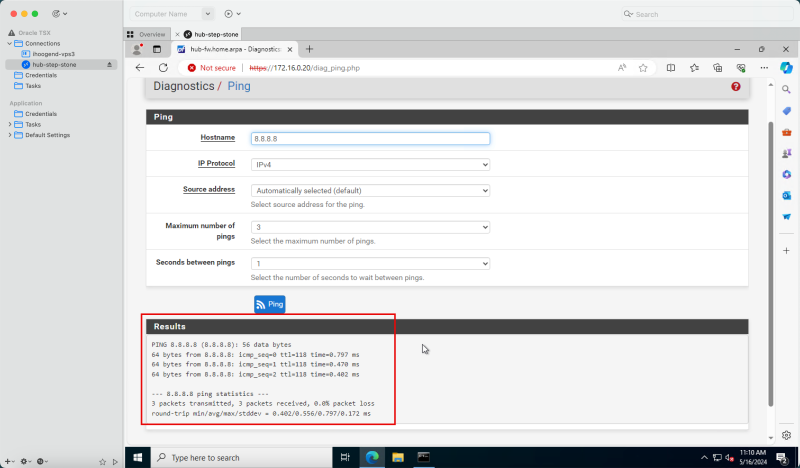
- Another ping test that we can do is from the pfSense firewall towards the internet.
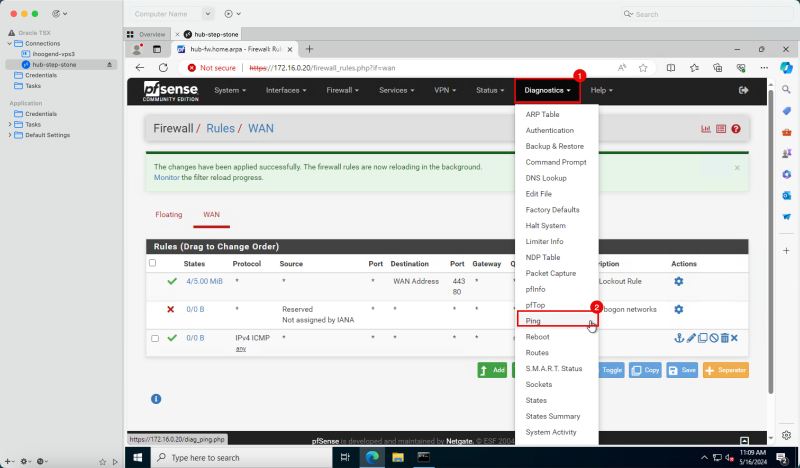
1. Click Diagnostics.
2. Click Ping.
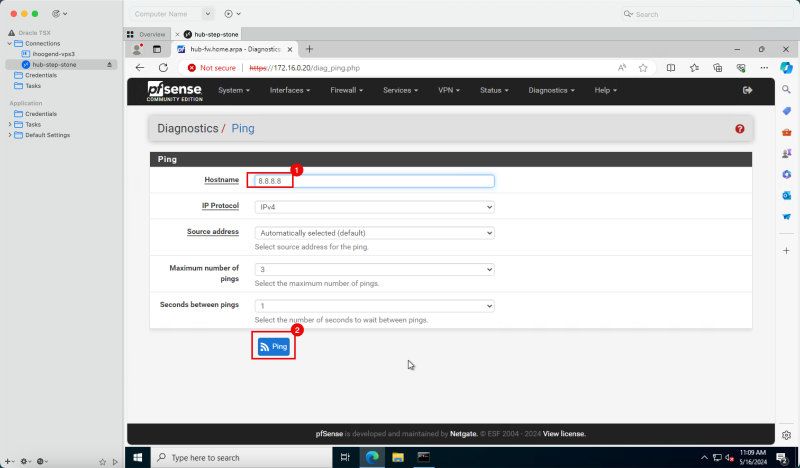
1. In Hostname, enter `8.8.8.8`.
2. Click Ping.
- Notice that the ping results are showing a 0% packet loss.
- The following image illustrates a visual representation of what you have created. Notice we have also opened ICMP on the default security list.
Conclusion
In this tutorial, we explained all the necessary steps that you required to set up a pfSense firewall inside OCI. We made adjustments to routing and security lists so that the pfSense firewall can be managed properly and we also did some ICMP tests to verify connectivity. This pfSense firewall setup can be used inside a Hub and Spoke VCN Routing scenario.
