Configure NSX-T URL Analysis: Difference between revisions
(Import pages from nsx.ninja) |
(Fix) |
||
| (4 intermediate revisions by 2 users not shown) | |||
| Line 1: | Line 1: | ||
NSX-T URL analysis allows you to get insight into what websites are accessed within the organization. | NSX-T URL analysis allows you to get insight into what websites are accessed within the organization. | ||
These websites are scored so you can review and understand the reputation and risk of the accessed websites. | These websites are scored so you can review and understand the reputation and risk of the accessed websites. | ||
This article will explain to you how to configure URL Analysis. | This article will explain to you how to configure URL Analysis. | ||
=Deployment Steps= | ==Deployment Steps== | ||
* STEP 01) Enable URL Analysis on an Edge Cluster | * STEP 01) Enable URL Analysis on an Edge Cluster | ||
| Line 12: | Line 11: | ||
* STEP 05) Review the URL Analysed | * STEP 05) Review the URL Analysed | ||
=STEP 01 | ==STEP 01{{fqm}} Enable URL Analysis on an Edge Cluster== | ||
NSX-T Manager: Security >> URL Analysis >> Settings | NSX-T Manager: Security >> URL Analysis >> Settings | ||
| Line 18: | Line 17: | ||
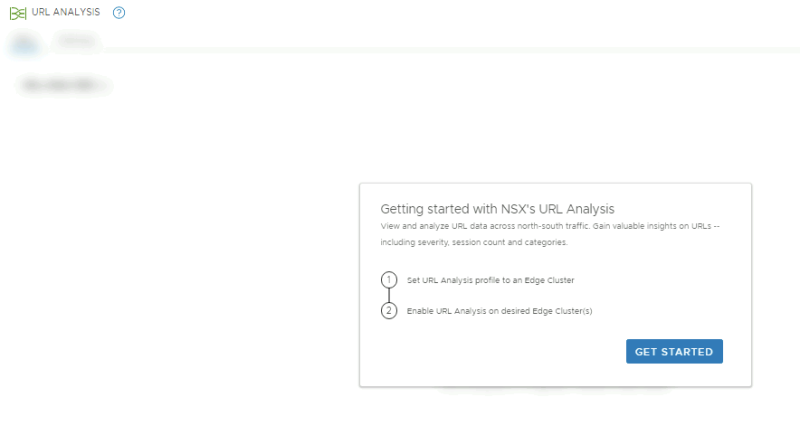
Click on get started: | Click on get started: | ||
<span style="border:3px solid | <span style="border:3px solid #f4c613;display: inline-block;">[[File:URL-A-01.png|800px]]</span> | ||
<div style="clear:both"></div> | <div style="clear:both"></div> | ||
By default URL Analysis is disabled so I need to enable it on the Edge CLuster: | By default URL Analysis is disabled so I need to enable it on the Edge CLuster: | ||
<span style="border:3px solid | <span style="border:3px solid #f4c613;display: inline-block;">[[File:URL-A-02.png|800px]]</span> | ||
<div style="clear:both"></div> | <div style="clear:both"></div> | ||
When I enabled it on the Edge Cluster I need to cinfirm this: | When I enabled it on the Edge Cluster I need to cinfirm this: | ||
<span style="border:3px solid | <span style="border:3px solid #f4c613;display: inline-block;">[[File:URL-A-03.png|400px]]</span> | ||
<div style="clear:both"></div> | <div style="clear:both"></div> | ||
Once confirmed URL Analysis is enabled on the Edge Cluster: | Once confirmed URL Analysis is enabled on the Edge Cluster: | ||
<span style="border:3px solid | <span style="border:3px solid #f4c613;display: inline-block;">[[File:URL-A-04.png|800px]]</span> | ||
<div style="clear:both"></div> | <div style="clear:both"></div> | ||
=STEP 02 | ==STEP 02{{fqm}} Create a context Profile== | ||
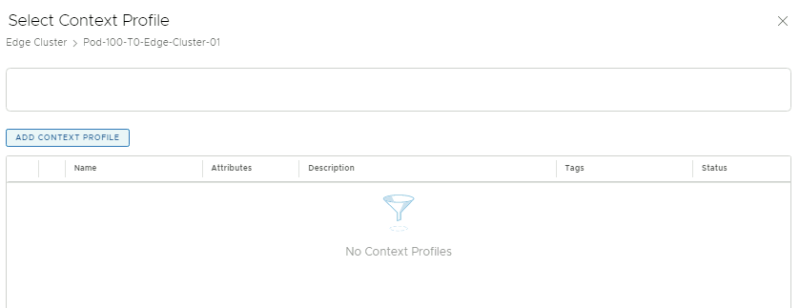
When you click on "set" in the previous screen you can create a contect profile: | When you click on "set" in the previous screen you can create a contect profile: | ||
<span style="border:3px solid | <span style="border:3px solid #f4c613;display: inline-block;">[[File:URL-A-05.png|800px]]</span> | ||
<div style="clear:both"></div> | <div style="clear:both"></div> | ||
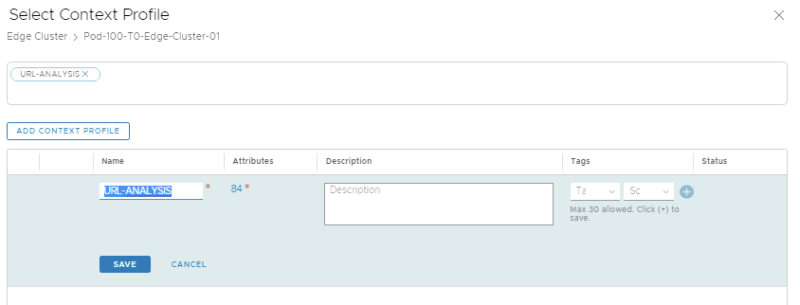
Give it a name, and click on the attributes to add the attributes: | Give it a name, and click on the attributes to add the attributes: | ||
<span style="border:3px solid | <span style="border:3px solid #f4c613;display: inline-block;">[[File:URL-A-06.png|800px]]</span> | ||
<div style="clear:both"></div> | <div style="clear:both"></div> | ||
Add all the attributes available: | Add all the attributes available: | ||
<span style="border:3px solid | <span style="border:3px solid #f4c613;display: inline-block;">[[File:URL-A-07.png|800px]]</span> | ||
<div style="clear:both"></div> | <div style="clear:both"></div> | ||
After I added the attributes in the contect profiles I can review them: | After I added the attributes in the contect profiles I can review them: | ||
<span style="border:3px solid | <span style="border:3px solid #f4c613;display: inline-block;">[[File:URL-A-08.png|800px]]</span> | ||
<div style="clear:both"></div> | <div style="clear:both"></div> | ||
When I click on "apply" a "1" appears in the profiles column: | When I click on "apply" a "1" appears in the profiles column: | ||
<span style="border:3px solid | <span style="border:3px solid #f4c613;display: inline-block;">[[File:URL-A-09.png|800px]]</span> | ||
<div style="clear:both"></div> | <div style="clear:both"></div> | ||
=STEP 03 | ==STEP 03{{fqm}} Create a Tier–1 Gateway Firewall Rule== | ||
NSX-T Manager: Security >> Gateway Firewall >> All shared Rules | NSX-T Manager: Security >> Gateway Firewall >> All shared Rules | ||
Create a (shared) Gateway firewall rule and apply it to the Tier-1 Gateway where the Segments/Virtual Machines are attached to that we want to analyze the URLs from. | Create a (shared) Gateway firewall rule and apply it to the Tier-1 Gateway where the Segments/Virtual Machines are attached to that we want to analyze the URLs from. | ||
<span style="border:3px solid | <span style="border:3px solid #f4c613;display: inline-block;">[[File:URL-A-10.png|800px]]</span> | ||
<div style="clear:both"></div> | <div style="clear:both"></div> | ||
| Line 74: | Line 73: | ||
We can also review the specific Tier-1 Gateway firewall rules for that specific Gateway. | We can also review the specific Tier-1 Gateway firewall rules for that specific Gateway. | ||
<span style="border:3px solid | <span style="border:3px solid #f4c613;display: inline-block;">[[File:URL-A-11.png|800px]]</span> | ||
<div style="clear:both"></div> | <div style="clear:both"></div> | ||
| Line 81: | Line 80: | ||
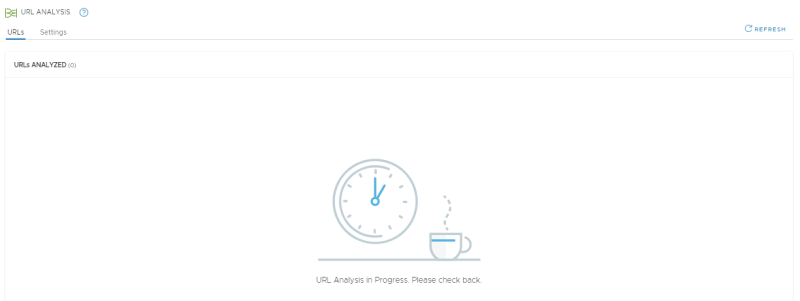
When we look at the URLs Analyzed section this is still empty: | When we look at the URLs Analyzed section this is still empty: | ||
<span style="border:3px solid | <span style="border:3px solid #f4c613;display: inline-block;">[[File:URL-A-12.png|800px]]</span> | ||
<div style="clear:both"></div> | <div style="clear:both"></div> | ||
=STEP 04 | ==STEP 04{{fqm}} Generate web traffic== | ||
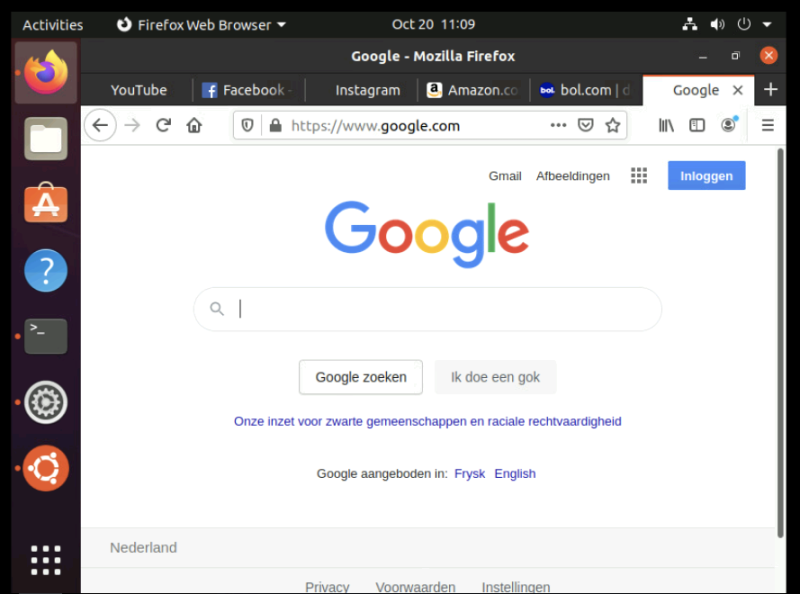
I have created a "dummy" Virtual Machines with Ubuntu and opened a few websites, and hit a few times on refresh: | I have created a "dummy" Virtual Machines with Ubuntu and opened a few websites, and hit a few times on refresh: | ||
<span style="border:3px solid | <span style="border:3px solid #f4c613;display: inline-block;">[[File:URL-A-13.png|800px]]</span> | ||
<div style="clear:both"></div> | <div style="clear:both"></div> | ||
=STEP 05 | ==STEP 05{{fqm}} Review the URL Analysed== | ||
NSX-T Manager: Security >> Security Overview | NSX-T Manager: Security >> Security Overview | ||
After 15 minutes the browsed URLs are catagorized: | After 15 minutes the browsed URLs are catagorized: | ||
<span style="border:3px solid | <span style="border:3px solid #f4c613;display: inline-block;">[[File:URL-A-14.png|800px]]</span> | ||
<div style="clear:both"></div> | <div style="clear:both"></div> | ||
| Line 102: | Line 101: | ||
A closer look will show the reputation and score: | A closer look will show the reputation and score: | ||
<span style="border:3px solid | <span style="border:3px solid #f4c613;display: inline-block;">[[File:URL-A-15.png|800px]]</span> | ||
<div style="clear:both"></div> | <div style="clear:both"></div> | ||
=Quality Check= | ==Quality Check== | ||
I am always trying to improve the quality of my articles, so if you see any errors, mistakes in this article or you have suggestions for improvement, [[Special:Contact|please contact me]], and I will fix this. | I am always trying to improve the quality of my articles, so if you see any errors, mistakes in this article or you have suggestions for improvement, [[Special:Contact|please contact me]], and I will fix this. | ||
[[Category:NSX | [[Category: NSX]] | ||
[[Category: | [[Category:Networking]] | ||
[[Category:VMware]] | |||
Latest revision as of 06:53, 16 March 2024
NSX-T URL analysis allows you to get insight into what websites are accessed within the organization. These websites are scored so you can review and understand the reputation and risk of the accessed websites. This article will explain to you how to configure URL Analysis.
Deployment Steps
- STEP 01) Enable URL Analysis on an Edge Cluster
- STEP 02) Create a context Profile
- STEP 03) Create a Tier-1 Gateway Firewall Rule
- STEP 04) Generate web traffic
- STEP 05) Review the URL Analysed
STEP 01» Enable URL Analysis on an Edge Cluster
NSX-T Manager: Security >> URL Analysis >> Settings
Click on get started:
By default URL Analysis is disabled so I need to enable it on the Edge CLuster:
When I enabled it on the Edge Cluster I need to cinfirm this:
Once confirmed URL Analysis is enabled on the Edge Cluster:
STEP 02» Create a context Profile
When you click on "set" in the previous screen you can create a contect profile:
Give it a name, and click on the attributes to add the attributes:
Add all the attributes available:
After I added the attributes in the contect profiles I can review them:
When I click on "apply" a "1" appears in the profiles column:
STEP 03» Create a Tier–1 Gateway Firewall Rule
NSX-T Manager: Security >> Gateway Firewall >> All shared Rules
Create a (shared) Gateway firewall rule and apply it to the Tier-1 Gateway where the Segments/Virtual Machines are attached to that we want to analyze the URLs from.
NSX-T Manager: Security >> Gateway Firewall >> Gateway SPecific Rules
We can also review the specific Tier-1 Gateway firewall rules for that specific Gateway.
NSX-T Manager: Security >> URL Analysis >> URLs
When we look at the URLs Analyzed section this is still empty:
STEP 04» Generate web traffic
I have created a "dummy" Virtual Machines with Ubuntu and opened a few websites, and hit a few times on refresh:
STEP 05» Review the URL Analysed
NSX-T Manager: Security >> Security Overview
After 15 minutes the browsed URLs are catagorized:
NSX-T Manager: Security >> URL Analysis >> URLs
A closer look will show the reputation and score:
Quality Check
I am always trying to improve the quality of my articles, so if you see any errors, mistakes in this article or you have suggestions for improvement, please contact me, and I will fix this.
