NSX-T (nested) Lab with (3) different sites (and full (nested) SDDC deployment)
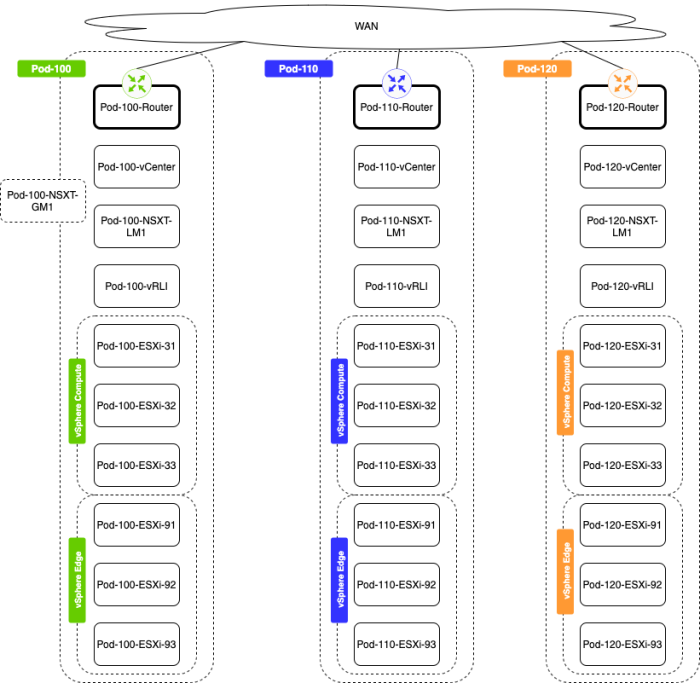
This article will explain how you created a full nested SDDC Lab with NSX-T inside your vSphere environment. I will show you how to create three fully isolated Pod environments where each Pod can be seen as a private cloud/location/region or lab on its own. Each Pod can be seen as a location:
- Pod 100 (GREEN) = Palo Alto
- Pod 110 (BLUE) = Rotterdam
- Pod 120 (ORANGE) = Singapore
With this lab consisting of three pods, you will be able to create your own NSX-T Federation lab. The configuration and deployment of Federation are out of scope for this article. What is in scope here is primarily setting up the infrastructure to test NSX-T across multiple locations.
NSX–T Federation
If you want to deploy NSX-T Federation I have explained this in a separate video series that can be found here in this article.
The steps to get the full lab deployed
- STEP 01» Deploy pod-segments on the VMC on AWS SDDC
- STEP 02» Deploy a DNS/NTP server (pod independent)
- STEP 03» Deploy Windows Stepstone (pod independent)
- STEP 04» Deploy a (virtual) Pod-100-Router (pod 100 specific)
- STEP 05» Configure a static route on the DNS server VM and the Windows Stepstone VM
- STEP 06» Deploy vCenter Server (pod 100 specific)
- STEP 07» Deploy (nested) ESXi Hosts (pod 100 specific)
- STEP 08» Deploy Local NSX-T Manager (pod 100 specific)
- STEP 09» Deploy vRealize Log Insight (pod 100 specific)
- STEP 10» Configure vSphere (VSAN, vCenter Server, ESXi Hosts, Clusters, VDS + vmk interfaces, etc.) based on your own preference (pod 100 specific)
- STEP 11» Configure Local NSX-T Manager: Add Licence + integrate with Center Server (pod 100 specific)
- STEP 12» Configure Local NSX-T Manager: Add Transport Zones, host transport nodes, uplink profiles, etc. (pod 100 specific)
- STEP 13» Deploy NSX-T Edge VMs (pod 100 specific)
- STEP 14» Configure NSX-T edge transport nodes (pod 100 specific)
- STEP 15» Configure Local NSX-T Manager: Add T0/T1Gateways (with BGP configuration on the T0) (pod 100 specific)
- STEP 16» Configure Local NSX-T Manager: Add Segments and attach these to the T1 Gateway (pod 100 specific)
- STEP 17» Repeat step 1 - 16 for Pod 110
- STEP 18» Repeat step 1 - 16 for Pod 120
- STEP 19» Configure OSPF between Pod Routers
- STEP 20» Deploy Global NSX-T Manager in Pod 100
- STEP 21» Configure Global NSX-T Manager and add Pod 100, 110, and 120 Local NSX-T Managers
- STEP 22» Configure Edge Transport Nodes with RTEP in Pod 100, 110, and 120
The config workbook
This config workbook) will provide all the details that will support you with building the full lab.
The network diagrams
Below you will find the diagrams for each Pod separately to get an idea of how everything is connected and how everything will interact from a network level.
All Pods overview
Pod 100 Lab diagram
This diagram will show you the SDDC components for Pod 100.
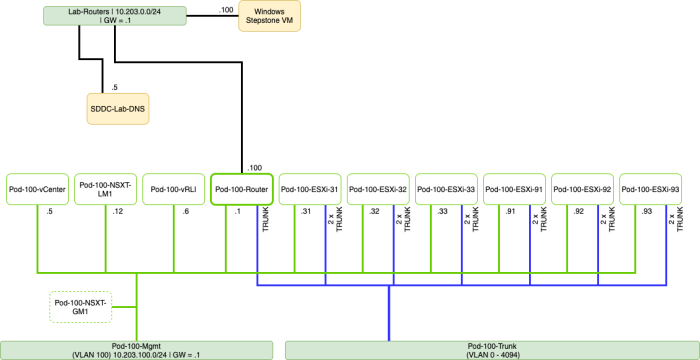
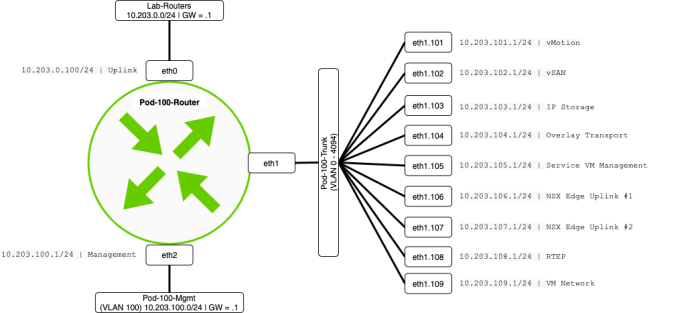
Pod 100 Network diagram
This diagram will show you the network configuration for Pod 100.
Pod 110 Lab diagram
This diagram will show you the SDDC components for Pod 110.
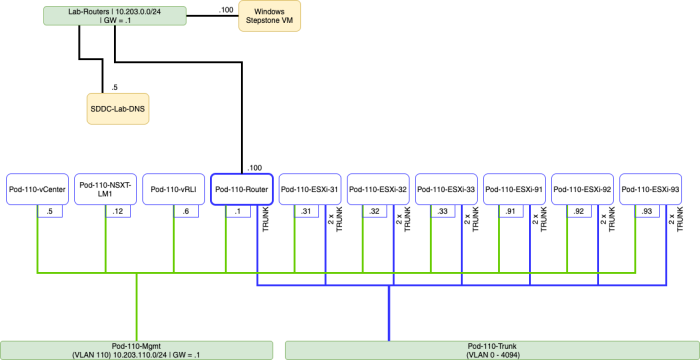
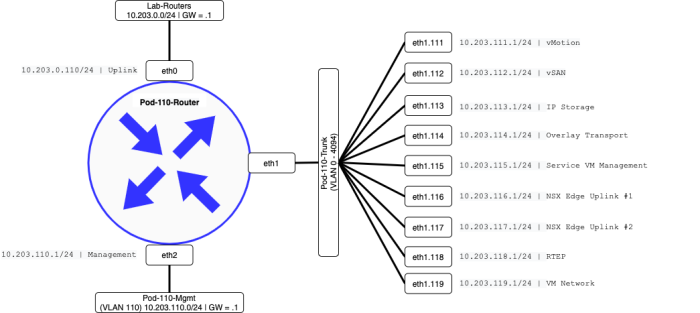
Pod 110 Network diagram
This diagram will show you the network configuration for Pod 110.
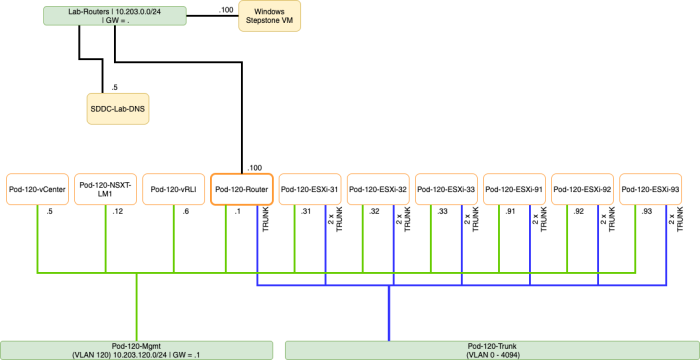
Pod 120 Lab diagram
This diagram will show you the SDDC components for Pod 120.
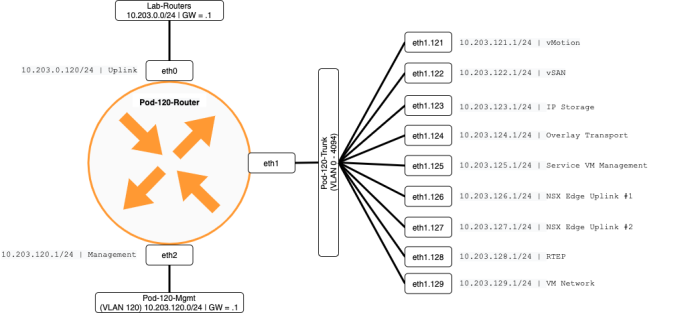
Pod 120 Network diagram
This diagram will show you the network configuration for Pod 120.
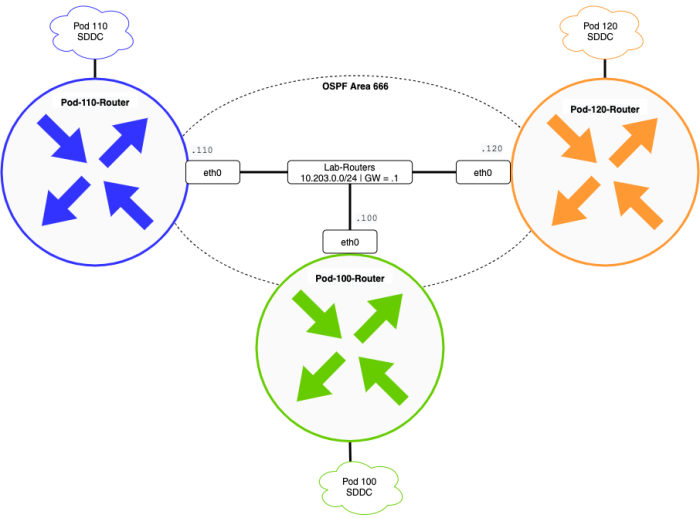
All pods connected network diagram
This diagram will show you how the Pods (or locations) are interconnected with each other.
STEP 01» Deploy pod–segments on the VMC on AWS SDDC
Either use VDS Port Groups or NSX-T Segments as your main infrastructure to build the (nested) SDDC on.
Use VDS Port Group as your network infra
This step needs to be performed on your "physical/virtual" infrastructure. You need to create two additional port-groups for Pod-100.
- Pod-100-Mgmt
- Pod-100-Trunk
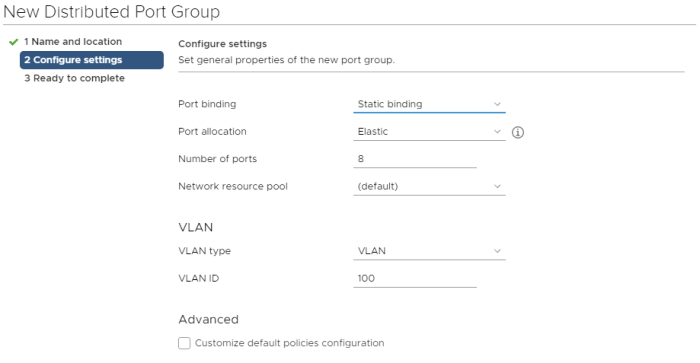
Create a Port Group for VLAN 100:
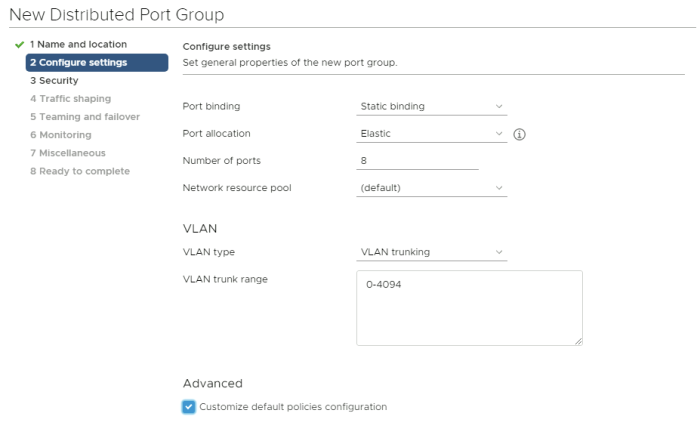
Create a Port Group for VLAN 0-4094:
Use NSX–T Segment 〈Port Group〉 as your network infra
It is possible to use NSX-T Segments as your network infrastructure. What is important here is that you enable Guest VLAN Tagging (GVT) on the Segments.
- ns-<username>-Pod-100-Mgmt
- enable Guest VLAN Tagging (GVT) for VLAN 100
- do not connect the segment to a Gateway
- select the vmc-overlay-tz Transport Zone
- ns-<username>-Pod-100-Trunk
- enable Guest VLAN Tagging (GVT) for VLAN 0-4094 (Trunk)
- select the IP-Discovery-Allow segment profile
- select the MAC-Allow segment profile
- do not connect the segment to a Gateway
- select the vmc-overlay-tz Transport Zone
The Segment Profiles (IP Discovery & MAC) needs to have the following settings:
STEP 02» Deploy a DNS/NTP server pod 〈independent〉
To deploy the SDDC components, some of them will need to use DNS and NTP services. So you need to create an Ubuntu Virtual Server with these services installed and configured. Creating the actual Ubuntu Server is out of scope for this article, but the scope is installing and configuring the actual DNS and NTP services. You can download the Ubuntu Server ISO and deploy ubuntu by yourself. I am using an Ubuntu Server but if you feel more comfortable using Windows DNS and Windows NTP on a Windows server, be my guest.
The configuration files of BIND 〈when you want to save time〉
I have included the BIND configuration files that you need to create for the DNS server. In the sections below, you can do this manually, or just download the files here and copy them over with SCP and save some time.
Install and configure 〈BIND〉 DNS
Install BIND on the Ubuntu Server
administrator@dns:~$ sudo apt install bind9 bind9utils bind9-doc bind9-host
Create a file with the following content:
administrator@dns:~$ sudo nano /etc/bind/named.conf
// This is the primary configuration file for the BIND DNS server named.
//
// Please read /usr/share/doc/bind9/README.Debian.gz for information on the
// structure of BIND configuration files in Debian, *BEFORE* you customize
// this configuration file.
//
// If you are just adding zones, please do that in /etc/bind/named.conf.local

include "/etc/bind/named.conf.options";
include "/etc/bind/named.conf.local";
include "/etc/bind/named.conf.default-zones";
administrator@dns:~$
Create file with the following content:
administrator@dns:~$ sudo nano /etc/bind/named.conf.options
//
// File: /etc/bind/named.conf.options
//

 options {
  directory "/var/cache/bind";
  recursion yes;
  notify yes;
  allow-query { any; };
  allow-query-cache { any; };
  allow-recursion { any; };
  forwarders { 8.8.8.8; };
  dnssec-validation no;
  auth-nxdomain no; # conform to RFC1035
  listen-on { localhost; any; };
  listen-on-v6 { localhost; any; };
  allow-transfer { any; };
};
administrator@dns:~$
Create file with the following content:
administrator@dns:~$ sudo nano /etc/bind/named.conf.local
//
// File: /etc/bind/named.conf.local
//

//
// Do any local configuration here
//

// Consider adding the 1918 zones here, if they are not used in your
// organization
//include "/etc/bind/zones.rfc1918";

zone "sddc.lab" {
  type master;
  allow-update { any; };         // Needs to include the IP address of the Ansible control station
  allow-transfer { any; };       // Needs to include the IP address of the Ansible control station for utils/showdns
  file "/var/lib/bind/db.sddc.lab";
};
zone "203.10.in-addr.arpa" {
  type master;
  allow-update { any; };         // Needs to include the IP address of the Ansible control station
  allow-transfer { any; };       // Needs to include the IP address of the Ansible control station for utils/showdns
  file "/var/lib/bind/db.10.203";
};
administrator@dns:~$
Create file with the following content:
administrator@dns:~$ sudo nano /var/lib/bind/db.sddc.lab
user $ORIGIN .
user $TTL 604800     ; 1 week
sddc.lab                IN SOA  dns.sddc.lab. admin.sddc.lab. (
                                329        ; serial
                                604800     ; refresh (1 week)
                                86400      ; retry (1 day)
                                2419200    ; expire (4 weeks)
                                604800     ; minimum (1 week)
                                )
                        NS      dns.sddc.lab.
user $ORIGIN sddc.lab.
dns                     A       10.203.0.5
user $TTL 3600       ; 1 hour
Pod-100-ESXi-21                         A       10.203.100.21
Pod-100-ESXi-22                         A       10.203.100.22
Pod-100-ESXi-23                         A       10.203.100.23
Pod-100-ESXi-31                         A       10.203.100.31
Pod-100-ESXi-32                         A       10.203.100.32
Pod-100-ESXi-33                         A       10.203.100.33
Pod-100-ESXi-91                         A       10.203.100.91
Pod-100-ESXi-92                         A       10.203.100.92
Pod-100-ESXi-93                         A       10.203.100.93
Pod-100-NSXT-CSM                        A       10.203.100.15
Pod-100-NSXT-GM1                        A       10.203.100.8
Pod-100-NSXT-LM1                        A       10.203.100.12
Pod-100-vCenter                         A       10.203.100.5
Pod-100-T0-EdgeVM-01                    A       10.203.105.254
Pod-100-T0-EdgeVM-02                    A       10.203.105.253
Pod-100-vRLI                            A       10.203.100.6
Pod-100-Router                          CNAME   Pod-100-Router-Uplink.SDDC.Lab.
Pod-100-Router-Uplink                   A       10.203.0.100
Pod-100-Router-Management               A       10.203.100.1
Pod-100-Router-vSAN                     A       10.203.102.1
Pod-100-Router-IPStorage                A       10.203.103.1
Pod-100-Router-Transport                A       10.203.104.1
Pod-100-Router-ServiceVM                A       10.203.105.1
Pod-100-Router-NSXEdgeUplink1           A       10.203.106.1
Pod-100-Router-NSXEdgeUplink2           A       10.203.107.1
Pod-100-Router-RTEP                     A       10.203.108.1
Pod-100-Router-VMNetwork                A       10.203.109.1
administrator@dns:~$
Create file with the following content:
administrator@dns:~$ sudo nano /var/lib/bind/db.10.203
user $ORIGIN .
user $TTL 604800     ; 1 week
203.10.in-addr.arpa     IN SOA  dns.sddc.lab. admin.sddc.lab. (
                                298        ; serial
                                604800     ; refresh (1 week)
                                86400      ; retry (1 day)
                                2419200    ; expire (4 weeks)
                                604800     ; minimum (1 week)
                                )
                        NS      dns.sddc.lab.
user $ORIGIN 0.203.10.in-addr.arpa.
user $TTL 3600       ; 1 hour
100                     PTR     Pod-100-Router-Uplink.SDDC.Lab.
user $TTL 604800     ; 1 week
5                       PTR     dns.sddc.lab.
user $ORIGIN 100.203.10.in-addr.arpa.
1                       PTR     Pod-100-Router-Management.SDDC.Lab.
12                      PTR     Pod-100-NSXT-LM.SDDC.Lab.
15                      PTR     Pod-100-NSXT-CSM.SDDC.Lab.
21                      PTR     Pod-100-ESXi-21.SDDC.Lab.
22                      PTR     Pod-100-ESXi-22.SDDC.Lab.
23                      PTR     Pod-100-ESXi-23.SDDC.Lab.
31                      PTR     Pod-100-ESXi-31.SDDC.Lab.
32                      PTR     Pod-100-ESXi-32.SDDC.Lab.
33                      PTR     Pod-100-ESXi-33.SDDC.Lab.
5                       PTR     Pod-100-vCenter.SDDC.Lab.
6                       PTR     Pod-100-vRLI.SDDC.Lab.
8                       PTR     Pod-100-NSXT-GM.SDDC.Lab.
91                      PTR     Pod-100-ESXi-91.SDDC.Lab.
92                      PTR     Pod-100-ESXi-92.SDDC.Lab.
93                      PTR     Pod-100-ESXi-93.SDDC.Lab.
user $ORIGIN 203.10.in-addr.arpa.
1.101                   PTR     Pod-100-Router-vMotion.SDDC.Lab.
1.102                   PTR     Pod-100-Router-vSAN.SDDC.Lab.
1.103                   PTR     Pod-100-Router-IPStorage.SDDC.Lab.
1.104                   PTR     Pod-100-Router-Transport.SDDC.Lab.
1.105                   PTR     Pod-100-Router-ServiceVM.SDDC.Lab.
254.105                 PTR     Pod-100-T0-EdgeVM-02.SDDC.Lab.
253.105                 PTR     Pod-100-T0-EdgeVM-01.SDDC.Lab.
1.106                   PTR     Pod-100-Router-NSXEdgeUplink1.SDDC.Lab.
1.107                   PTR     Pod-100-Router-NSXEdgeUplink2.SDDC.Lab.
1.108                   PTR     Pod-100-Router-RTEP.SDDC.Lab.
1.109                   PTR     Pod-100-Router-VMNetwork.SDDC.Lab.

user $TTL 604800     ; 1 week
dns                     A       10.203.0.5
administrator@dns:~$
Other useful BIND commands:
BIND commands
Start BIND:
   sudo systemctl start named


Restart BIND:
   sudo systemctl restart named


BIND Status (Useful to show errors in configuration)
   sudo systemctl status named


Enable auto-start at enable BIND:
   sudo systemctl enable named


Verify all listeners are operational:
   sudo netstat -lnptu
Verify BIND is working (from DNS server)
From BIND Server:
   dig @127.0.0.1 dns.sddc.lab
From other systems:
   dig @<IP-OF-BIND-SeRVER> dns.sddc.lab
Verify if BIND is running properly.
sudo systemctl status named
administrator@dns:~$ sudo systemctl status named
● named.service - BIND Domain Name Server
     Loaded: loaded (/lib/systemd/system/named.service; enabled; vendor preset: enabled)
     Active: active (running) since Thu 2020-10-08 07:51:15 UTC; 6s ago
       Docs: man:named(8)
   Main PID: 2382 (named)
      Tasks: 8 (limit: 2282)
     Memory: 17.0M
     CGroup: /system.slice/named.service
             └─2382 /usr/sbin/named -f -u bind

Oct 08 07:51:15 dns named[2382]: command channel listening on ::1#953
Oct 08 07:51:15 dns named[2382]: managed-keys-zone: loaded serial 3
Oct 08 07:51:15 dns named[2382]: zone 0.in-addr.arpa/IN: loaded serial 1
Oct 08 07:51:15 dns named[2382]: zone 203.10.in-addr.arpa/IN: loaded serial 298
Oct 08 07:51:15 dns named[2382]: zone 127.in-addr.arpa/IN: loaded serial 1
Oct 08 07:51:15 dns named[2382]: zone sddc.lab/IN: loaded serial 329
Oct 08 07:51:15 dns named[2382]: zone 255.in-addr.arpa/IN: loaded serial 1
Oct 08 07:51:15 dns named[2382]: zone localhost/IN: loaded serial 2
Oct 08 07:51:15 dns named[2382]: all zones loaded
Oct 08 07:51:15 dns named[2382]: running
administrator@dns:~$
Install and configure NTP
Install NTP on the Ubuntu Server
administrator@dns:~$ sudo apt install ntp
Edit this file /etc/ntp.conf to point to your closest NTP server in the internet.
root # Use servers from the NTP Pool Project. Approved by Ubuntu Technical Board
root # on 2011-02-08 (LP: #104525). See http://www.pool.ntp.org/join.html for
root # more information.
pool 0.ubuntu.pool.ntp.org iburst
pool 1.ubuntu.pool.ntp.org iburst
pool 2.ubuntu.pool.ntp.org iburst
pool 3.ubuntu.pool.ntp.org iburst
Look up the NTP servers that are close to you with this link. Replace the above NTP servers in the config files with the NTP server that is closest to you.
Verify if NTP is running properly.
sudo systemctl status ntp
administrator@dns:~$ sudo systemctl status ntp
● ntp.service - Network Time Service
     Loaded: loaded (/lib/systemd/system/ntp.service; enabled; vendor preset: enabled)
     Active: active (running) since Thu 2020-10-08 07:58:44 UTC; 4min 44s ago
       Docs: man:ntpd(8)
   Main PID: 2636 (ntpd)
      Tasks: 2 (limit: 2282)
     Memory: 1.2M
     CGroup: /system.slice/ntp.service
             └─2636 /usr/sbin/ntpd -p /var/run/ntpd.pid -g -u 113:118

Oct 08 07:58:48 dns ntpd[2636]: Soliciting pool server 45.55.58.103
Oct 08 07:58:48 dns ntpd[2636]: Soliciting pool server 213.206.165.21
Oct 08 07:58:49 dns ntpd[2636]: Soliciting pool server 194.29.130.252
Oct 08 07:58:49 dns ntpd[2636]: Soliciting pool server 72.5.72.15
Oct 08 07:58:49 dns ntpd[2636]: Soliciting pool server 91.189.94.4
Oct 08 07:58:50 dns ntpd[2636]: Soliciting pool server 91.189.89.198
Oct 08 07:58:50 dns ntpd[2636]: Soliciting pool server 195.171.43.12
Oct 08 07:58:51 dns ntpd[2636]: Soliciting pool server 91.189.89.199
Oct 08 07:58:51 dns ntpd[2636]: Soliciting pool server 91.198.10.4
Oct 08 07:58:52 dns ntpd[2636]: Soliciting pool server 91.189.91.157
administrator@dns:~$
STEP 03» Deploy Windows Stepstone 〈pod independent〉
Deploying a Windows Virtual Machine is not rocket science and is out of scope for this article. I have deployed just a regular Windows 2019 Stepstone machine that I have connected on the same network as the DNS server (in my example, this is my 10.203.0.0/24 segment.
STEP 04» Deploy a 〈virtual〉l Pod-100-Router 〈pod 100 specific〉
Each Pod that you will build will have its own dedicated Virtual Router. The Virtual Router that I am using as a VyOS router. You can download the latest VyOS image here. I have downloaded this image (vyos-rolling-latest.iso).
You need to create a new Virtual Machine using the following specifics:
| Processor | 1 vCPU |
| RAM | 512 MB |
| Diskspace | 10 GB |
| OS | Debian 10/64bit |
| NICs | 3 x vNIC |
Selecting the correct Guest OS Family and Version:
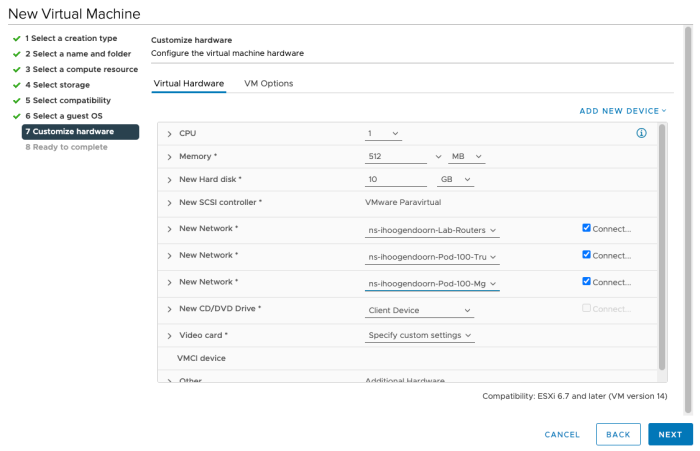
Specify the CPU, RAM, HD space, and create three additional vNICs with the correct networks/port groups selected.
| VM NIC | VyOS interface | Port Group |
|---|---|---|
| vNIC1 | eth0 | Lab-Routers |
| vNIC2 | eth1 | Pod-100-Trunk |
| vNIC3 | eth2 | Pod-100-Mgmt |
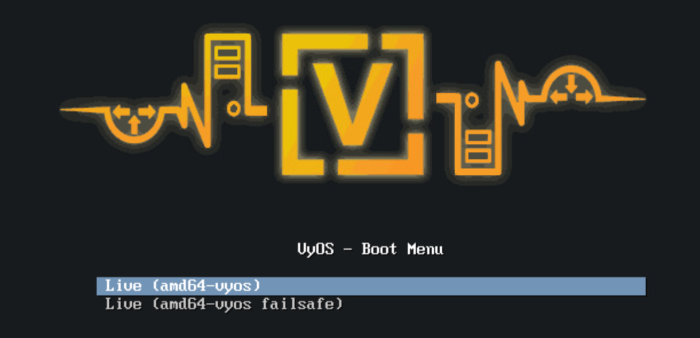
When you open the console,, you will see this screen; when it does not autoboot, select the menu's first option.
You will get a login prompt, and you can log in with the default credentials."
login: vyos
password: vyos
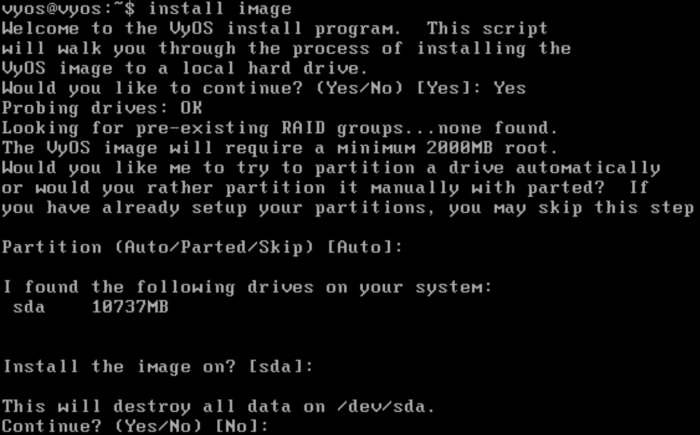
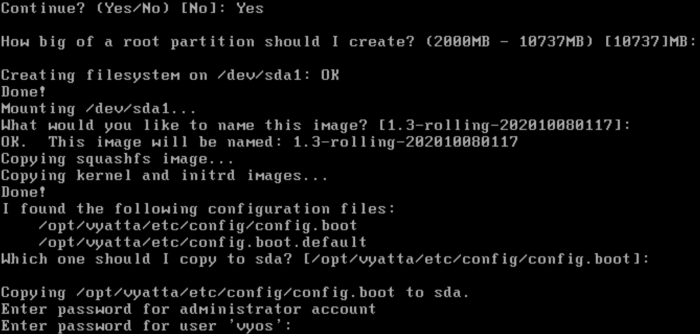
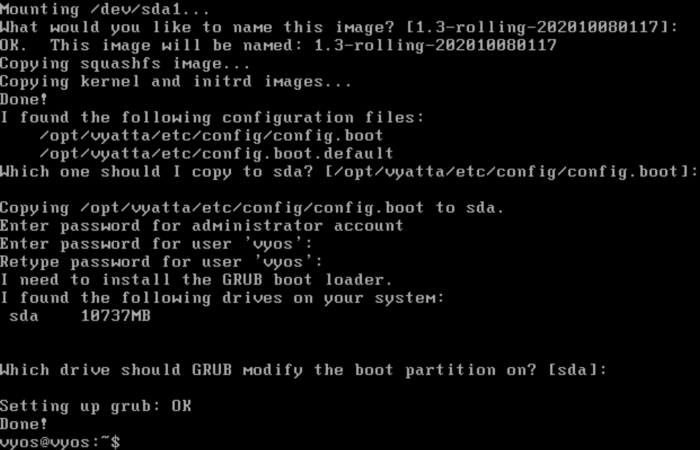
You have booted from the ISO file, and you must install the vyOS Operating System on the VM so that you can save your configs and reboot, etc. Type in:
vyos@vyos:~$ install image
And answer the questions as I did in the screenshots below:
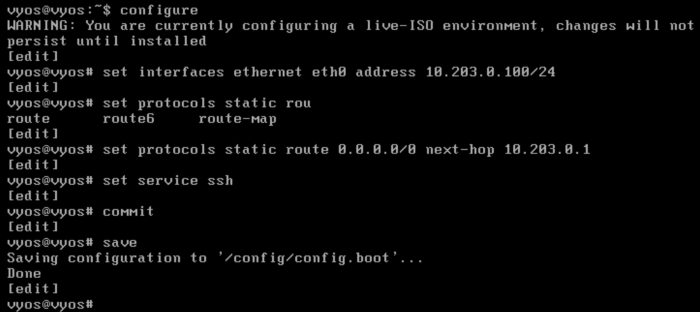
Reboot the image so it can boot from the hard disk, and not form the ISO. Any configuration you do now (before the reboot) will be lost after the reboot, and you will have to start over again. After the reboot, you need to do a base configuration to configure the management IP interface from the vSphere console. You will need this so you can connect to the Virtual Router using SSH, making the configuration much easier as you can then copy/paste in the additional router configuration.
initial configuration
configure

set interfaces ethernet eth0 mtu '1500'
set interfaces ethernet eth0 address '10.203.0.100/24'
set protocols static route 0.0.0.0/0 next-hop 10.203.0.1
set service ssh

commit
save
Now use an SSH client and copy in the configuration below. This will configure the Virtual Router's remaining interfaces that you require to have connectivity within the Pod and between the other Pods.
Pod 100 Router Configuration
configure

set system host-name Pod-100-Router

set interfaces ethernet eth1 mtu '9000'

set interfaces ethernet eth1 vif 101 mtu '9000'
set interfaces ethernet eth1 vif 101 address '10.203.101.1/24'
set interfaces ethernet eth1 vif 101 description 'vMotion'

set interfaces ethernet eth1 vif 102 mtu '9000'
set interfaces ethernet eth1 vif 102 address '10.203.102.1/24'
set interfaces ethernet eth1 vif 102 description 'vSAN'

set interfaces ethernet eth1 vif 103 mtu '9000'
set interfaces ethernet eth1 vif 103 address '10.203.103.1/24'
set interfaces ethernet eth1 vif 103 description 'IP Storage'

set interfaces ethernet eth1 vif 104 mtu '9000'
set interfaces ethernet eth1 vif 104 address '10.203.104.1/24'
set interfaces ethernet eth1 vif 104 description 'Overlay Transport'

set interfaces ethernet eth1 vif 105 mtu '1500'
set interfaces ethernet eth1 vif 105 address '10.203.105.1/24'
set interfaces ethernet eth1 vif 105 description 'Service VM Management'

set interfaces ethernet eth1 vif 106 mtu '1600'
set interfaces ethernet eth1 vif 106 address '10.203.106.1/24'
set interfaces ethernet eth1 vif 106 description 'NSX Edge Uplink #1'

set interfaces ethernet eth1 vif 107 mtu '1600'
set interfaces ethernet eth1 vif 107 address '10.203.107.1/24'
set interfaces ethernet eth1 vif 107 description 'NSX Edge Uplink #2'

set interfaces ethernet eth1 vif 108 mtu '1500'
set interfaces ethernet eth1 vif 108 address '10.203.108.1/24'
set interfaces ethernet eth1 vif 108 description 'RTEP'

set interfaces ethernet eth1 vif 109 mtu '1500'
set interfaces ethernet eth1 vif 109 address '10.203.109.1/24'
set interfaces ethernet eth1 vif 109 description 'VM Network'

set interfaces ethernet eth2 mtu '9000'
set interfaces ethernet eth2 address '10.203.100.1/24'
set interfaces ethernet eth2 description 'Management'

commit
save
exit
reboot
When you have rebooted, it is always good to verify if all your interfaces are configured according to plan and if your interfaces are all up.
vyos@Pod-100-Router:~$ show interfaces
Codes: S - State, L - Link, u - Up, D - Down, A - Admin Down
Interface        IP Address                        S/L  Description
----        ----------                        ---  -----------
eth0             10.203.0.100/24                   u/u
eth1             -                                 u/u
eth1.101         10.203.101.1/24                   u/u  vMotion
eth1.102         10.203.102.1/24                   u/u  vSAN
eth1.103         10.203.103.1/24                   u/u  IP Storage
eth1.104         10.203.104.1/24                   u/u  Overlay Transport
eth1.105         10.203.105.1/24                   u/u  Service VM Management
eth1.106         10.203.106.1/24                   u/u  NSX Edge Uplink #1
eth1.107         10.203.107.1/24                   u/u  NSX Edge Uplink #2
eth1.108         10.203.108.1/24                   u/u  RTEP
eth1.109         10.203.109.1/24                   u/u  VM Network
eth2             10.203.100.1/24                   u/u  Management
lo               127.0.0.1/8                       u/u
                 ::1/128
vyos@Pod-100-Router:~$
STEP 05» Configure a static route on the DNS server VM and the Windows Stepstone VM
Your Pod Management Network is in the 10.203.100.0/24 range, and this network is only reachable from your Virtual Router. To connect to your vCenter Server GUI, NSX-T Manager GUI (and all other management IP addresses in that subnet) from your Stepstone, you need to tell the DNS server and the stepstone how then can reach the 10.203.100.0/24 network. You need to configure a static route on both Virtual machines to get this working:
Stepstone 〈Windows Server〉
Open a Windows Command Window and type in the following command:
ROUTE ADD -p 10.203.100.0 MASK 255.255.255.0 10.203.0.100
DNS 〈Ubuntu Server〉
In the terminal type in the following command:
sudo ip route add 10.203.100.0/24 via 10.203.0.100 dev ens160
STEP 06» Deploy vCenter Server 〈pod 100 specific〉
Now that you have routing and DNS working, the next step is to deploy your Pod specific vCenter Server. Each Pod that you will build will have its own dedicated vCenter Server. The vCenter Server deployment on a VMC on AWS SDDC requires a different approach using two stages. You will need to deploy the vCenter Server using the .ova file. The .ova file can be retrieved from the vCenter Server ISO file that you can download from the VMware website.
STAGE 1 Deployment
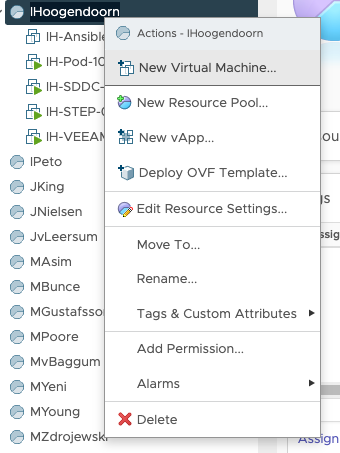
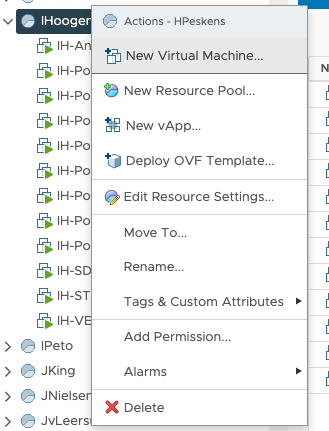
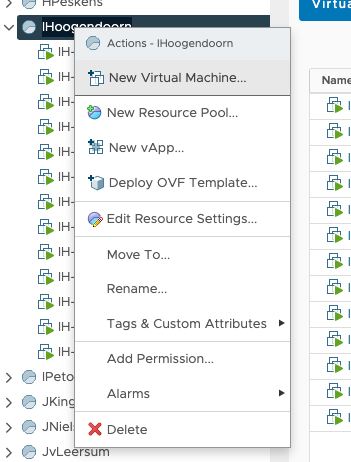
Create a new Virtual Machine:
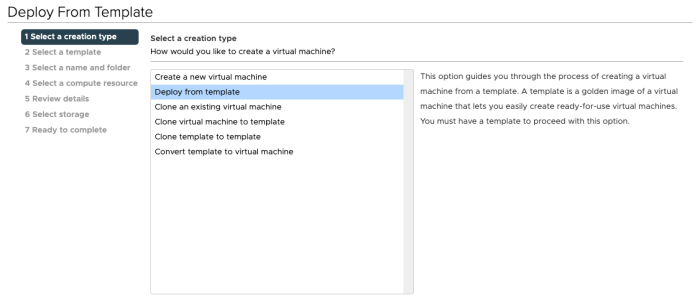
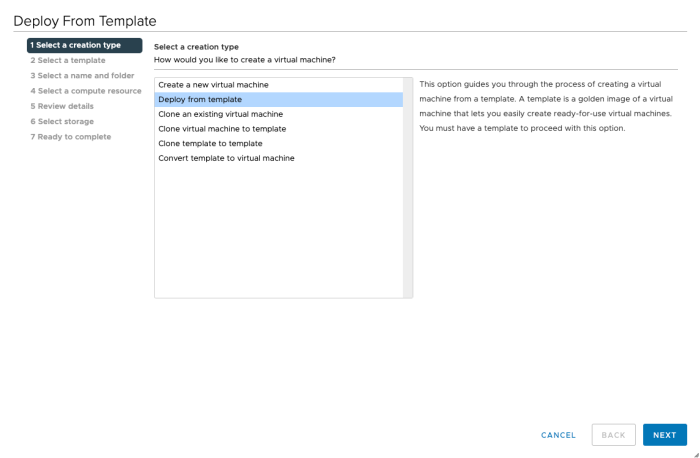
Select: Deploy from template:
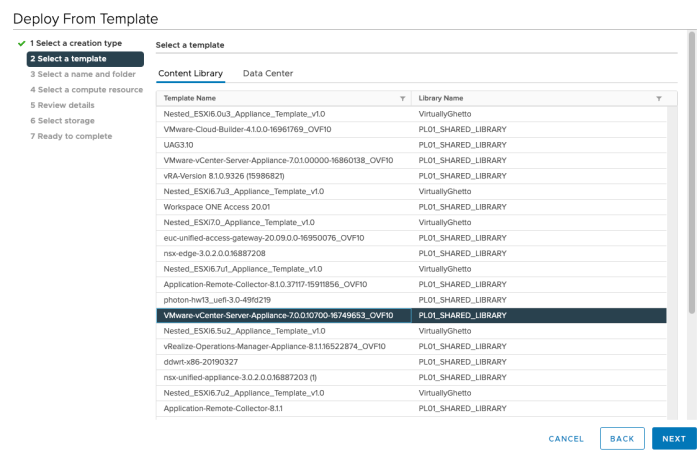
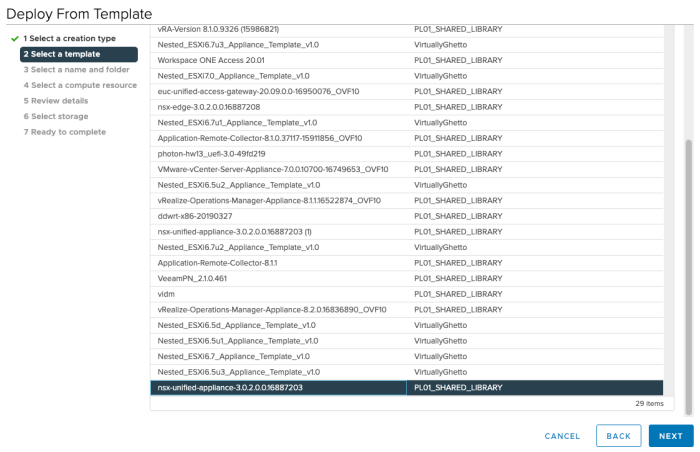
Choose the OVA/OVF Template you want to deploy from:
Provide a Virtual Machine name:
Select the correct Resource Pool (the one with your name on it):
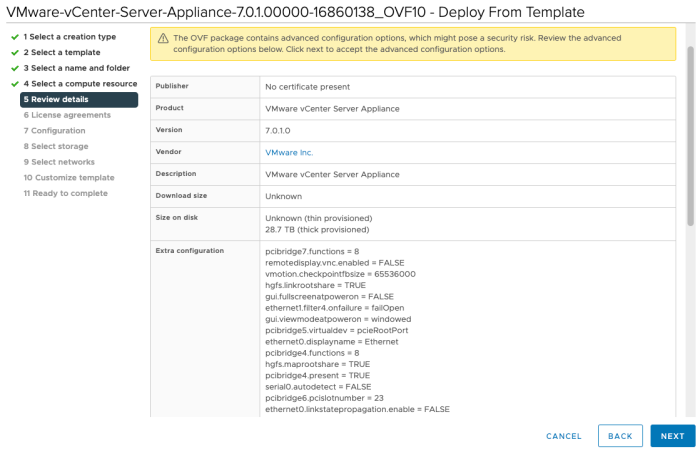
Review the details:
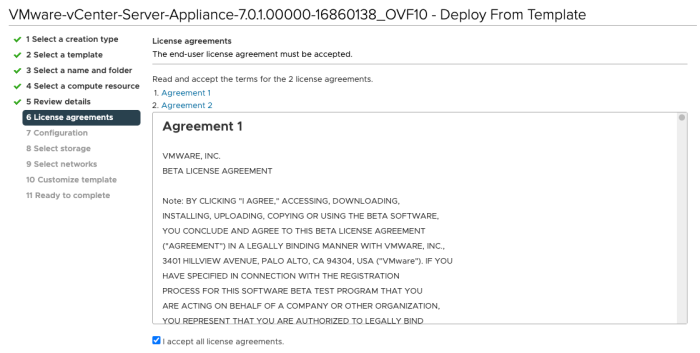
Accept the licence agreement:
Select the Storage:
Select the destination network:
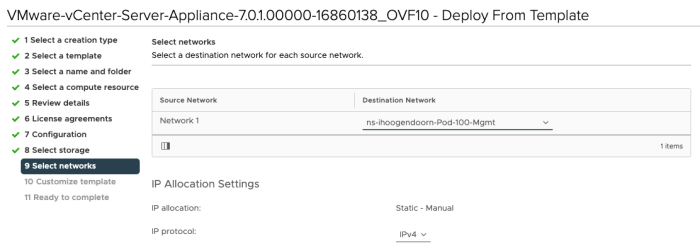
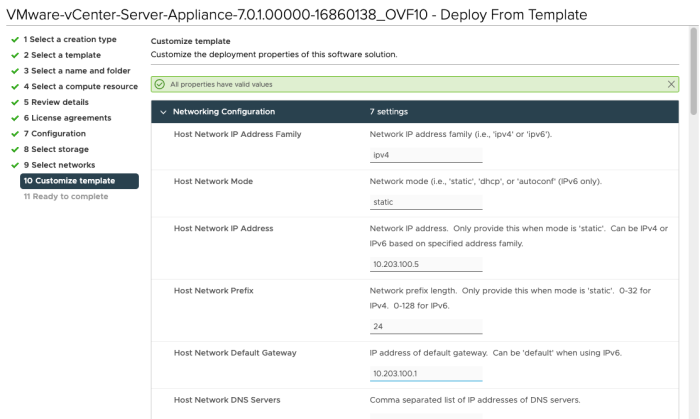
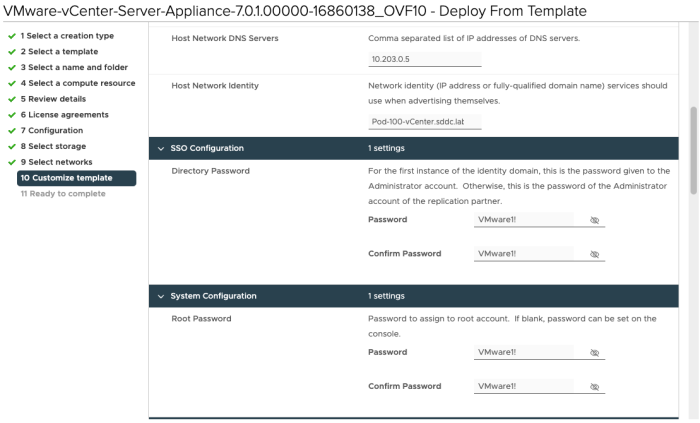
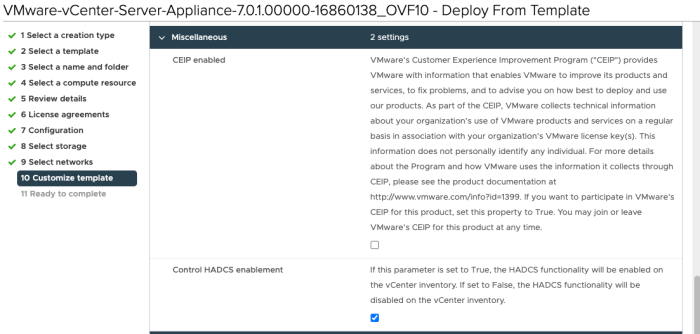
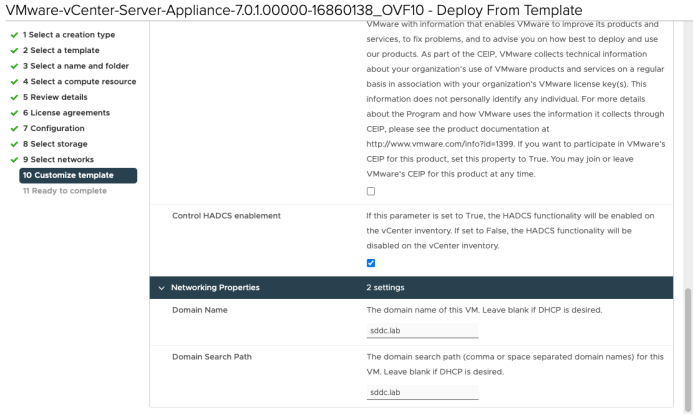
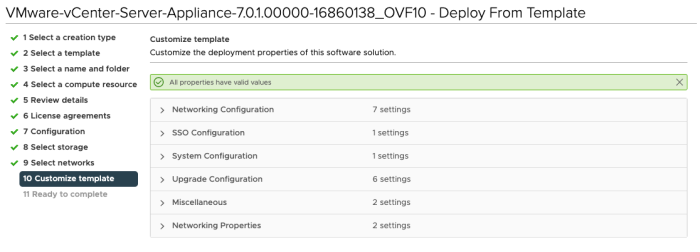
Specify the template specific properties like passwords, IP address, DNS, default gateway settings, etc.:
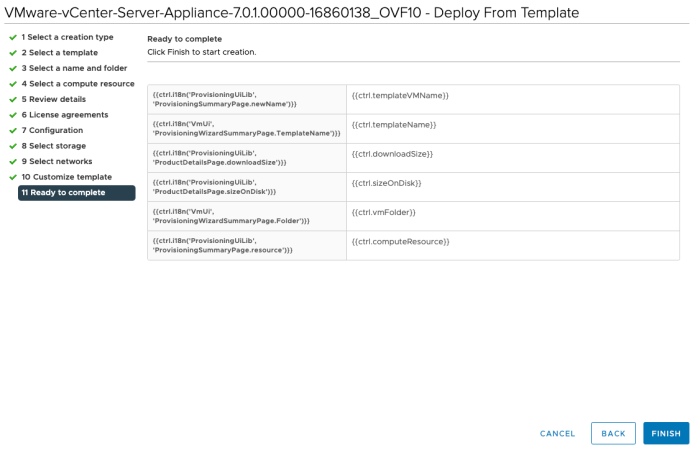
Review the Summary before you start the actual deploy:
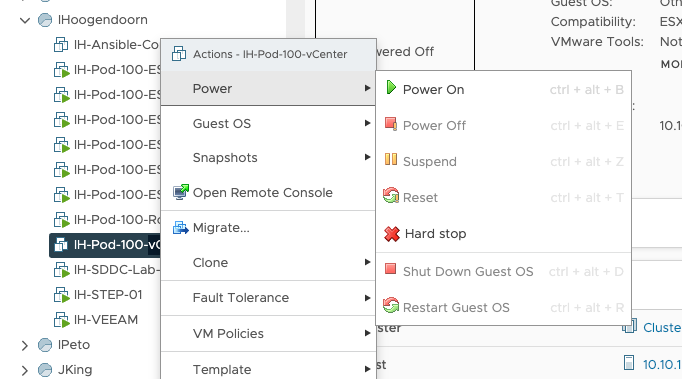
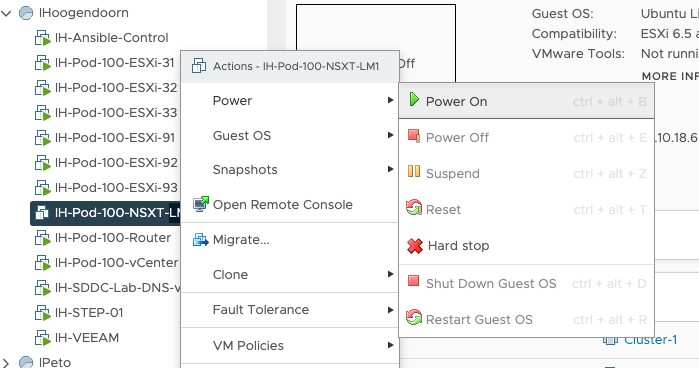
Power on the Virtual Machine:
STAGE 2 Deployment
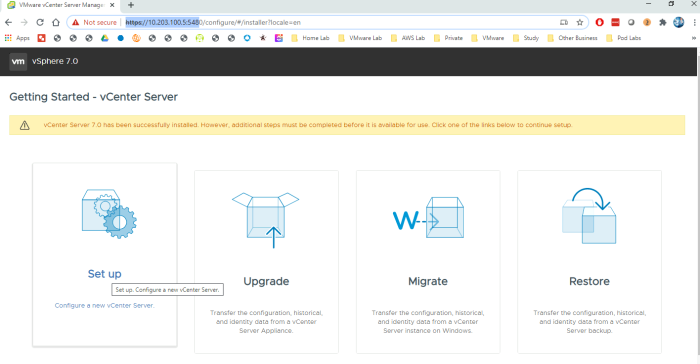
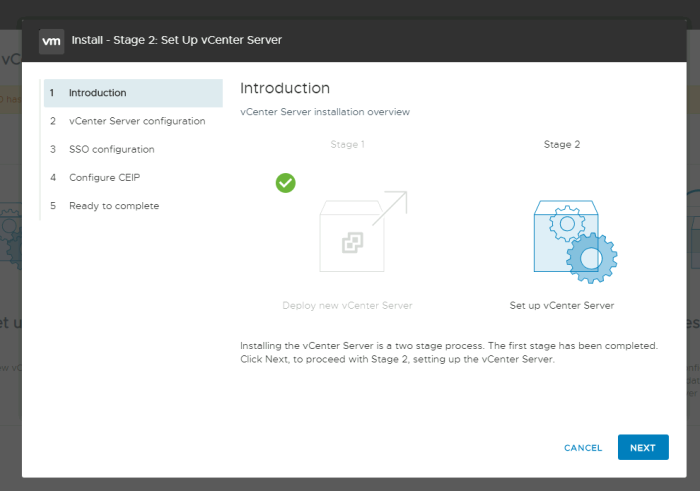
When you powered on the Virtual machine, you have only completed the STAGE 1 vCenter Server deployment, and we still need to complete the STAGE 2 deployment. To do this, you need to browse from the Stepstone to https://10.203.100.5:5480 (the vCenter Server Management IP address) Log in to the vCenter Server to complete the STAGE 2 deployment.
Click next:
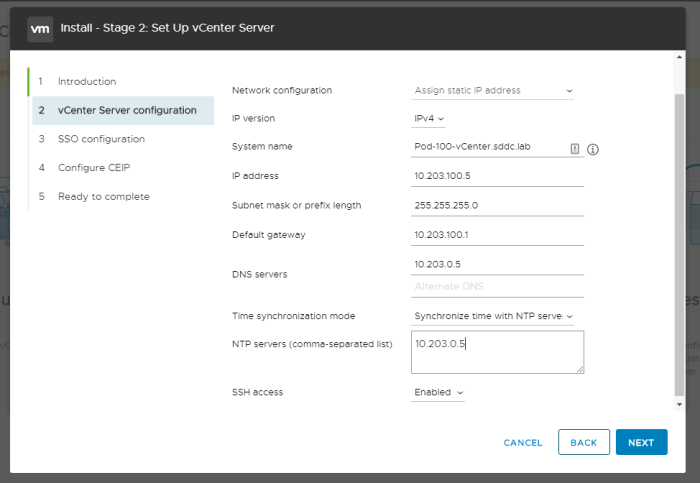
Verify all the parameters, and select to synchronize your NTP with a selected NTP server.
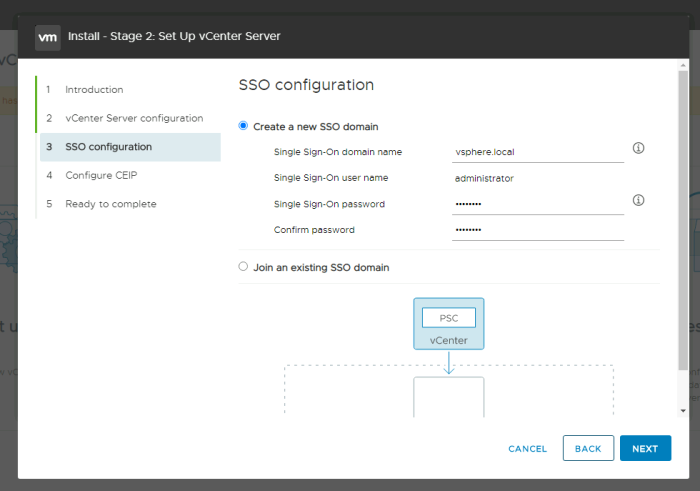
Specify the SSO configuration details:
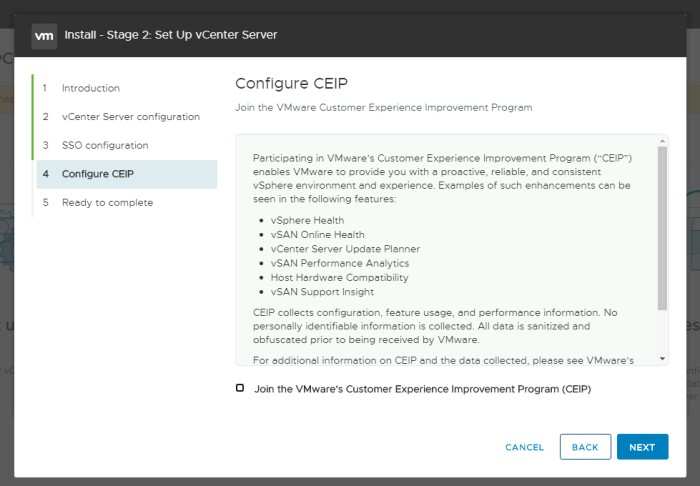
Configure CEIP (or not):
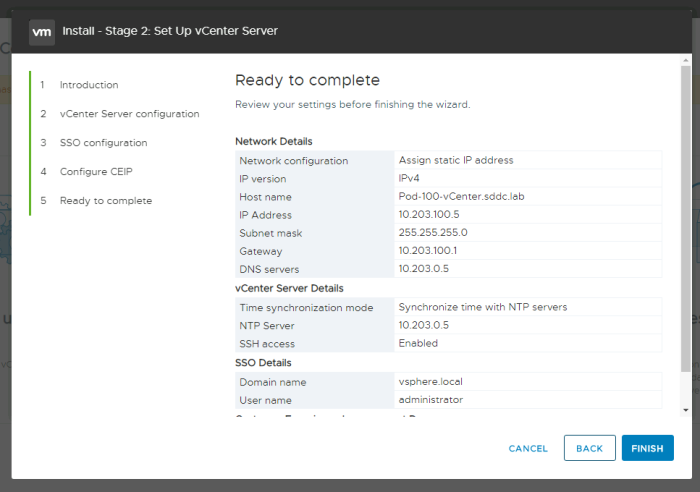
Review the final STAGE 2 configuration details and click finish to start the STAGE 2 deployment:
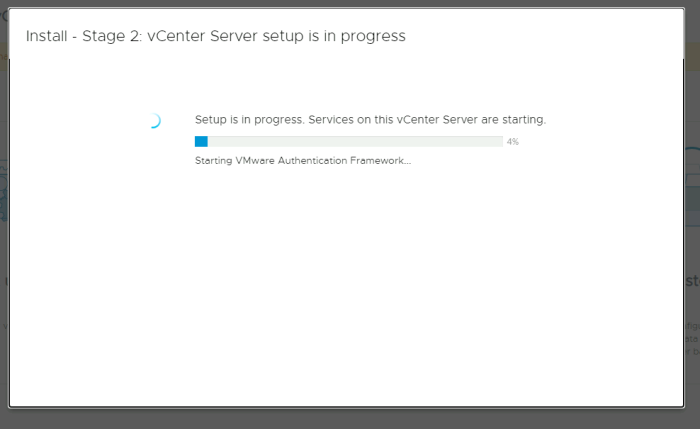
Watch the progress screen until it finishes:
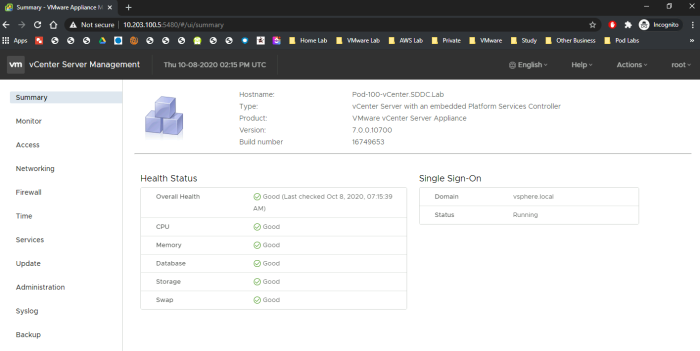
When STAGE 2 deployment is finished sometimes, you will get a screen that is finalized, and sometimes it does not do the autorefresh properly, and it times out. The STAGE 2 deployment takes around 20 minutes, and after the deployment, you can refresh the screen and log in again and look at the vCenter Server Appliance summary screen:
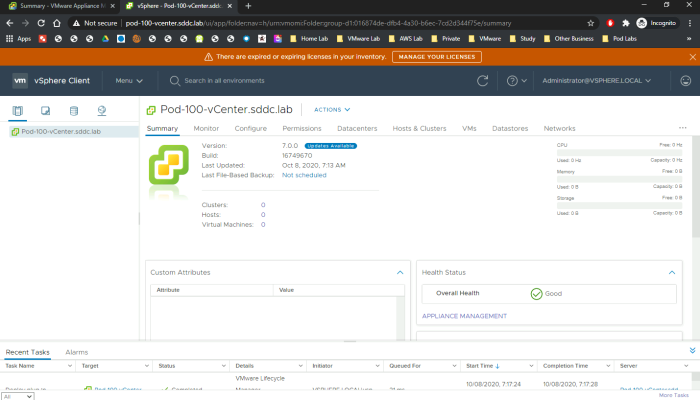
Now you are ready to log into the vCenter Server GUI:
STEP 07» Deploy 〈nested〉 ESXi Hosts 〈pod 100 specific〉
Now that your vCenter Server is up and running and reachable the next step is to deploy the (nested) ESXi Compute and Edge hosts. Per Pod I am deploying in total six (nested) ESXi hosts (as per the diagrams in the diagrams section above) For Pod 100 the details for the (nested) ESXi hosts to deploy are found in the table below:
| ESXi Hostname | VM Name | vmk0 IP address | Purpose |
|---|---|---|---|
| Pod-100-ESXi-31 | IH-Pod-100-ESXi-31 | 10.203.100.31/24 | Compute Host |
| Pod-100-ESXi-32 | IH-Pod-100-ESXi-32 | 10.203.100.32/24 | Compute Host |
| Pod-100-ESXi-33 | IH-Pod-100-ESXi-33 | 10.203.100.33/24 | Compute Host |
| Pod-100-ESXi-91 | IH-Pod-100-ESXi-91 | 10.203.100.91/24 | Edge Host |
| Pod-100-ESXi-92 | IH-Pod-100-ESXi-92 | 10.203.100.92/24 | Edge Host |
| Pod-100-ESXi-93 | IH-Pod-100-ESXi-93 | 10.203.100.93/24 | Edge Host |
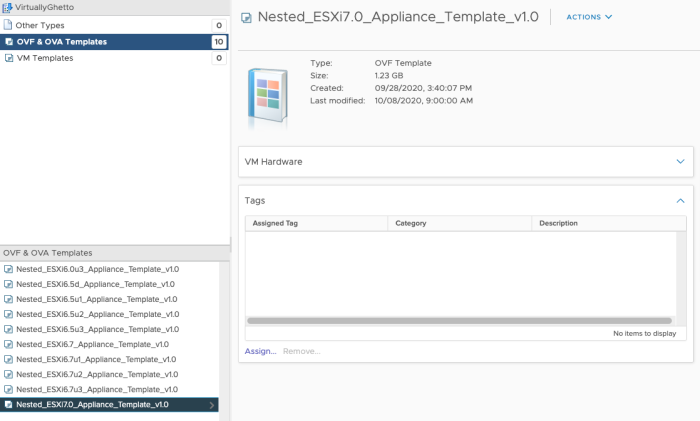
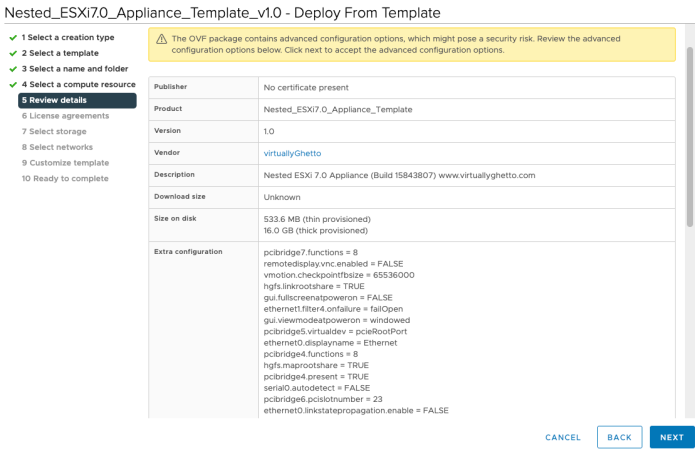
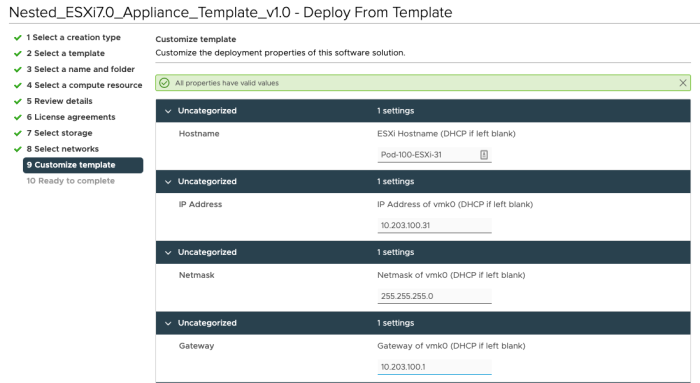
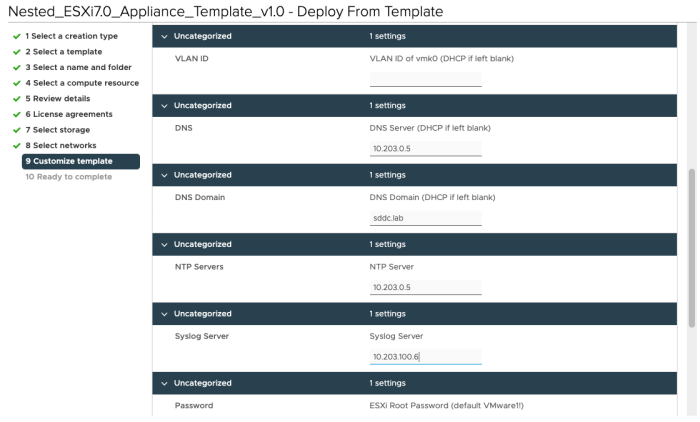
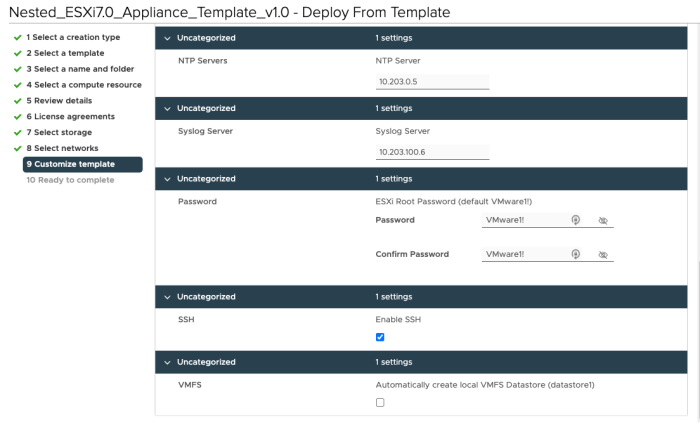
I am using an ova template (Nested_ESXi7.0_Appliance_Template_v1.0)that has been provided by William Lam.
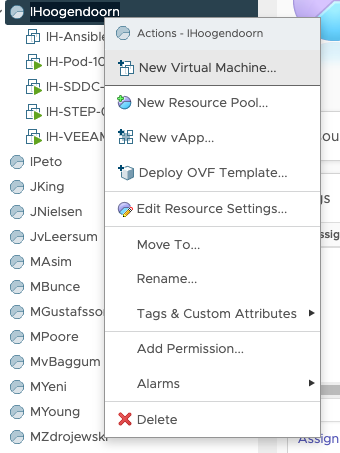
Create a new Virtual Machine:
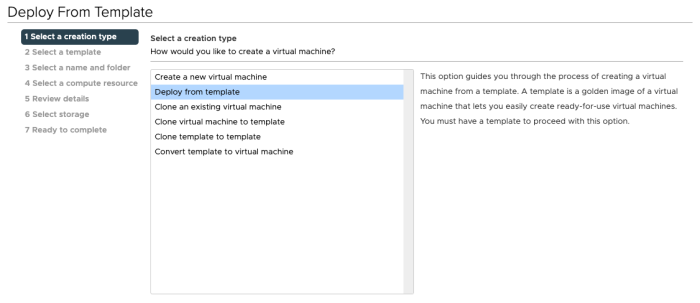
Select: Deploy from template:
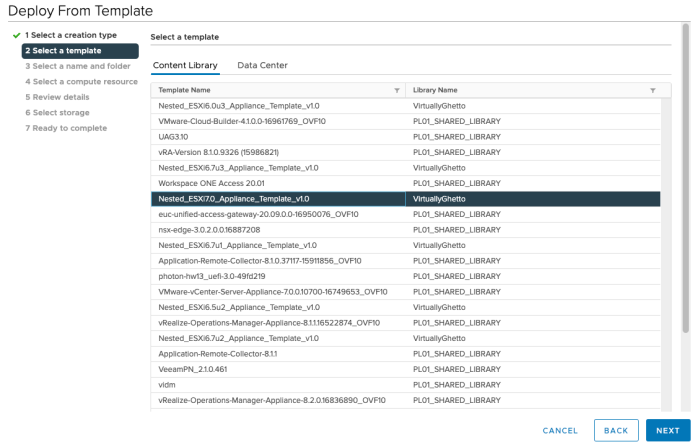
Choose the OVA/OVF Template you want to deploy from:
Provide a Virtual Machine name:
Select the correct Resource Pool (the one with your name on it):
Review the details:
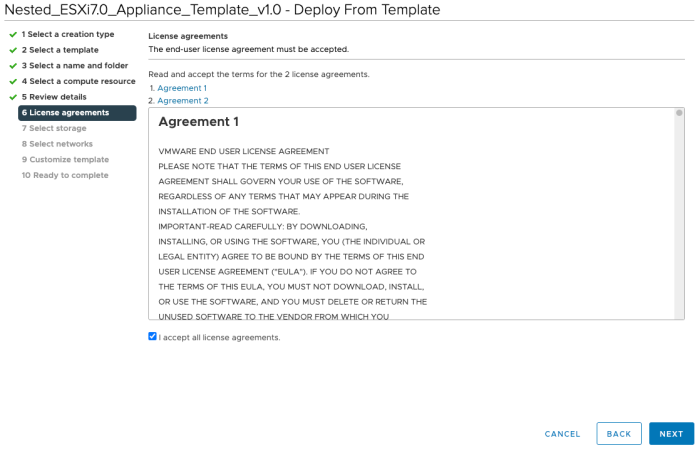
Accept the licence agreement:
Select the Storage:
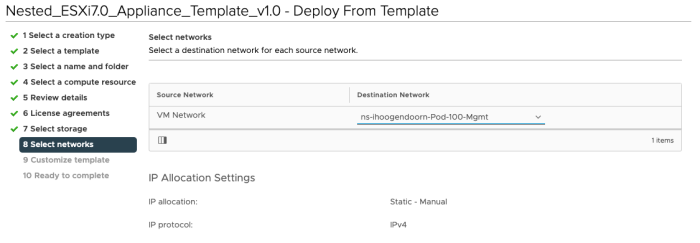
Select the destination network:
Specify the template specific properties like passwords, IP address, DNS, default gateway settings, etc.:
Review the Summary before you start the actual deploy:
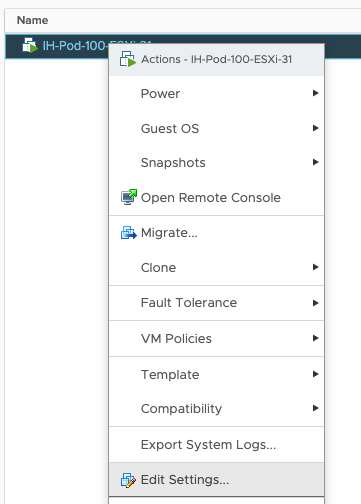
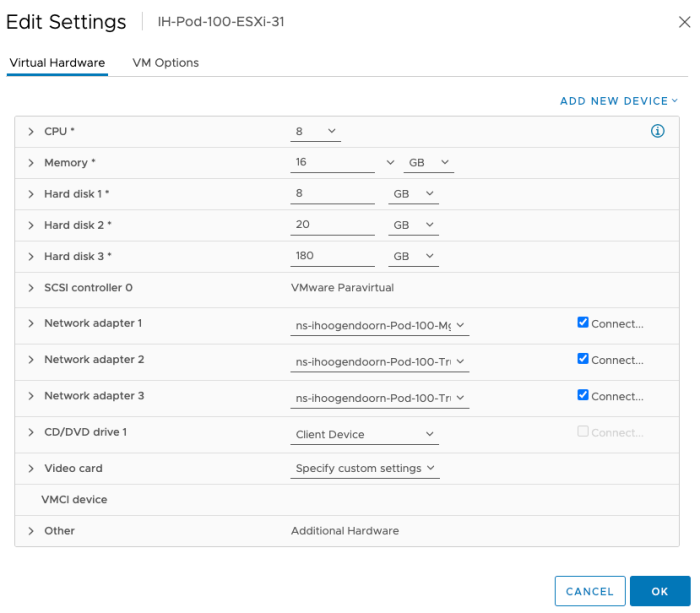
Now that the first (nested) ESXi host is deployed, we need to add an additional Virtual Network adapter and change the CPU, RAM, and Hard Disk settings. Let's edit the settings the newly created (nested) ESXi host:
Add Network Adapter so we can use the first NIC dedicated for management.
| vNIC# | Port Group |
|---|---|
| Network Adaptor 1 | Pod-100-Mgmt |
| Network Adaptor 2 | Pod-100-Trunk |
| Network Adaptor 3 | Pod-100-Trunk |
Change the CPU, RAM, and Hard Disk settings:
| vCPU | 8 |
| RAM | 16 GB |
| Hard Disk 1 | 8 GB |
| Hard Disk 2 | 20 GB |
| Hard Disk 3 | 180 GB |
Edit the VM settings:
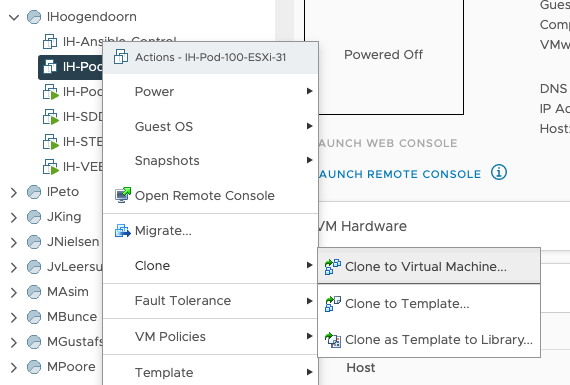
Now that you have just change the settings, you can use this Virtual Machine and clone this five times and specify the (nested) ESXi host-specific parameters during the clone wizard. Clone the Virtual Machine:
Provide a Virtual Machine name:
Select the correct Resource Pool (the one with your name on it):
Select the Storage:
As you are cloning, this exact VM and the Virtual Machines will be identical, you don't need any OS or hardware modification, and you can choose for yourself if you want to power the VM on after deployment. I prefer powering them up all at the same time.
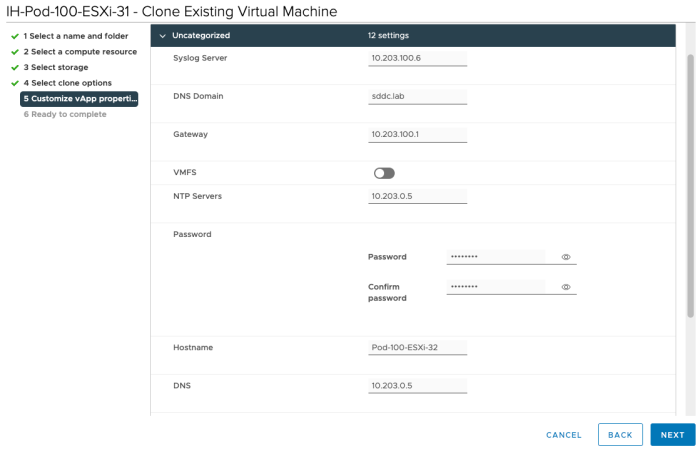
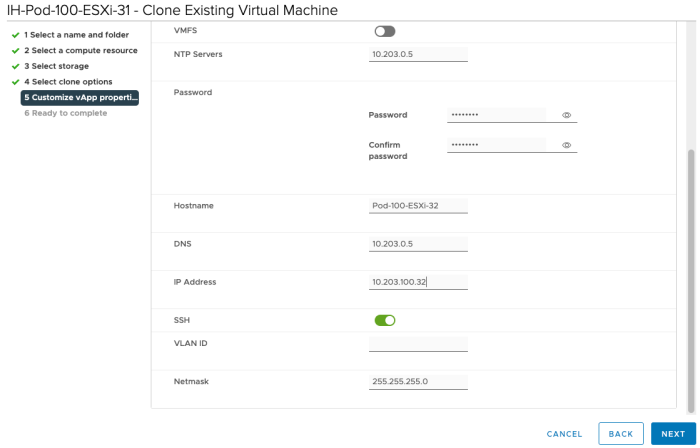
Specify the template specific properties like passwords, IP address, DNS, default gateway settings, etc. Most of the details are already predefined, the only thing you need to change is the hostname and the management IP address:
Now you have ESXI-31 and ESXI-32; repeat the cloning steps for all the (nested) ESXi hosts you required in your SDDC lab / Pod. I deployed everything according to the diagram.
STEP 08» Deploy Local NSX–T Manager 〈pod 100 specific〉
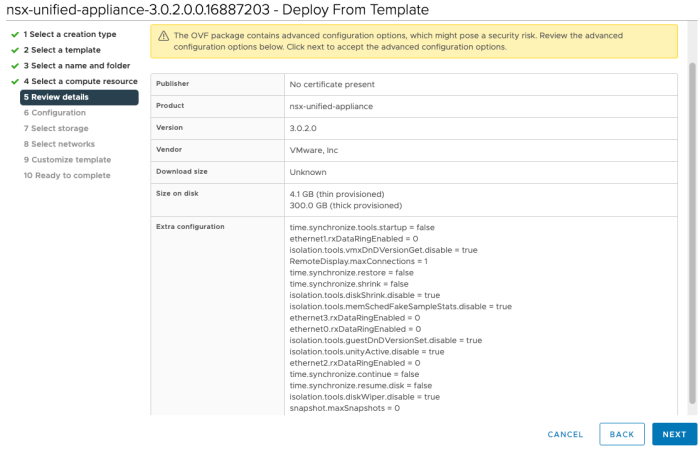
The next step is to deploy the NSX-T Manager. You will need to deploy the NSX-T manager using the .ova file. The .ova file that you can download from the VMware website. I have downloaded this image nsx-unified-appliance-3.0.2.0.0.16887203.ova file.
Create a new Virtual Machine:
Select: Deploy from template:
Choose the OVA/OVF Template you want to deploy from:
Provide a Virtual Machine name:
Select the correct Resource Pool (the one with your name on it):
Review the details:
Select the NSX-T manager Size:
Select the Storage:
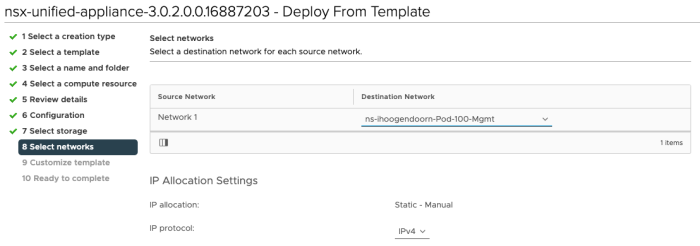
Select the destination network:
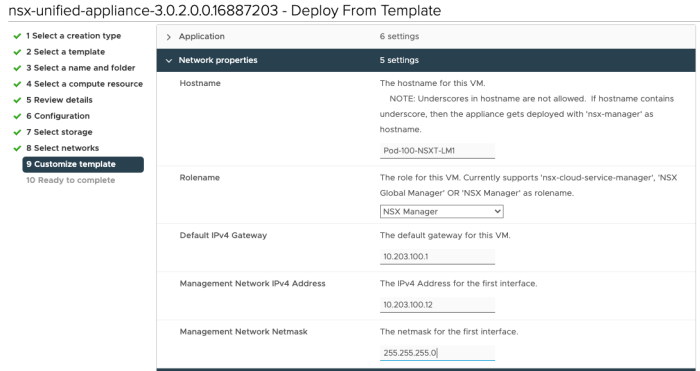
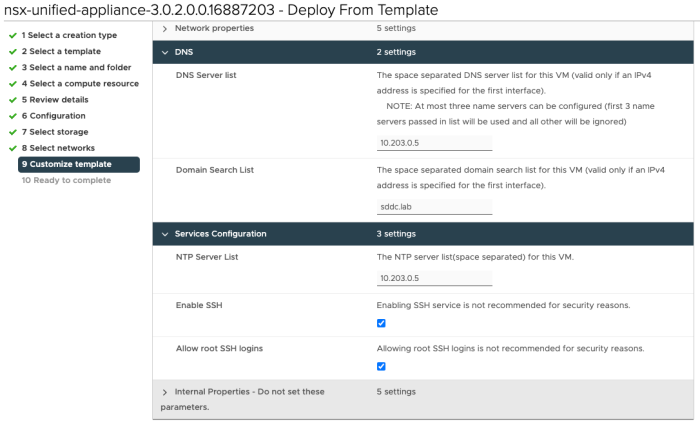
Specify the template specific properties like passwords, IP address, DNS, default gateway settings, etc.:
Review the Summary before you start the actual deploy (screenshot not included).
Power on the Virtual Machine:
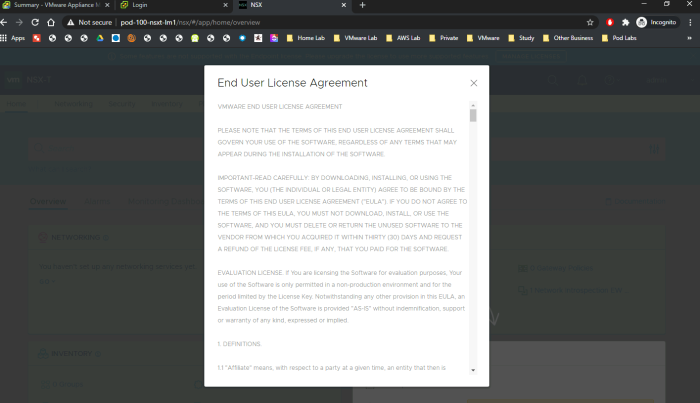
When you have logged in you can see that your NSX-T Manager is working, and you need to accept the licence agreement:
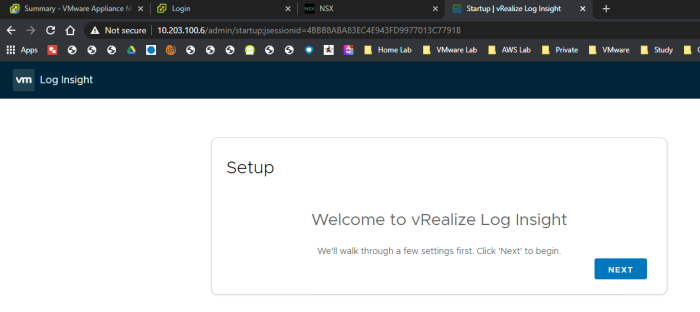
STEP 09» Deploy vRealize Log Insight 〈pod 100 specific〉
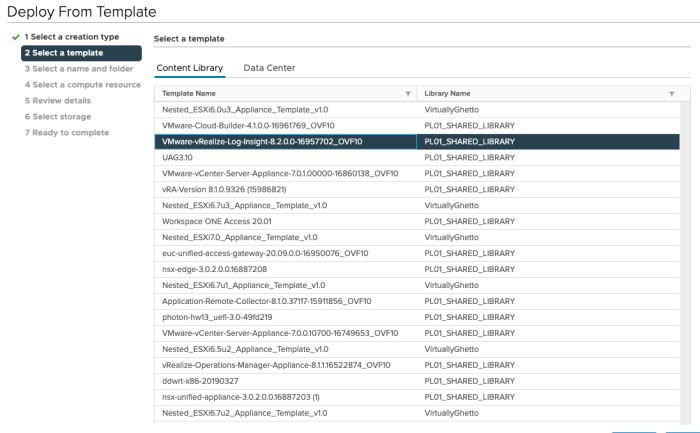
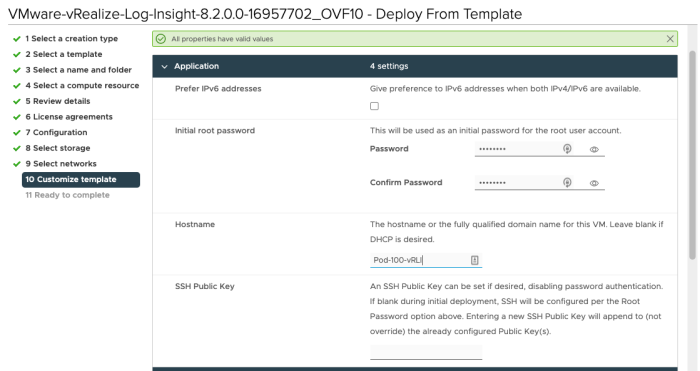
The next step is to deploy the logging server. You will need to deploy vRealize Log Insight using the .ova file. The .ova file that you can download from the VMware website. I have downloaded this image VMware-vRealize-Log-Insight-8.2.0.0-16957702_OVF10.ova file.
Create a new Virtual Machine:
Select: Deploy from template:
Choose the OVA/OVF Template you want to deploy from:
Provide a Virtual Machine name:
Select the correct Resource Pool (the one with your name on it):
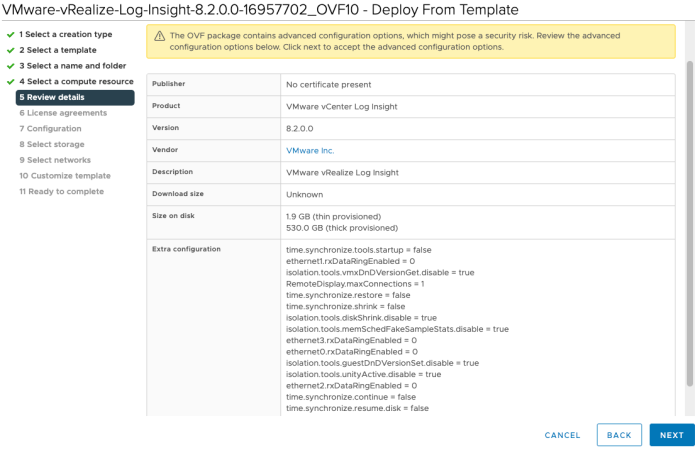
Review the details:
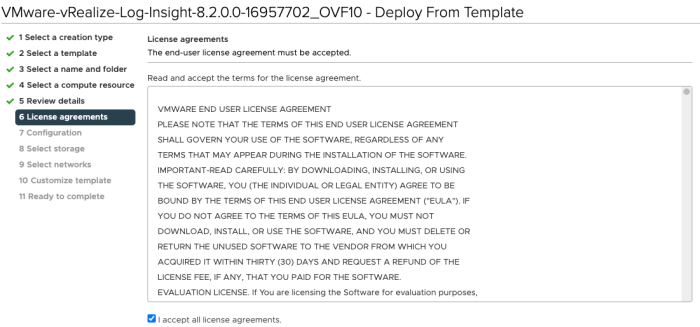
Accept the licence agreement:
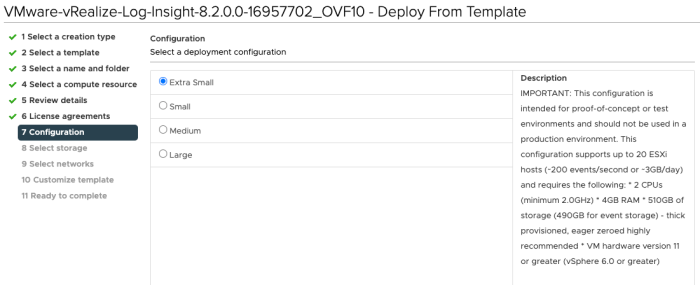
Select the vRealize Log Insight Size:
Select the Storage:
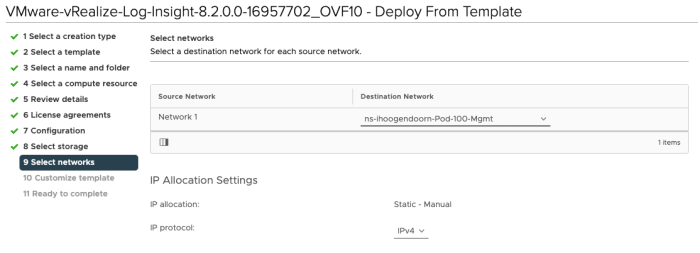
Select the destination network:
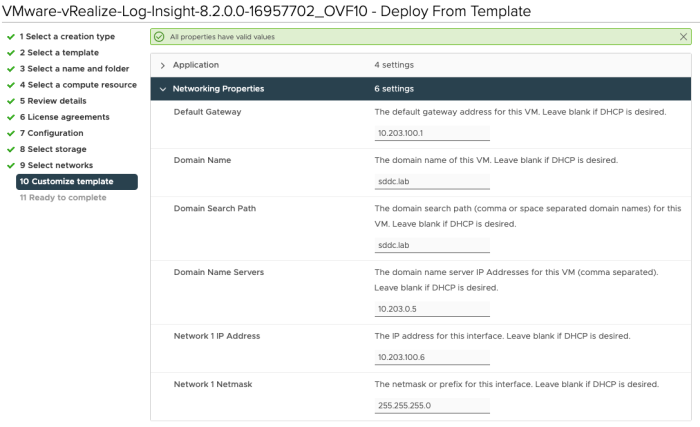
Specify the template specific properties like passwords, IP address, DNS, default gateway settings, etc.:
Review the Summary before you start the actual deploy:
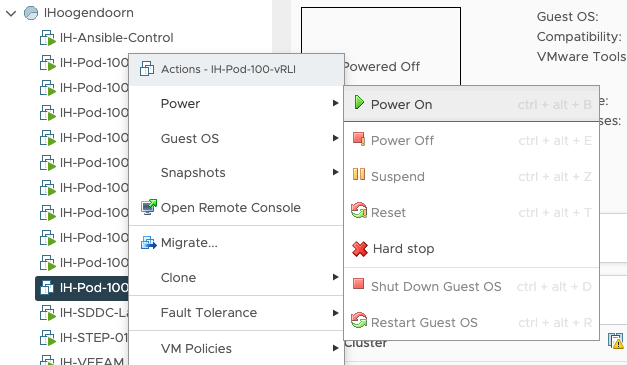
Power on the Virtual Machine:
Log in to the vRealize Log Insight Server:
Now you have deployed one full (nested) SDDC Pod on your environment! Congratulations! The remaining steps will be given, but I will go into the details on how this is done because this is just regular vSphere, NSX-T, and Log Insight configuration not related to running this all on a VMC on AWS SDDC. I have shown you the way, but you have to walk for yourself.
STEP 10» Configure vSphere 〈VSAN, vCenter Server, ESXi Hosts, Clusters, VDS + vmk interfaces, etc.〉 based on your own preference 〈pod 100 specific〉
The configuration of these items are required to finish the setup of your (nested) SDDC Pod with NSX-T, but is out of scope for this article.
STEP 11» Configure Local NSX–T Manager» Add Licence + integrate with Center Server 〈pod 100 specific〉
The configuration of these items are required to finish the setup of your (nested) SDDC Pod with NSX-T, but is out of scope for this article.
STEP 12» Configure Local NSX–T Manager» Add Transport Zones, host transport nodes, uplink profiles, etc. 〈pod 100 specific〉
The configuration of these items are required to finish the setup of your (nested) SDDC Pod with NSX-T, but is out of scope for this article.
STEP 13» Deploy NSX–T Edge VMs 〈pod 100 specific〉
The configuration of these items are required to finish the setup of your (nested) SDDC Pod with NSX-T, but is out of scope for this article.
STEP 14» Configure NSX–T edge transport nodes 〈pod 100 specific〉
The configuration of these items are required to finish the setup of your (nested) SDDC Pod with NSX-T, but is out of scope for this article.
STEP 15» Configure Local NSX–T Manager» Add T0/T1Gateways 〈with BGP configuration on the T0〉 〈pod 100 specific〉
The configuration of these items are required to finish the setup of your (nested) SDDC Pod with NSX-T, but is out of scope for this article.
STEP 16» Configure Local NSX–T Manager» Add Segments and attach these to the T1 Gateway 〈pod 100 specific〉
The configuration of these items are required to finish the setup of your (nested) SDDC Pod with NSX-T, but is out of scope for this article.
STEP 17» Repeat step 1 – 16 for Pod 110
To deploy another Pod, like 110, for example, you need to follow the same steps above, just keep the following in mind:
- Make sure you use the correct VM Names and hostnames (specific for Pod 110)
- Make sure you use the correct IP addresses and subnets (specific for Pod 110)
- Make sure you add the DNS records for the Pod 120 SDDC components
- Make sure you add the routing config is tailored to the new Pod 110.
DNS settings for Pod 110
/var/lib/bind/db.sddc.lab
root #
root # Add the following to the /var/lib/bind/db.sddc.lab file
root #
Pod-110-ESXi-21                         A       10.203.110.21
Pod-110-ESXi-22                         A       10.203.110.22
Pod-110-ESXi-23                         A       10.203.110.23
Pod-110-ESXi-31                         A       10.203.110.31
Pod-110-ESXi-32                         A       10.203.110.32
Pod-110-ESXi-33                         A       10.203.110.33
Pod-110-ESXi-91                         A       10.203.110.91
Pod-110-ESXi-92                         A       10.203.110.92
Pod-110-ESXi-93                         A       10.203.110.93
Pod-110-NSXT-CSM                        A       10.203.110.15
Pod-110-NSXT-GM1                        A       10.203.110.8
Pod-110-NSXT-LM1                        A       10.203.110.12
Pod-110-vCenter                         A       10.203.110.5
Pod-110-T0-EdgeVM-01                    A       10.203.115.254
Pod-110-T0-EdgeVM-02                    A       10.203.115.253
Pod-110-vRLI                            A       10.203.110.6
Pod-110-Router                          CNAME   Pod-110-Router-Uplink.SDDC.Lab.
Pod-110-Router-Uplink                   A       10.203.0.110
Pod-110-Router-Management               A       10.203.110.1
Pod-110-Router-vSAN                     A       10.203.112.1
Pod-110-Router-IPStorage                A       10.203.113.1
Pod-110-Router-Transport                A       10.203.114.1
Pod-110-Router-ServiceVM                A       10.203.115.1
Pod-110-Router-NSXEdgeUplink1           A       10.203.116.1
Pod-110-Router-NSXEdgeUplink2           A       10.203.117.1
Pod-110-Router-RTEP                     A       10.203.118.1
Pod-110-Router-VMNetwork                A       10.203.119.1
/var/lib/bind/db.10.203
root #
root # Add the following to the /var/lib/bind/db.sddc.lab file (in the correct section)
root #
user $ORIGIN 0.203.10.in-addr.arpa.
user $TTL 3600       ; 1 hour
110                     PTR     Pod-110-Router-Uplink.SDDC.Lab.
user $ORIGIN 110.203.10.in-addr.arpa.
1                       PTR     Pod-110-Router-Management.SDDC.Lab.
12                      PTR     Pod-110-NSXT-LM.SDDC.Lab.
15                      PTR     Pod-110-NSXT-CSM.SDDC.Lab.
21                      PTR     Pod-110-ESXi-21.SDDC.Lab.
22                      PTR     Pod-110-ESXi-22.SDDC.Lab.
23                      PTR     Pod-110-ESXi-23.SDDC.Lab.
31                      PTR     Pod-110-ESXi-31.SDDC.Lab.
32                      PTR     Pod-110-ESXi-32.SDDC.Lab.
33                      PTR     Pod-110-ESXi-33.SDDC.Lab.
5                       PTR     Pod-110-vCenter.SDDC.Lab.
6                       PTR     Pod-110-vRLI.SDDC.Lab.
8                       PTR     Pod-110-NSXT-GM.SDDC.Lab.
91                      PTR     Pod-110-ESXi-91.SDDC.Lab.
92                      PTR     Pod-110-ESXi-92.SDDC.Lab.
93                      PTR     Pod-110-ESXi-93.SDDC.Lab.
user $ORIGIN 203.10.in-addr.arpa.
1.111                   PTR     Pod-110-Router-vMotion.SDDC.Lab.
1.112                   PTR     Pod-110-Router-vSAN.SDDC.Lab.
1.113                   PTR     Pod-110-Router-IPStorage.SDDC.Lab.
1.114                   PTR     Pod-110-Router-Transport.SDDC.Lab.
1.115                   PTR     Pod-110-Router-ServiceVM.SDDC.Lab.
253.115                 PTR     Pod-110-T0-EdgeVM-02.SDDC.Lab.
254.115                 PTR     Pod-110-T0-EdgeVM-01.SDDC.Lab.
1.116                   PTR     Pod-110-Router-NSXEdgeUplink1.SDDC.Lab.
1.117                   PTR     Pod-110-Router-NSXEdgeUplink2.SDDC.Lab.
1.118                   PTR     Pod-110-Router-RTEP.SDDC.Lab.
1.119                   PTR     Pod-110-Router-VMNetwork.SDDC.Lab.
Router settings for Pod 110
initial configuration
configure

set interfaces ethernet eth0 mtu '1500'
set interfaces ethernet eth0 address '10.203.0.110/24'
set protocols static route 0.0.0.0/0 next-hop 10.203.0.1
set service ssh

commit
save
Pod 110 Router Configuration
configure

set system host-name Pod-110-Router

set interfaces ethernet eth1 mtu '9000'

set interfaces ethernet eth1 vif 111 mtu '9000'
set interfaces ethernet eth1 vif 111 address '10.203.111.1/24'
set interfaces ethernet eth1 vif 111 description 'vMotion'

set interfaces ethernet eth1 vif 112 mtu '9000'
set interfaces ethernet eth1 vif 112 address '10.203.112.1/24'
set interfaces ethernet eth1 vif 112 description 'vSAN'

set interfaces ethernet eth1 vif 113 mtu '9000'
set interfaces ethernet eth1 vif 113 address '10.203.113.1/24'
set interfaces ethernet eth1 vif 113 description 'IP Storage'

set interfaces ethernet eth1 vif 114 mtu '9000'
set interfaces ethernet eth1 vif 114 address '10.203.114.1/24'
set interfaces ethernet eth1 vif 114 description 'Overlay Transport'

set interfaces ethernet eth1 vif 115 mtu '1500'
set interfaces ethernet eth1 vif 115 address '10.203.115.1/24'
set interfaces ethernet eth1 vif 115 description 'Service VM Management'

set interfaces ethernet eth1 vif 116 mtu '1600'
set interfaces ethernet eth1 vif 116 address '10.203.116.1/24'
set interfaces ethernet eth1 vif 116 description 'NSX Edge Uplink #1'

set interfaces ethernet eth1 vif 117 mtu '1600'
set interfaces ethernet eth1 vif 117 address '10.203.117.1/24'
set interfaces ethernet eth1 vif 117 description 'NSX Edge Uplink #2'

set interfaces ethernet eth1 vif 118 mtu '1500'
set interfaces ethernet eth1 vif 118 address '10.203.118.1/24'
set interfaces ethernet eth1 vif 118 description 'RTEP'

set interfaces ethernet eth1 vif 119 mtu '1500'
set interfaces ethernet eth1 vif 119 address '10.203.119.1/24'
set interfaces ethernet eth1 vif 119 description 'VM Network'

set interfaces ethernet eth2 mtu '9000'
set interfaces ethernet eth2 address '10.203.110.1/24'
set interfaces ethernet eth2 description 'Management'

commit
save
exit
reboot
Static routes for Pod 110
Stepstone 〈Windows Server〉
Open an Windows Command Window and type in the following command:
ROUTE ADD -p 10.203.110.0 MASK 255.255.255.0 10.203.0.110
DNS 〈Ubuntu Server〉
In the terminal type in the following command:
sudo ip route add 10.203.110.0/24 via 10.203.0.110 dev ens160
STEP 18» Repeat step 1 – 16 for Pod 120
To deploy another Pod, like 120, for example, you need to follow the same steps above, just keep the following in mind:
- Make sure you use the correct VM Names and hostnames (specific for Pod 120)
- Make sure you use the correct IP addresses and subnets (specific for Pod 120)
- Make sure you add the DNS records for the Pod 120 SDDC components
- Make sure you add the routing config is tailored to the new Pod 120.
DNS settings for Pod 120
/var/lib/bind/db.sddc.lab
root #
root # Add the following to the /var/lib/bind/db.sddc.lab file
root #
Pod-120-ESXi-21                         A       10.203.120.21
Pod-120-ESXi-22                         A       10.203.120.22
Pod-120-ESXi-23                         A       10.203.120.23
Pod-120-ESXi-31                         A       10.203.120.31
Pod-120-ESXi-32                         A       10.203.120.32
Pod-120-ESXi-33                         A       10.203.120.33
Pod-120-ESXi-91                         A       10.203.120.91
Pod-120-ESXi-92                         A       10.203.120.92
Pod-120-ESXi-93                         A       10.203.120.93
Pod-120-NSXT-CSM                        A       10.203.120.15
Pod-120-NSXT-GM1                        A       10.203.120.8
Pod-120-NSXT-LM1                        A       10.203.120.12
Pod-120-vCenter                         A       10.203.120.5
Pod-120-T0-EdgeVM-01                    A       10.203.125.254
Pod-120-T0-EdgeVM-02                    A       10.203.125.253
Pod-120-vRLI                            A       10.203.120.6
Pod-120-Router                          CNAME   Pod-120-Router-Uplink.SDDC.Lab.
Pod-120-Router-Uplink                   A       10.203.0.120
Pod-120-Router-Management               A       10.203.120.1
Pod-120-Router-vSAN                     A       10.203.122.1
Pod-120-Router-IPStorage                A       10.203.123.1
Pod-120-Router-Transport                A       10.203.124.1
Pod-120-Router-ServiceVM                A       10.203.125.1
Pod-120-Router-NSXEdgeUplink1           A       10.203.126.1
Pod-120-Router-NSXEdgeUplink2           A       10.203.127.1
Pod-120-Router-RTEP                     A       10.203.128.1
Pod-120-Router-VMNetwork                A       10.203.129.1
/var/lib/bind/db.10.203
root #
root # Add the following to the /var/lib/bind/db.sddc.lab file (in the correct section)
root #
user $ORIGIN 0.203.10.in-addr.arpa.
user $TTL 3600       ; 1 hour
110                     PTR     Pod-120-Router-Uplink.SDDC.Lab.
user $ORIGIN 120.203.10.in-addr.arpa.
1                       PTR     Pod-120-Router-Management.SDDC.Lab.
12                      PTR     Pod-120-NSXT-LM.SDDC.Lab.
15                      PTR     Pod-120-NSXT-CSM.SDDC.Lab.
21                      PTR     Pod-120-ESXi-21.SDDC.Lab.
22                      PTR     Pod-120-ESXi-22.SDDC.Lab.
23                      PTR     Pod-120-ESXi-23.SDDC.Lab.
31                      PTR     Pod-120-ESXi-31.SDDC.Lab.
32                      PTR     Pod-120-ESXi-32.SDDC.Lab.
33                      PTR     Pod-120-ESXi-33.SDDC.Lab.
5                       PTR     Pod-120-vCenter.SDDC.Lab.
6                       PTR     Pod-120-vRLI.SDDC.Lab.
8                       PTR     Pod-120-NSXT-GM.SDDC.Lab.
91                      PTR     Pod-120-ESXi-91.SDDC.Lab.
92                      PTR     Pod-120-ESXi-92.SDDC.Lab.
93                      PTR     Pod-120-ESXi-93.SDDC.Lab.
user $ORIGIN 203.10.in-addr.arpa.
1.121                   PTR     Pod-120-Router-vMotion.SDDC.Lab.
1.122                   PTR     Pod-120-Router-vSAN.SDDC.Lab.
1.123                   PTR     Pod-120-Router-IPStorage.SDDC.Lab.
1.124                   PTR     Pod-120-Router-Transport.SDDC.Lab.
1.125                   PTR     Pod-120-Router-ServiceVM.SDDC.Lab.
253.125                 PTR     Pod-120-T0-EdgeVM-02.SDDC.Lab.
254.125                 PTR     Pod-120-T0-EdgeVM-01.SDDC.Lab.
1.126                   PTR     Pod-120-Router-NSXEdgeUplink1.SDDC.Lab.
1.127                   PTR     Pod-120-Router-NSXEdgeUplink2.SDDC.Lab.
1.128                   PTR     Pod-120-Router-RTEP.SDDC.Lab.
1.129                   PTR     Pod-120-Router-VMNetwork.SDDC.Lab.
Router settings for Pod 120
initial configuration
configure

set interfaces ethernet eth0 mtu '1500'
set interfaces ethernet eth0 address '10.203.0.110/24'
set protocols static route 0.0.0.0/0 next-hop 10.203.0.1
set service ssh

commit
save
Pod 120 Router Configuration
configure

set system host-name Pod-120-Router

set interfaces ethernet eth1 mtu '9000'

set interfaces ethernet eth1 vif 121 mtu '9000'
set interfaces ethernet eth1 vif 121 address '10.203.121.1/24'
set interfaces ethernet eth1 vif 121 description 'vMotion'

set interfaces ethernet eth1 vif 122 mtu '9000'
set interfaces ethernet eth1 vif 122 address '10.203.122.1/24'
set interfaces ethernet eth1 vif 122 description 'vSAN'

set interfaces ethernet eth1 vif 123 mtu '9000'
set interfaces ethernet eth1 vif 123 address '10.203.123.1/24'
set interfaces ethernet eth1 vif 123 description 'IP Storage'

set interfaces ethernet eth1 vif 124 mtu '9000'
set interfaces ethernet eth1 vif 124 address '10.203.124.1/24'
set interfaces ethernet eth1 vif 124 description 'Overlay Transport'

set interfaces ethernet eth1 vif 125 mtu '1500'
set interfaces ethernet eth1 vif 125 address '10.203.125.1/24'
set interfaces ethernet eth1 vif 125 description 'Service VM Management'

set interfaces ethernet eth1 vif 126 mtu '1600'
set interfaces ethernet eth1 vif 126 address '10.203.126.1/24'
set interfaces ethernet eth1 vif 126 description 'NSX Edge Uplink #1'

set interfaces ethernet eth1 vif 127 mtu '1600'
set interfaces ethernet eth1 vif 127 address '10.203.127.1/24'
set interfaces ethernet eth1 vif 127 description 'NSX Edge Uplink #2'

set interfaces ethernet eth1 vif 128 mtu '1500'
set interfaces ethernet eth1 vif 128 address '10.203.128.1/24'
set interfaces ethernet eth1 vif 128 description 'RTEP'

set interfaces ethernet eth1 vif 129 mtu '1500'
set interfaces ethernet eth1 vif 129 address '10.203.129.1/24'
set interfaces ethernet eth1 vif 129 description 'VM Network'

set interfaces ethernet eth2 mtu '9000'
set interfaces ethernet eth2 address '10.203.120.1/24'
set interfaces ethernet eth2 description 'Management'

commit
save
exit
reboot
Static routes for Pod 120
Stepstone 〈Windows Server〉
Open an Windows Command Window and type in the following command:
ROUTE ADD -p 10.203.120.0 MASK 255.255.255.0 10.203.0.120
DNS 〈Ubuntu Server〉
In the terminal type in the following command:
sudo ip route add 10.203.120.0/24 via 10.203.0.120 dev ens160
STEP 19» Configure OSPF between Pod Routers
To allow connectivity between the Pods, you need to configure a routing protocol on the Pod Routers. I have chosen OSPF because BGP requires more tailed configuration with peers, and the OSPF configuration is pretty similar everywhere, and it does the job.
Pod 100 Virtual Router configuration
OSPF Configuration Pod 100 Router
configure
set protocols ospf area 666 network '10.203.0.0/24'
set protocols ospf log-adjacency-changes
set protocols ospf parameters router-id '10.203.0.100'
set protocols ospf redistribute connected metric-type '2'
commit
save
exit
Pod 110 Virtual Router configuration
OSPF Configuration Pod 110 Router
configure
set protocols ospf area 666 network '10.203.0.0/24'
set protocols ospf log-adjacency-changes
set protocols ospf parameters router-id '10.203.0.110'
set protocols ospf redistribute connected metric-type '2'
commit
save
exit
Pod 120 Virtual Router configuration
OSPF Configuration Pod 120 Router
configure
set protocols ospf area 666 network '10.203.0.0/24'
set protocols ospf log-adjacency-changes
set protocols ospf parameters router-id '10.203.0.120'
set protocols ospf redistribute connected metric-type '2'
commit
save
exit
Pod 100 Virtual Router OSPF Verification
OSPF Verification Pod 100 Router
vyos@Pod-100-Router:~$ show ip ospf neighbor

Neighbor ID     Pri State           Dead Time Address         Interface                        RXmtL RqstL DBsmL
10.203.0.110      1 2-Way/DROther     37.577s 10.203.0.110    eth0:10.203.0.100                    0     0     0
10.203.0.120      1 2-Way/DROther     38.396s 10.203.0.120    eth0:10.203.0.100                    0     0     0

vyos@Pod-100-Router:~$ show ip route ospf
Codes: K - kernel route, C - connected, S - static, R - RIP,
       O - OSPF, I - IS-IS, B - BGP, E - EIGRP, N - NHRP,
       T - Table, v - VNC, V - VNC-Direct, A - Babel, D - SHARP,
       F - PBR, f - OpenFabric,
       > - selected route, * - FIB route, q - queued route, r - rejected route

O   10.203.0.0/24 [110/10] is directly connected, eth0, 00:00:06
O>* 10.203.110.0/24 [110/20] via 10.203.0.110, eth0, 00:00:05
O>* 10.203.111.0/24 [110/20] via 10.203.0.110, eth0, 00:00:05
O>* 10.203.112.0/24 [110/20] via 10.203.0.110, eth0, 00:00:05
O>* 10.203.113.0/24 [110/20] via 10.203.0.110, eth0, 00:00:05
O>* 10.203.114.0/24 [110/20] via 10.203.0.110, eth0, 00:00:05
O>* 10.203.115.0/24 [110/20] via 10.203.0.110, eth0, 00:00:05
O>* 10.203.116.0/24 [110/20] via 10.203.0.110, eth0, 00:00:05
O>* 10.203.117.0/24 [110/20] via 10.203.0.110, eth0, 00:00:05
O>* 10.203.118.0/24 [110/20] via 10.203.0.110, eth0, 00:00:05
O>* 10.203.119.0/24 [110/20] via 10.203.0.110, eth0, 00:00:05
O>* 10.203.120.0/24 [110/20] via 10.203.0.120, eth0, 00:00:05
O>* 10.203.121.0/24 [110/20] via 10.203.0.120, eth0, 00:00:05
O>* 10.203.122.0/24 [110/20] via 10.203.0.120, eth0, 00:00:05
O>* 10.203.123.0/24 [110/20] via 10.203.0.120, eth0, 00:00:05
O>* 10.203.124.0/24 [110/20] via 10.203.0.120, eth0, 00:00:05
O>* 10.203.125.0/24 [110/20] via 10.203.0.120, eth0, 00:00:05
O>* 10.203.126.0/24 [110/20] via 10.203.0.120, eth0, 00:00:05
O>* 10.203.127.0/24 [110/20] via 10.203.0.120, eth0, 00:00:05
O>* 10.203.128.0/24 [110/20] via 10.203.0.120, eth0, 00:00:05
O>* 10.203.129.0/24 [110/20] via 10.203.0.120, eth0, 00:00:05
vyos@Pod-100-Router:~$
Pod 110 Virtual Router OSPF Verification
OSPF Verification Pod 110 Router
vyos@Pod-110-Router:~$ show ip ospf neighbor

Neighbor ID     Pri State           Dead Time Address         Interface                        RXmtL RqstL DBsmL
10.203.0.100      1 2-Way/DROther     34.077s 10.203.0.100    eth0:10.203.0.110                    0     0     0
10.203.0.120      1 ExStart/DR        35.403s 10.203.0.120    eth0:10.203.0.110                    0     0     0

vyos@Pod-110-Router:~$ show ip route ospf
Codes: K - kernel route, C - connected, S - static, R - RIP,
       O - OSPF, I - IS-IS, B - BGP, E - EIGRP, N - NHRP,
       T - Table, v - VNC, V - VNC-Direct, A - Babel, D - SHARP,
       F - PBR, f - OpenFabric,
       > - selected route, * - FIB route, q - queued route, r - rejected route

O   10.203.0.0/24 [110/10] is directly connected, eth0, 00:01:19
O>* 10.203.100.0/24 [110/20] via 10.203.0.100, eth0, 00:00:17
O>* 10.203.101.0/24 [110/20] via 10.203.0.100, eth0, 00:00:17
O>* 10.203.102.0/24 [110/20] via 10.203.0.100, eth0, 00:00:17
O>* 10.203.103.0/24 [110/20] via 10.203.0.100, eth0, 00:00:17
O>* 10.203.104.0/24 [110/20] via 10.203.0.100, eth0, 00:00:17
O>* 10.203.105.0/24 [110/20] via 10.203.0.100, eth0, 00:00:17
O>* 10.203.106.0/24 [110/20] via 10.203.0.100, eth0, 00:00:17
O>* 10.203.107.0/24 [110/20] via 10.203.0.100, eth0, 00:00:17
O>* 10.203.108.0/24 [110/20] via 10.203.0.100, eth0, 00:00:17
O>* 10.203.109.0/24 [110/20] via 10.203.0.100, eth0, 00:00:17
O>* 10.203.120.0/24 [110/20] via 10.203.0.120, eth0, 00:00:17
O>* 10.203.121.0/24 [110/20] via 10.203.0.120, eth0, 00:00:17
O>* 10.203.122.0/24 [110/20] via 10.203.0.120, eth0, 00:00:17
O>* 10.203.123.0/24 [110/20] via 10.203.0.120, eth0, 00:00:17
O>* 10.203.124.0/24 [110/20] via 10.203.0.120, eth0, 00:00:17
O>* 10.203.125.0/24 [110/20] via 10.203.0.120, eth0, 00:00:17
O>* 10.203.126.0/24 [110/20] via 10.203.0.120, eth0, 00:00:17
O>* 10.203.127.0/24 [110/20] via 10.203.0.120, eth0, 00:00:17
O>* 10.203.128.0/24 [110/20] via 10.203.0.120, eth0, 00:00:17
O>* 10.203.129.0/24 [110/20] via 10.203.0.120, eth0, 00:00:17
vyos@Pod-110-Router:~$
Pod 120 Virtual Router OSPF Verification
OSPF Verification Pod 120 Router
vyos@Pod-100-Router:~$ show ip ospf neighbor

Neighbor ID     Pri State           Dead Time Address         Interface                        RXmtL RqstL DBsmL
10.203.0.110      1 2-Way/DROther     37.577s 10.203.0.110    eth0:10.203.0.100                    0     0     0
10.203.0.120      1 2-Way/DROther     38.396s 10.203.0.120    eth0:10.203.0.100                    0     0     0

vyos@Pod-100-Router:~$ show ip route ospf
Codes: K - kernel route, C - connected, S - static, R - RIP,
       O - OSPF, I - IS-IS, B - BGP, E - EIGRP, N - NHRP,
       T - Table, v - VNC, V - VNC-Direct, A - Babel, D - SHARP,
       F - PBR, f - OpenFabric,
       > - selected route, * - FIB route, q - queued route, r - rejected route

O   10.203.0.0/24 [110/10] is directly connected, eth0, 00:00:06
O>* 10.203.110.0/24 [110/20] via 10.203.0.110, eth0, 00:00:05
O>* 10.203.111.0/24 [110/20] via 10.203.0.110, eth0, 00:00:05
O>* 10.203.112.0/24 [110/20] via 10.203.0.110, eth0, 00:00:05
O>* 10.203.113.0/24 [110/20] via 10.203.0.110, eth0, 00:00:05
O>* 10.203.114.0/24 [110/20] via 10.203.0.110, eth0, 00:00:05
O>* 10.203.115.0/24 [110/20] via 10.203.0.110, eth0, 00:00:05
O>* 10.203.116.0/24 [110/20] via 10.203.0.110, eth0, 00:00:05
O>* 10.203.117.0/24 [110/20] via 10.203.0.110, eth0, 00:00:05
O>* 10.203.118.0/24 [110/20] via 10.203.0.110, eth0, 00:00:05
O>* 10.203.119.0/24 [110/20] via 10.203.0.110, eth0, 00:00:05
O>* 10.203.120.0/24 [110/20] via 10.203.0.120, eth0, 00:00:05
O>* 10.203.121.0/24 [110/20] via 10.203.0.120, eth0, 00:00:05
O>* 10.203.122.0/24 [110/20] via 10.203.0.120, eth0, 00:00:05
O>* 10.203.123.0/24 [110/20] via 10.203.0.120, eth0, 00:00:05
O>* 10.203.124.0/24 [110/20] via 10.203.0.120, eth0, 00:00:05
O>* 10.203.125.0/24 [110/20] via 10.203.0.120, eth0, 00:00:05
O>* 10.203.126.0/24 [110/20] via 10.203.0.120, eth0, 00:00:05
O>* 10.203.127.0/24 [110/20] via 10.203.0.120, eth0, 00:00:05
O>* 10.203.128.0/24 [110/20] via 10.203.0.120, eth0, 00:00:05
O>* 10.203.129.0/24 [110/20] via 10.203.0.120, eth0, 00:00:05
vyos@Pod-100-Router:~$
STEP 20» Deploy Global NSX–T Manager in Pod 100
The deployment of the NSX-T Global Manager (GM) is identical to the deployment of a Local Manager (LM). You have to specify that you are deploying a Global Manager in the OVA parameters.
STEP 21» Configure Global NSX–T Manager and add Pod 100 – 110 and 120 Local NSX–T Managers
The configuration of these items are required to finish the setup of your (nested) SDDC Pod with NSX-T, but is out of scope for this article.
STEP 22» Configure Edge Transport Nodes with RTEP in Pod 100– 110 and 120
The configuration of these items are required to finish the setup of your (nested) SDDC Pod with NSX-T, but is out of scope for this article.
Tips
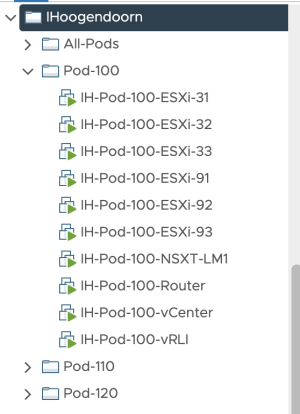
Using folders for your Pod VMs
When you have deployed all of your Pod VMs, it is good practice to place them into folders to keep them nicely organized.
Quality Check
I am always trying to improve the quality of my articles, so if you see any errors, mistakes in this article or you have suggestions for improvement, please contact me, and I will fix this.
