Leveraging SSH Tunneling with Oracle Kubernetes Engine for Secure Application Development
Introduction
When I got SSH Tunneling with OKE working with Ali Mukadam's help, I called it "magic."
He responded to me with:
The original quote is from a Thor movie:
"Your Ancestors Called it Magic, but You Call it Science. I Come From a Land Where They Are One and the Same."
What is the Magic?
In modern application development, securing connections between local and cloud-based resources is essential, especially when working with Oracle Kubernetes Engine (OKE). SSH tunneling offers a simple yet powerful way to securely connect to OKE clusters, enabling developers to manage and interact with resources without exposing them to the public Internet. This article explores how to set up SSH tunneling with OKE and how developers can integrate this approach into their workflow for enhanced security and efficiency. From initial configuration to best practices, we'll cover everything you need to leverage SSH tunneling effectively in your OKE-based applications.
The Steps
- [ ] STEP 01: Make sure a Kubernetes cluster is deployed on OKE (with a bastion and operator instance)
- [ ] STEP 02: Deploy an NGINX webserver on the Kubernetes Cluster running on OKE
- [ ] STEP 03: Create an SSH config script (with localhost entries)
- [ ] STEP 04: Set up the SSH tunnel and connect to the NGINX web server using localhost
- [ ] STEP 05: Deploy a MySQL Database service on the Kubernetes Cluster running on OKE
- [ ] STEP 06: Add additional localhost entries inside the SSH config script (to access the new MySQL Database service)
- [ ] STEP 07: Set up the SSH tunnel and connect to the MySQL Database using localhost
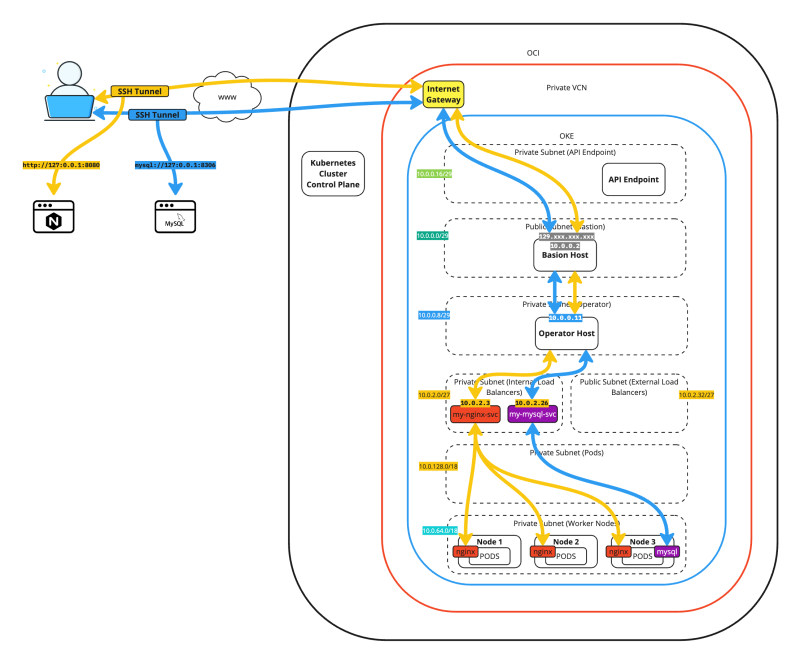
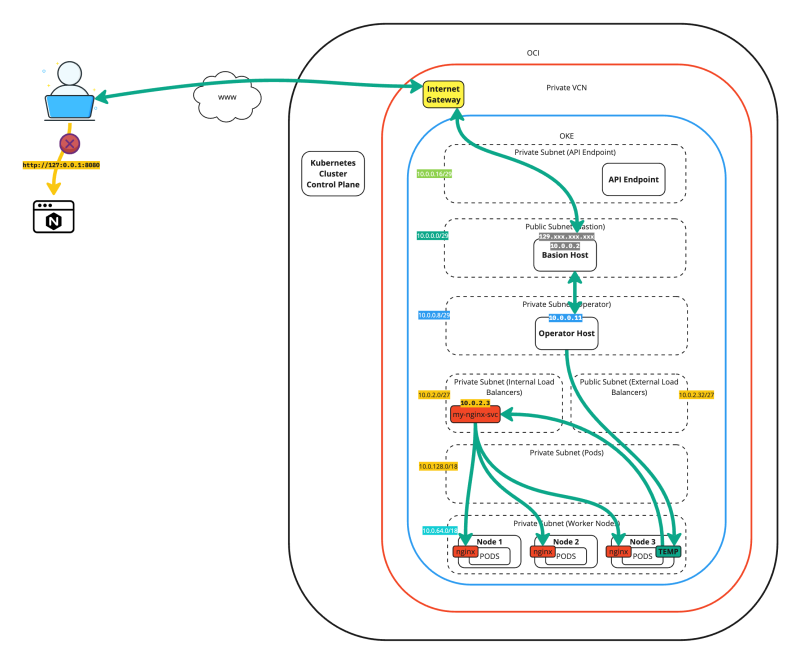
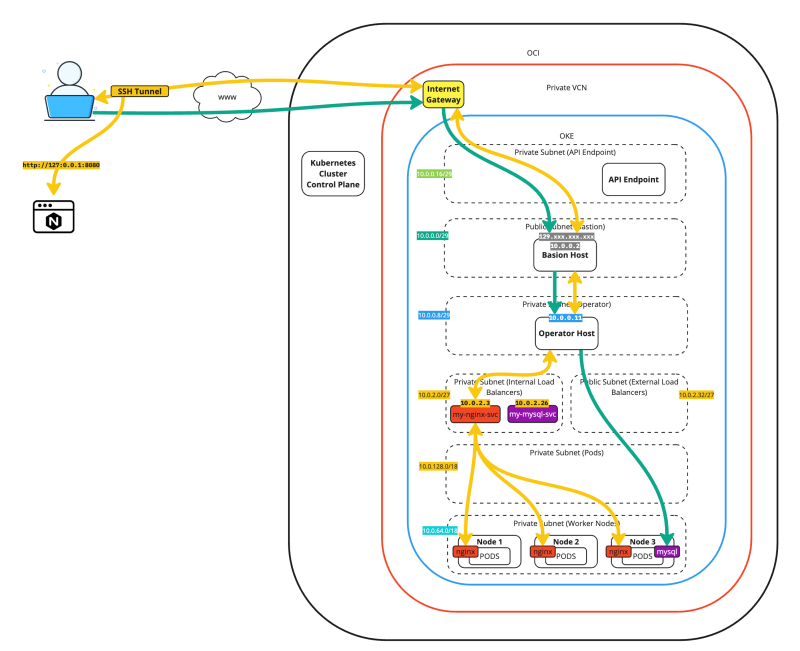
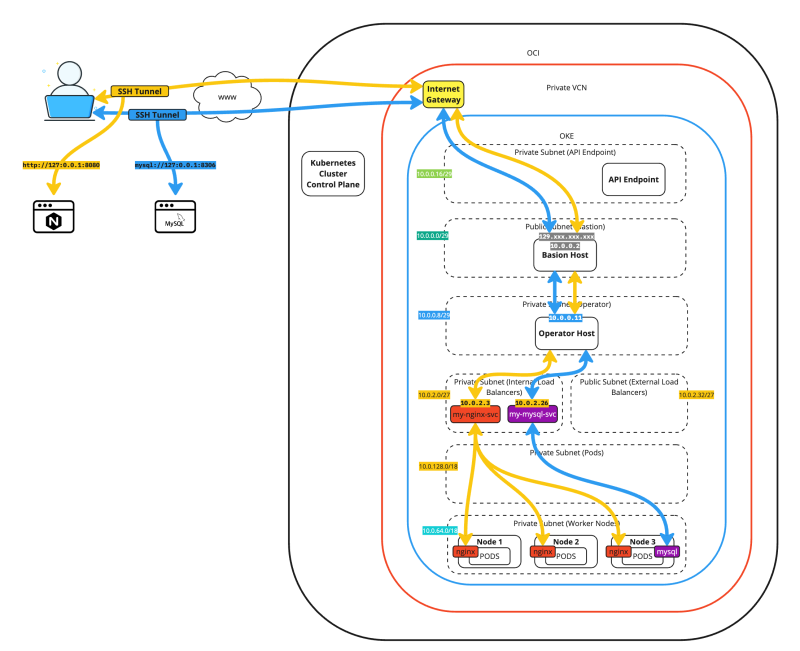
The figure below demonstrates the full traffic flows of SSH tunneling two different applications.
STEP 01 - Make sure a Kubernetes cluster is deployed on OKE with a bastion and operator instance
The deployment of a Kubernetes Cluster on OKE is out of the scope of this tutorial.
- [In this tutorial, I have explained how to deploy a Single Kubernetes Cluster on OKE using Terraform]
- [In this tutorial, I have explained how to Multi-site a Kubernetes Cluster on OKE using Terraform]
- [In this tutorial, I have explained how to deploy a Single Kubernetes Cluster using the manual quick create method]
- [In this tutorial, I have explained how to deploy a Single Kubernetes Cluster using the manual custom create method]
In this tutorial, I will use [the deployment of the first link] as the base Kubernetes Cluster on OKE to explain how we can use an SSH Tunnel to access a container-based application deployed on OKE with localhost.
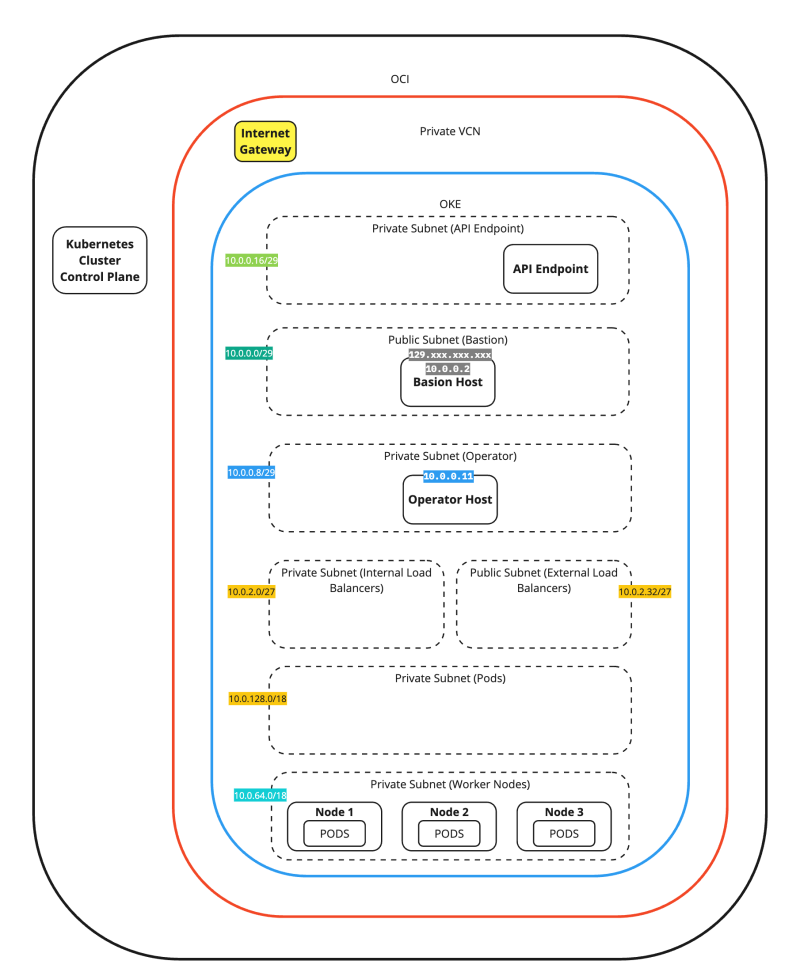
Let's quickly review the OCI OKE environment to set the stage.
VCN
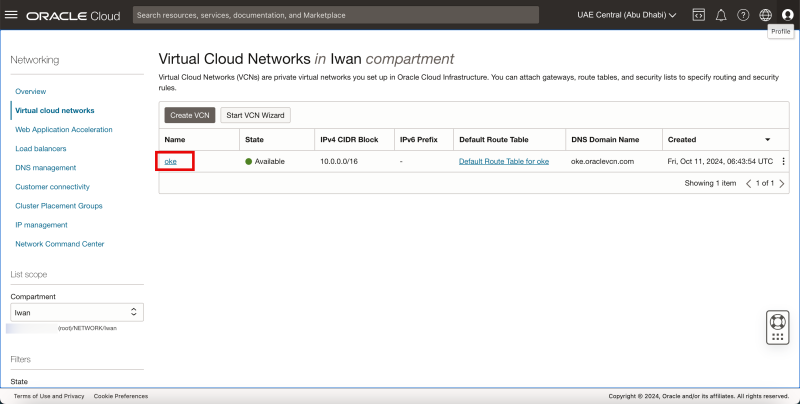
Use the hamburger menu to browse to Networking > Virtual Cloud Networks.
- Review the VCN, which is called oke.
- Click on the oke VCN.
Subnets
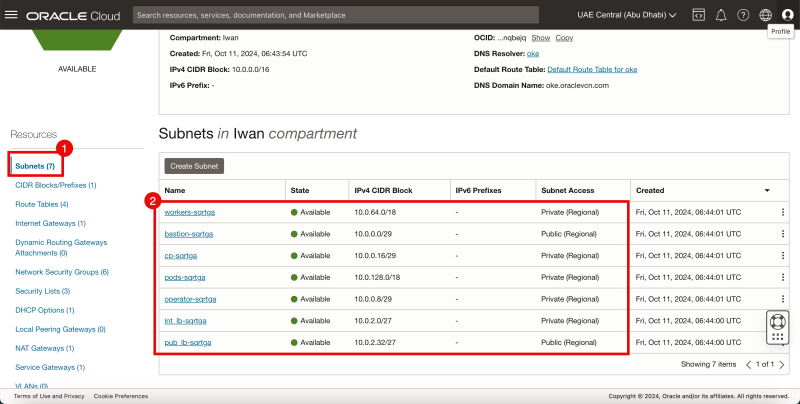
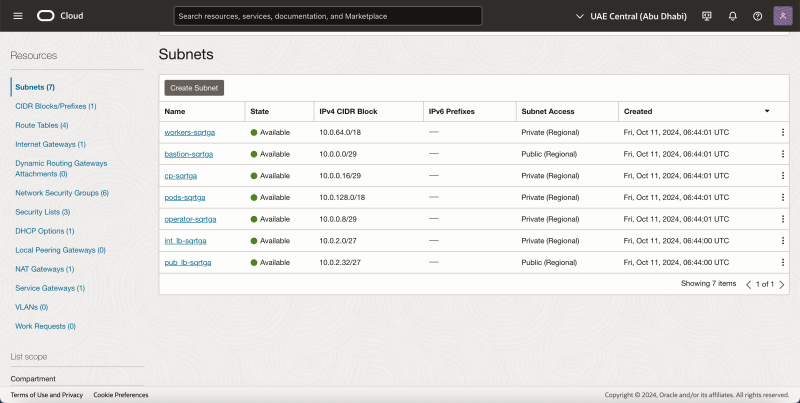
- Click on Subnets.
- Review the deployed Subnets.
Gateways
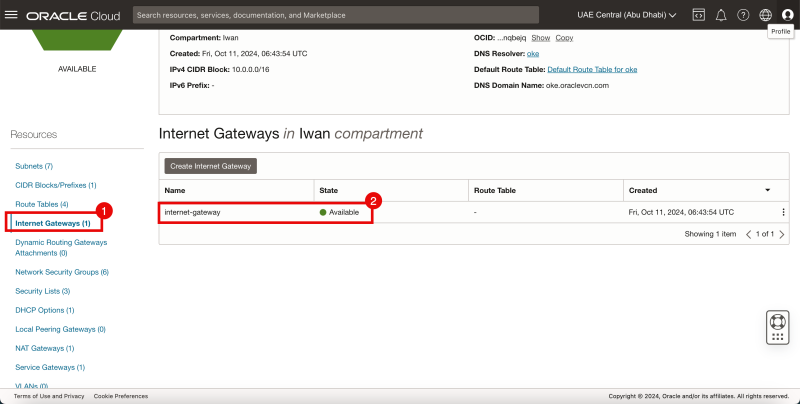
- Click on the Internet Gateways.
- Review the created Internet Gateway.
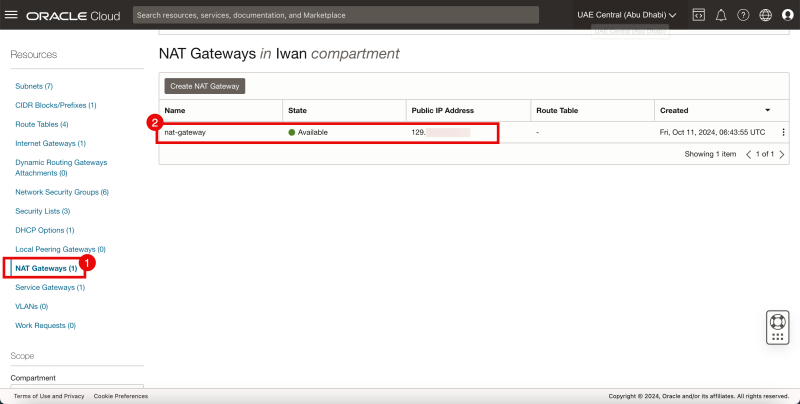
- Click on the NAT Gateways.
- Review the created NAT Gateway.
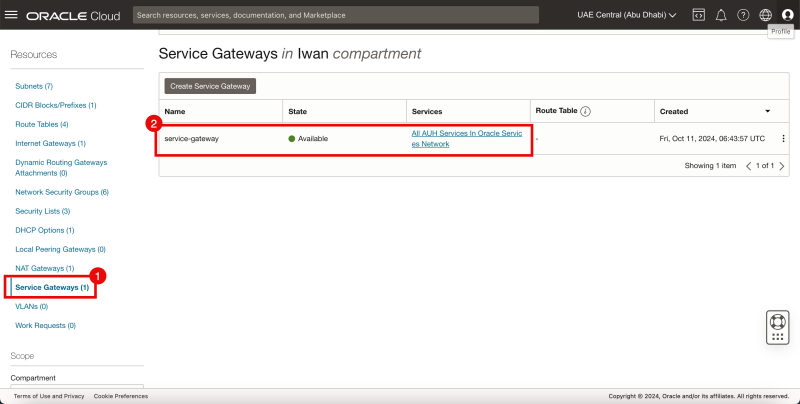
- Click on the Service Gateways.
- Review the created Service Gateway.
Security Lists
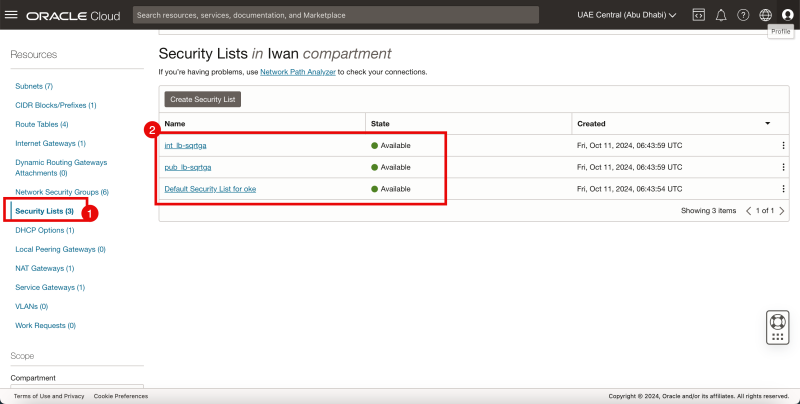
- Click on the Security Lists.
- Review the created Security Lists.
OKE
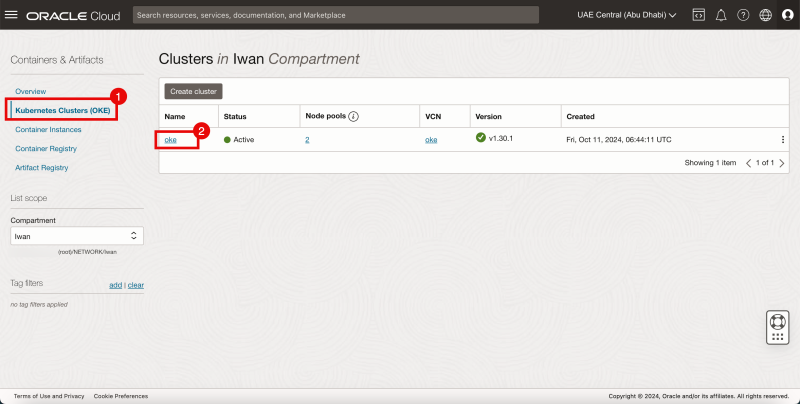
Use the hamburger menu to browse to Developer Services > Kubernetes Clusters (OKE).
- Click on Kubernetes Clusters (OKE).
- Click on the oke cluster.
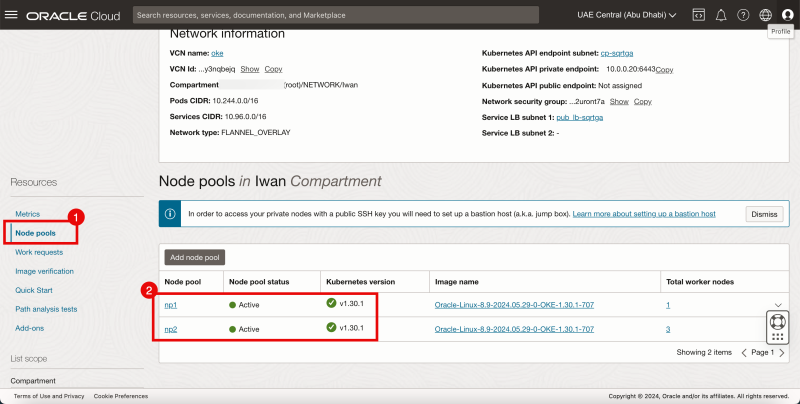
Node Pools
- Click on the Node Pools.
- Review the Node Pools.
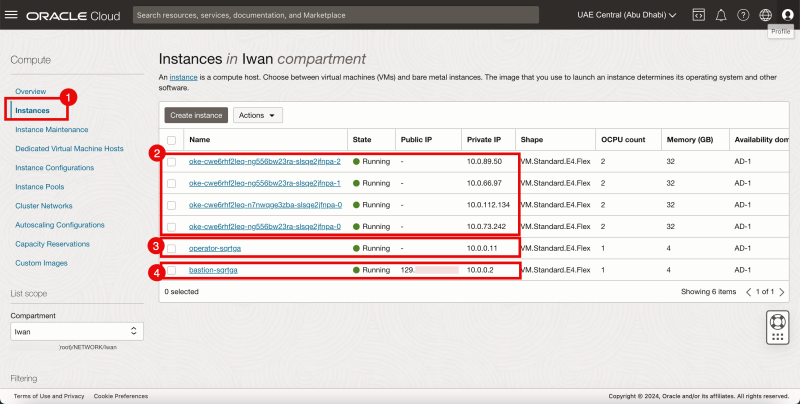
Instances
Use the hamburger menu to browse to Compute > Instances.
- Click on the Instances.
- Review the Kubernetes Worker nodes deployments.
- Review the Bastion Host deployment.
- Review the Kubernetes Operator deployment.
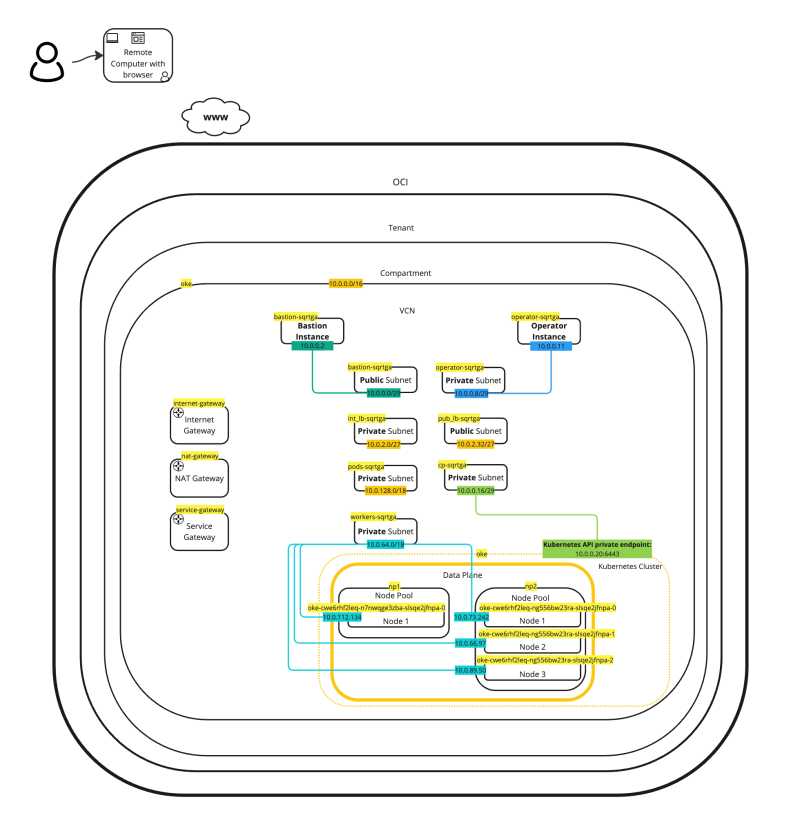
The figure below provides a complete overview of our starting point for the remaining content of this tutorial.
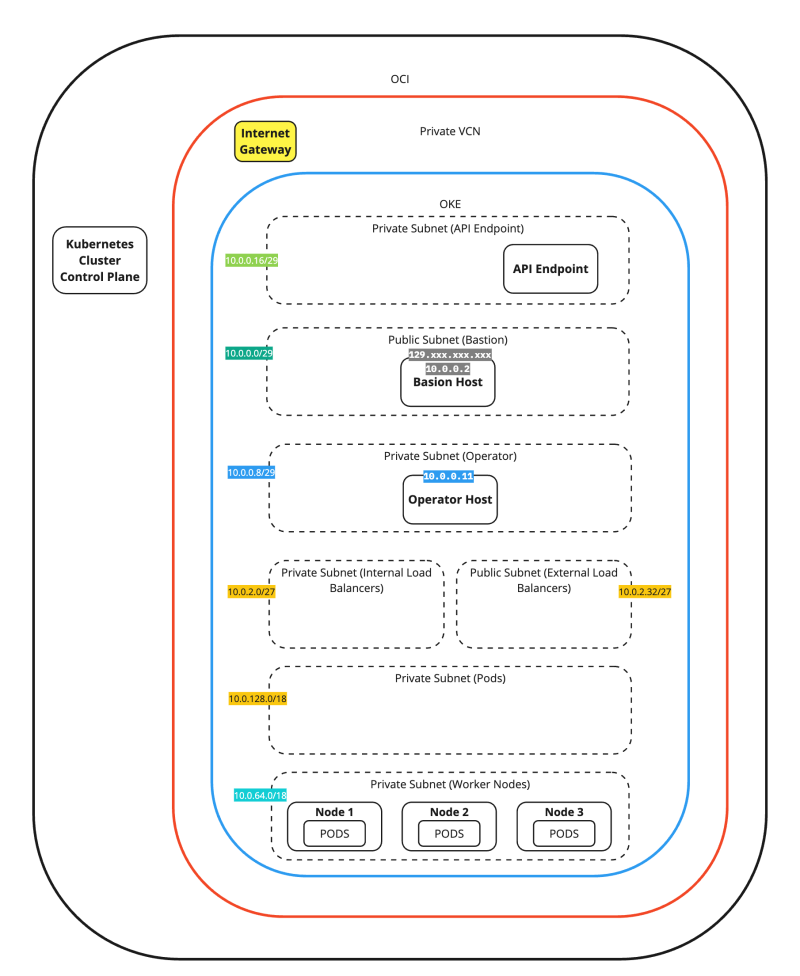
The figure below is a simplified view of the previous figure. We will use this figure in the rest of this tutorial.
STEP 02 - Deploy an NGINX webserver on the Kubernetes Cluster running on OKE
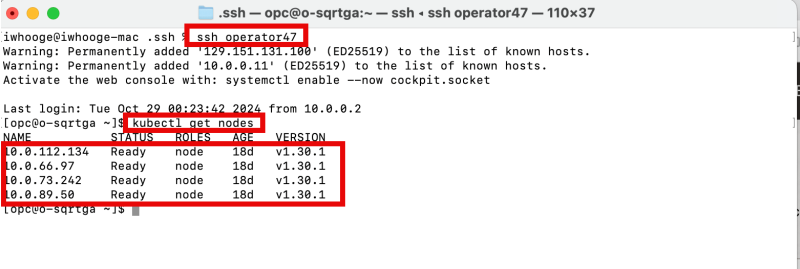
The Operator can not be accessed directly from the Internet; we must go through the Bastion host. I am using an SSH script provided by Ali Mukadam to connect to the Operator using one single SSH command. This script and method to connect are provided here: [Task 4: Use Bastion and Operator to Check the Connectivity]. You will need this script later in this article so make sure you use it.
- Set up an SSH session for the Kubernetes Operator.
- Review the active Worker Nodes with the
kubectl get nodescommand. - Review all the active worker nodes.
To create a sample NGINX application inside a container, create a YAML file with the following code on the Operator. The YAML file contains the code to create the NGINX webserver application with 3 replicas, and it will also make a service for the type load balancer.
modified2_nginx_ext_lb.yaml
apiVersion: apps/v1
kind: Deployment
metadata:
  name: my-nginx
  labels:
    app: nginx
spec:
  replicas: 3
  selector:
    matchLabels:
      app: nginx
  template:
    metadata:
      labels:
	app: nginx
    spec:
      containers:
** name: nginx
        image: nginx:latest
        ports:
* containerPort: 80
---
apiVersion: v1
kind: Service
metadata:
  name: my-nginx-svc
  labels:
    app: nginx
  annotations:
    oci.oraclecloud.com/load-balancer-type: "lb"
    service.beta.kubernetes.io/oci-load-balancer-internal: "true"
    service.beta.kubernetes.io/oci-load-balancer-subnet1: "ocid1.subnet.oc1.me-abudhabi-1.aaaaaaaaguwakvc6joopln7daz7rikkjfa6er2rseu7rixvdf5urvpxldhya"
    service.beta.kubernetes.io/oci-load-balancer-shape: "flexible"
    service.beta.kubernetes.io/oci-load-balancer-shape-flex-min: "50"
    service.beta.kubernetes.io/oci-load-balancer-shape-flex-max: "100"
spec:
  type: LoadBalancer
  ports:
* port: 80
  selector:
    app: nginx
I only wanted to make this application accessible internally, so I created a service of the type load balancer attached to the private load balancer subnet.
To assign the service of the type load balancer to a private load balancer subnet, you need the Subnet OCID of the private load balancer subnet, and you need to add the following code in the annotations section:
annotations:
    oci.oraclecloud.com/load-balancer-type: "lb"
    service.beta.kubernetes.io/oci-load-balancer-internal: "true"
    service.beta.kubernetes.io/oci-load-balancer-subnet1: "ocid1.subnet.oc1.me-abudhabi-1.aaaaaaaaguwakvc6joopln7daz7rikkjfa6er2rseu7rixvdf5urvpxldhya"
    service.beta.kubernetes.io/oci-load-balancer-shape: "flexible"
    service.beta.kubernetes.io/oci-load-balancer-shape-flex-min: "50"
    service.beta.kubernetes.io/oci-load-balancer-shape-flex-max: "100"
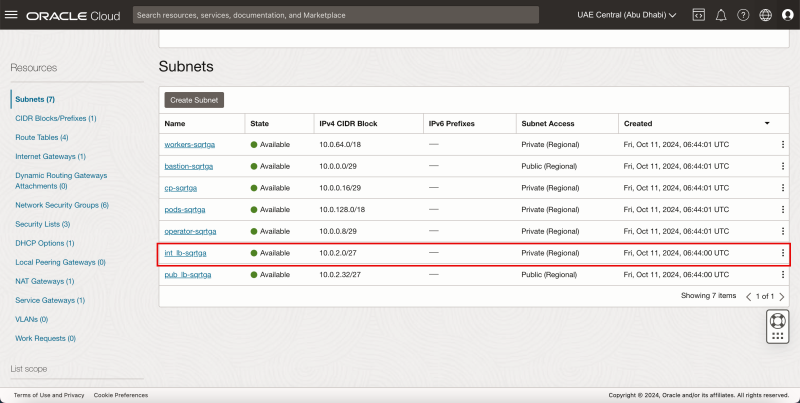
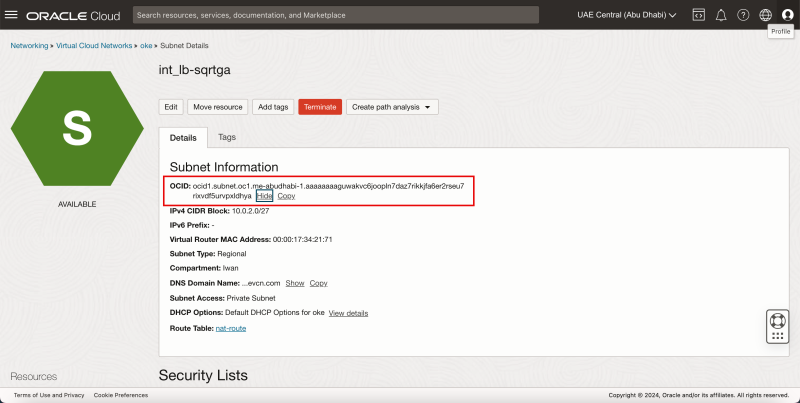
To get the subnet OCID of the private load balancer subnet, click on the internal (load balancer) subnet.
Then, in the OCID section, click "show" and "copy" to display the entire private load balancer subnet OCID. Use this OCID in the annotations section precisely as I did above.
Now, it's time to deploy the NGINX application and the service of the type load balancer.
- Use the command below to create the YAML file (on the Operator),
nano modified2_nginx_ext_lb.yaml
- Use the command below to deploy the NGINX application with the service of the type load balancer.
kubectl apply -f modified2_nginx_ext_lb.yaml
- Use the command below to verify if the NGINX application was deployed successfully. (not shown in the screenshot below)
kubectl get pods
- Use the command below to verify if the service of the type load balancer was deployed successfully.
kubectl get svc
- Notice that the service of the type load balancer was deployed successfully.
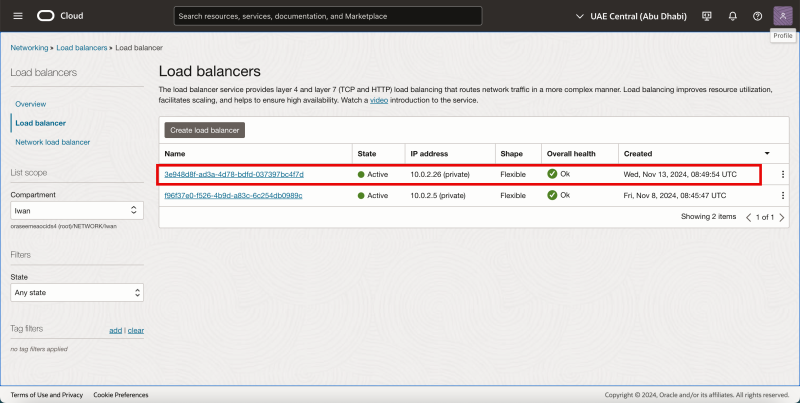
When we look at the internal load balancer subnet, we can see that the CIDR block for this subnet is 10.0.2.0/27. The new service of the type load balancer has the IP address 10.0.2.3, so we are good here.
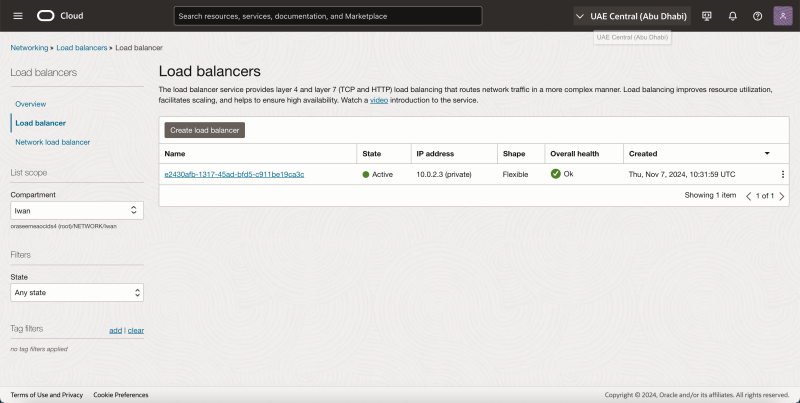
To verify the load balancer object in the OCI console, browse to Networking > Load balancer. and click on Load Balancer.
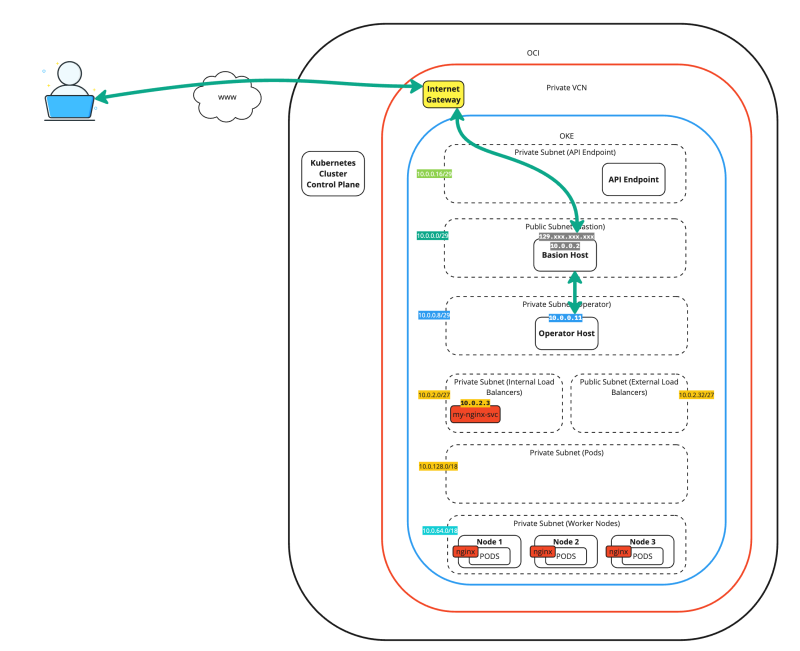
The figure below illustrates the deployment up to this point. Notice that the Load balancer is added.
Testing the new pod-app from a temporary pod
We can perform an internal connectivity test using a temporary pod to test whether the newly deployed NGINX application works with the type load balancer service.
There are multiple ways to test the application's connectivity. One way is to open a browser and test whether you can access the webpage. However, when we do not have a browser, we can do another quick test by deploying a temporary pod.
In one of [my previously written articles], I have explained how to create a temporary pod and use that for connectivity tests.
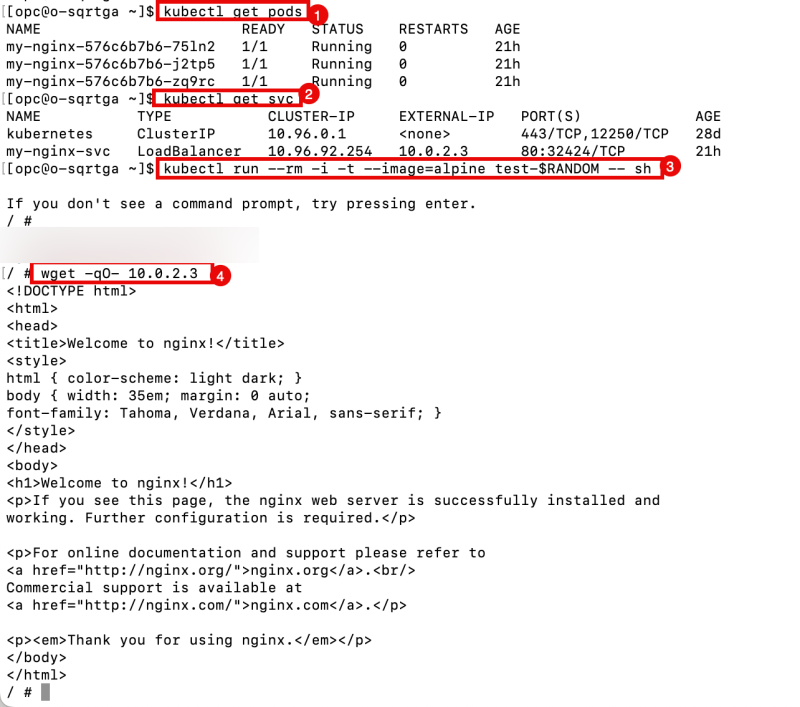
- Use the command below to get the IP address of the internal LB Service.
kubectl get svc
- Use the command below to deploy a sample pod to test the web application connectivity.
kubectl run --rm -i -t --image=alpine test-$RANDOM -- sh
- Use the command below to test connectivity to the web server using wget.
wget -qO- http://<ip-of-internal-lb-service>
- Notice the HTML code the web server returns, confirming that the web server and connectivity (using the internal load balancing service) are working.
- Issue this command to exit the temporary pod:
exit
- Notice that the pod was deleted after I exited the CLI.
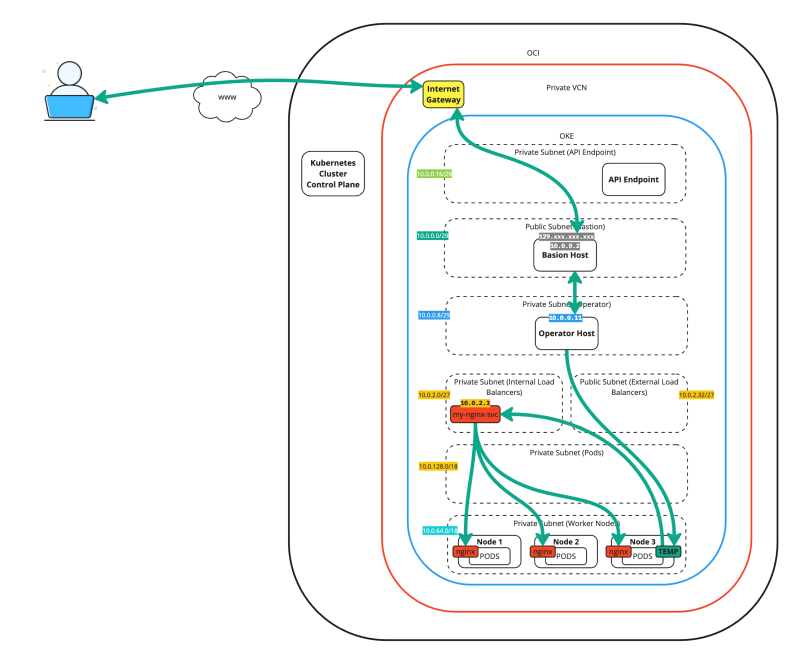
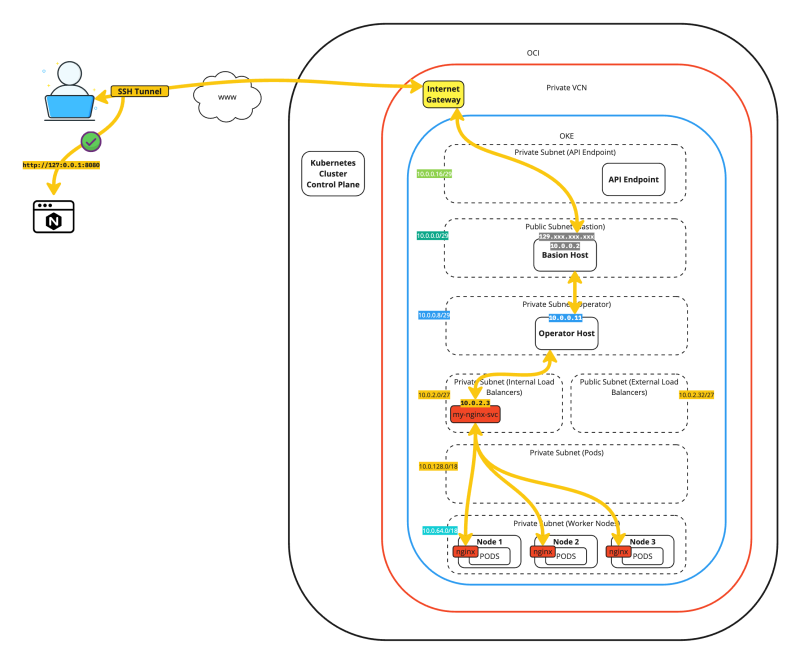
The figure below illustrates the deployment up to this point. Notice that the temporarily deployed pod connects to the "load balancer IP service" type to test the connectivity.
Testing the new pod-app from your local computer
We can use the command below to test connectivity to the test NGINX application with the service of the type load balancer from our local laptop.
iwhooge@iwhooge-mac ~ % wget -qO- <ip-of-internal-lb-service>
As you will notice, this is currently not working as the service of the type load balancer has an INTERNAL IP address, and this is only reachable inside the Kubernetes environment.
For fun, you can also issue the command below to try accessing the NGINX application using the local IP address with a custom port 8080.
iwhooge@iwhooge-mac ~ % wget -qO- 127.0.0.1:8080
iwhooge@iwhooge-mac ~ %
Now, this is not working, but we will use the same command later in this tutorial after we have set up the SSH tunnel.
The figure below illustrates the deployment up to this point. Notice that the tunneled connection to the local IP address is not working.
STEP 03 - Create an SSH config script with localhost entries
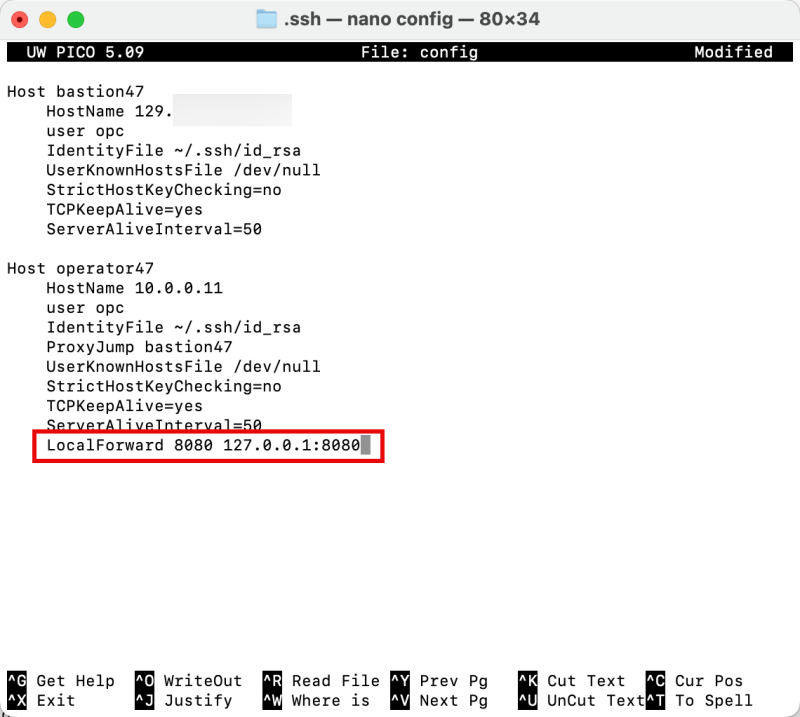
To allow the SSH tunnel to work, we must add the following entry in our ssh config file, located in the /Users/iwhooge/.ssh folder.
Edit the config file with the command nano /Users/iwhooge/.ssh/config.
Add the following line in the Host operator47 section.
LocalForward 8080 127.0.0.1:8080
Below is a complete output of the SSH config file.
iwhooge@iwhooge-mac .ssh % pwd
/Users/iwhooge/.ssh

iwhooge@iwhooge-mac .ssh % more config
Host bastion47
    HostName 129.xxx.xxx.xxx
    user opc
    IdentityFile ~/.ssh/id_rsa
    UserKnownHostsFile /dev/null
    StrictHostKeyChecking=no
    TCPKeepAlive=yes
    ServerAliveInterval=50

Host operator47
    HostName 10.0.0.11
    user opc
    IdentityFile ~/.ssh/id_rsa
    ProxyJump bastion47
    UserKnownHostsFile /dev/null
    StrictHostKeyChecking=no
    TCPKeepAlive=yes
    ServerAliveInterval=50
    LocalForward 8080 127.0.0.1:8080
iwhooge@iwhooge-mac .ssh %
Notice that the LocalForward command is added to the SSH config file.
STEP 04 - Set up the SSH tunnel and connect to the NGINX web server using localhost
If you previously connected with SSH to the Operator, disconnect that session.
- Reconnect to the Operator using the script again.
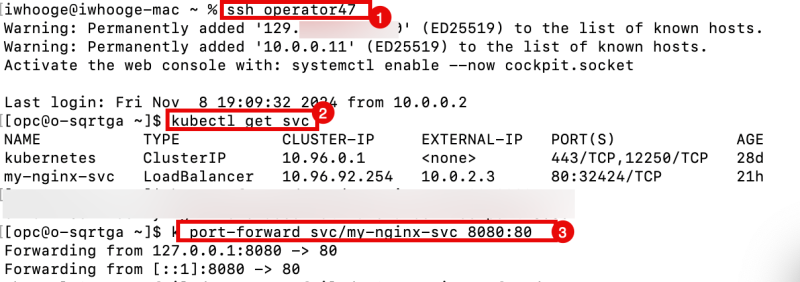
iwhooge@iwhooge-mac ~ % ssh operator47
- Use the command below to get the IP address of the internal LB Service.
[opc@o-sqrtga ~]$ kubectl get svc
- Use the command below ON THE OPERATOR (SSH window) to set up the SSH tunnel and forward all traffic going to localhost 8080 to the service of type load balancer 80. The service of type load balancer will then eventually forward the traffic to the NGINX application.
[opc@o-sqrtga ~]$ k port-forward svc/my-nginx-svc 8080:80
Notice the "forwarding" messages on the SSH window that localhost port 8080 is forwarded to port 80.
Forwarding from 127.0.0.1:8080 -> 80
Forwarding from [::1]:8080 -> 80
Now, let's test the connectivity from our local computer. We'll verify if the connectivity works using a local IP address (127.0.0.1) with port 8080 and see if that will allow us to connect to our NGINX application inside our OKE environment.
Make sure you open A NEW TERMINAL for the commands below.
Use the command below to test the connectivity.
iwhooge@iwhooge-mac ~ % wget -qO- 127.0.0.1:8080
Notice that you will get the following output from your local computer terminal. Now it is working!
iwhooge@iwhooge-mac ~ % wget -qO- 127.0.0.1:8080
<!DOCTYPE html>
<html>
<head>
<title>Welcome to nginx!</title>
<style>
html { color-scheme: light dark; }
body { width: 35em; margin: 0 auto;
font-family: Tahoma, Verdana, Arial, sans-serif; }
</style>
</head>
<body>
<h1>Welcome to nginx!</h1>
<p>If you see this page, the nginx web server is successfully installed and
working. Further configuration is required.</p>

<p>For online documentation and support please refer to
<a href="http://nginx.org/">nginx.org</a>.<br/>
Commercial support is available at
<a href="http://nginx.com/">nginx.com</a>.</p>

<p><em>Thank you for using nginx.</em></p>
</body>
</html>
iwhooge@iwhooge-mac ~ %
On the Operator SSH window, notice the output has changed, and a new line was added:
Handling connection for 8080.
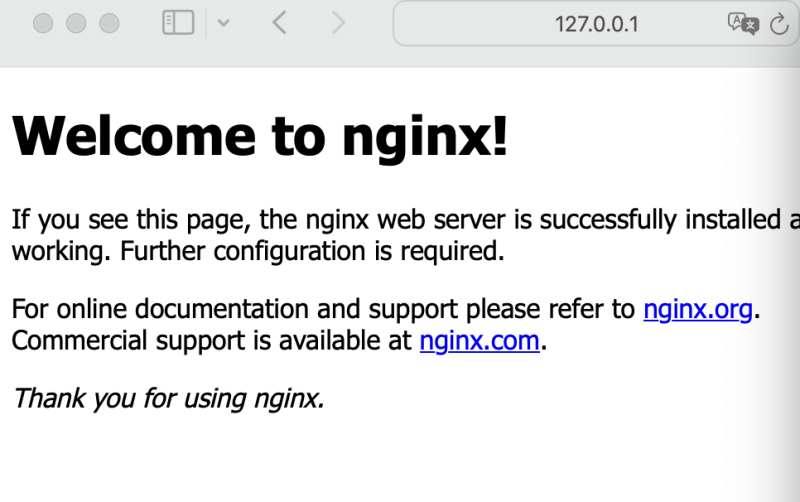
A quick test using a web browser gave me the following output:
The figure below illustrates the deployment up to this point. Notice that the tunneled connection to the local IP address is NOW working.
STEP 05 - Deploy a MySQL Database service on the Kubernetes Cluster running on OKE
Now that we can reach the NGINX application through the SSH Tunnel, we will add a MySQL database service inside the OKE environment.
To set up a MySQL Database service inside a Kubernetes environment, you need to:
- create a secret (for password protection)
- create a Persistent Volume and a Persistent Volume Claim (for database storage)
- create the MYSQL database service itself with a service of the type load balancer.
- Use the command below to create the password for the MySQL database service.
nano mysql-secret.yaml
Use the following YAML code:
mysql-secret.yaml
apiVersion: v1
kind: Secret
metadata:
  name: mysql-secret
type: kubernetes.io/basic-auth
stringData:
  password: Or@cle1
- Apply the YAML code.
kubectl apply -f mysql-secret.yaml
- Use the command below to create the storage for the MySQL database service.
nano mysql-storage.yaml
Use the following YAML code:
mysql-storage.yaml
apiVersion: v1
kind: PersistentVolume
metadata:
  name: mysql-pv-volume
  labels:
    type: local
spec:
  storageClassName: manual
  capacity:
    storage: 20Gi
  accessModes:
** ReadWriteOnce
  hostPath:
    path: "/mnt/data"
---
apiVersion: v1
kind: PersistentVolumeClaim
metadata:
  name: mysql-pv-claim
spec:
  storageClassName: manual
  accessModes:
** ReadWriteOnce
  resources:
    requests:
      storage: 20Gi
- Apply the YAML code.
kubectl apply -f mysql-storage.yaml
- Use the command below to create the MySQL database service and the service of the type load balancer.
nano mysql-deployment.yaml
Use the following YAML code:
mysql-deployment.yaml
apiVersion: apps/v1
kind: Deployment
metadata:
  name: mysql
spec:
  selector:
    matchLabels:
      app: mysql
  strategy:
    type: Recreate
  template:
    metadata:
      labels:
        app: mysql
    spec:
      containers:
** image: mysql:latest
        name: mysql
        env:
*** name: MYSQL_ROOT_PASSWORD
          valueFrom:
            secretKeyRef:
              name: mysql-secret
              key: password
        ports:
*** containerPort: 3306
          name: mysql
        volumeMounts:
*** name: mysql-persistent-storage
          mountPath: /var/lib/mysql
      volumes:
** name: mysql-persistent-storage
        persistentVolumeClaim:
          claimName: mysql-pv-claim
---
apiVersion: v1
kind: Service
metadata:
  name: my-mysql-svc
  labels:
    app: mysql
  annotations:
    oci.oraclecloud.com/load-balancer-type: "lb"
    service.beta.kubernetes.io/oci-load-balancer-internal: "true"
    service.beta.kubernetes.io/oci-load-balancer-subnet1: "ocid1.subnet.oc1.me-abudhabi-1.aaaaaaaaguwakvc6joopln7daz7rikkjfa6er2rseu7rixvdf5urvpxldhya"
    service.beta.kubernetes.io/oci-load-balancer-shape: "flexible"
    service.beta.kubernetes.io/oci-load-balancer-shape-flex-min: "50"
    service.beta.kubernetes.io/oci-load-balancer-shape-flex-max: "100"
spec:
  type: LoadBalancer
  ports:
* port: 3306
  selector:
    app: mysql
- Apply the YAML code.
kubectl apply -f mysql-deployment.yaml
- Use the command below to verify if the MySQL Database service has been deployed successfully.
kubectl get pod
- Notice that the MySQL Database service has been deployed successfully.
- Use the command below to verify if the service of type load balancer has been deployed successfully.
kubectl get svc
- Notice that the service for the type load balancer has been deployed successfully.
To verify the load balancer object in the OCI console, browse to Networking > Load balancer. and click on Load Balancer.
To access the terminal console of the MySQL Database service, we can
- use the
kubectl execcommand - use the localhost SSH tunnel command
- To access the terminal console using the
kubectl execcommand, use the command below from the Operator.
kubectl exec --stdin --tty mysql-74f8bf98c5-bl8vv -- /bin/bash
- Use the command below to access the MySQL database service console.
Type in the password you specified in the mysql-secret.yaml YAML file.
mysql -p
- Notice the "welcome" message of the MySQL database service.
- Issue the SQL query below to list all MySQL databases inside the service.
SHOW DATABASES;
We accessed the MySQL database service management console from within the Kubernetes environment.
The figure below illustrates the deployment up to this point. Notice that the MuSQL service with the service of the type load balancer is deployed.
STEP 06 - Add additional localhost entries inside the SSH config script to access the new MySQL Database service
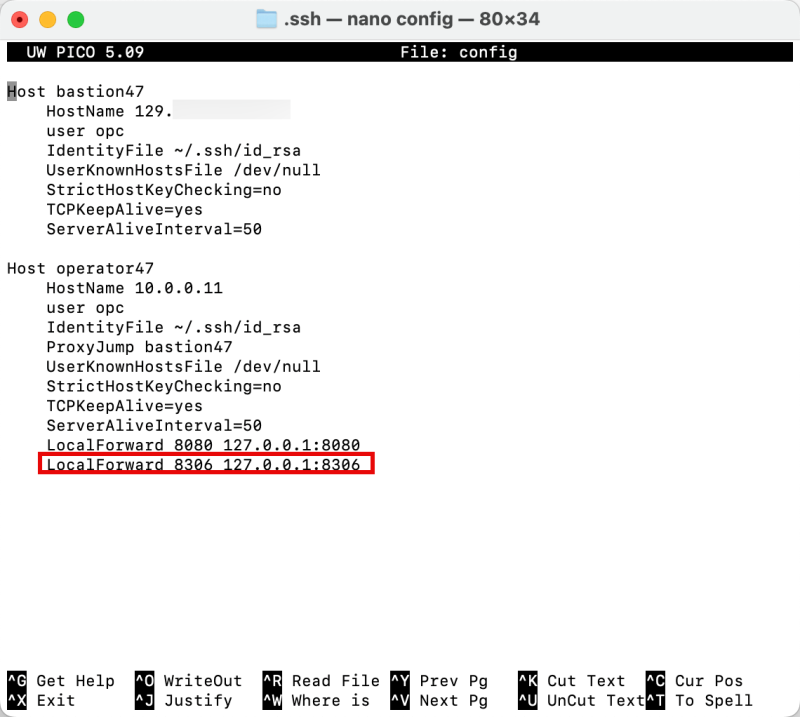
To allow the SSH tunnel to work (for the MySQL database service), we must add the following entry in our ssh config file, located in the /Users/iwhooge/.ssh folder.
Edit the config file with the command nano /Users/iwhooge/.ssh/config.
Add the following line in the Host operator47 section.
LocalForward 8306 127.0.0.1:8306
Below is a complete output of the SSH config file.
Host bastion47
    HostName 129.xxx.xxx.xxx
    user opc
    IdentityFile ~/.ssh/id_rsa
    UserKnownHostsFile /dev/null
    StrictHostKeyChecking=no
    TCPKeepAlive=yes
    ServerAliveInterval=50
Host operator47
    HostName 10.0.0.11
    user opc
    IdentityFile ~/.ssh/id_rsa
    ProxyJump bastion47
    UserKnownHostsFile /dev/null
    StrictHostKeyChecking=no
    TCPKeepAlive=yes
    ServerAliveInterval=50
    LocalForward 8080 127.0.0.1:8080
    LocalForward 8306 127.0.0.1:8306
Notice that the LocalForward command is added to the SSH config file.
STEP 07 - Set up the SSH tunnel and connect to the MySQL Database using localhost
To test the connection to the MySQL database service from the local computer, you need to download and install [MySQL Workbench] (on the local computer).
- Use the script again to Open a NEW terminal (leave the other one open) for the Operator.
iwhooge@iwhooge-mac ~ % ssh operator47
- Use the command below ==on the operator== (SSH window) to set up the SSH tunnel and forward all traffic going to localhost 8306 to the service of type load balancer 3306. The service of type load balancer will then forward the traffic to the MySQL database service.
[opc@o-sqrtga ~]$ k port-forward svc/my-mysql-svc 8306:3306
- Notice the "forwarding" messages on the SSH window that localhost port 8306 is forwarded to port 3306.
Forwarding from 127.0.0.1:8306 -> 3306
Forwarding from [::1]:8306 -> 3306
Now that the MySQL Workbench application is installed and the SSH session and tunnel are established open the application on your local computer.
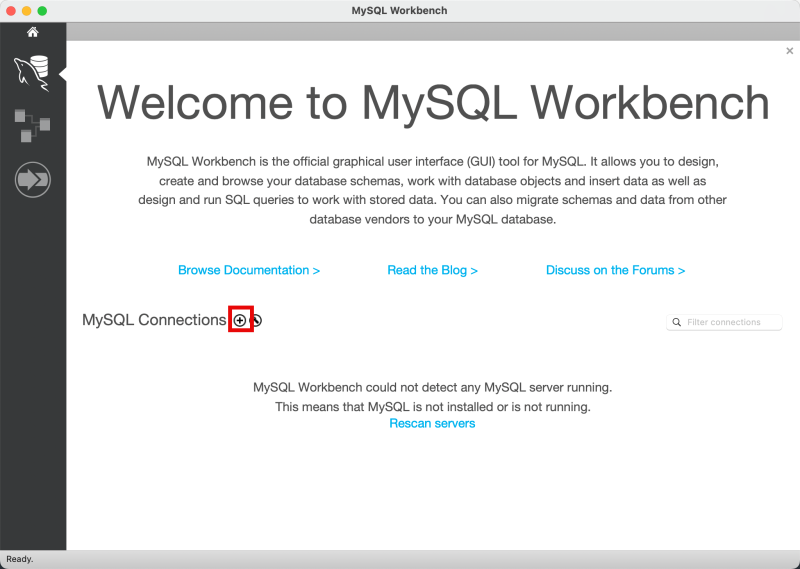
Click the + to add a new MySQL Connection.
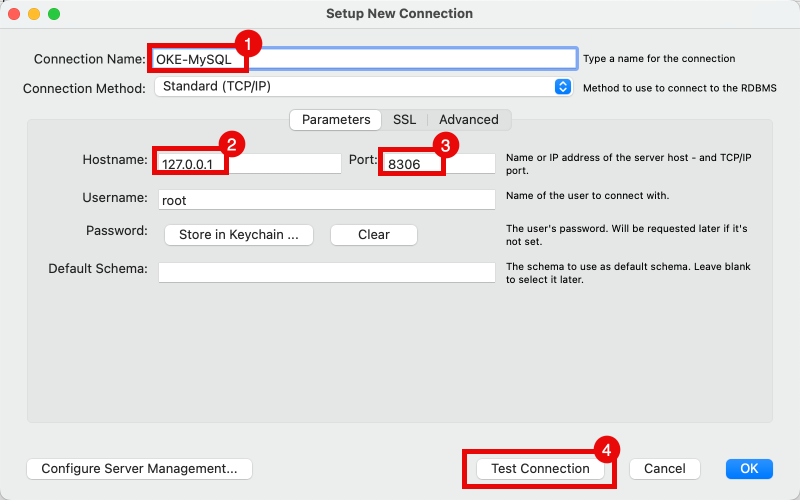
- Specify a name.
- Specify the IP address to be 127.0.0.1 (localhost as we are tunneling the traffic)
- Specify the port to be 8306 (the post we use for the local tunnel forwarding for the MySQL database service).
- Click on the Test Connection button.
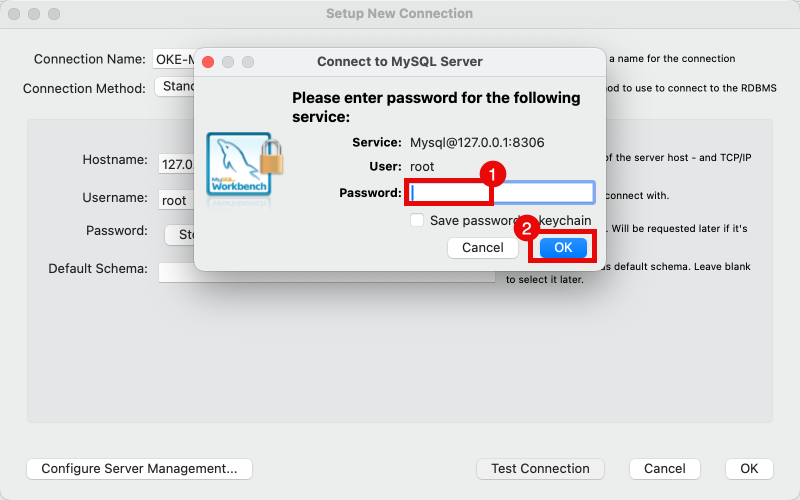
- Type in the password you specified in the mysql-secret.yaml YAML file.
- Click on the OK button.
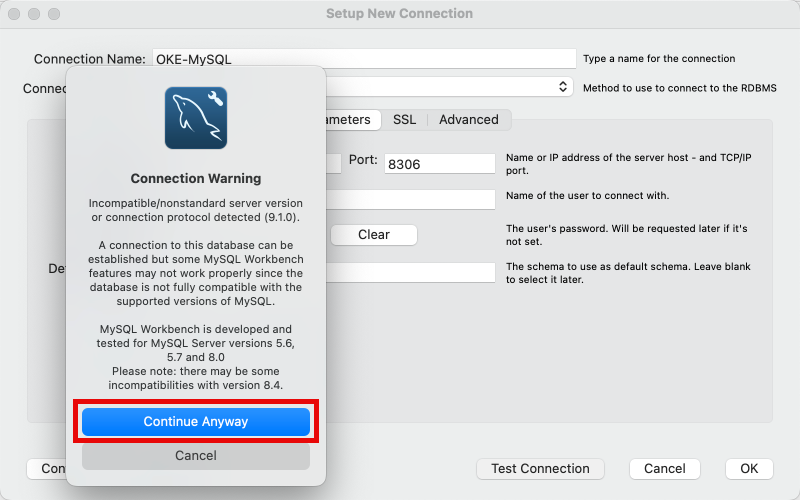
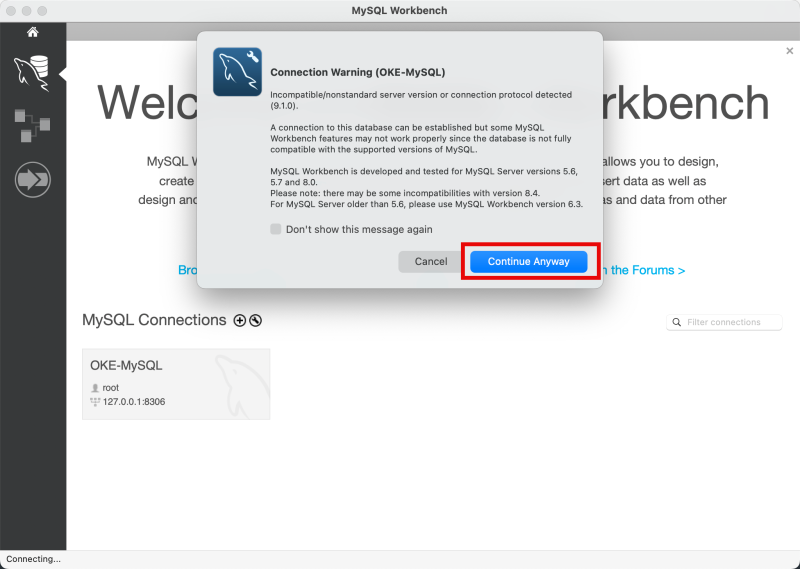
Disregard the Connection Warning and click on the Continue Anyway button. This warning is given as the MySQL Workbench application version, and the deployed MySQL database service version might not be compatible.
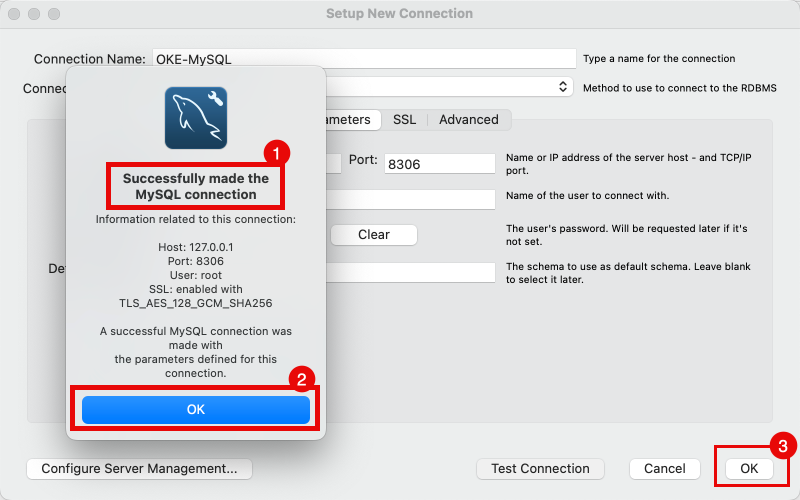
- Notice the successful connection message.
- Click on the OK button.
- Click on OK to save the MySQL connection.
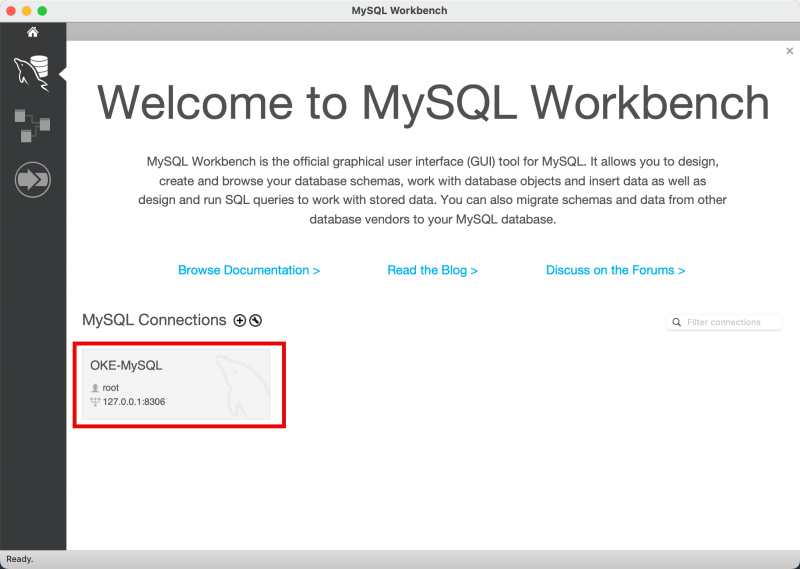
Click on the saved MySQL connection to open the session.
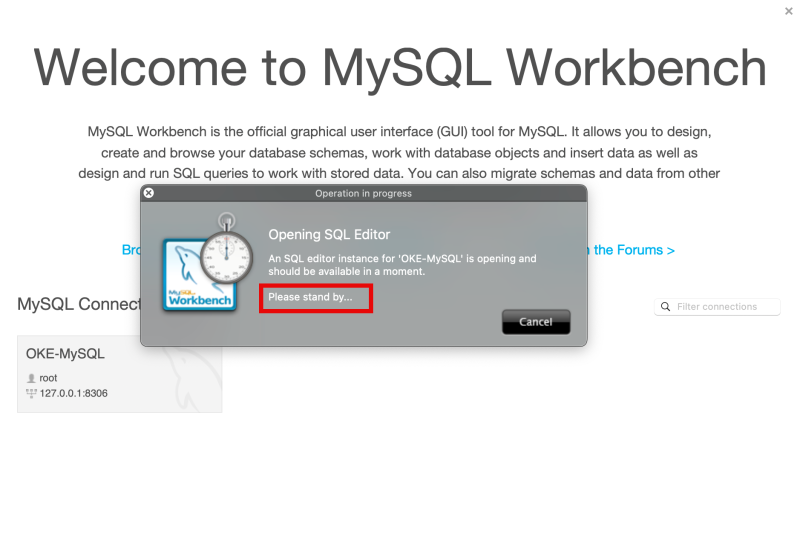
Notice the; please stand by message.
Disregard the Connection Warning and click on the Continue Anyway button.
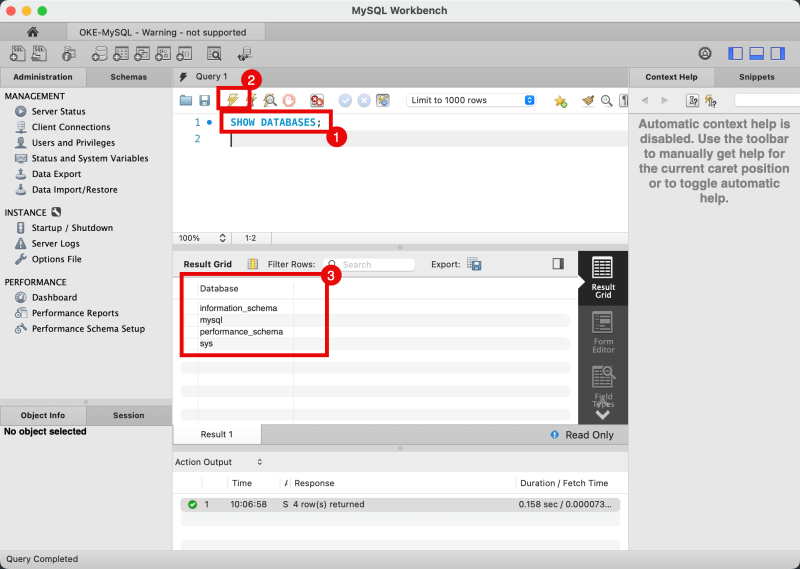
- Issue the SQL query below to list all MySQL databases inside the service.
SHOW DATABASES;
- Click on the lightning button
- Notice the output of all the MySQL databases inside the MySQL database service.
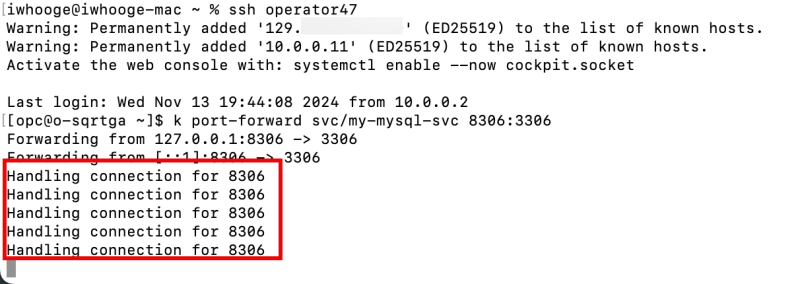
On the Operator SSH window, notice the output has changed, and a new line was added:
Handling connection for 8306.
There are multiple entries because I have made numerous connections.
- One for the test
- One for the actual connection
- One for the SQL query
- And one additional one for a test I did earlier
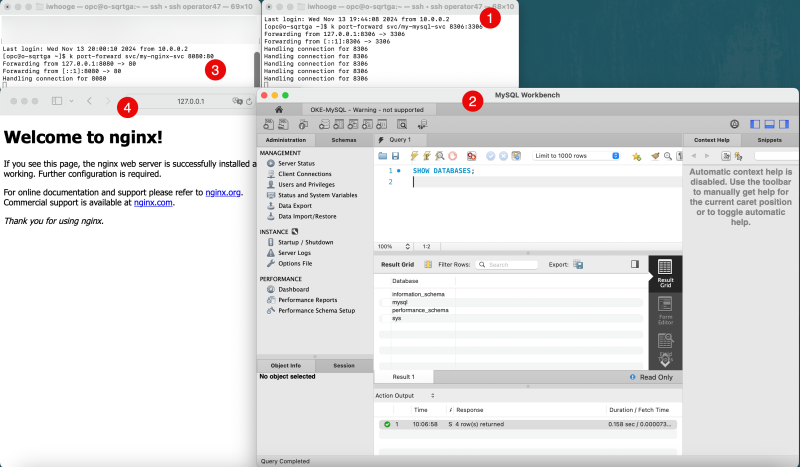
We can now open multiple SSH sessions to the Operator and issue multiple tunnel commands for different applications simultaneously.
- Notice the SSH Terminal with the tunnel command for the MySQL database service.
- Notice the connection using the MYSQL Workbench application from the local computer to the MySQL database service using the localhost IP address 127.0.0.1.
- Notice the SSH Terminal with the tunnel command for the NGINX application
- Notice the connection using the Safari Internet Browser from the local computer to the NGINX application using the localhost IP address 127.0.0.1.
The figure below illustrates the deployment up to this point. Notice that a tunneled connection to the local IP address works simultaneously for the NGINX application and the MySQL database service, using multiple SSH sessions and SSH Tunnels.
STEP 08 - Clean up all applications and services
To clean up the deployed NGINX application and associated service, use the following commands in the order provided below.
kubectl get pods
kubectl delete service my-nginx-svc -n default
kubectl get pods
kubectl get svc
kubectl delete deployment my-nginx --namespace default
kubectl get svc
To clean up the deployed MySQL database service and the associated service, storage, and password, use the following commands in the order provided below.
kubectl delete deployment,svc mysql
kubectl delete pvc mysql-pv-claim
kubectl delete pv mysql-pv-volume
kubectl delete secret mysql-secret
The figure below illustrates the deployment up to this point, where you have a clean environment again and can start over.
Conclusion
In conclusion, securing access to Oracle Kubernetes Engine (OKE) clusters is a critical step in modern application development, and SSH tunneling provides a robust and straightforward solution. By implementing the steps in this tutorial, developers can safeguard their resources, streamline their workflows, and maintain control over sensitive connections for multiple applications. Integrating SSH tunneling into your OKE setup enhances security and minimizes the risks of exposing resources to the public Internet. With these practices in place, you can confidently use your OKE clusters and focus on building scalable, secure, and efficient applications.

