Deploy a virtual Cisco Nexus Switch with NX-OS
This article will show you how to deploy a virtual Cisco NX-OS Layer three switch inside the VMware vSphere environment. After the Deployment, I will show you how to do the basic configuration in order to use it together with NSX-T (or to build your own network topology using Cisco Nexus Switches).
The high–level steps
Below you will find the high-level steps on how to deploy and configure a virtual Cisco NX-OS Layer three switch.
- STEP 1) Download the NX-OS OVA installation file from the Cisco website
- STEP 2) Deploy the NX-OS OVA (either through the ESXi host or vCenter Server)
- STEP 3) Add a Serial Console port to access the console of the virtual Nexus Switch
- STEP 4) Manually boot to the NX-OS image
- STEP 5) Connect to the console of the virtual Nexus Switch (using telnet)
- STEP 6) Perform initial configuration through the console
- STEP 7) Power off virtual Nexus Switch and disconnect the Serial Port
- STEP 8) Connect through SSH to the virtual Nexus Switch
STEP 1» Download the NX–OS OVA installation file from the Cisco website
First, make sure you downloaded the proper files from the Cisco website.
In this example, I am using the "nxosv.9.2.4.ova" file for the deployment of my Virtual NX-OS Switch.
STEP 2» Deploy the NX–OS OVA either through the ESXi host or vCenter Server
I doing this deployment straight from an ESXi host, but the process on the vCenter Server will not be much different.
First right click Virtual Machines and select "Create/Register VM".
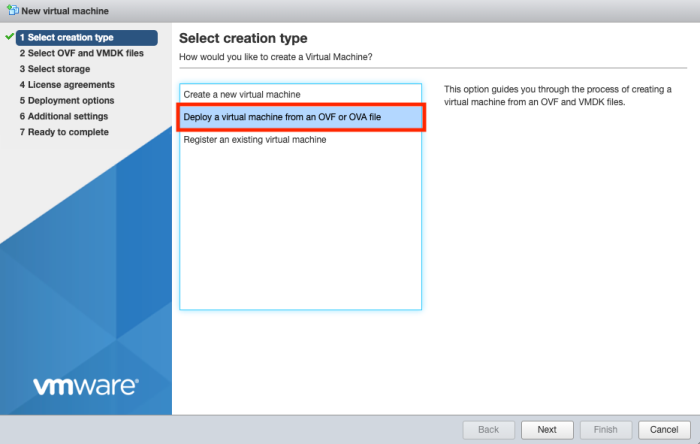
Select "Deploy a virtual machine from an OVA or OVF file".
Provide a name for the Virtual Machine.
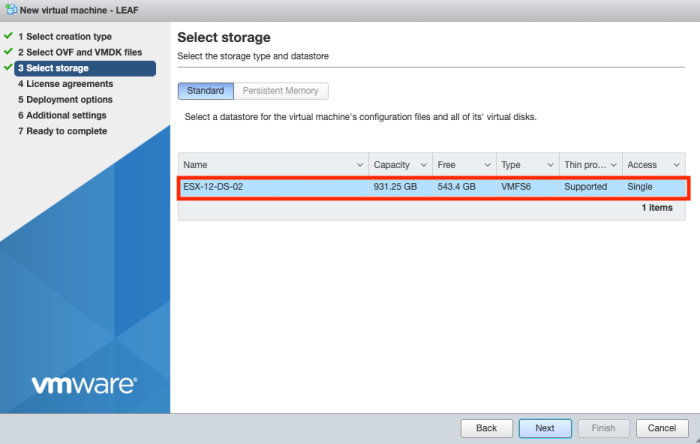
Select a proper storage resource.
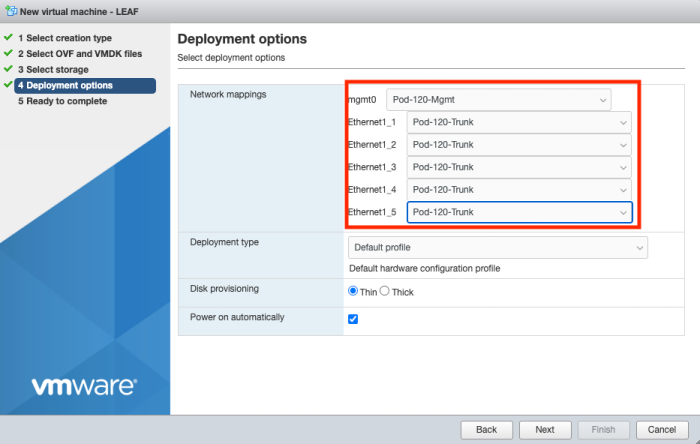
Configure the network interfaces as required. Make sure the first interface is the management interface and the other interfaces can be configured how you want. I am planning to use VLAN ID interfaces so that's why I am connecting them all to a trunk Port Group.
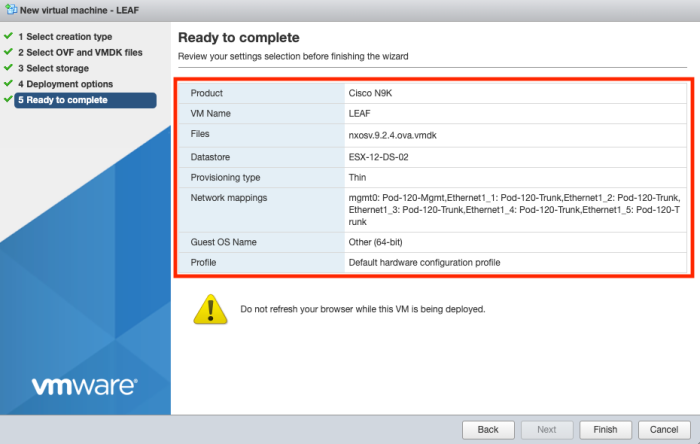
Verify the details in the summary before you start the deploy.
The deploy has started.
The deploy has completed.
Verify if the Virtual Machine is booting properly.
Make sure the Virtual Machine is turned off to add the Serial Console in the next step.
STEP 3» Add a Serial Console port to access the console of the virtual Nexus Switch
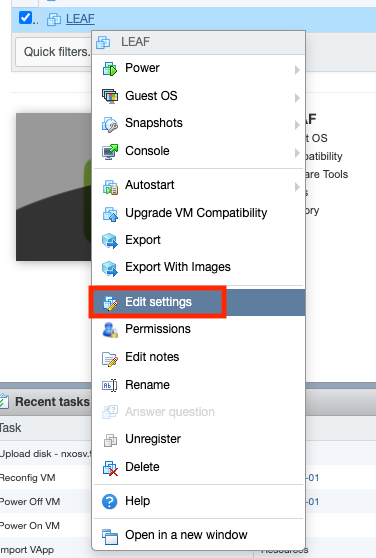
Right-click on the selected Virtual Machine "LEAF" and edit the settings.
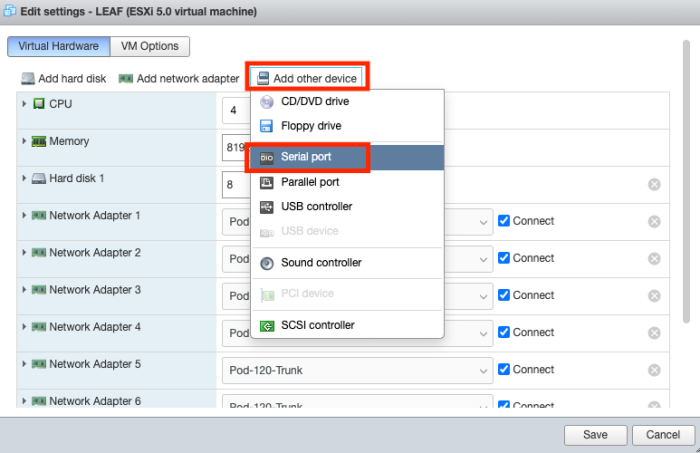
Add a new "Serial Port" Device.
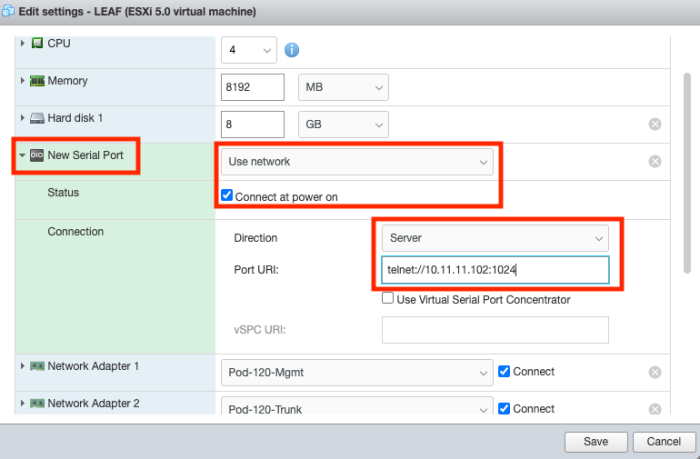
Make sure the device is connected at power on. Select the Direction to be a "Server". Make sure the PORT URI is "telnet://<the IP address of you vmk0 interface of the ESXi host>:1024"
IMPORTANT: The IP address you should use here is the management IP address of your ESXi host that is hosting the Virtual NX-OS Switch.
By default, the ESXi firewall is disabled for the "VM serial port connected over the network".
We need to enable this.
When you have successfully enabled it you will see that port 23 and 1024 are enabled by default.
When the host is added to a vCenter Server you will more options as you will be able to add more ports here.
STEP 4» Manually boot to the NX–OS image
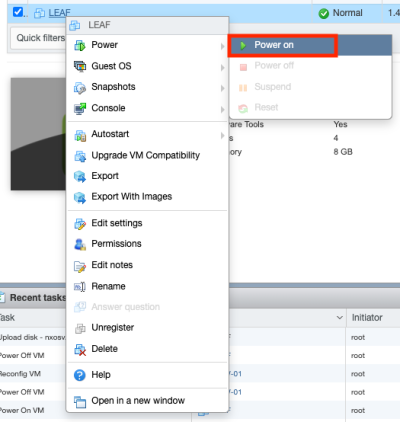
Power on the Virtual Machine.
Open the console of the Virtual Machine.
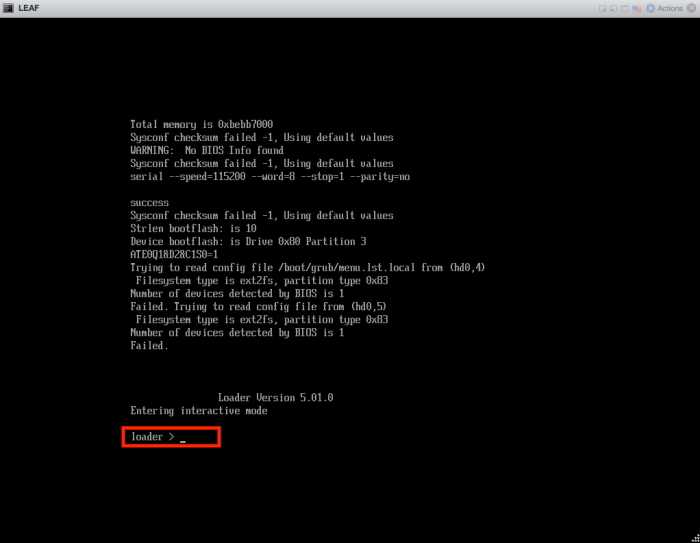
Wait until you see the "loader >" prompt.
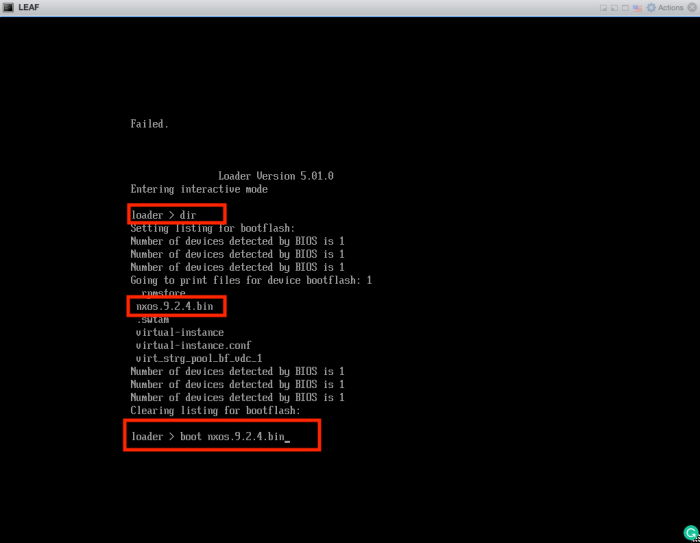
Verify the directory content with:
loader >dir
Make sure you see the .bin file in there. When the .bin file is located you need to boot to it with:
loader >boot nxos.9.2.4.bin
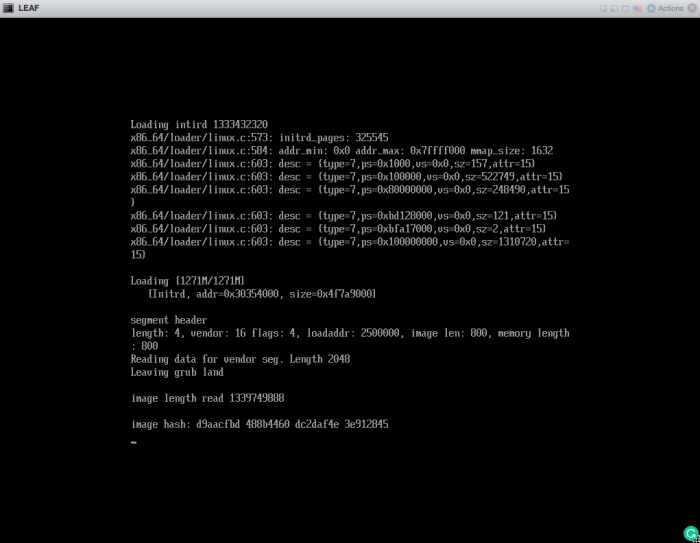
Wait until you see the "image hash".
STEP 5» Connect to the console of the virtual Nexus Switch using telnet
From this moment on you can use a telnet client to connect to the console of the virtual NX-OS Switch. We need to use telnet as the protocol towards the IP address of the ESXi host with port 1024 (the details we specified in STEP 3)
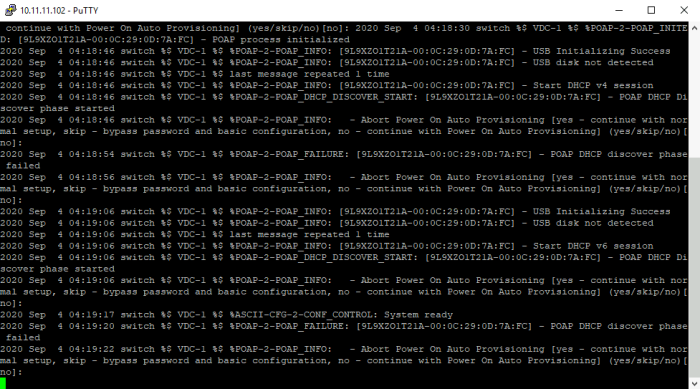
Once you connected through the console you will see a lot of messages on the screen and this looks like this:
STEP 6» Perform initial configuration through the console
When you connect to the console you need to wait until the virtual NX-OS Switch is fully booted.
2020 Sep  4 04:19:47 switch %$ VDC-1 %$ %VMAN-2-ACTIVATION_STATE: Successfully activated virtual service 'guestshell+'
2020 Sep  4 04:19:47 switch %$ VDC-1 %$ %VMAN-2-GUESTSHELL_ENABLED: The guest shell has been enabled. The command 'guestshell' may be used to access it, 'guestshell destroy' to remove it.
2020 Sep  4 04:20:18 switch %$ VDC-1 %$ %POAP-2-POAP_INFO: [9L9XZO1T21A-00:0C:29:0D:7A:FC] - USB Initializing Success
2020 Sep  4 04:20:18 switch %$ VDC-1 %$ %POAP-2-POAP_INFO: [9L9XZO1T21A-00:0C:29:0D:7A:FC] - USB disk not detected
2020 Sep  4 04:20:18 switch %$ VDC-1 %$ last message repeated 1 time
2020 Sep  4 04:20:18 switch %$ VDC-1 %$ %POAP-2-POAP_INFO: [9L9XZO1T21A-00:0C:29:0D:7A:FC] - Start DHCP v4 session
2020 Sep  4 04:20:18 switch %$ VDC-1 %$ %POAP-2-POAP_DHCP_DISCOVER_START: [9L9XZO1T21A-00:0C:29:0D:7A:FC] - POAP DHCP Discover phase started
2020 Sep  4 04:20:18 switch %$ VDC-1 %$ %POAP-2-POAP_INFO:   -
On the question to "Abort Power On Auto Provisioning" type in "yes"
Abort Power On Auto Provisioning [yes - continue with normal setup, skip - bypass password and basic configuration, no - continue with Power On Auto Provisioning] (yes/skip/no)[no]:yes
2020 Sep  4 04:20:42 switch %$ VDC-1 %$ poap: Rolling back, please wait... (This may take 5-15 minutes)
Choose "no" to enforce a secure password standard and set the password.
---- System Admin Account Setup ----

Do you want to enforce secure password standard (yes/no) [y]:n

  Enter the password for "admin": VMware1!
  Confirm the password for "admin": VMware1!

         ---- Basic System Configuration Dialog VDC: 1 ----

This setup utility will guide you through the basic configuration of
the system. Setup configures only enough connectivity for the management
of the system.

Please register Cisco Nexus9000 Family devices promptly with your
supplier. Failure to register may affect response times for initial
service calls. Nexus9000 devices must be registered to receive
entitled support services.
Type "no" to enter the basic configuration dialog.
Would you like to enter the basic configuration dialog (yes/no): no

2020 Sep  4 04:25:04 switch %$ VDC-1 %$ %ACLQOS-SLOT1-2-ACLQOS_FAILED: ACLQOS failure: TCAM region is not configured for feature QoS class IPv4 direction ingress. Please configure TCAM region Ingress COPP [copp] and retry the command.
2020 Sep  4 04:25:04 switch %$ VDC-1 %$ %COPP-2-COPP_POLICY: Control-Plane is protected with policy copp-system-p-policy-strict.

Error: There was an error executing atleast one of the command
Please verify the following log for the command execution errors.
TCAM region is not configured. Please configure TCAM region and retry the command
Now it's time to log in with the password you just set for the "admin" user.
User Access Verification
 login: admin
Password: VMware1!

Cisco NX-OS Software
Copyright (c) 2002-2019, Cisco Systems, Inc. All rights reserved.
Nexus 9000v software ("Nexus 9000v Software") and related documentation,
files or other reference materials ("Documentation") are
the proprietary property and confidential information of Cisco
Systems, Inc. ("Cisco") and are protected, without limitation,
pursuant to United States and International copyright and trademark
laws in the applicable jurisdiction which provide civil and criminal
penalties for copying or distribution without Cisco's authorization.

Any use or disclosure, in whole or in part, of the Nexus 9000v Software
or Documentation to any third party for any purposes is expressly
prohibited except as otherwise authorized by Cisco in writing.
The copyrights to certain works contained herein are owned by other
third parties and are used and distributed under license. Some parts
of this software may be covered under the GNU Public License or the
GNU Lesser General Public License. A copy of each such license is
available at
http://www.gnu.org/licenses/gpl.html and
http://www.gnu.org/licenses/lgpl.html
***************************************************************************
*  Nexus 9000v is strictly limited to use for evaluation, demonstration   *
*  and NX-OS education. Any use or disclosure, in whole or in part of     *
*  the Nexus 9000v Software or Documentation to any third party for any   *
*  purposes is expressly prohibited except as otherwise authorized by     *
*  Cisco in writing.                                                      *
***************************************************************************
switch#
When you logged in using the console we need to set up some basic configuration to make sure the virtual NX-OS Switch will have the correct settings when it boots the next time.
We start by turning off the logging on the console.
switch# conf t
Enter configuration commands, one per line. End with CNTL/Z.
switch(config)# no logging console
Then we set the boot image.
switch(config)# dir
       4096    Sep 04 04:04:26 2020  .rpmstore/
       4096    Sep 04 04:05:14 2020  .swtam/
     646335    Sep 04 04:21:15 2020  20200904_041830_poap_32176_init.log
 1339749888    Aug 20 16:27:04 2019  nxos.9.2.4.bin
          0    Sep 04 04:25:38 2020  platform-sdk.cmd
       4096    Sep 04 04:18:27 2020  scripts/
       4096    Sep 04 04:19:17 2020  virt_strg_pool_bf_vdc_1/
       4096    Sep 04 04:17:53 2020  virtual-instance/
         59    Sep 04 04:17:44 2020  virtual-instance.conf

Usage for bootflash://
 1519652864 bytes used
 1950457856 bytes free
 3470110720 bytes total
switch(config)# boot nxos bootflash:/nxos.9.2.4.bin
Performing image verification and compatibility check, please wait....
then we configure the management IP address + gateway so we can manage the virtual NX-OS Switch through SSH next time.
switch(config)# interface mgmt 0
switch(config-if)# ip address 10.203.120.10/24
switch(config-if)# vrf context management
switch(config-vrf)# ip route 0.0.0.0/0 10.203.120.1
We also change the hostname to give it a nice name.
switch(config-vrf)# hostname LEAF
Because we want to use all ports as a routing port we can change all ports to routing ports.
LEAF(config)# interface ethernet 1/1-128
LEAF(config-if-range)# no switchport
LEAF(config-if-range)#
Save the configuration
LEAF(config-if-range)# copy run start
[########################################]  98%
STEP 7» Power off virtual Nexus Switch and disconnect the Serial Port
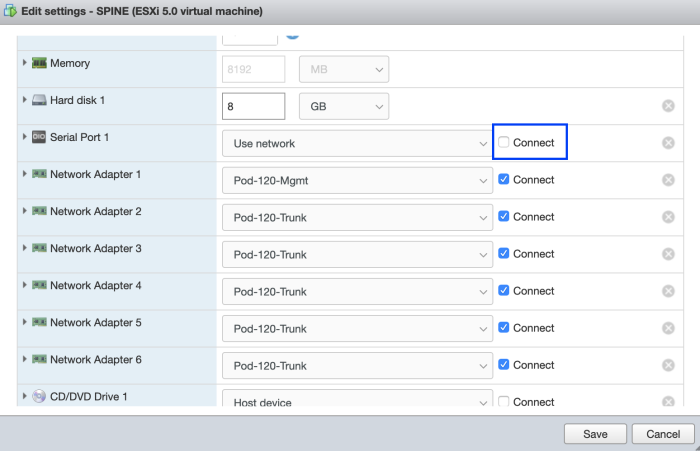
When the Virtual Machine is powered off go into the settings and uncheck the checkbox of the Serial Port so this is no longer connected to the Virtual Machine.
STEP 8» Connect through SSH to the virtual Nexus Switch
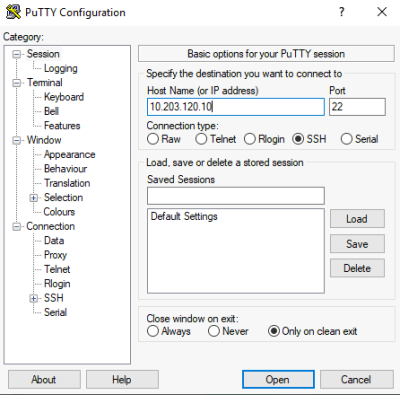
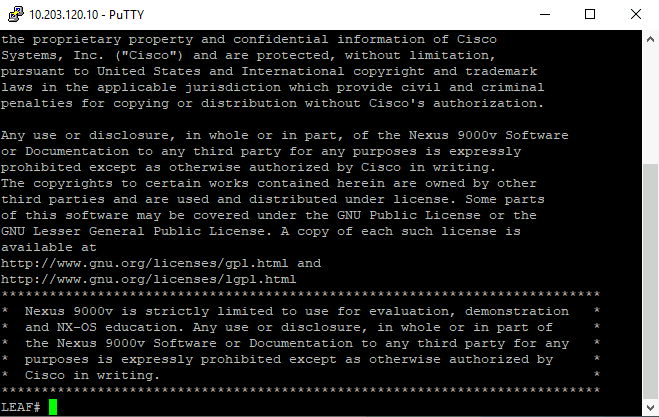
Now we can power on the virtual NX-OS Switch again and use putty again to connect to the virtual NX-OS Switch. This time we are not using Telnet, but we are using SSH and we connect to the IP address we assigned in STEP6.
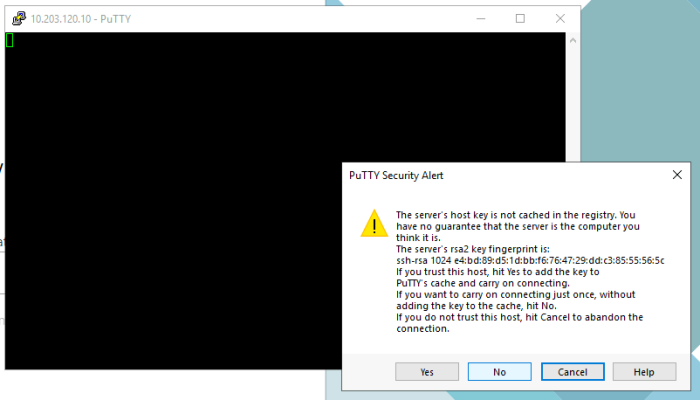
Make sure you click YES to add the certificate (when you connect to this IP address for the first time using SSH).
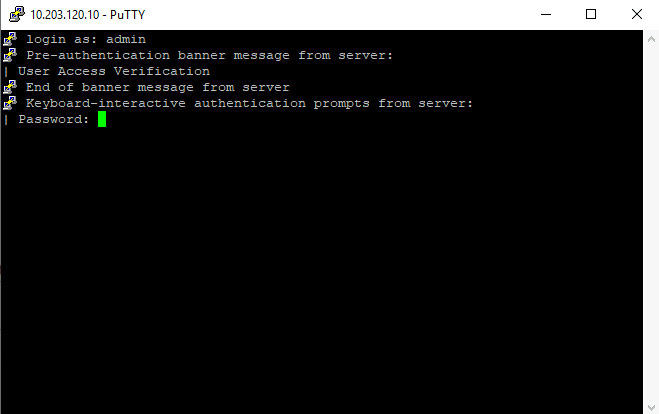
Type in your credentials.
And we are now logged in into our virtual NX-OS Switch.
The output will look like this:
User Access Verification
Password:

Cisco NX-OS Software
Copyright (c) 2002-2019, Cisco Systems, Inc. All rights reserved.
Nexus 9000v software ("Nexus 9000v Software") and related documentation,
files or other reference materials ("Documentation") are
the proprietary property and confidential information of Cisco
Systems, Inc. ("Cisco") and are protected, without limitation,
pursuant to United States and International copyright and trademark
laws in the applicable jurisdiction which provide civil and criminal
penalties for copying or distribution without Cisco's authorization.

Any use or disclosure, in whole or in part, of the Nexus 9000v Software
or Documentation to any third party for any purposes is expressly
prohibited except as otherwise authorized by Cisco in writing.
The copyrights to certain works contained herein are owned by other
third parties and are used and distributed under license. Some parts
of this software may be covered under the GNU Public License or the
GNU Lesser General Public License. A copy of each such license is
available at
http://www.gnu.org/licenses/gpl.html and
http://www.gnu.org/licenses/lgpl.html
***************************************************************************
*  Nexus 9000v is strictly limited to use for evaluation, demonstration   *
*  and NX-OS education. Any use or disclosure, in whole or in part of     *
*  the Nexus 9000v Software or Documentation to any third party for any   *
*  purposes is expressly prohibited except as otherwise authorized by     *
*  Cisco in writing.                                                      *
***************************************************************************
LEAF#
I am always trying to improve the quality of my articles so if you see any errors, mistakes in this article or you have suggestions for improvement, please contact me and I will fix this.


