Assigning an IP address to a second interface on an Oracle Linux Instance
This tutorial provides step-by-step instructions on assigning an IP address to a secondary network interface on an Oracle Linux instance. Whether you are expanding your network configuration or setting up a specific routing policy, adding and configuring a second interface is a critical skill.
You'll learn how to:
- Identify the available network interfaces.
- Configure the secondary interface with a static or dynamic IP address.
- Update network configuration files for persistence across reboots.
- Verify the configuration and ensure connectivity.
By the end of this guide, you’ll be able to extend the networking capabilities of your Oracle Linux instance confidently, enabling it to interact seamlessly across multiple subnets or networks.
Objectives
In this tutorial, you will learn how to assign an IP address to a second network interface on an Oracle Linux instance. By the end of this guide, you will:
- Understand the configuration files involved in setting up a secondary network interface.
- Learn how to assign a static IP address to the second interface.
- Verify the connectivity and proper functionality of the newly configured interface.
Prerequisites
- VCN
- 2 x Subnets
The Steps Summary
- [ ] STEP 01 Create a new Instance
- [ ] STEP 02 Add second vNIC to the Instance
- [ ] STEP 03 METHOD 01 Use OCI CLI (oci-utils) to assign an IP address to the second interface of an OCI Instance (using the oci-network-config command)
- [ ] STEP 04 METHOD 02 Use OCI CLI (oci-utils) to assign an IP address to the second interface of an OCI Instance (using the ocid daemon)
- [ ] STEP 05 METHOD 03 Use the OCI_Multi_VNIC_Setup script
- [ ] STEP 06 METHOD 04 Create the interface config file manually for the new VNIC in the
/etc/sysconfig/network-scripts/folder
For a comprehensive and practical learning experience, start with Method 1 or Method 2, as these leverage OCI-native tools and provide a straightforward setup. As you gain familiarity, explore Method 3 for scripting and automation, and finally, try Method 4 for advanced manual configurations.
STEP 01 - Create a new Instance
In this section, we will create a new instance in the OCI cloud environment.
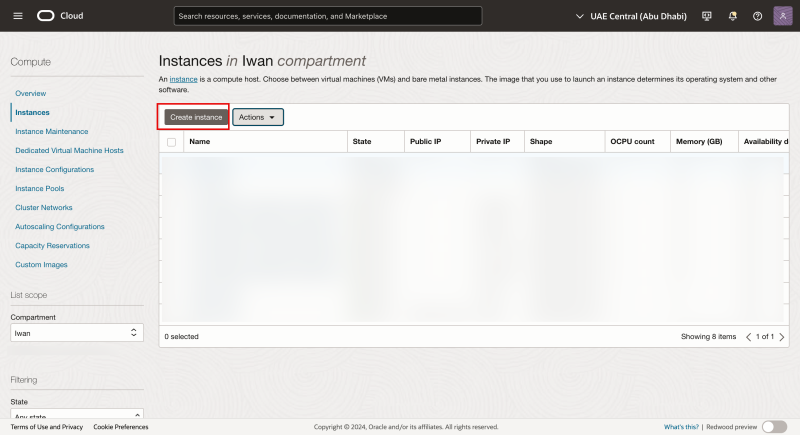
- Use the hamburger menu to navigate to through Compute > Instances.
- Click on the Create instance button.
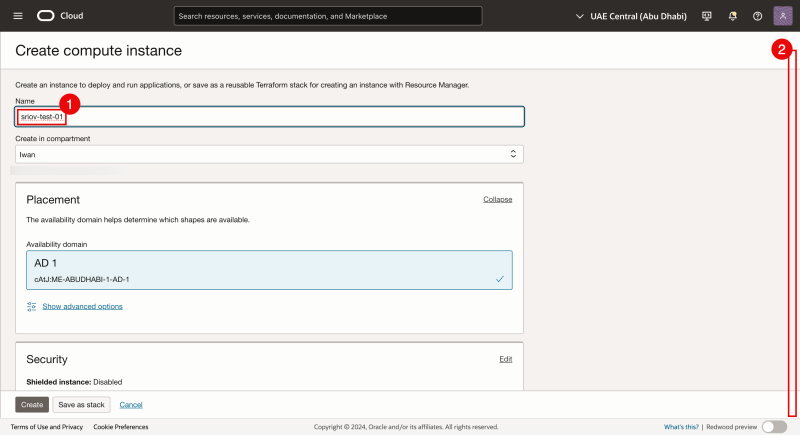
- Specify a name for the instance (we will use sriov-test-01)
- Scroll down.
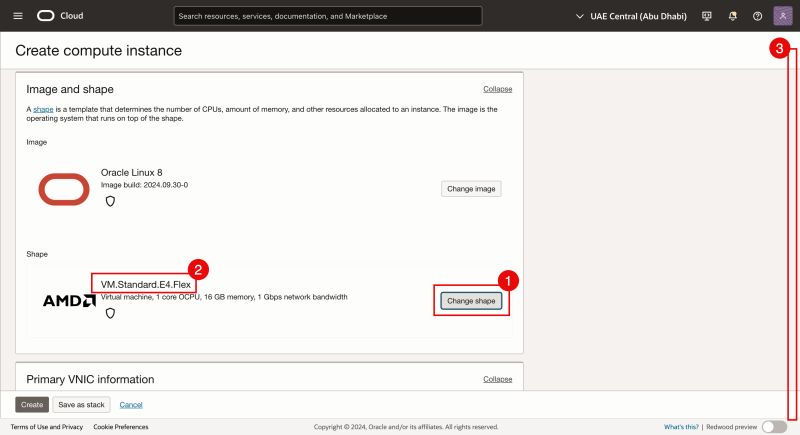
- We will change the shape:
- to VM.STandard.E4.Flex (but if you want to use E5 you can).
- Scroll down.
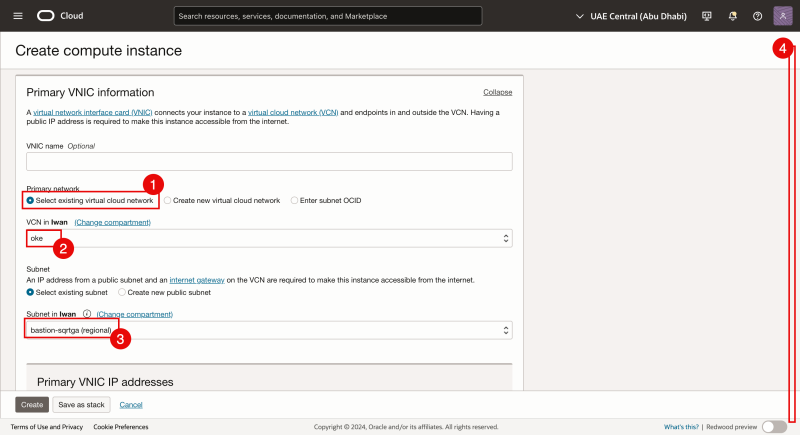
- We are using an existing VCN.
- Select the VCN (we are using the oke VCN).
- Select the existing Subnet (for the primary vNIC).
- Scroll down.
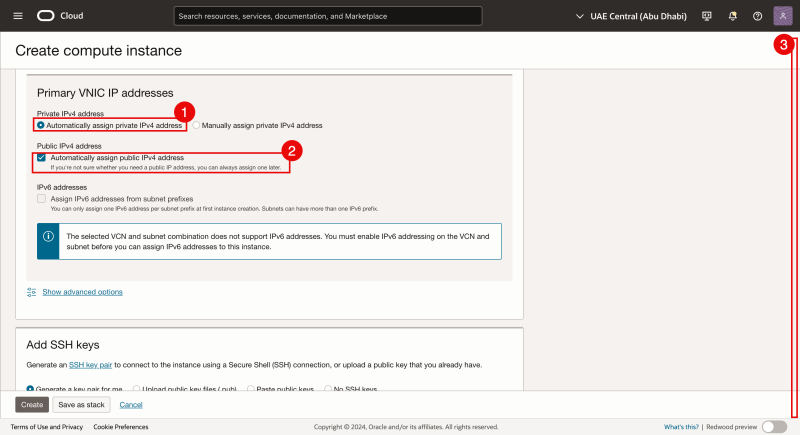
- For (first) vNIC interface IP address we select to Automatically assign the private IPv4 address.
- As we selected a public subnet for the primary interface we select 'Automatically assign the public IPv4 address*
- Scroll down.
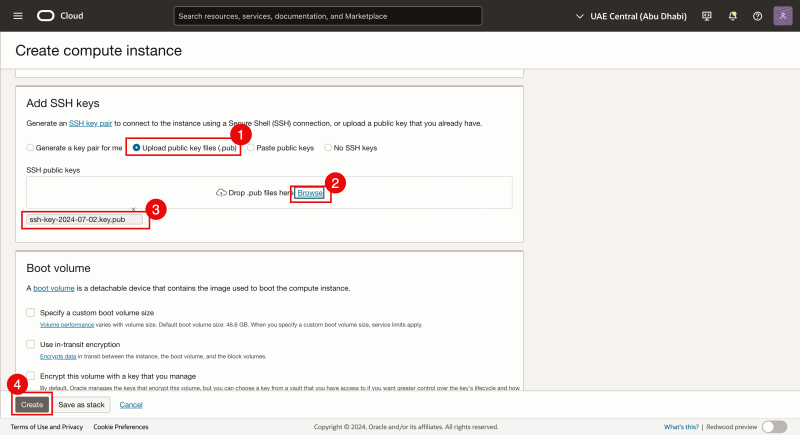
- We will use/upload existing (previously generated) public and private SSH keys.
- Click on Browse to select the existing public key.
- Verify if the existing public key is selected for upload.
- Click on the Create button.
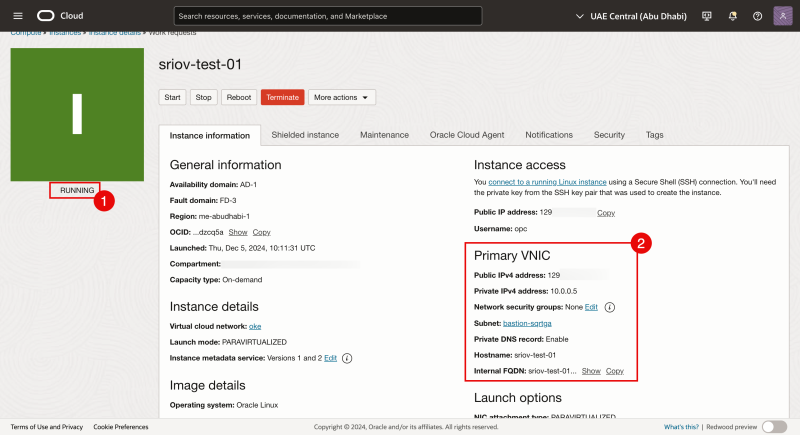
- If the instance is deployed successfully the status will be showing RUNNING.
- Notice that the primary VNIC is configured and the IP address is assigned automatically.
STEP 02 - Add second vNIC to the Instance
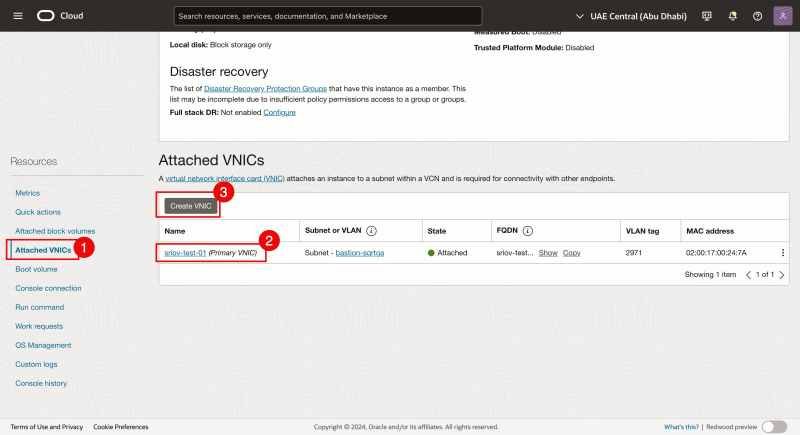
- Scroll down (after we created the instance) and click on Attached VNICs.
- Notice that there in only one VNIC and we renamed this to sr-iov-test-01 (the default name that OCI provides is different).
- Click on the Create VNIC button.
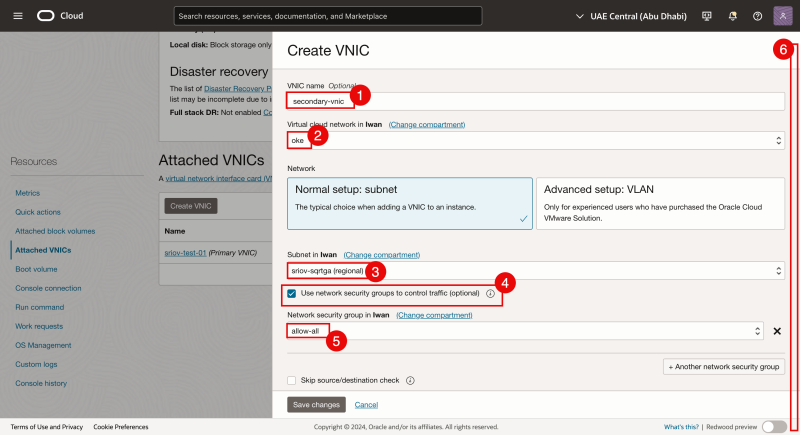
- Specify a name for the second VNIC (we will use secondary-vnic)
- Select the VCN (we are using the oke VCN).
- Select the existing Subnet (for the secondary vNIC) This is a different Subnet than that the Primary VNIC is attached to.
- Enable the checkbox to Use network security groups.
- We creates a Network Security Group up front that allows all ingress and egress traffic. Select this group.
- Scroll down.
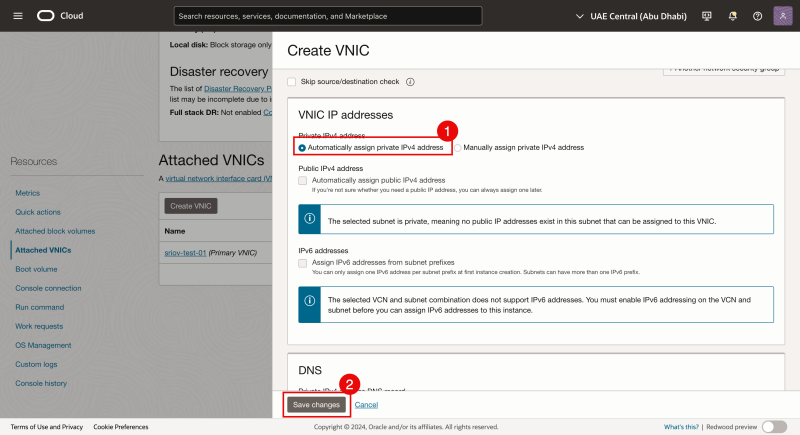
Step 5 and 6 are optional.
- For (second) vNIC interface IP address we select to Automatically assign the private IPv4 address.
- Click on the Save changes button.
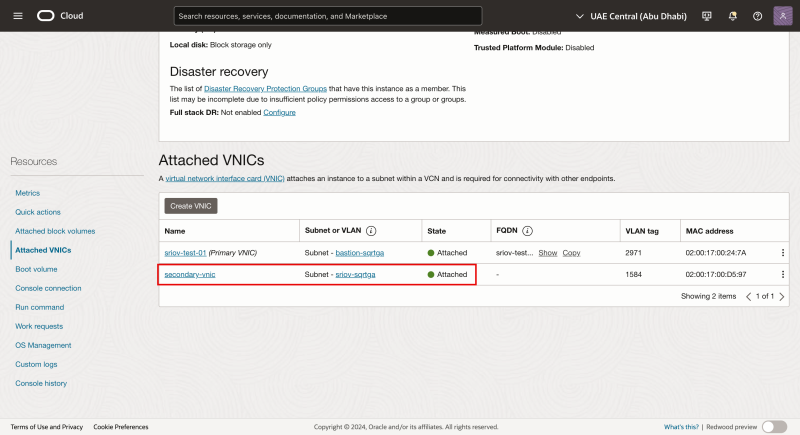
- Notice that the second VNIC is now created and attached to the instance and the other Subnet.
Even tough we have selected the option that the second VNIC should automatically get an IP address from OCI the Operating System (Oracle Linux) will not configure the IP address on the VNIC. The IP address is reserved by the OCI console, but is not configured yet.
The configuration of the IP address on the second VNIC can be done with multiple methods.
- Use OCI CLI (oci-utils) to assign an IP address to the second interface of an OCI Instance (using the [oci-network-config command])
- Use OCI CLI (oci-utils) to assign an IP address to the second interface of an OCI Instance (using the [ocid daemon])
- Use the [OCI_Multi_VNIC_Setup script]
- Create the interface config file manually for the new VNIC in the
/etc/sysconfig/network-scripts/folder.
In the steps below we will test them out one by one.
STEP 03 - METHOD 01 - Use OCI CLI oci-utils to assign an IP address to the second interface of an OCI Instance
Method 1 - Test with a new clean Instance sriov-test-04
I have created a new instance named "sriov-test-04" that I will be using to configure the IP address for the second VNIC using the OCI CLI (oci-utils). I will assign an IP address to the second interface of my OCI Instance (using the [oci-network-config command]).
Prerequisites
- Provisioned a new Instance
- Added a second VNIC
Configure IP address on the second interface
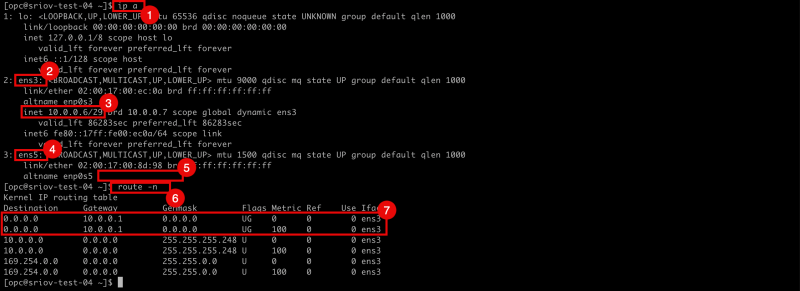
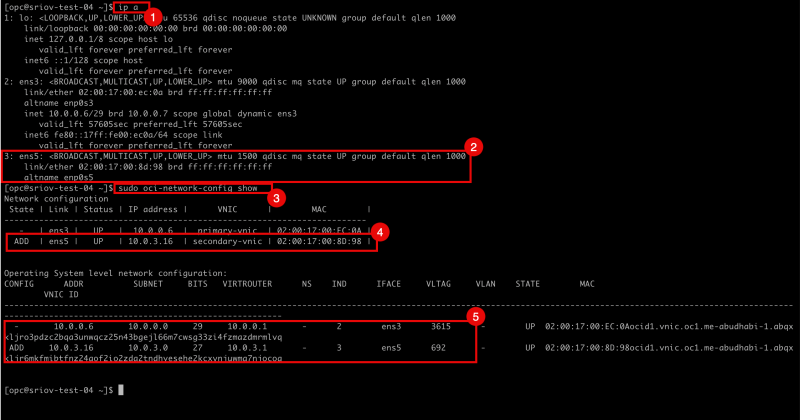
- Issue the
ip acommand to retrieve the IP address from all the interfaces. - Notice the
ens3interface. - Notice that the
ens3interface has an IP address configured. - Notice the
ens5interface. - Notice that the
ens5interface has NO IP address configured. - Issue the
route -ncommand to retrieve all the routes (and default gateways) for all interfaces. - Notice that there is only a gateway available for the
ens3interface.
The following commands where used to "test" if the oci-utils commands are working out of the box.
- Issue the command
sudo oci-compartementidto retrieve the OCID for the compartment where the Instance is part of. - Issue the command
sudo oci-instanceidto retrieve the OCID for the Instance.
Here we have proven that oci-utils commands are working out of the box.
- Issue the command
sudo oci-network-config showto retrieve all network configuration from the instance. - Notice the error:
Cannot show information: Failed to get API session.The information regarding the VNICS of the instance will not be provided on Operating System Level and not on OCI level. - Notice the Operating System Level information on the
ens3interface. - Notice the Operating System Level information on the
ens5interface. - Notice the
ADDflag for the interfaceens5.
To configure the ens5 interface that currently is flagged with ADD we need to issue the OCI CLI command sudo oci-network-config configure.
This is not possible as we will get the same error when we issue the command oci-network-config show that is Cannot show information: Failed to get API session.
Why are we getting this error?
- A VCN is not an object owned by an instance, which means the instance cannot directly access VCN information without proper authentication.
- To enable the instance to fetch VCN details from the API, you must create a dynamic group that includes the instance and assign a policy granting the necessary permissions.
To enable an Oracle Cloud Infrastructure (OCI) instance to fetch Virtual Cloud Network (VCN) details via API, the following steps are typically required:
- Create a Dynamic Group: This dynamic group includes the instance(s) that require access to the API. You define the group using rules based on attributes like instance OCID or compartment.
- Assign Permissions with a Policy: You need to create an Identity and Access Management (IAM) policy that grants the dynamic group permission to read or manage VCN-related resources. For example:
allow dynamic-group <dynamic-group-name> to read virtual-network-family in compartment <compartment-name>
- Use Instance Principals for Authentication: Instances in the dynamic group authenticate directly using their identity, allowing secure API access without embedding credentials in the application. This method simplifies security management while maintaining robust access control.
Let's try it out.
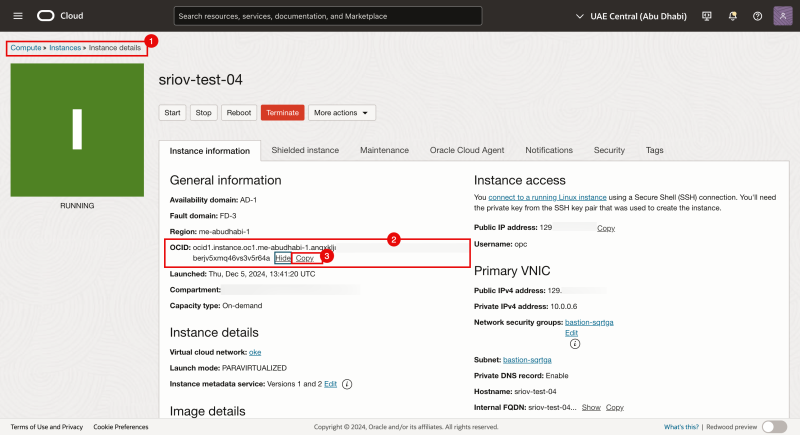
- Click on the hamburger menu by navigating through Compute > Instance and click on the compute instance you want to issue the commands
sudo oci-network-config showandsudo oci-network-config configureon. - Click on show to display the Instance OCID value.
- Click on copy the copy the Instance OCID value.
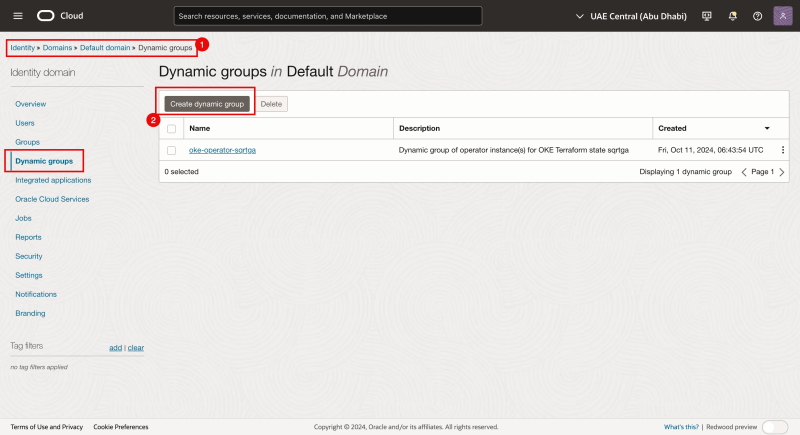
- Click on the hamburger menu by navigating through Identity > Domains > Default domain > Dynamic groups.
- Click on the Create dynamic group button.
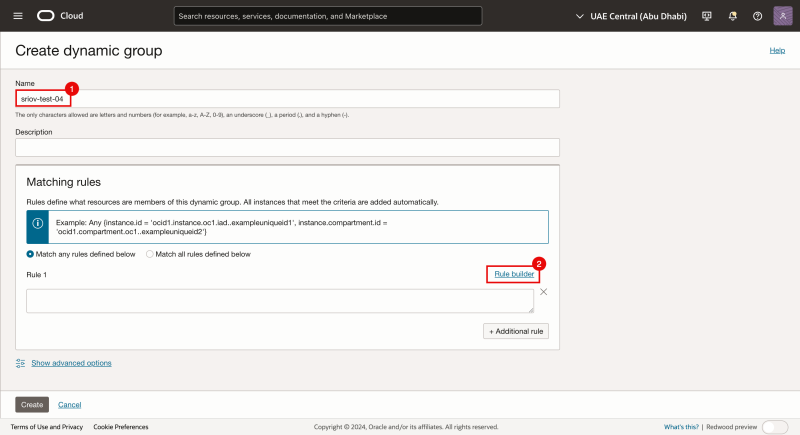
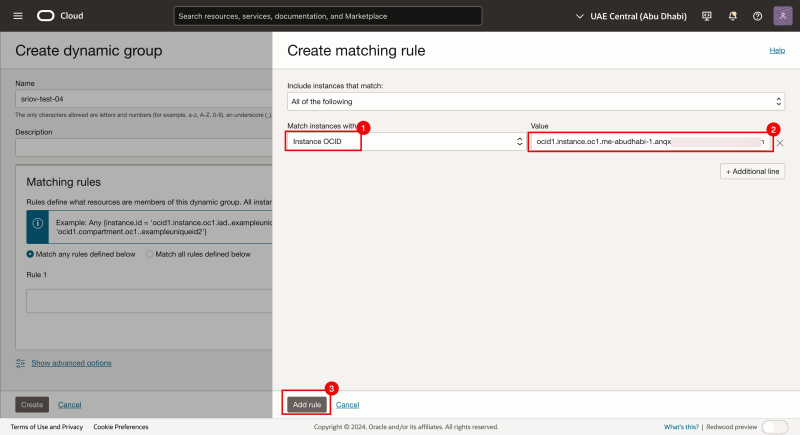
- Specify a name for the Dynamic group (we will use sriov-test-04)
- Click on rule builder.
- Match instances with Instance OCID.
- Paste the the OCID value of the instance (that we just copied)
- Click on the Add rule button.
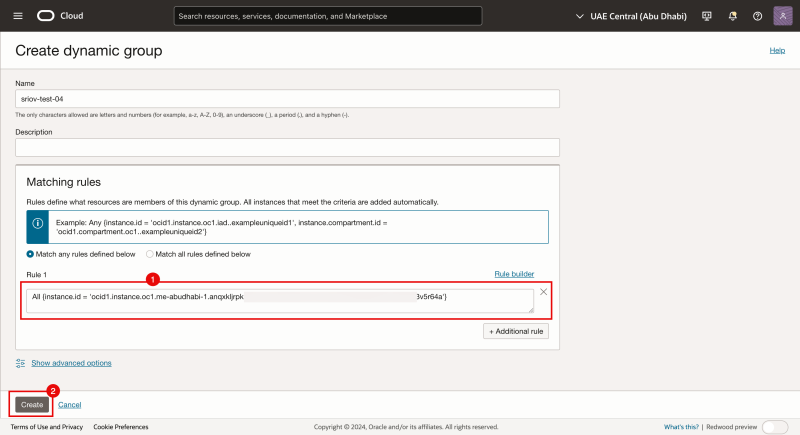
- Notice that a new rule is added to the group.
- Click on the Create button.
Now that we have the group where the instance is now part of, we need to create a policy inside the compartements where the Instance is part of to allow that instances in this group are allowed to perform operations on VCN objects (like subnets).
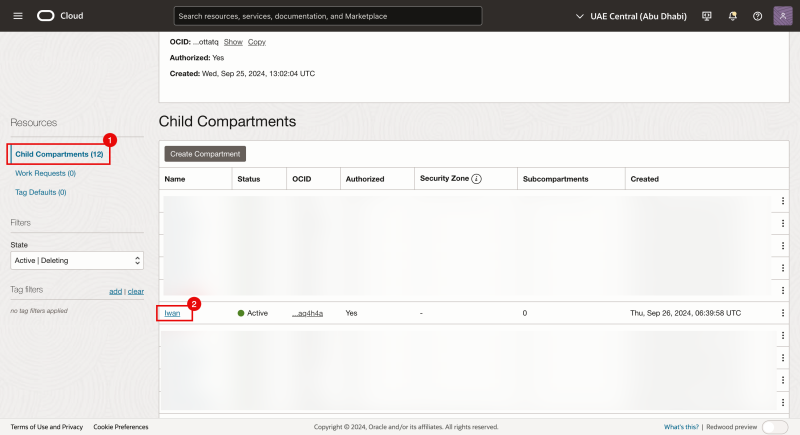
In our case this is oraseemeaocids4 > NETWORK > Iwan
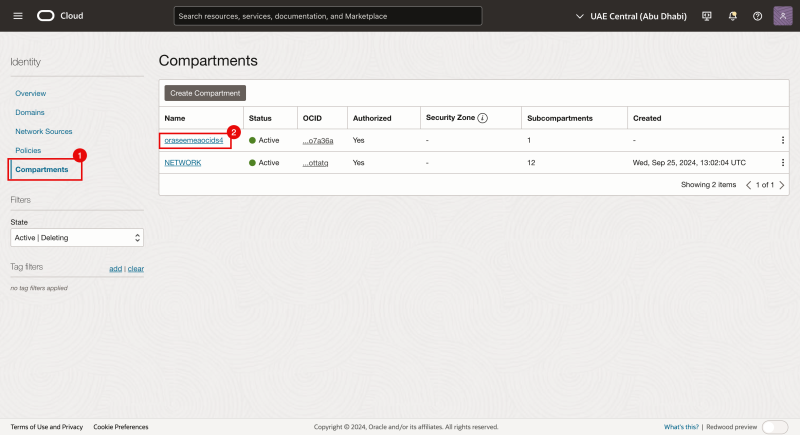
- Click on the hamburger menu by navigating through Identity > Compartments
- Click on the root compartment (in our case this is oraseemeaocids4).
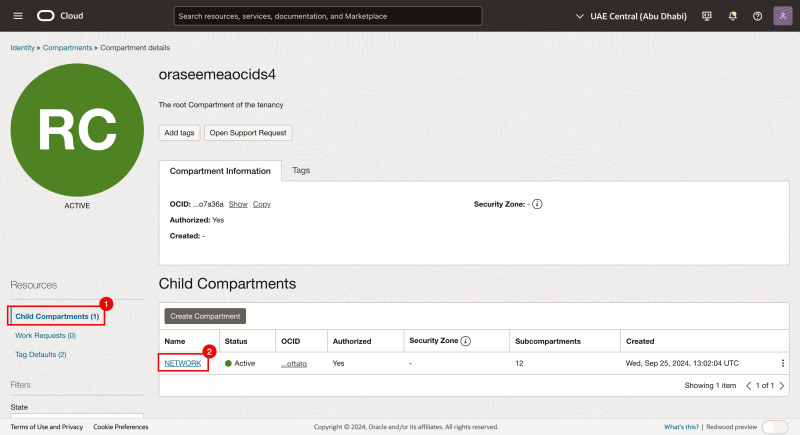
- Notice that we are now in the child compartments.
- Click on the next child compartment (in our case this is NETWORK).
- Notice that we are now in the next child compartments.
- Click on the next child compartment (in our case this is Iwan).
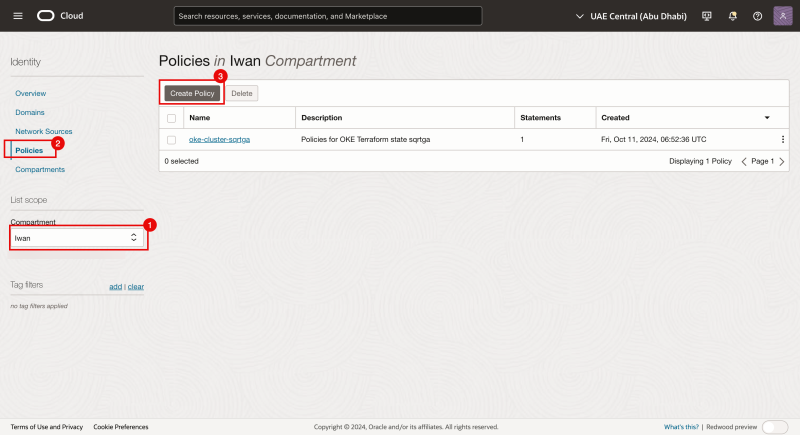
- Make sure the right compartment is selected.
- Click on Policies.
- Click on the Create Policy button.
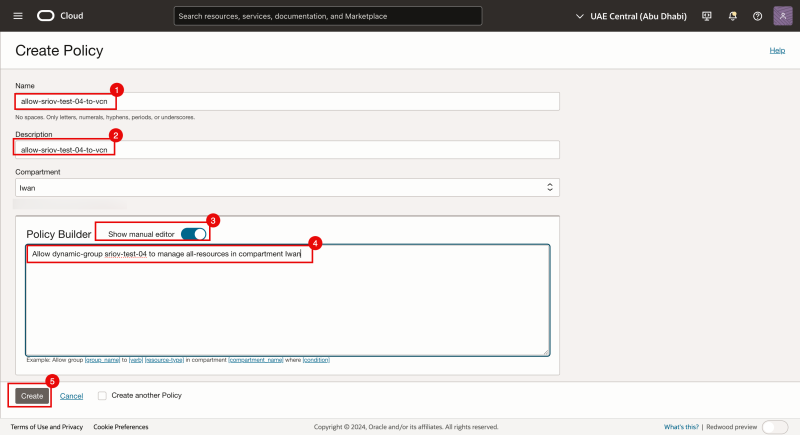
- Specify a name for the Policy (we will use allow-sriov-test-04-to-vcn).
- Specify a description for the Policy (we will use allow-sriov-test-04-to-vcn).
- Toggle the Show manual editor to on.
- Specify the following policy
allow dynamic-group sriov-test-04 to manage all-resources in compartment Iwan - Click on the Create button.
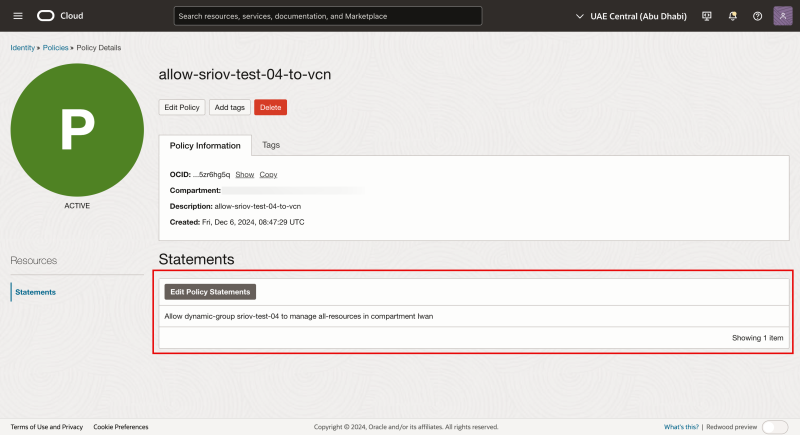
Notice the new Policy statement inside the newly created policy.
Now that we have allowed the instance to perform API calls (through OCI CLI) to the VCN, lets jump back on the instance.
- Issue the
ip acommand to retrieve the IP address from all the interfaces. - Notice that the
ens5interface has NO IP address configured. - Issue the command
sudo oci-network-config showto retrieve all network configuration from the instance on OCI level. Notice that the error is now gone. - Notice the OCI Level information on the
ens5interface and theADDflag for the interfaceens5. - Notice the Operating System Level information on the
ens3andens5interfaces.
Before we issue the sudo oci-network-config configure command to configure the IP address of the second VNIC we need to create a new directory (/etc/iproute2) and a new file (/etc/iproute2/rt_tables).
This is required so that the system can correctly configure the routing and default gateway for this new interface.
The /etc/iproute2/rt_tables file is used to define and manage multiple routing tables in Linux, enabling policy-based routing. It maps human-readable names to routing table numbers, allowing advanced setups like routing specific traffic through different gateways, interfaces, or ISPs.
- Create a new
/etc/iproute2directory with the commandsudo mkdir -p /etc/iproute2 - Create the
rt_tablesfile with the commandsudo touch /etc/iproute2/rt_tables
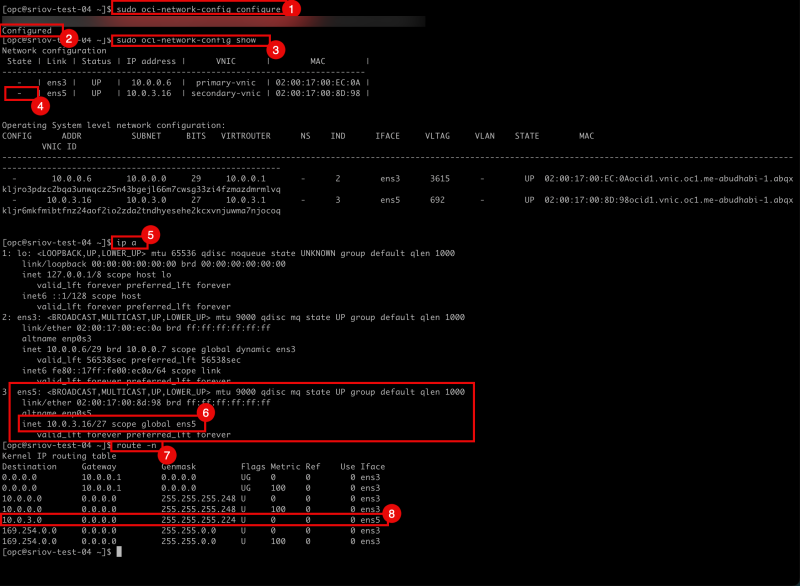
- Issue the
sudo oci-network-config configurecommand to configure the IP address of the second VNIC. - Notice the Configured message.
- Issue the command
sudo oci-network-config showto retrieve all network configuration from the instance on OCI level. - Notice the OCI Level information on the
ens5interface and theADDflag for the interfaceens5is now gone. - Issue the
ip acommand to retrieve the IP address from all the interfaces. - Notice that the
ens5interface now has an IP address configured. - Issue the
route -ncommand to retrieve all the routes (and default gateways) for all interfaces. - Notice that the gateway is now available for the
ens5interface.
- Issue the command
more /etc/iproute2/rt_tablesto verify it a new entry is made. - Notice the
11 ortentry. - Issue the command
ip route show table 11to review the routing table for this mapping. - Notice that there is a default route for the interface
ens5the new second VNIC on the instance.
STEP 04 - METHOD 02 - Use OCI CLI oci-utils to assign an IP address to the second interface of an OCI Instance using the ocid daemon
Method 2 Test with a new clean Instance sriov-test-01
I have created a new instance named "sriov-test-01" that I will be using to configure the IP address for the second VNIC using the [ocid daemon].
Prerequisites
- Provisioned a new Instance
- Added a second VNIC
Configure IP address on the second interface
- Issue the
ip acommand to retrieve the IP address from all the interfaces. - Notice that the
ens5interface has NO IP address configured.
- Issue the
route -ncommand to retrieve all the routes (and default gateways) for all interfaces. - Notice that there is only a gateway available for the
ens3interface.
- Issue the (filtered) command
ip -f inet -o addrto show all configured IP addresses on all interfaces. - Notice that there is only configured interface and IP address is the
ens3interface.
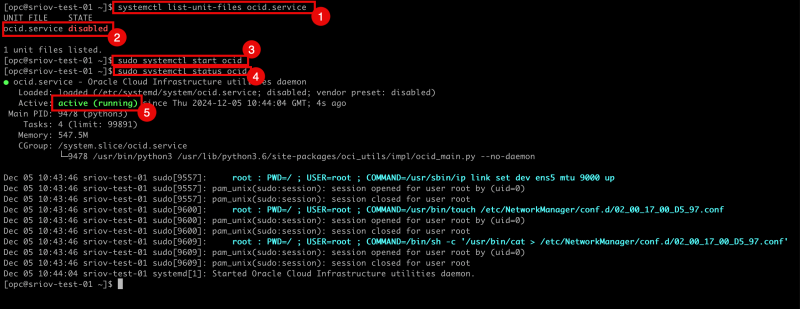
- Issue the command
systemctl list-unit-files ocid.serviceto verify if the OCID daemon is enabled. Notice that the - Notice that the OCID daemon is disabled.
- Issue the command
sudo systemctl start ocidto start the OCID daemon. - Issue the command
sudo systemctl status ocidto verify the status of the the OCID daemon. - Notice that the OCID daemon is active and running.
- Issue the (filtered) command
ip -f inet -o addrto show all configured IP addresses on all interfaces. - Notice that
ens5interface is now configured and has an IP address.
- Issue the
ip acommand to retrieve the IP address from all the interfaces. - Notice that the
ens5interface now has an IP address configured.
- Issue the
route -ncommand to retrieve all the routes (and default gateways) for all interfaces. - Notice that the gateway is now available for the
ens5interface.
- To make sure the OCID service is automatically starting after a reboot issue this command
sudo systemctl enable ocid
Just like we did in method 1 we also need to create a new directory (/etc/iproute2) and a new file (/etc/iproute2/rt_tables).
This is required so that the system can correctly configure the routing and default gateway for this new interface.
The /etc/iproute2/rt_tables file is used to define and manage multiple routing tables in Linux, enabling policy-based routing. It maps human-readable names to routing table numbers, allowing advanced setups like routing specific traffic through different gateways, interfaces, or ISPs.
- Create a new
/etc/iproute2directory with the commandsudo mkdir -p /etc/iproute2 - Create the
rt_tablesfile with the commandsudo touch /etc/iproute2/rt_tables
- Issue the
sudo rebootcommand
- Issue the command
more /etc/iproute2/rt_tablesto verify it a new entry is made. - Notice the
11 ort3entry. - Issue the command
ip route show table 11to review the routing table for this mapping. - Notice that there is a default route for the interface
ens5the new second VNIC on the instance.
STEP 05 - METHOD 03 - Use the OCI_Multi_VNIC_Setup script
Method 3 Test with a new clean Instance sriov-test-02
I have created a new instance named "sriov-test-02" that I will be using to configure the IP address for the second VNIC using the [OCI_Multi_VNIC_Setup script].
Prerequisites
- Provisioned a new Instance
- Added a second VNIC
Configure IP address on the second interface
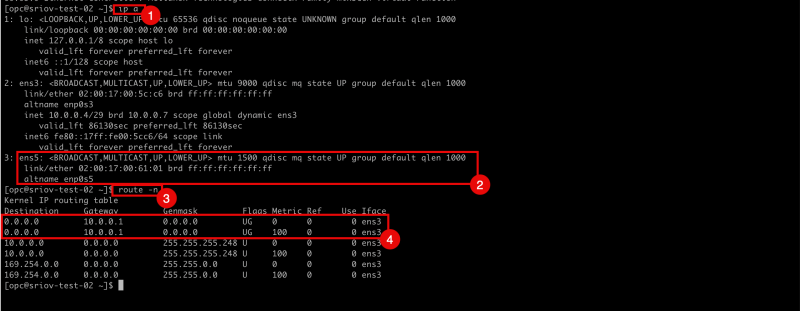
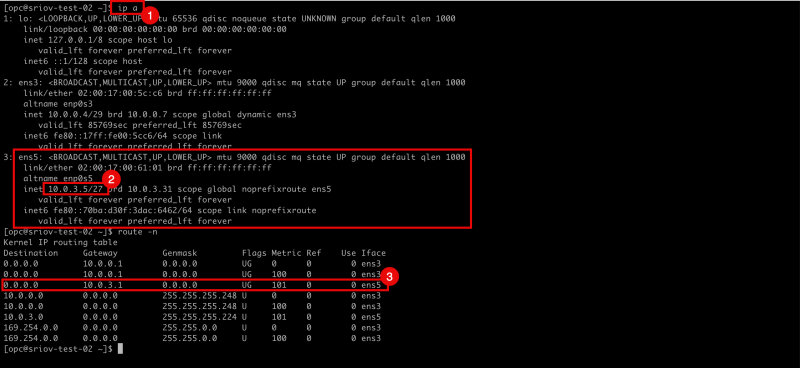
- Issue the
ip acommand to retrieve the IP address from all the interfaces. - Notice that the
ens5interface has NO IP address configured. - Issue the
route -ncommand to retrieve all the routes (and default gateways) for all interfaces. - Notice that there is only a gateway available for the
ens3interface.
- Download the
OCI_Multi_VNIC_Setup.shscript with the curl commandcurl -o OCI_Multi_VNIC_Setup.sh https://raw.githubusercontent.com/Olygo/OCI_Multi_VNIC_Setup/refs/heads/main/OCI_Multi_VNIC_Setup.sh - Use the command
ls -lto list all the files. - Notice that the script
CI_Multi_VNIC_Setup.shis downloaded sucessfully. - Make the downloaded script executable with the command
chmod +x ./OCI_Multi_VNIC_Setup.sh - Execute the script with the command
sudo ./OCI_Multi_VNIC_Setup.sh
Before we continue with the script we first need to gather some information from the OCI console that we need to use as the input when we run the script.
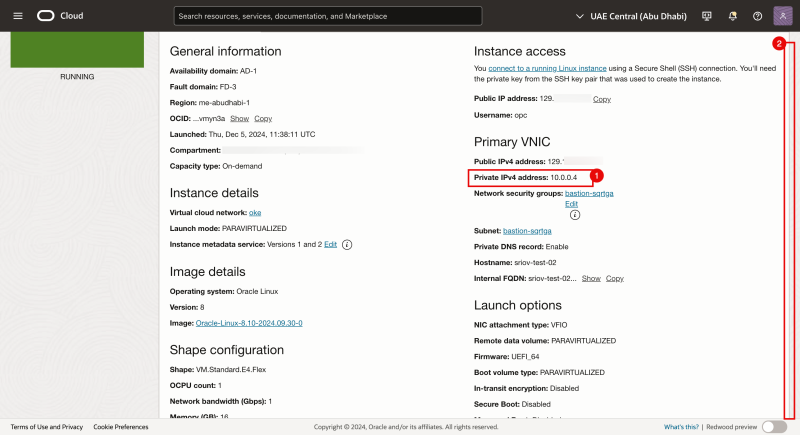
- Go the the Instance details (in the OCI Console) and make a note of the IP address of the primary inteface.
- Scroll down.
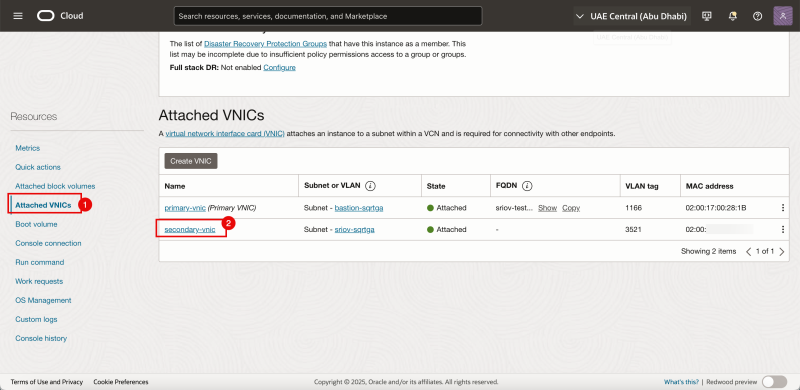
- Click on Attached VNICs.
- Click on the second VNIC.
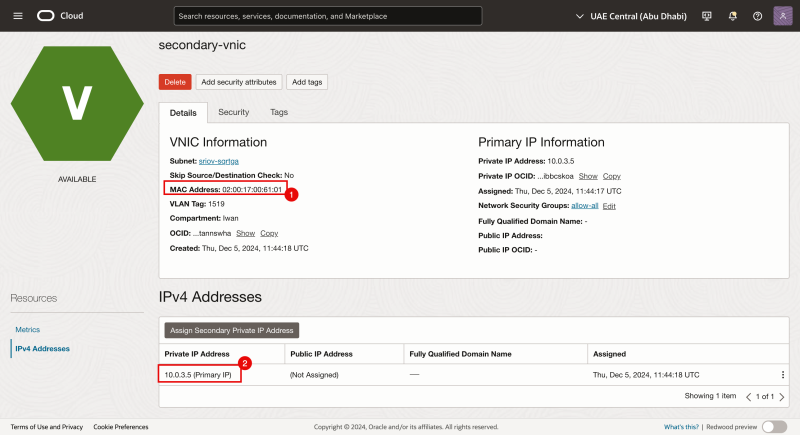
- Make a note of the MAC address of the second VNIC.
- Make a note of the IP address of the second VNIC.
Even tough the IP address is not configured on the Instance Operating System, the IP address is already reserved by the OCI Management Console.
Based on the IP address and subnet information we need to figure out what the default gateway is for that subnet as the script will ask for this information.
The OCI console for not provide any details of the default gateway, but this is typically the first usable IP address in the subnet.
With this information we have the following information gathered:
| Primary interface (ens3) | Secondary interface (ens5) | |
|---|---|---|
| IPv4 subnet: | 10.0.0.0/29 | 10.0.3.0/27 |
| IPv4 address: | 10.0.0.4 | 10.0.3.5/27 |
| IPv4 gateway: | 10.0.0.1 | 10.0.3.1 |
| MAC address: | Not required for script | 02:00:17:00:61:01 |
- Specify the primary VNIC name as
ens3. - Specify the primary VNIC IP as
10.0.0.4. - Specify the primary VNIC Gateway as
10.0.0.1. - Specify the secondary VNIC name as
ens5. - Specify the secondary VNIC IP as
10.0.3.5/27with full CIDR Notation. - Specify the secondary VNIC MAC address as
02:00:17:00:61:01. - This interface will be part of a different subnet so type in
yhere. - Specify the secondary VNIC Gateway as
10.0.3.1.
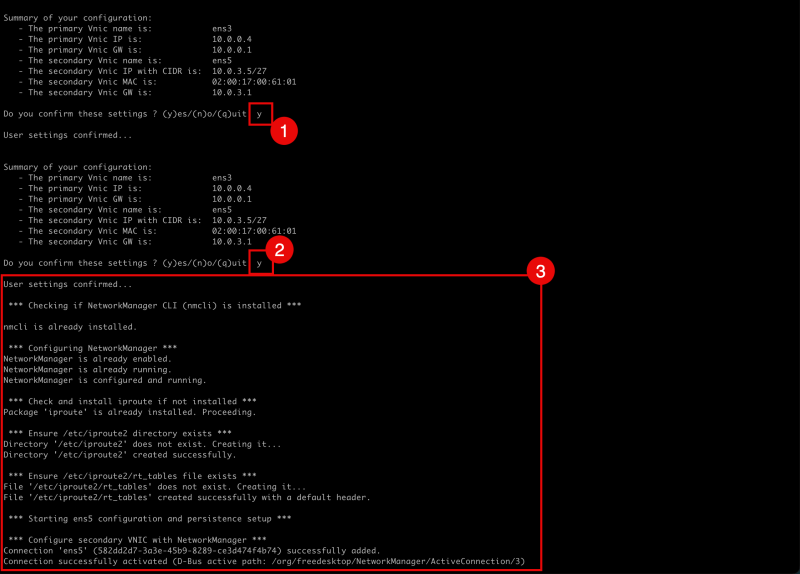
- Verify the information and if this is all correct confirm with
y. - Confirm the settings again with
y. - Notice that the script will start the interface configuration and will provide status updates while doing this.
The full output of the status messages are given below:
Summary of your configuration:
* The primary Vnic name is:            ens3
* The primary Vnic IP is:              10.0.0.4
* The primary Vnic GW is:              10.0.0.1
* The secondary Vnic name is:          ens5
* The secondary Vnic IP with CIDR is:  10.0.3.5/27
* The secondary Vnic MAC is:           02:00:17:00:61:01
* The secondary Vnic GW is:            10.0.3.1

Do you confirm these settings ? (y)es/(n)o/(q)uit: y

User settings confirmed...


Summary of your configuration:
* The primary Vnic name is:            ens3
* The primary Vnic IP is:              10.0.0.4
* The primary Vnic GW is:              10.0.0.1
* The secondary Vnic name is:          ens5
* The secondary Vnic IP with CIDR is:  10.0.3.5/27
* The secondary Vnic MAC is:           02:00:17:00:61:01
* The secondary Vnic GW is:            10.0.3.1

Do you confirm these settings ? (y)es/(n)o/(q)uit: y

User settings confirmed...

 ''''' Checking if NetworkManager CLI (nmcli) is installed '''''

nmcli is already installed.

 ''''' Configuring NetworkManager '''''
NetworkManager is already enabled.
NetworkManager is already running.
NetworkManager is configured and running.

 ''''' Check and install iproute if not installed '''''
Package 'iproute' is already installed. Proceeding.

 ''''' Ensure /etc/iproute2 directory exists '''''
Directory '/etc/iproute2' does not exist. Creating it...
Directory '/etc/iproute2' created successfully.

 ''''' Ensure /etc/iproute2/rt_tables file exists '''''
File '/etc/iproute2/rt_tables' does not exist. Creating it...
File '/etc/iproute2/rt_tables' created successfully with a default header.

 ''''' Starting ens5 configuration and persistence setup '''''

 ''''' Configure secondary VNIC with NetworkManager '''''
Connection 'ens5' (582dd2d7-3a3e-45b9-8289-ce3d474f4b74) successfully added.
Connection successfully activated (D-Bus active path: /org/freedesktop/NetworkManager/ActiveConnection/3)

 ''''' Enable IP forwarding and configure reverse path filtering '''''
= Enable IP forwarding =
net.ipv4.ip_forward=1

= Configure reverse path filtering =
net.ipv4.conf.all.rp_filter=2
net.ipv4.conf.default.rp_filter=2
net.ipv4.conf.ens3.rp_filter=2
net.ipv4.conf.ens5.rp_filter=2

 ''''' Apply sysctl settings immediately '''''
kernel.unknown_nmi_panic = 1
net.ipv4.ip_forward = 1
net.ipv4.conf.all.rp_filter = 2
net.ipv4.conf.default.rp_filter = 2
net.ipv4.conf.ens3.rp_filter = 2
net.ipv4.conf.ens5.rp_filter = 2

 ''''' Adding custom routing tables '''''
100 vnic_1
200 vnic_2

 ''''' Adding IP rules and routes '''''

 ''''' Creating policy routing persistence script '''''

 ''''' Creating systemd service for policy routing '''''
Created symlink /etc/systemd/system/multi-user.target.wants/policy-routing.service → /etc/systemd/system/policy-routing.service.

 ''''' Testing connectivity '''''
PING 10.0.0.4 (10.0.0.4) 56(84) bytes of data.
64 bytes from 10.0.0.4: icmp_seq=1 ttl=64 time=0.059 ms
64 bytes from 10.0.0.4: icmp_seq=2 ttl=64 time=0.037 ms
64 bytes from 10.0.0.4: icmp_seq=3 ttl=64 time=0.031 ms
64 bytes from 10.0.0.4: icmp_seq=4 ttl=64 time=0.027 ms

--- 10.0.0.4 ping statistics ---
4 packets transmitted, 4 received, 0% packet loss, time 3073ms
rtt min/avg/max/mdev = 0.027/0.038/0.059/0.013 ms
PING 10.0.3.5 (10.0.3.5) 56(84) bytes of data.
64 bytes from 10.0.3.5: icmp_seq=1 ttl=64 time=0.026 ms
64 bytes from 10.0.3.5: icmp_seq=2 ttl=64 time=0.022 ms
64 bytes from 10.0.3.5: icmp_seq=3 ttl=64 time=0.023 ms
64 bytes from 10.0.3.5: icmp_seq=4 ttl=64 time=0.035 ms

--- 10.0.3.5 ping statistics ---
4 packets transmitted, 4 received, 0% packet loss, time 3069ms
rtt min/avg/max/mdev = 0.022/0.026/0.035/0.007 ms
PING 10.0.0.1 (10.0.0.1) 56(84) bytes of data.
64 bytes from 10.0.0.1: icmp_seq=1 ttl=64 time=0.098 ms
64 bytes from 10.0.0.1: icmp_seq=2 ttl=64 time=0.097 ms
64 bytes from 10.0.0.1: icmp_seq=3 ttl=64 time=0.067 ms
64 bytes from 10.0.0.1: icmp_seq=4 ttl=64 time=0.060 ms

--- 10.0.0.1 ping statistics ---
4 packets transmitted, 4 received, 0% packet loss, time 3069ms
rtt min/avg/max/mdev = 0.060/0.080/0.098/0.019 ms

 ''''' Network configuration completed '''''

IP rules:
0:	from all lookup local
32764:	from 10.0.3.5 lookup vnic_2
32765:	from 10.0.0.4 lookup vnic_1
32766:	from all lookup main
32767:	from all lookup default

user $ nmcli device show ens5

GENERAL.DEVICE:                         ens5
GENERAL.TYPE:                           ethernet
GENERAL.HWADDR:                         02:00:17:00:61:01
GENERAL.MTU:                            9000
GENERAL.STATE:                          100 (connected)
GENERAL.CONNECTION:                     ens5
GENERAL.CON-PATH:                       /org/freedesktop/NetworkManager/ActiveConnection/3
WIRED-PROPERTIES.CARRIER:               on
IP4.ADDRESS[1]:                         10.0.3.5/27
IP4.GATEWAY:                            10.0.3.1
IP4.ROUTE[1]:                           dst = 10.0.3.0/27, nh = 0.0.0.0, mt = 101
IP4.ROUTE[2]:                           dst = 0.0.0.0/0, nh = 10.0.3.1, mt = 101
IP4.ROUTE[3]:                           dst = 0.0.0.0/0, nh = 10.0.3.1, mt = 0, table=200
IP6.ADDRESS[1]:                         fe80::70ba:d30f:3dac:6462/64
IP6.GATEWAY:                            --
IP6.ROUTE[1]:                           dst = fe80::/64, nh = ::, mt = 1024

 ''''' Configuration complete! ens5 is set up and all settings are persistent '''''

[opc@sriov-test-02 ~]$
- Issue the
ip acommand to retrieve the IP address from all the interfaces. - Notice that the
ens5interface now has an IP address configured. - After issuing the
route -ncommand to retrieve all the routes (and default gateways) for all interfaces notice that the gateway is now available for theens5interface.
Configuring an IP address and making sure routing works correctly are two different things! Fortunately the script will also configure the routing part for us. Pay attention to the specific outputs of the script below:
Here the script will create the /etc/iproute2 directory and will create the rt_tables file.
''''' Ensure /etc/iproute2 directory exists '''''
Directory '/etc/iproute2' does not exist. Creating it...
Directory '/etc/iproute2' created successfully.

 ''''' Ensure /etc/iproute2/rt_tables file exists '''''
File '/etc/iproute2/rt_tables' does not exist. Creating it...
File '/etc/iproute2/rt_tables' created successfully with a default header.
Here the script will add the necessary entries into the rt_tables file.
''''' Adding custom routing tables '''''
100 vnic_1
200 vnic_2
Here the script will add the IP routing rules to allow policy based routing on the instance and will also enable the service for policy based routing which is required if you are have an instance with multiple VNICs.
''''' Adding IP rules and routes '''''

 ''''' Creating policy routing persistence script '''''

 ''''' Creating systemd service for policy routing '''''
Created symlink /etc/systemd/system/multi-user.target.wants/policy-routing.service → /etc/systemd/system/policy-routing.service.
- Issue the command
more /etc/iproute2/rt_tablesto verify it a new entry is made. - Notice the
100 vnic_1and200 vnic_2entries. - Issue the command
ip route show table 100to review the routing table for this mapping and notice that there is a default route for the interfaceens3the primary VNIC on the instance. - Issue the command
ip route show table 200to review the routing table for this mapping and notice that there is a default route for the interfaceens5the new second VNIC on the instance.
STEP 06 - METHOD 04 - Create the interface config file manually
Method 4 Test with a new clean Instance sriov-test-03
I have created a new instance named "sriov-test-03" that I will be using to configure the IP address for the second VNIC by a definition for the new VNIC in the /etc/sysconfig/network-scripts/ directory.
In this method we will be configuration almost all the steps that is automatically done by the script in [[https //github.com/Olygo/OCI_Multi_VNIC_Setup [#STEP 05 METHOD 03 Use the [OCI_Multi_VNIC_Setup script]]|Method 3 ]] for us.
Prerequisites
- Provisioned a new Instance
- Added a second VNIC
Configure IP address on the second interface
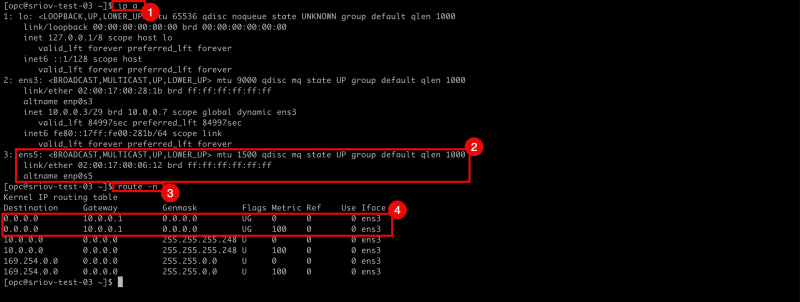
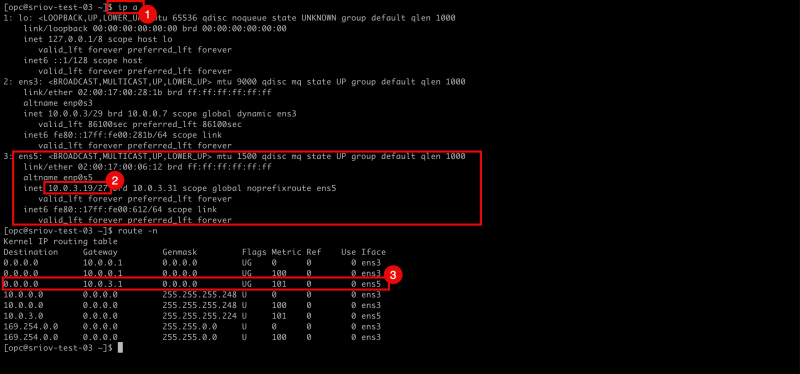
- Issue the
ip acommand to retrieve the IP address from all the interfaces. - Notice that the
ens5interface has NO IP address configured. - After issuing the
route -ncommand to retrieve all the routes (and default gateways) for all interfaces - Notice that there is only a gateway available for the
ens3interface.
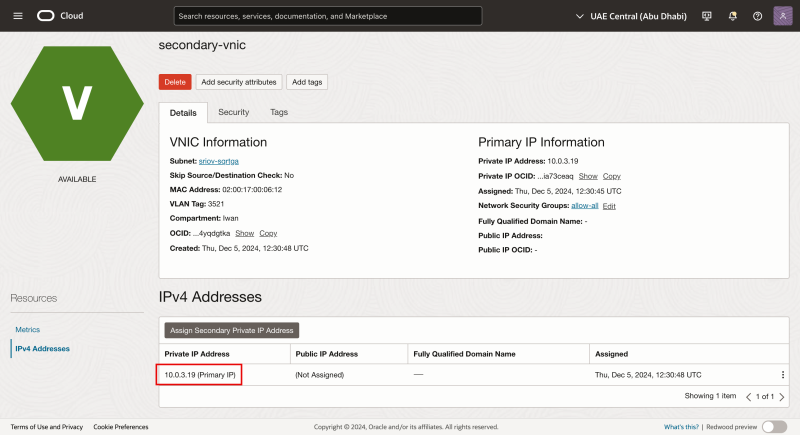
- Retrieve the IP address of the second VNIC by navigating to the Instance > Attached VNICS and select the second VNIC.
- Make a note of the IP address that is assigned by the OCI Management Console.
- Browse to the
/network-scriptsfolder using the commandcd /etc/sysconfig/network-scripts/ - Create a new file in the
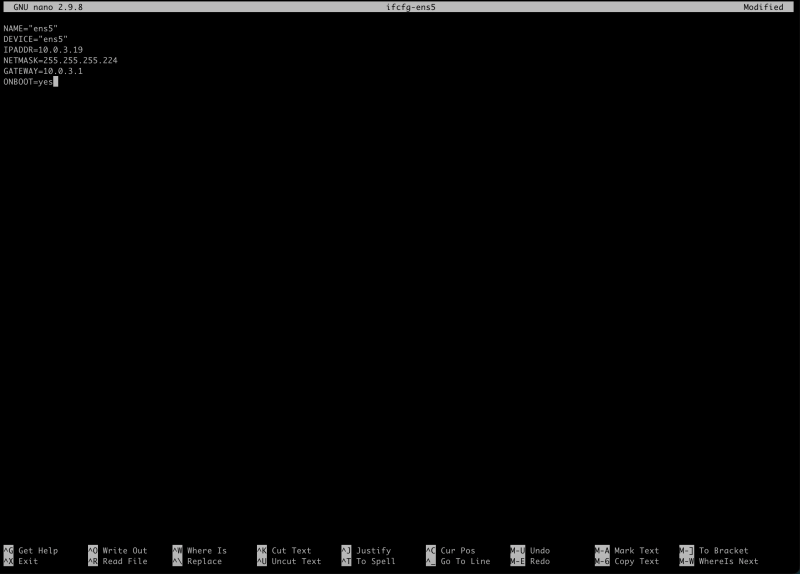
/etc/sysconfig/network-scripts/folder with the nameifcfg-ens5using the commandsudo nano ifcfg-ens5.
- Configure the
ens5interface with the following parameters:
NAME="ens5"
DEVICE="ens5"
IPADDR=10.0.3.19
NETMASK=255.255.255.224
GATEWAY=10.0.3.1
ONBOOT=yes
- Notice that the IP address is the IP address we retrieved from the management console.
- The subnet is retrieved from the subnet inside the VCN that we have connected this interface to.
- The Gateway IP address is the first IP address in the Subnet.
- Save the config file
ifcfg-ens5with the nano editor.
- List the files in the
/etc/sysconfig/network-scripts/directory with the commandls -l. - Notice that that there is an interface configuration file for
ens3. - Notice that that there is an interface configuration file for
ens5.
- Verify the content of the
ifcfg-ens5file with the commandmore ifcfg-ens5. - Make sure the parameters are all correctly configured.
- Issue the
ip acommand to retrieve the IP address from all the interfaces. - Notice that the
ens5interface still has NO IP address configured.
- Reboot the instance with the
sudo rebootcommand.
- Issue the
ip acommand to retrieve the IP address from all the interfaces. - Notice that the
ens5interface now has an IP address configured. - After issuing the
route -ncommand to retrieve all the routes (and default gateways) for all interfaces notice that the gateway is now available for theens5interface.
Configuring an IP address and making sure routing works correctly are two different things! In order to configure routing follow the steps below.
The /etc/iproute2/rt_tables file is used to define and manage multiple routing tables in Linux, enabling policy-based routing. It maps human-readable names to routing table numbers, allowing advanced setups like routing specific traffic through different gateways, interfaces, or ISPs.
- Create a new
/etc/iproute2directory with the commandsudo mkdir -p /etc/iproute2 - Create the
rt_tablesfile with the commandsudo nano /etc/iproute2/rt_tables - Configure the following parameters in the
rt_tablesfile.
100 vnic_1
200 vnic_2
- Add the static default route for the
ens5interface with the commandsudo ip route add default via 10.0.3.1 dev ens5 table 200 - Create the service file to enable the service for policy based routing which is required if you are have an instance with multiple VNICs with the command
sudo nano /etc/systemd/system/policy-routing.service. - Configure the following parameters in the
policy-routing.servicefile.
[Unit]
Description=Setup Policy Routing for Multiple VNICs
After=network-online.target
Wants=network-online.target

[Service]
Type=oneshot
ExecStart=/usr/local/bin/setup_policy_routing.sh
RemainAfterExit=true

[Install]
WantedBy=multi-user.target
- Make the service file for policy based routing executable with the command
sudo chmod +x /etc/systemd/system/policy-routing.service. - Start the service for policy based routing with the command
sudo systemctl start policy-routing.service. - Make sure the service for policy based routing is loaded and active with the command
sudo systemctl status policy-routing.
[opc@sriov-test-03 ~]$ sudo systemctl status policy-routing
● policy-routing.service - Setup Policy Routing for Multiple VNICs
   Loaded: loaded (/etc/systemd/system/policy-routing.service; enabled; vendor preset: disabled)
   Active: active (exited) since Wed 2024-12-11 09:07:16 GMT; 4 weeks 1 days ago
  Process: 2415 ExecStart=/usr/local/bin/setup_policy_routing.sh (code=exited, status=0/SUCCESS)
 Main PID: 2415 (code=exited, status=0/SUCCESS)
    Tasks: 0 (limit: 99891)
   Memory: 0B
   CGroup: /system.slice/policy-routing.service

Warning: Journal has been rotated since unit was started. Log output is incomplete or unavailable.
[opc@sriov-test-03 ~]$
- Make sure the service for policy based routing will be starting when the instance is (re)starting with the command
sudo systemctl enable policy-routing.service. - Reboot the instance with the command
sudo reboot.
- Issue the command
more /etc/iproute2/rt_tablesto verify it a new entry is made. - Notice the
100 vnic_1and200 vnic_2entries (that we manually configured before). - Issue the command
ip route show table 100to review the routing table for this mapping and notice that there is a default route for the interfaceens3the primary VNIC on the instance. - Issue the command
ip route show table 200to review the routing table for this mapping and notice that there is a default route for the interfaceens5the new second VNIC on the instance.
Conclusion
Choosing the right method to configure a second interface on an OCI Linux instance depends on your requirements, technical expertise, and desired level of control. If you are looking for a straightforward and efficient setup, Methods 1 and 2, which use the oci-utils package and Oracle-native tools, are highly recommended. These methods are ideal for users who want to leverage OCI’s built-in functionality without diving into manual configurations or external scripts.
For scenarios where automation and scalability are critical, Method 3, utilizing the OCI_Multi_VNIC_Setup script, provides a flexible solution. It is especially useful when managing multiple interfaces across different instances, offering time savings and consistency in configuration.
Meanwhile, Method 4, the manual configuration approach, provides the highest level of customization. This method is best suited for advanced users or specific environments where automation tools are either unavailable or not preferred. It also serves as an excellent way to understand the inner workings of networking on OCI Linux instances.
By understanding and mastering these methods, you gain the flexibility to configure secondary interfaces in a variety of scenarios, from basic setups to complex multicloud architectures. With the right approach, you can ensure reliable and efficient network configurations tailored to your OCI workloads.
